Control Node configuration
This document describes the tasks to perform after completing package installation on a Control Node.
- Node A initial setup: Configure the basic settings of Node A using the web installer.
- Federation communication account setup: Set up the federation account used for communication between nodes.
- Node B initial setup: Configure the basic settings of Node B to match the settings of Node A.
- Web console login: Log in to the web console on Node A and Node B.
- License registration: Register a license on each node.
- Control Node pair setup: Configure Node A and Node B as a single pair and set the unique identifier of the Node Pair.
- Network redundancy: Configure network high availability (HA) using a virtual IP address (VIP).
- Access the web console via the virtual IP address: Access the web console using the virtual IP address.
Node A initial setup
A Control Node provides a user interface in the form of a web service (the web console). When an administrator accesses the web console for the first time, the web installer runs and guides you through the initial setup tailored to the server operating environment.
Access the web console
-
Open a web browser and access the IP address or FQDN address of Control Node A (for example,
https://192.0.2.1,https://c1a.example.com,https://c1a). -
Because a private SSL certificate is used, the web browser displays a security warning message. If there is no issue, ignore the security warning and proceed with the connection.
Register the cluster administrator
Register the cluster administrator, the top-level administrator of Logpresso Sonar.
-
When the Registering Cluster Administrator screen appears, enter the information required to register the cluster administrator.
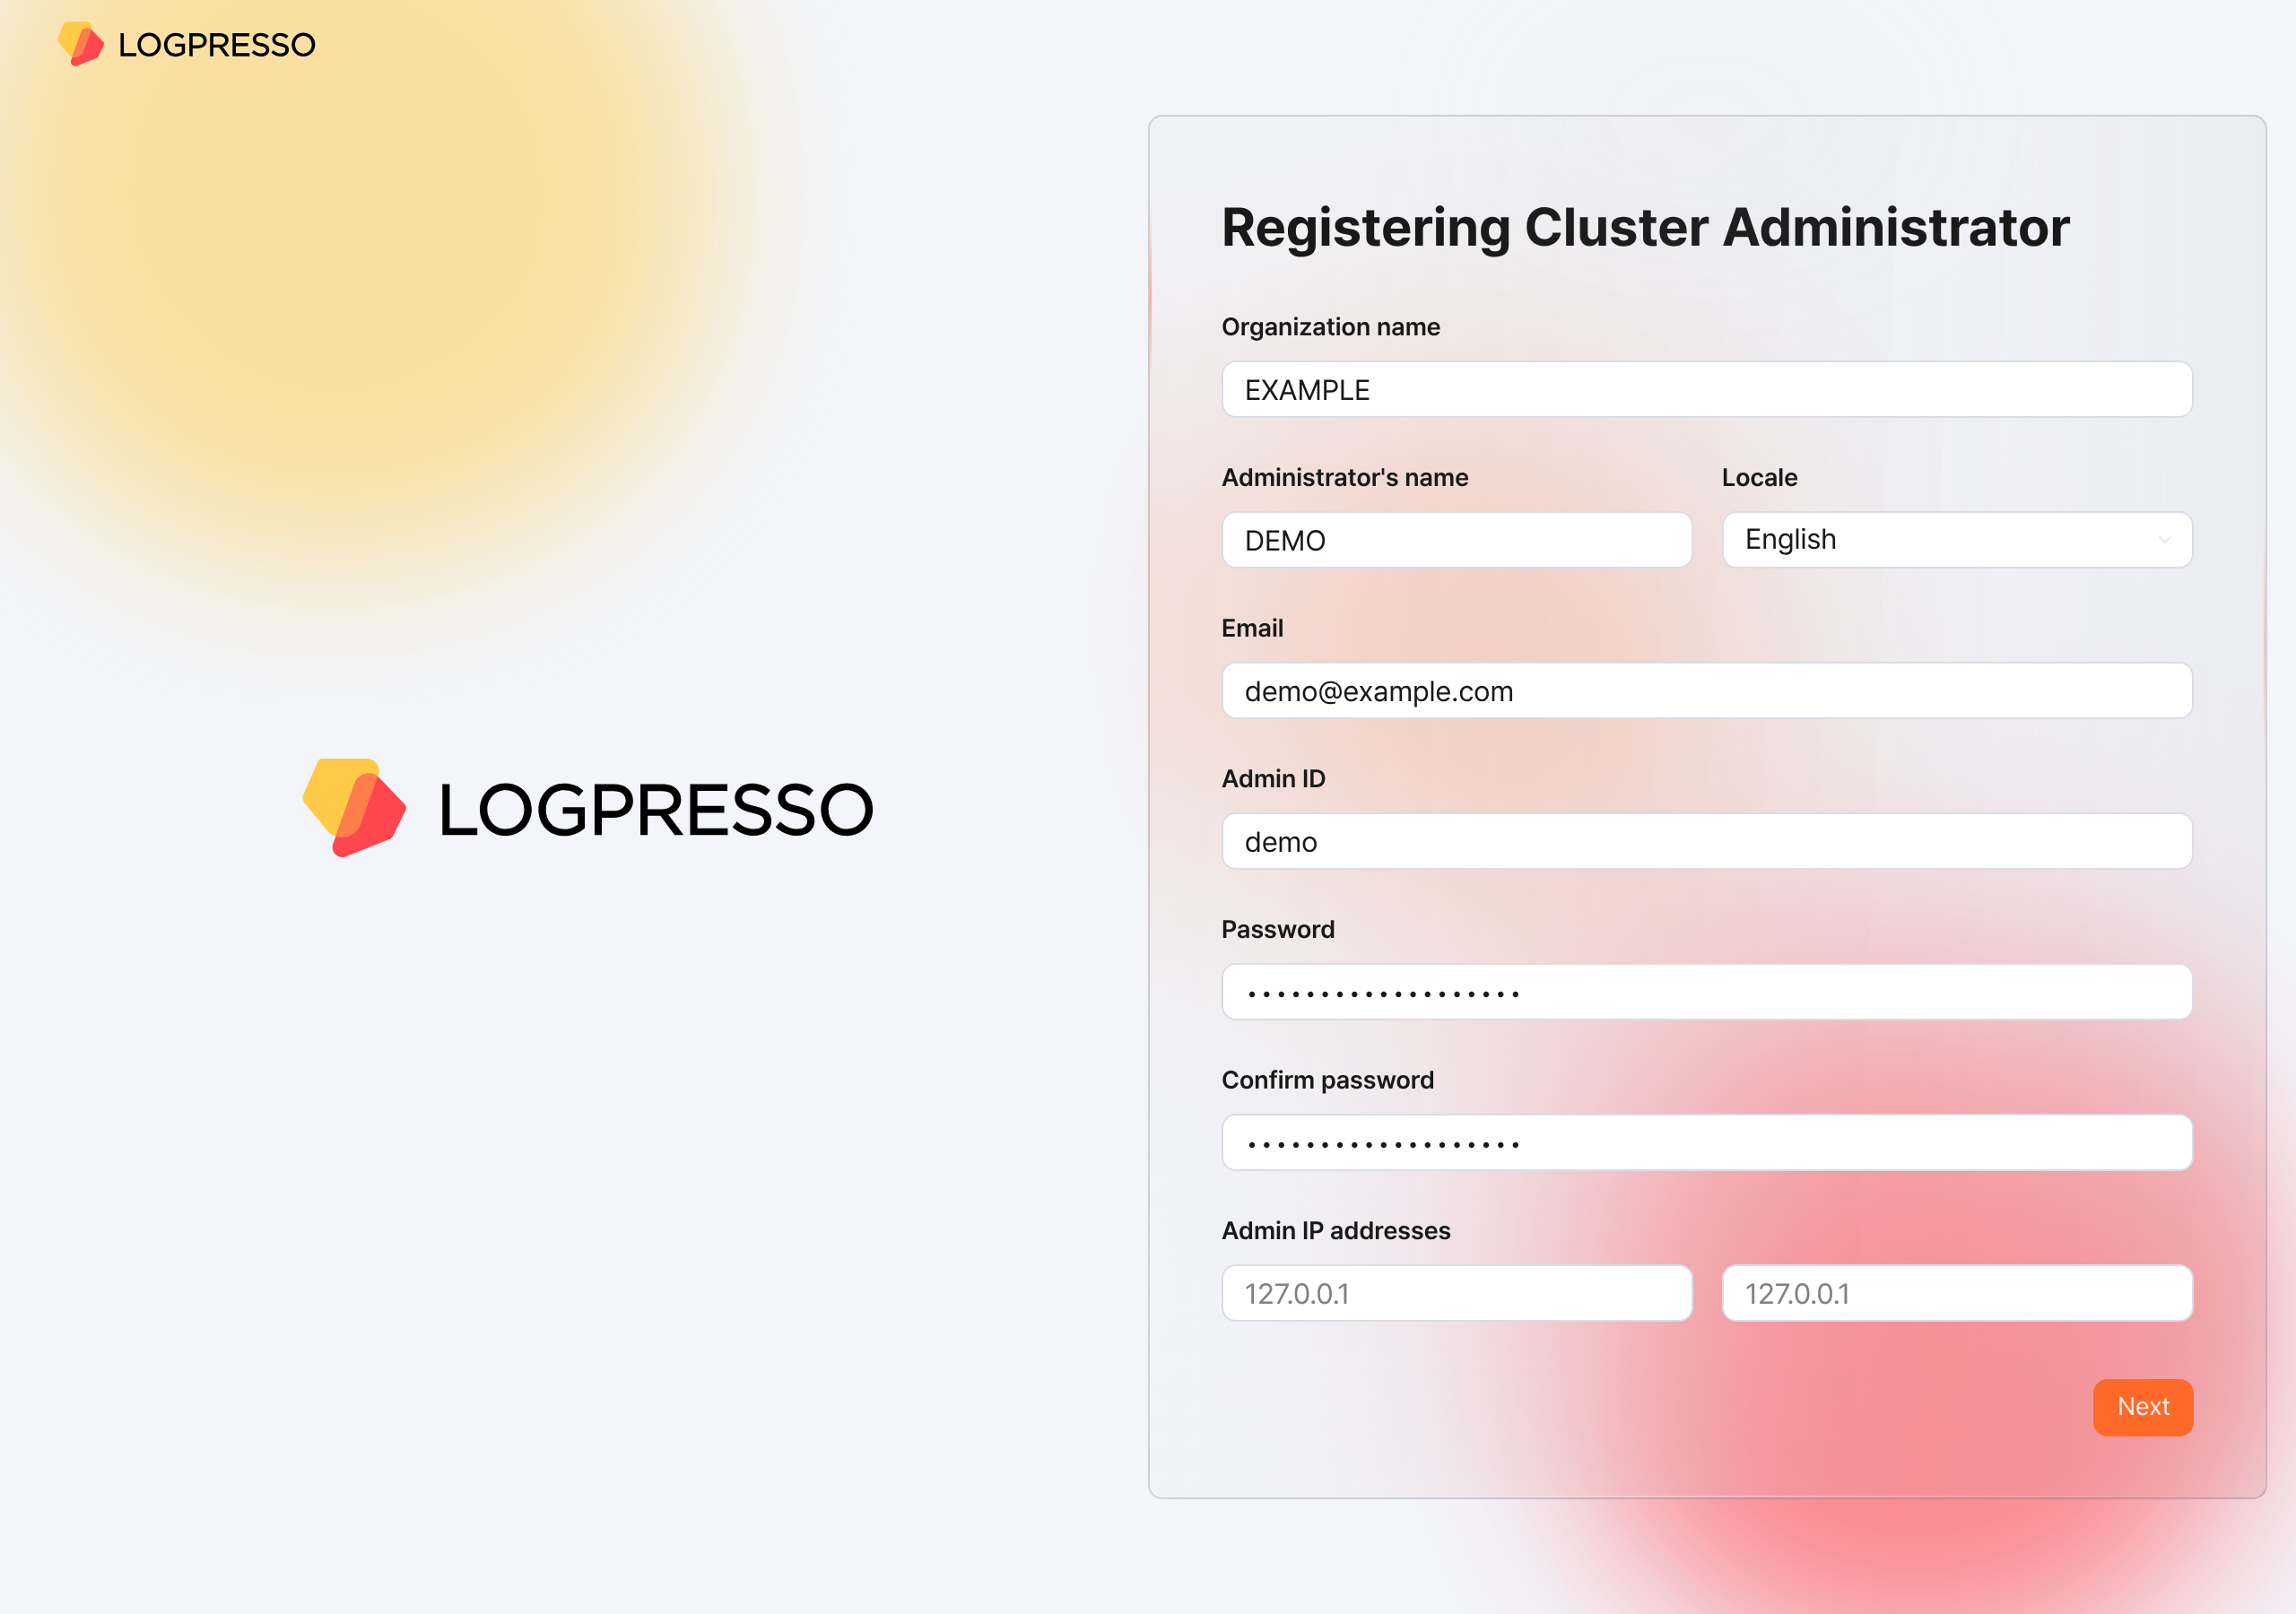
- Organization name: The name of the company or organization that will operate Logpresso Sonar
- Administrator's name: The name of the cluster administrator. When the cluster administrator logs in, the administrator's name is displayed in the upper-right corner of the web console.
- Locale: The language of the cluster administrator. Either Korean or English is selected according to the language of the web browser you access from.
- Email: The email address of the cluster administrator
- Admin ID: The login name of the cluster administrator. Do not use well-known login names such as
root,system,admin,administrator,logpresso, orsonar. - Password/Confirm password: The login password of the cluster administrator. The password must satisfy the system password policy; by default it must be at least 9 characters and include letters, numbers, and special characters, and must not repeat the same character three times in a row (see Password policy for details).
- Admin IP addresses: Used to restrict cluster administrator access to specific IP addresses. You can specify up to two IP addresses.
-
Click the Next button to proceed to the next step.
Configure the certificates and web endpoint
Replace the certificates and configure the web endpoint. The web endpoint is the address that employees access when writing or reviewing explanations for security events.
-
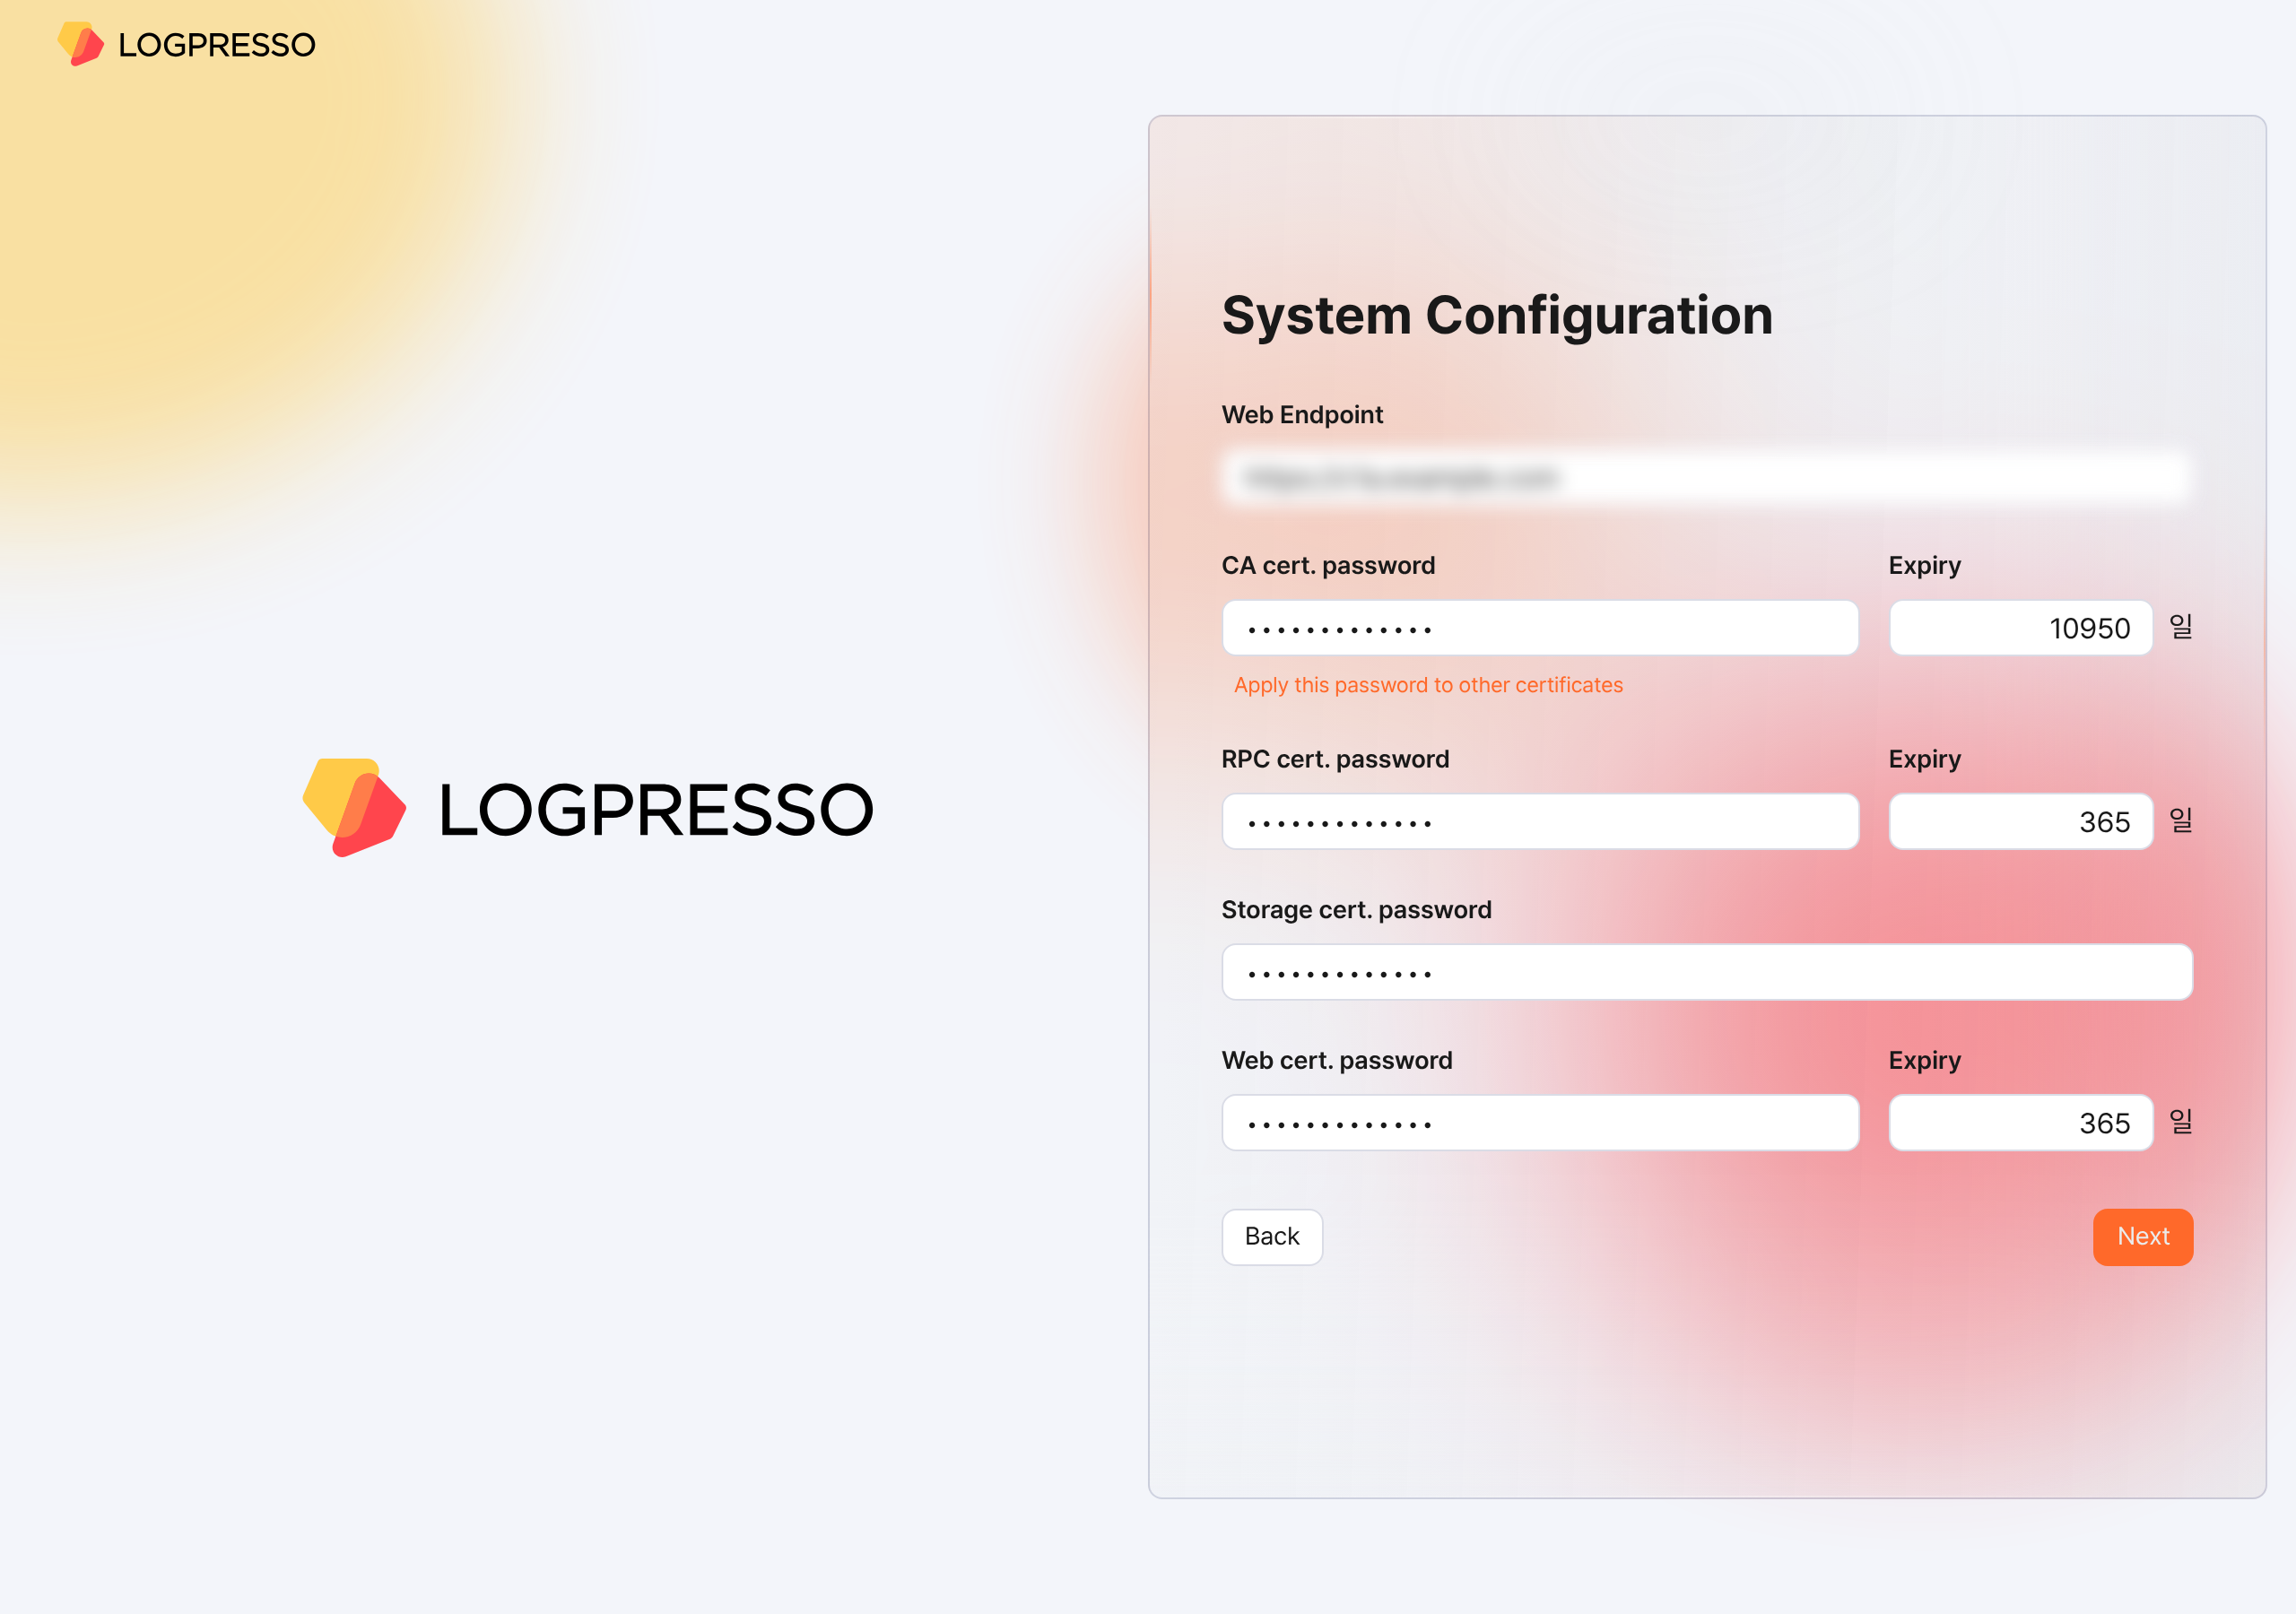
When the System Configuration screen appears, enter the information required for the system configuration.
-
Web Endpoint: The web console address. Use the virtual IP address or FQDN address of the Control Node pair, as shown below.
# Virtual IP address of the Control Node: 192.0.2.24 # FQDN: sonar.example.com https://192.0.2.24 or https://sonar.example.com -
CA cert. password: The CA certificate password (default/maximum validity period: 10950 days). After you enter the password, click Apply this password to other certificates to enter the same password for the other certificates.
-
RPC cert. password: The certificate password used when communicating with Sentry (default/maximum validity period: 365 days)
-
Storage cert. password: The password used for the certificate that stores the table encryption key. This certificate has no validity period.
-
Web cert. password: The password of the web server certificate used when accessing the Logpresso Sonar web console (default/maximum validity period: 365 days)
Certificate passwords must be 9-127 characters and include letters, numbers, and special characters, and must not repeat the same character three times in a row. For details, see Certificate management.
-
-
Click the Next button to proceed to the next step.
Also keep the following in mind.
- You can change the Web Endpoint on the web console Push Templates screen.
- On the web console Certificates screen, you can view certificate information, reissue certificates, and more.
Configure object storage
Configure the object storage to use as Cold tier storage in the data lifecycle feature. If you do not use object storage or want to configure it later, click the Skip button.
-
When the Object Storage Configuration screen appears, enter the information required for the object storage configuration.
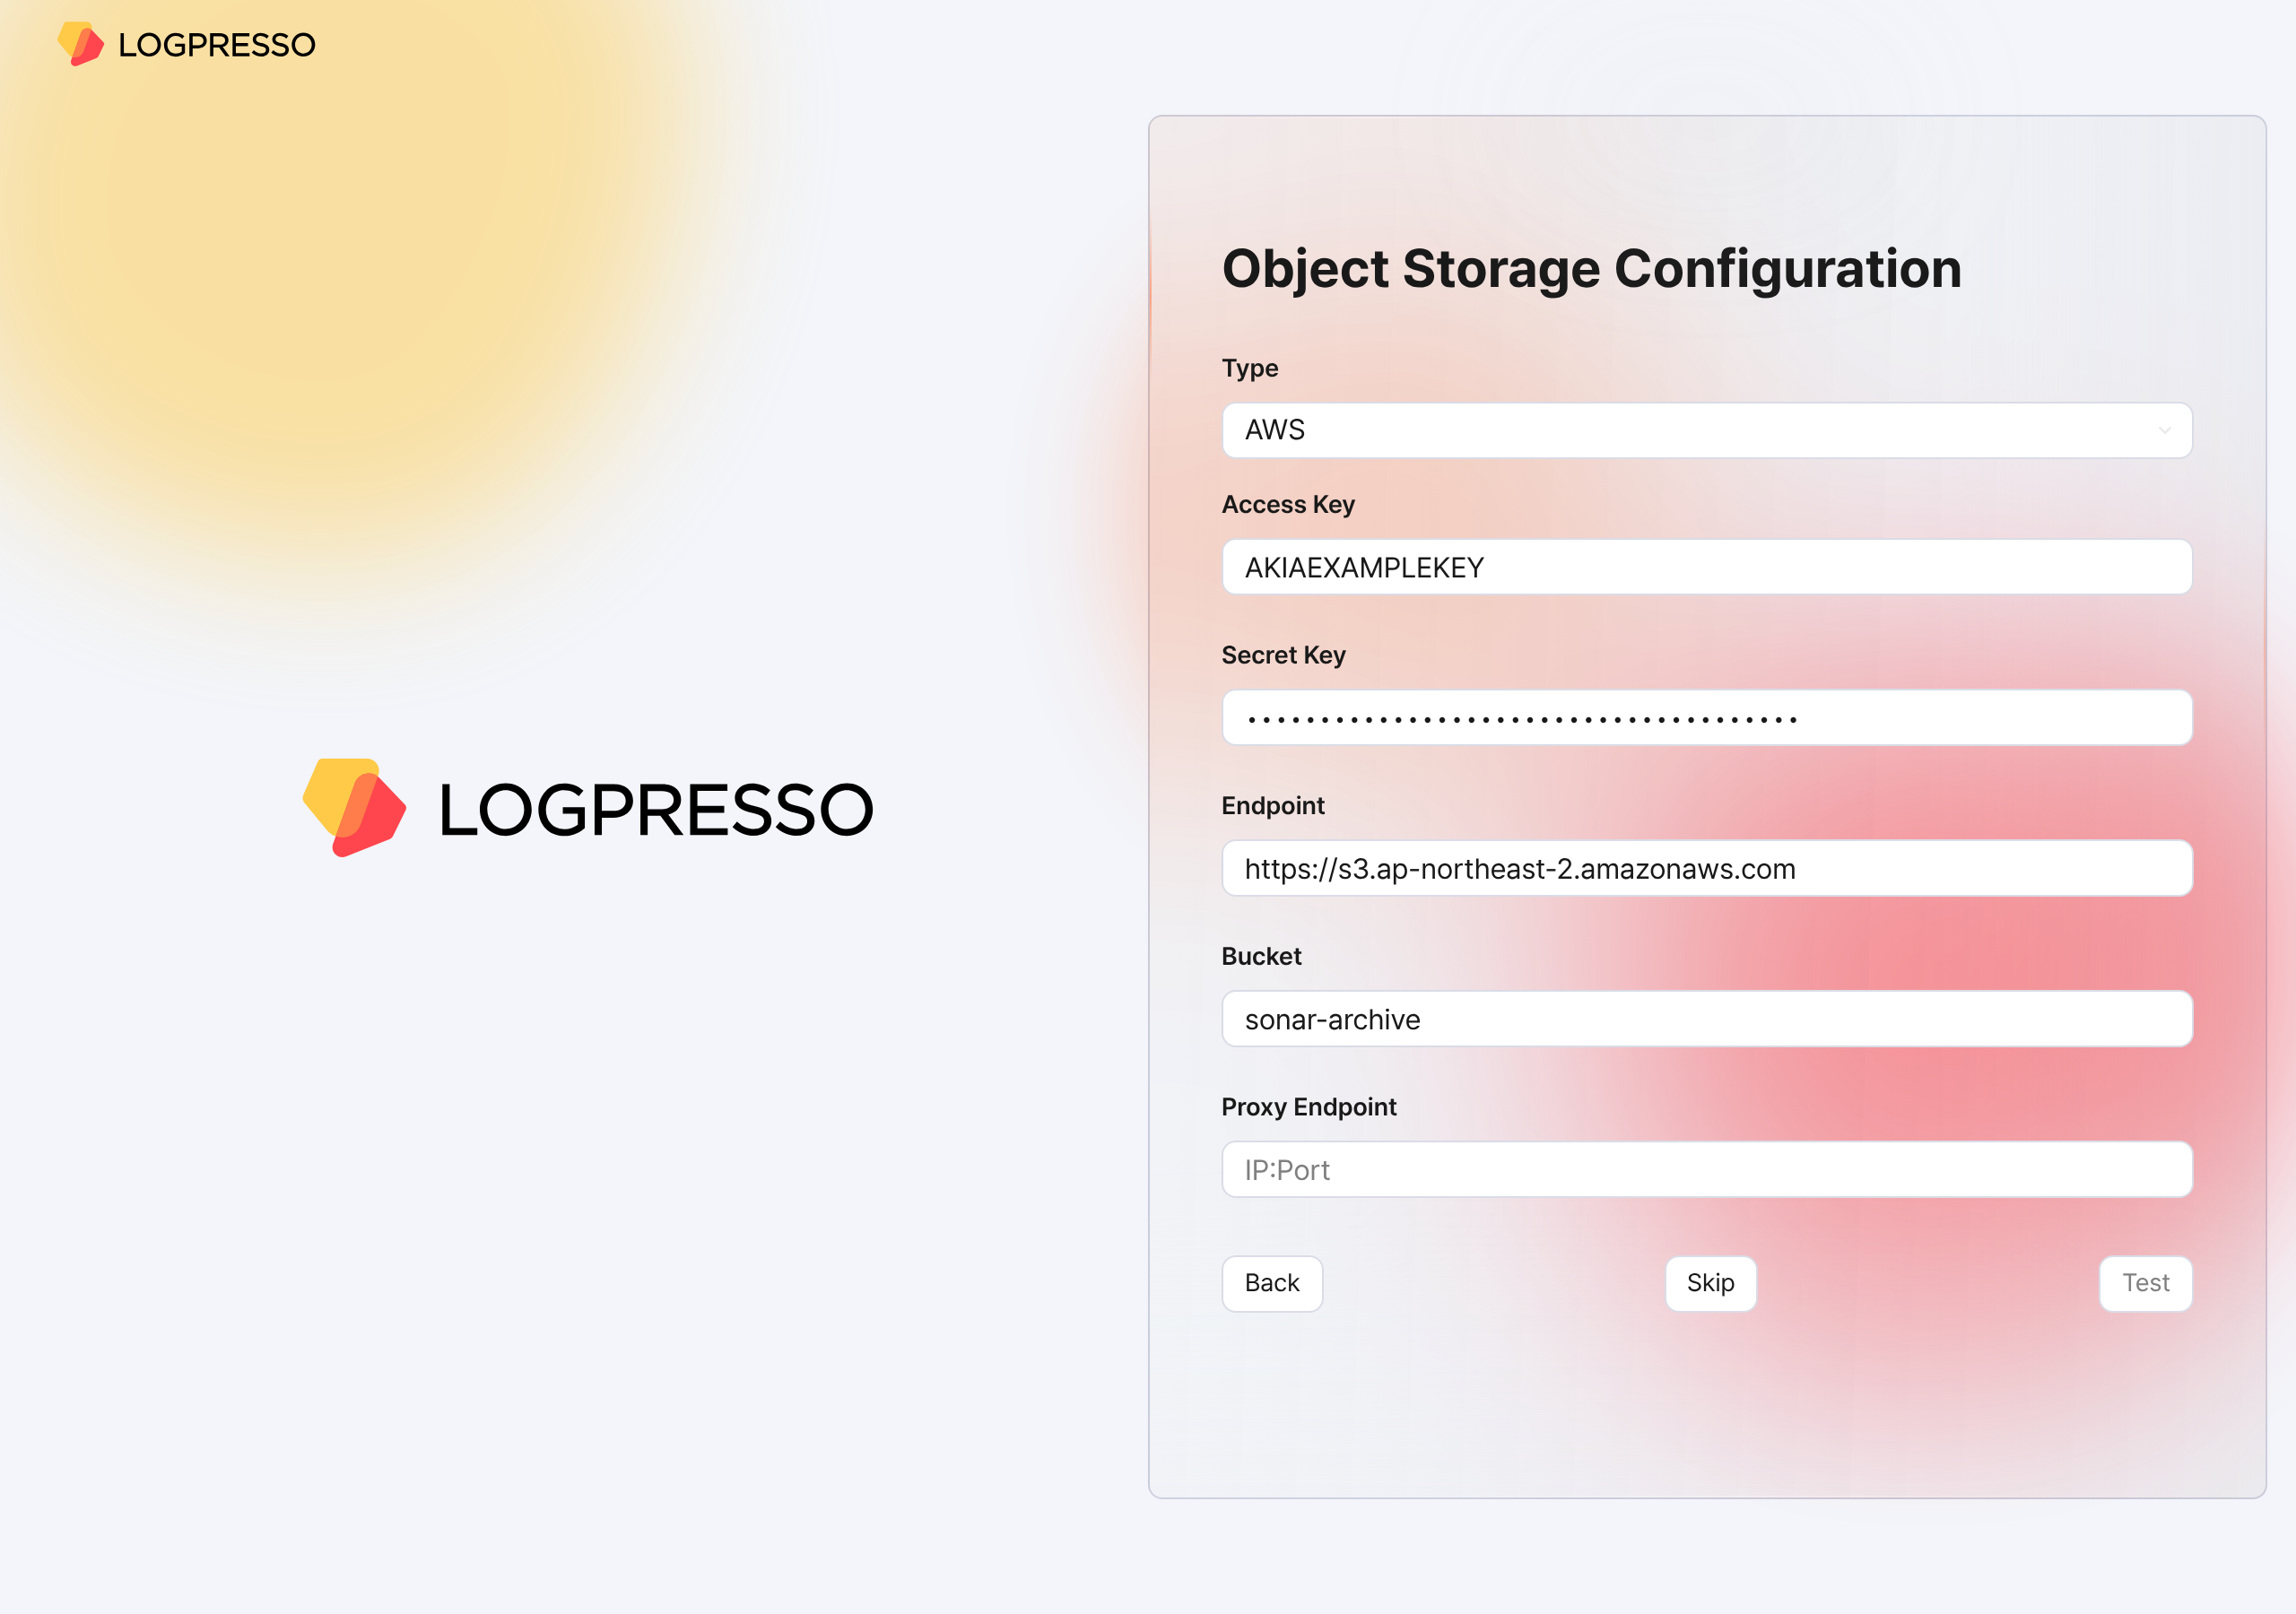
- Type: The storage service provider (select one of AWS, S3 Compatible Storage, or kakaocloud; default: AWS)
- Access Key or Authentication Key: The access key for connecting to the storage service
- Secret Key or Secret access Key: The secret access key for connecting to the storage service
- Endpoint: The connection address of the storage service
- Bucket: The name of the storage bucket
-
After entering all properties, click the Test button. The test must succeed before you can proceed to the next step.
Also keep the following in mind.
- On the Lifecycle tab of the web console Clusters screen, set the retention period for each storage tier, and on the Storage tab, set the rollover. Only then can you manage data according to the data lifecycle.
Configure the database
Now connect the MariaDB database to Logpresso Sonar.
-
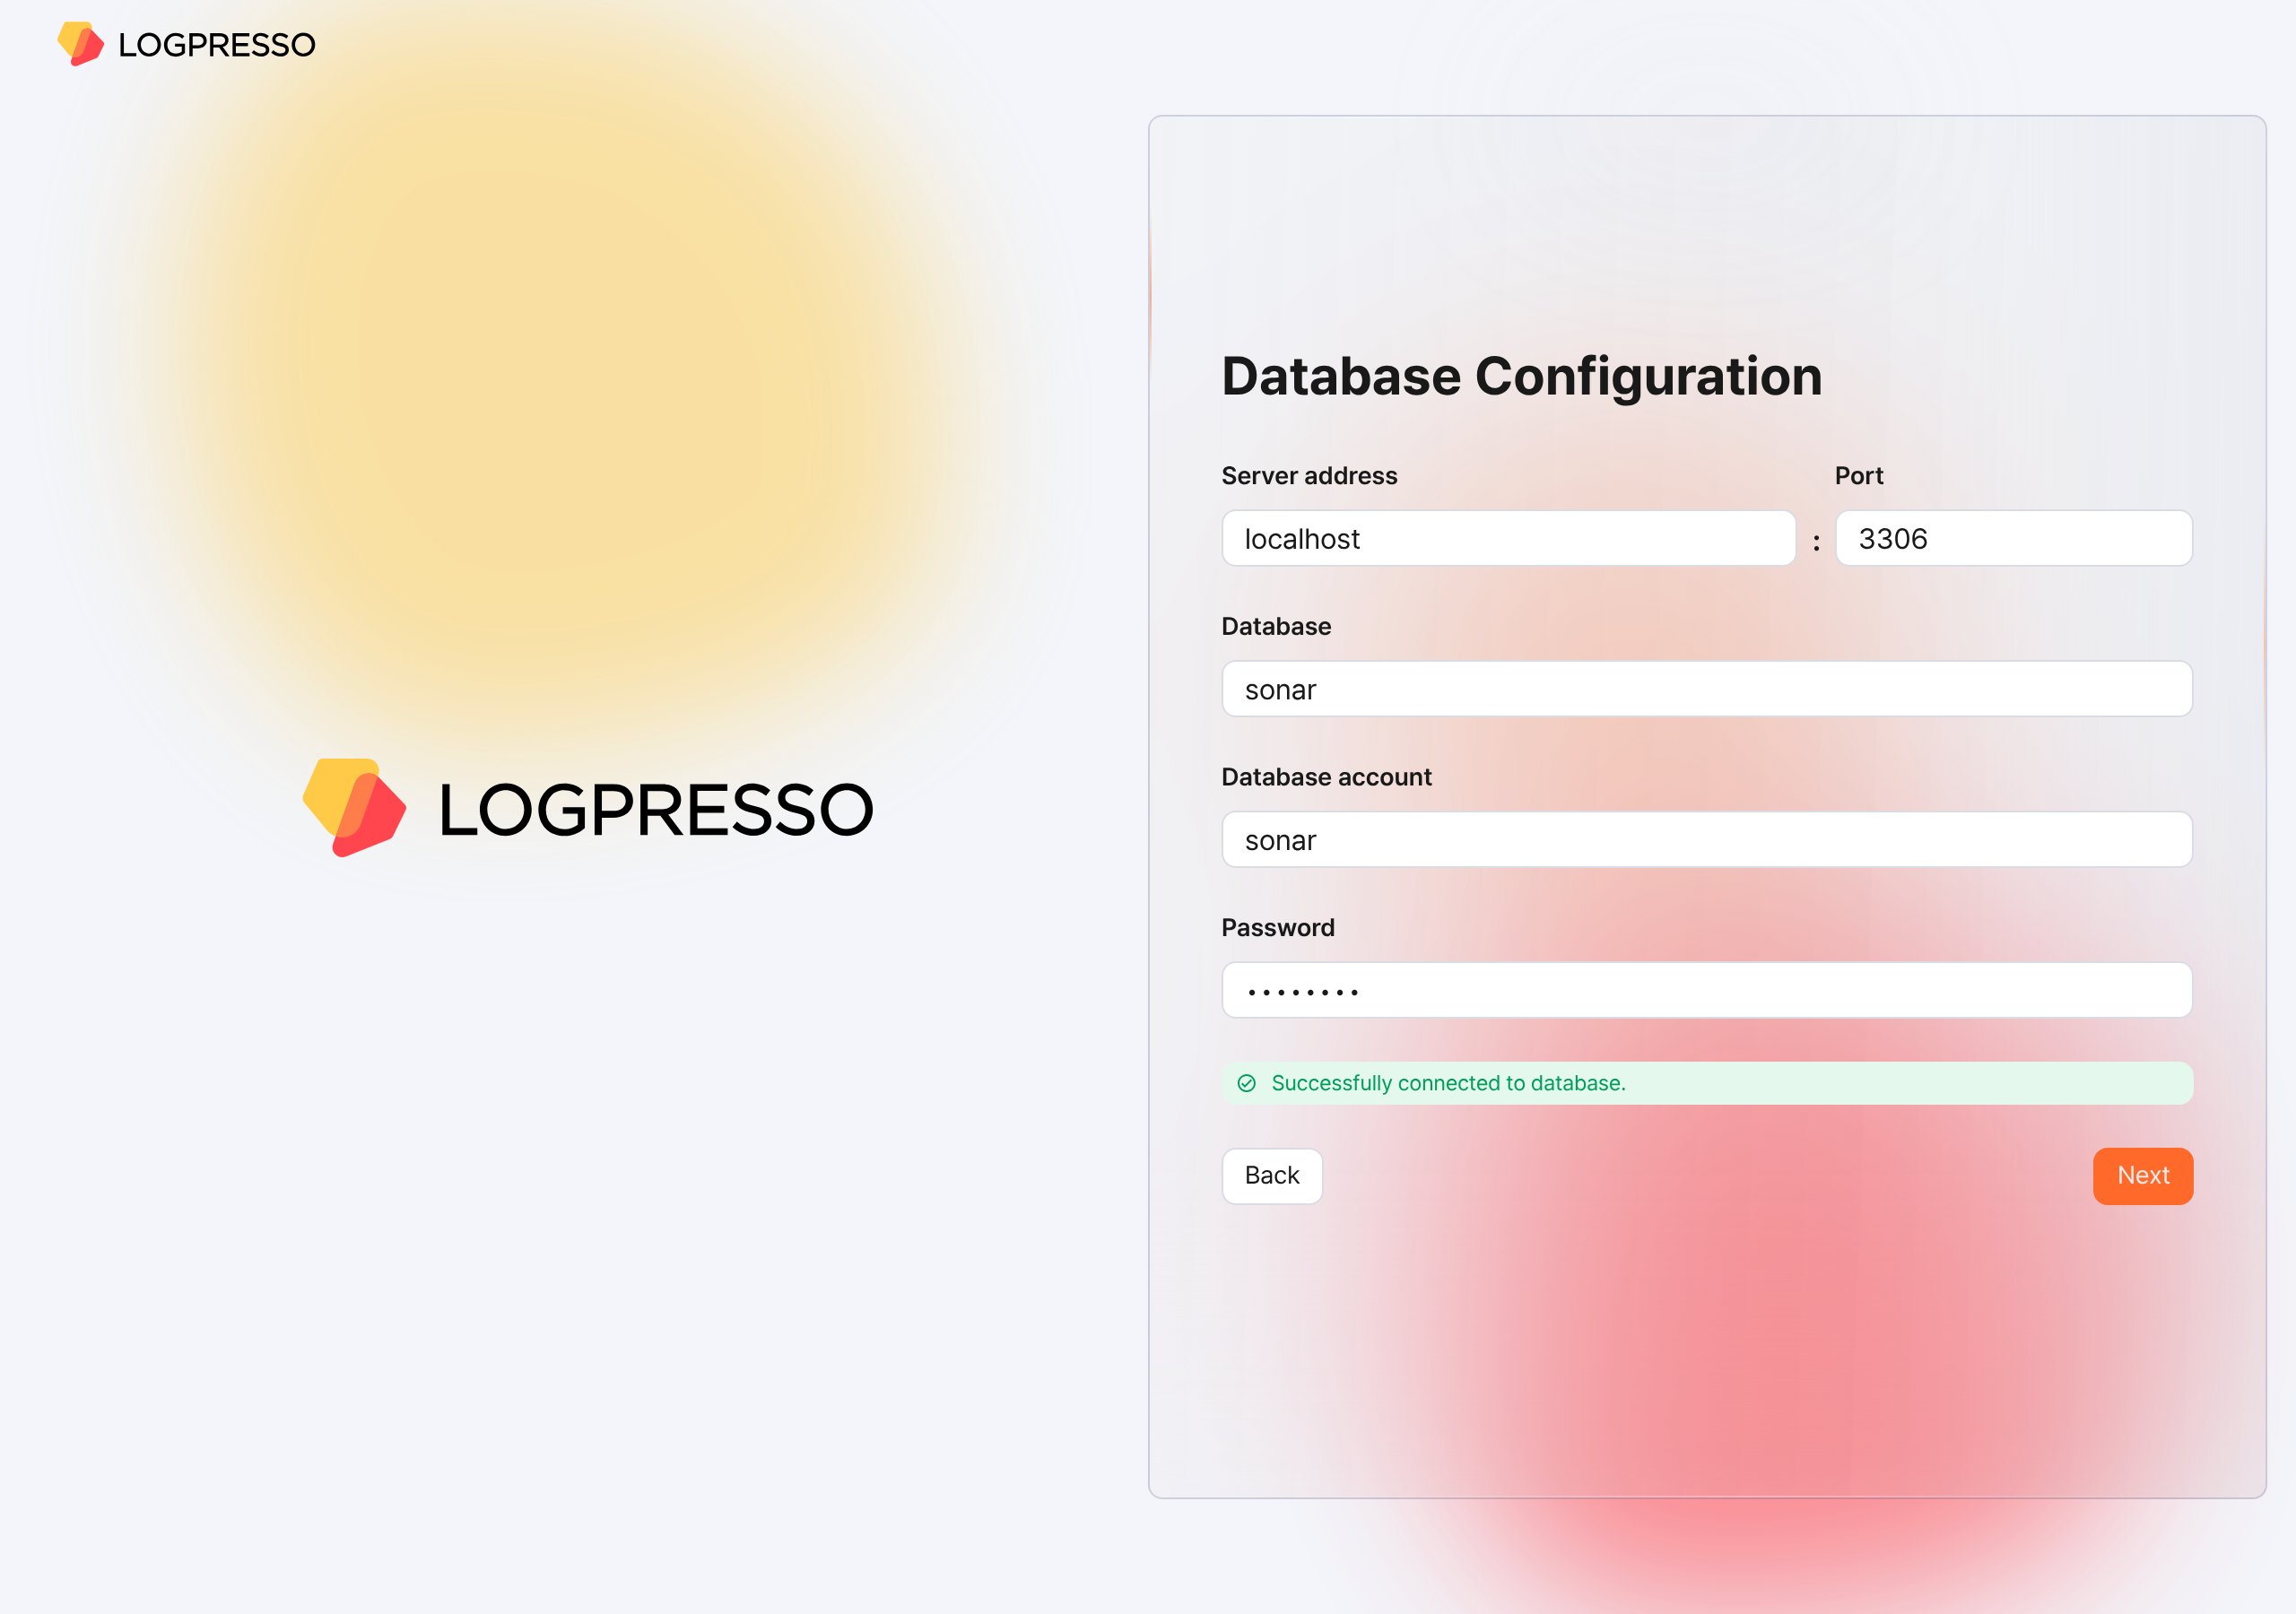
When the Database Configuration screen appears, enter the database configuration. Once you enter all the configuration values, a database connection is attempted automatically. If the connection succeeds, the message Successfully connected to database. is displayed and the Next button becomes active. Click the activated Next button.
-
Server address: The address of the MariaDB server (default:
localhost) -
Port: The port number of the MariaDB server (default:
3306) -
Database: The database name of the MariaDB server (default:
sonar) -
Database account: The dedicated database account for Logpresso Sonar (default:
sonar) -
Password: The password of the dedicated database account for Logpresso Sonar
-
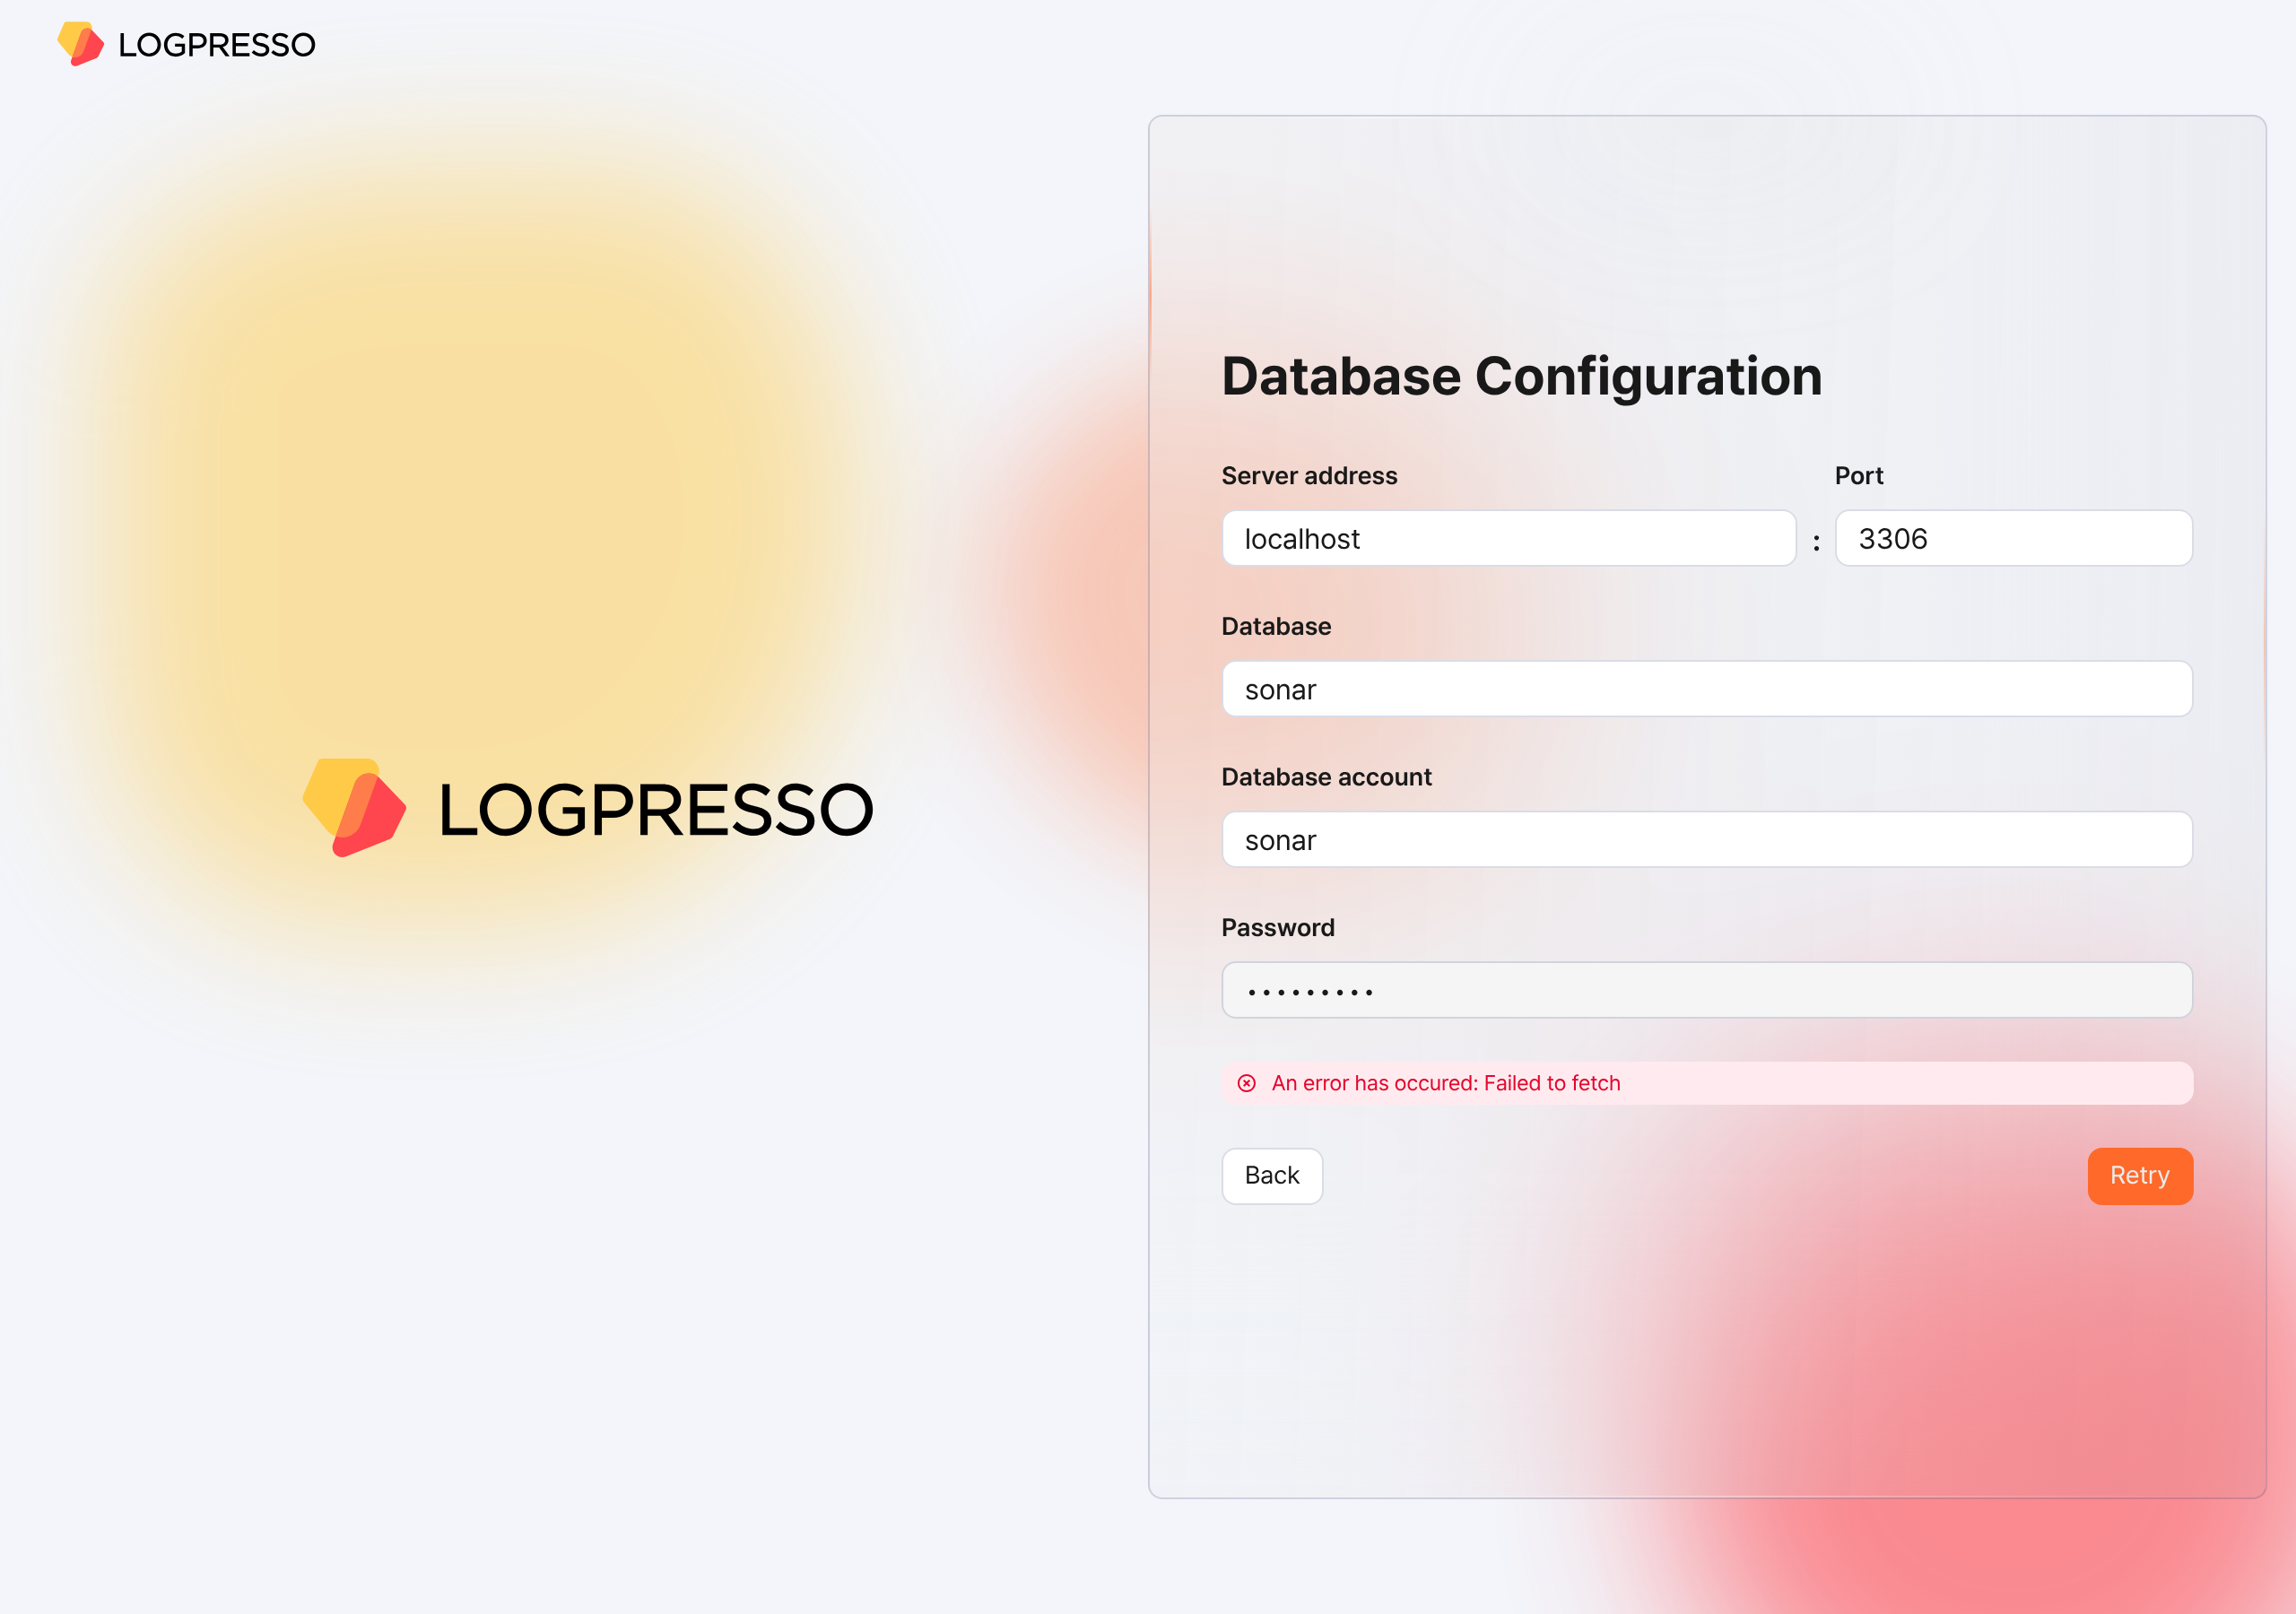
If the connection fails, an error message appears. Review the error, correct the configuration values, and then click the Retry button.
-
-
When the database configuration is complete, the settings required to run Logpresso Sonar are applied automatically. All settings configured in the web installer are synchronized with Node B through the Galera Cluster.
-
When the settings have been applied, the certificates are replaced and the browser reconnects to the web console login screen. Because a renewed self-signed server certificate is used, a security warning may appear. Ignore the warning and proceed.
Summary
After you complete the steps up to this point, the following tasks have been performed on Node A.
- A database and tables are created in MariaDB, and default data is injected
- The database layer is synchronized with Node B by the Galera Cluster
- The application layer is configured
- A JDBC profile required to connect to the database is created
- The authentication service required for the cluster administrator to access the web console is configured
The basic setup of Node A is complete, but the application layer configuration of Node B still remains. You will proceed with this configuration in the next step.
If you operate as a standalone deployment without configuring a cluster, skip to the License registration step.
Federation communication account setup
For federation communication between nodes, you must set the passwords of the Logpresso Shell account and the federation account on both Node A and Node B. This process is performed in the Logpresso Shell. The Logpresso Shell is the CLI of the Logpresso engine and uses an account that is separate from the web console access account (for example, the cluster administrator).
Access the Logpresso Shell
Access the Logpresso Shell on each of Control Node A and B, and change the default password. We recommend registering an SSH key in case you lose the password.
Change the default password
-
In the terminal, run the following command to access the Logpresso Shell. The port number may differ depending on the
SSH_PORTsetting in thelogpresso.conffile (default: 7022).ssh -p 7022 root@localhost -
When prompted for a password, enter the Logpresso Shell default password.
-
When the new password prompt appears, enter a new password and press the Enter key. The Logpresso Shell account is used only for SSH access to each node, so you can set a different password for each node.
Please change the default password. New password: # Enter a new password, then press Enter Retype password: # Re-enter the new password, then press Enter Password changed successfully. Logpresso SNR-4.0.2511.1 (build 20250805) on Araqne Core 4.0.5 logpresso> # Logpresso Shell promptCautionThe Logpresso Shell rejects reuse of the default password. Never reuse the default password on any account. If a problem occurs due to using the default password, Logpresso is not responsible for it.
Depending on the operating system, the connection may fail during SSH key exchange and encryption algorithm negotiation when connecting to the Logpresso Shell. Add the following content to the ~/.ssh/config file of Control Nodes A and B, and connect using the ssh sonar command.
Host sonar
    HostName 127.0.0.1
    Port 7022
    User root
    HostKeyAlgorithms +ssh-rsa
    PubkeyAcceptedAlgorithms +ssh-rsa
    KexAlgorithms +diffie-hellman-group14-sha1
    Ciphers +aes256-cbc
    PreferredAuthentications publickey # SSH key login
    IdentityOnly yes                   # SSH key login
    IdentityFile ~/.ssh/logpresso_rsa  # SSH key login
Register an SSH key (optional)
You can access the Logpresso Shell using SSH key authentication. Because you can access it even if you lose the password, we recommend registering an SSH key.
-
If you do not have an RSA key, run the following command to generate a key pair.
ssh-keygen -t rsa -b 2048 -f ~/.ssh/logpresso_rsaNoteThe Logpresso Shell supports only ssh-rsa keys.
-
In the Logpresso Shell, run the following command to register the SSH public key.
account.addSshKey root -
When the prompt appears, enter the SSH public key. The public key is in the
~/.ssh/logpresso_rsa.pubfile.SSH public key? ssh-rsa AAAAB3NzaC1yc2EAAAADAQABAAACAQ... # Enter the entire public key root password: # Enter the current password addedTipYou can also specify the absolute path of the public key file directly: account.addSshKey root /home/logpresso/.ssh/logpresso_rsa.pub
-
Run the following command to check the list of registered SSH keys.
account.sshKeys rootWhen you run the command, you can check the registered SSH keys as follows.
Authorized SSH keys --------------------- 1: ssh-rsa AAAAB3NzaC1yc2EAAAADAQABAAACAQ... -
You can now access the Logpresso Shell with the SSH key without a password.
ssh -p 7022 -i ~/.ssh/logpresso_rsa root@localhost
Set the federation account password
The federation account is the account used for communication between all nodes that make up the cluster, and all Control, Data, and Forwarder Nodes must use the same federation account password. The federation account password set in this step is used not only in Control Node pair registration, but also in the Data Node pair and the Forwarder Node pair.
-
In the Logpresso Shell of Node A and Node B, run the following command to change the password of the federation account.
dom.resetPassword localhost root -
When the new password prompt appears, enter a new password and press the Enter key.
New Password: # Enter a new password, then press Enter- You can enter the password only once. If you enter the password incorrectly, run the
dom.resetPassword localhost rootcommand again.
NoteThe federation account root belongs to a different authentication domain than the Logpresso Shell account root, even though they have the same name. During the federation password change process, ERROR logs may be temporarily recorded in araqne.log, but they are resolved after the change is complete.
- You can enter the password only once. If you enter the password incorrectly, run the
-
Refer to this document to change the Password Expiration of the federation account to Unlimited.
- Open a web browser, access
https://<Control Node A IP address>:8443, and then log in with the federation account. - In the left menu of the web console, go to the System > Users screen.
- In the federation account list, click root.
- In the Passwd. Expiration field, select Unlimited and click the Save button.
- Perform the same task on Node B as well.
- Open a web browser, access
Node B initial setup
On Node A, the web installer automatically configures the authentication service and the database connection. On Node B, you must perform this configuration manually. Because Node A and Node B share the same MariaDB, once you complete this configuration, the cluster administrator can log in to the Node B web console with the same account.
Configure the sonar authentication service
The sonar authentication service is used for web console user authentication. You must complete this configuration for the cluster administrator to log in to the Node B web console.
-
In the Logpresso Shell of Node B, run the following command to enable the
sonarauthentication service.logdb.useAuthService sonar dom -
Run the following command to check whether the
sonarauthentication service is enabled.logdb.authServicesIn the
External Auth Serviceslist, ifdomandsonarare marked with an asterisk (*) and theorderissonar - dom, it is normal.External Auth Services ------------------------ [*] dom - araqne-dom authentication provider for araqne logdb [*] sonar - com.logpresso.sonar.dom.impl.SonarAuthServiceImpl@5d7b80f7 order: sonar - dom
Create a JDBC profile
For Logpresso Sonar to connect to MariaDB on Node B, you must create a JDBC profile.
-
Run the following command to create a JDBC profile.
logpresso.createConnectProfile jdbc sonar -
When the profile creation prompt appears, enter the values as follows.
Connection String (required)? jdbc:mariadb://localhost:3306/sonar # Database connection string User (optional)? sonar # The database account created with the web installer on Node A (default: sonar) Password (optional)? # The password of the database account created with the web installer on Node A Read Only (optional)? false # Be sure to enter false Granted users (csv)? # Press the Enter key to skip Granted groups (csv)? # Press the Enter key to skip -
Run the following command to check the GUID of the created JDBC profile.
logpresso> logpresso.connectProfiles Connect Profiles ------------------ guid=59f4788b-75df-4297-afbd-579eed9cb086, type=jdbc, name=sonar, description=null, source=ENT -
Run the following command with the GUID you checked to verify that the profile was created correctly.
logpresso> logpresso.connectProfile 59f4788b-75df-4297-afbd-579eed9cb086
Connect Profile
-----------------
Type: jdbc
Name: sonar
Description: null
Configs
 * Connection String: jdbc:mariadb://localhost:3306/sonar
 * User: sonar
 * Password: ********
 * Read Only: false
Restart the Logpresso service
To apply the profile settings, you must restart the Logpresso service.
-
On Node B, run the following command to restart the Logpresso service.
sudo systemctl restart logpresso -
Run the following command to verify that the service is running normally.
sudo systemctl status logpressoIf the status is
Active: active (running)as shown below, it is normal.logpresso.service - Logpresso daemon Loaded: loaded (/usr/lib/systemd/system/logpresso.service; enabled; preset: disabled) Active: active (running) since Sat 2025-12-13 10:56:58 KST; 6 days ago Docs: https://ko.logpresso.com/documents Main PID: 1682 (java) Tasks: 229 (limit: 23116) Memory: 4.1G CPU: 4d 40min 56.229s CGroup: /system.slice/logpresso.service └─1682 /opt/logpresso/jre/bin/java ...(omitted)... -jar /opt/logpresso/sonar/araqne-core-4.0.5-package.jar
Web console login
Log in to the web console on Node A and Node B respectively. Log in with the cluster administrator account.
-
On Node A, after running the web installer, verify that the login screen is displayed. If you closed the web browser window, access the
https://NODE_A_IP_ADDRorhttps://FQDNaddress (for example,https://203.0.113.194,https://c1a.example.com). -
On Node B as well, access the
https://NODE_B_IP_ADDRorhttps://FQDNaddress (for example,https://203.0.113.195,https://c1b.example.com). -
When you access the web console, a notification blocking message may appear in the lower-right corner of the screen.

-
Change the notification setting of the web browser to Allow so that you can check server notifications in the web console.

-
Enter the Username and Password of the cluster administrator and click the Login button.
NoteIf you fail to log in several times, the account is locked for a certain period. If you need to unlock the account or change the password, contact the server administrator.
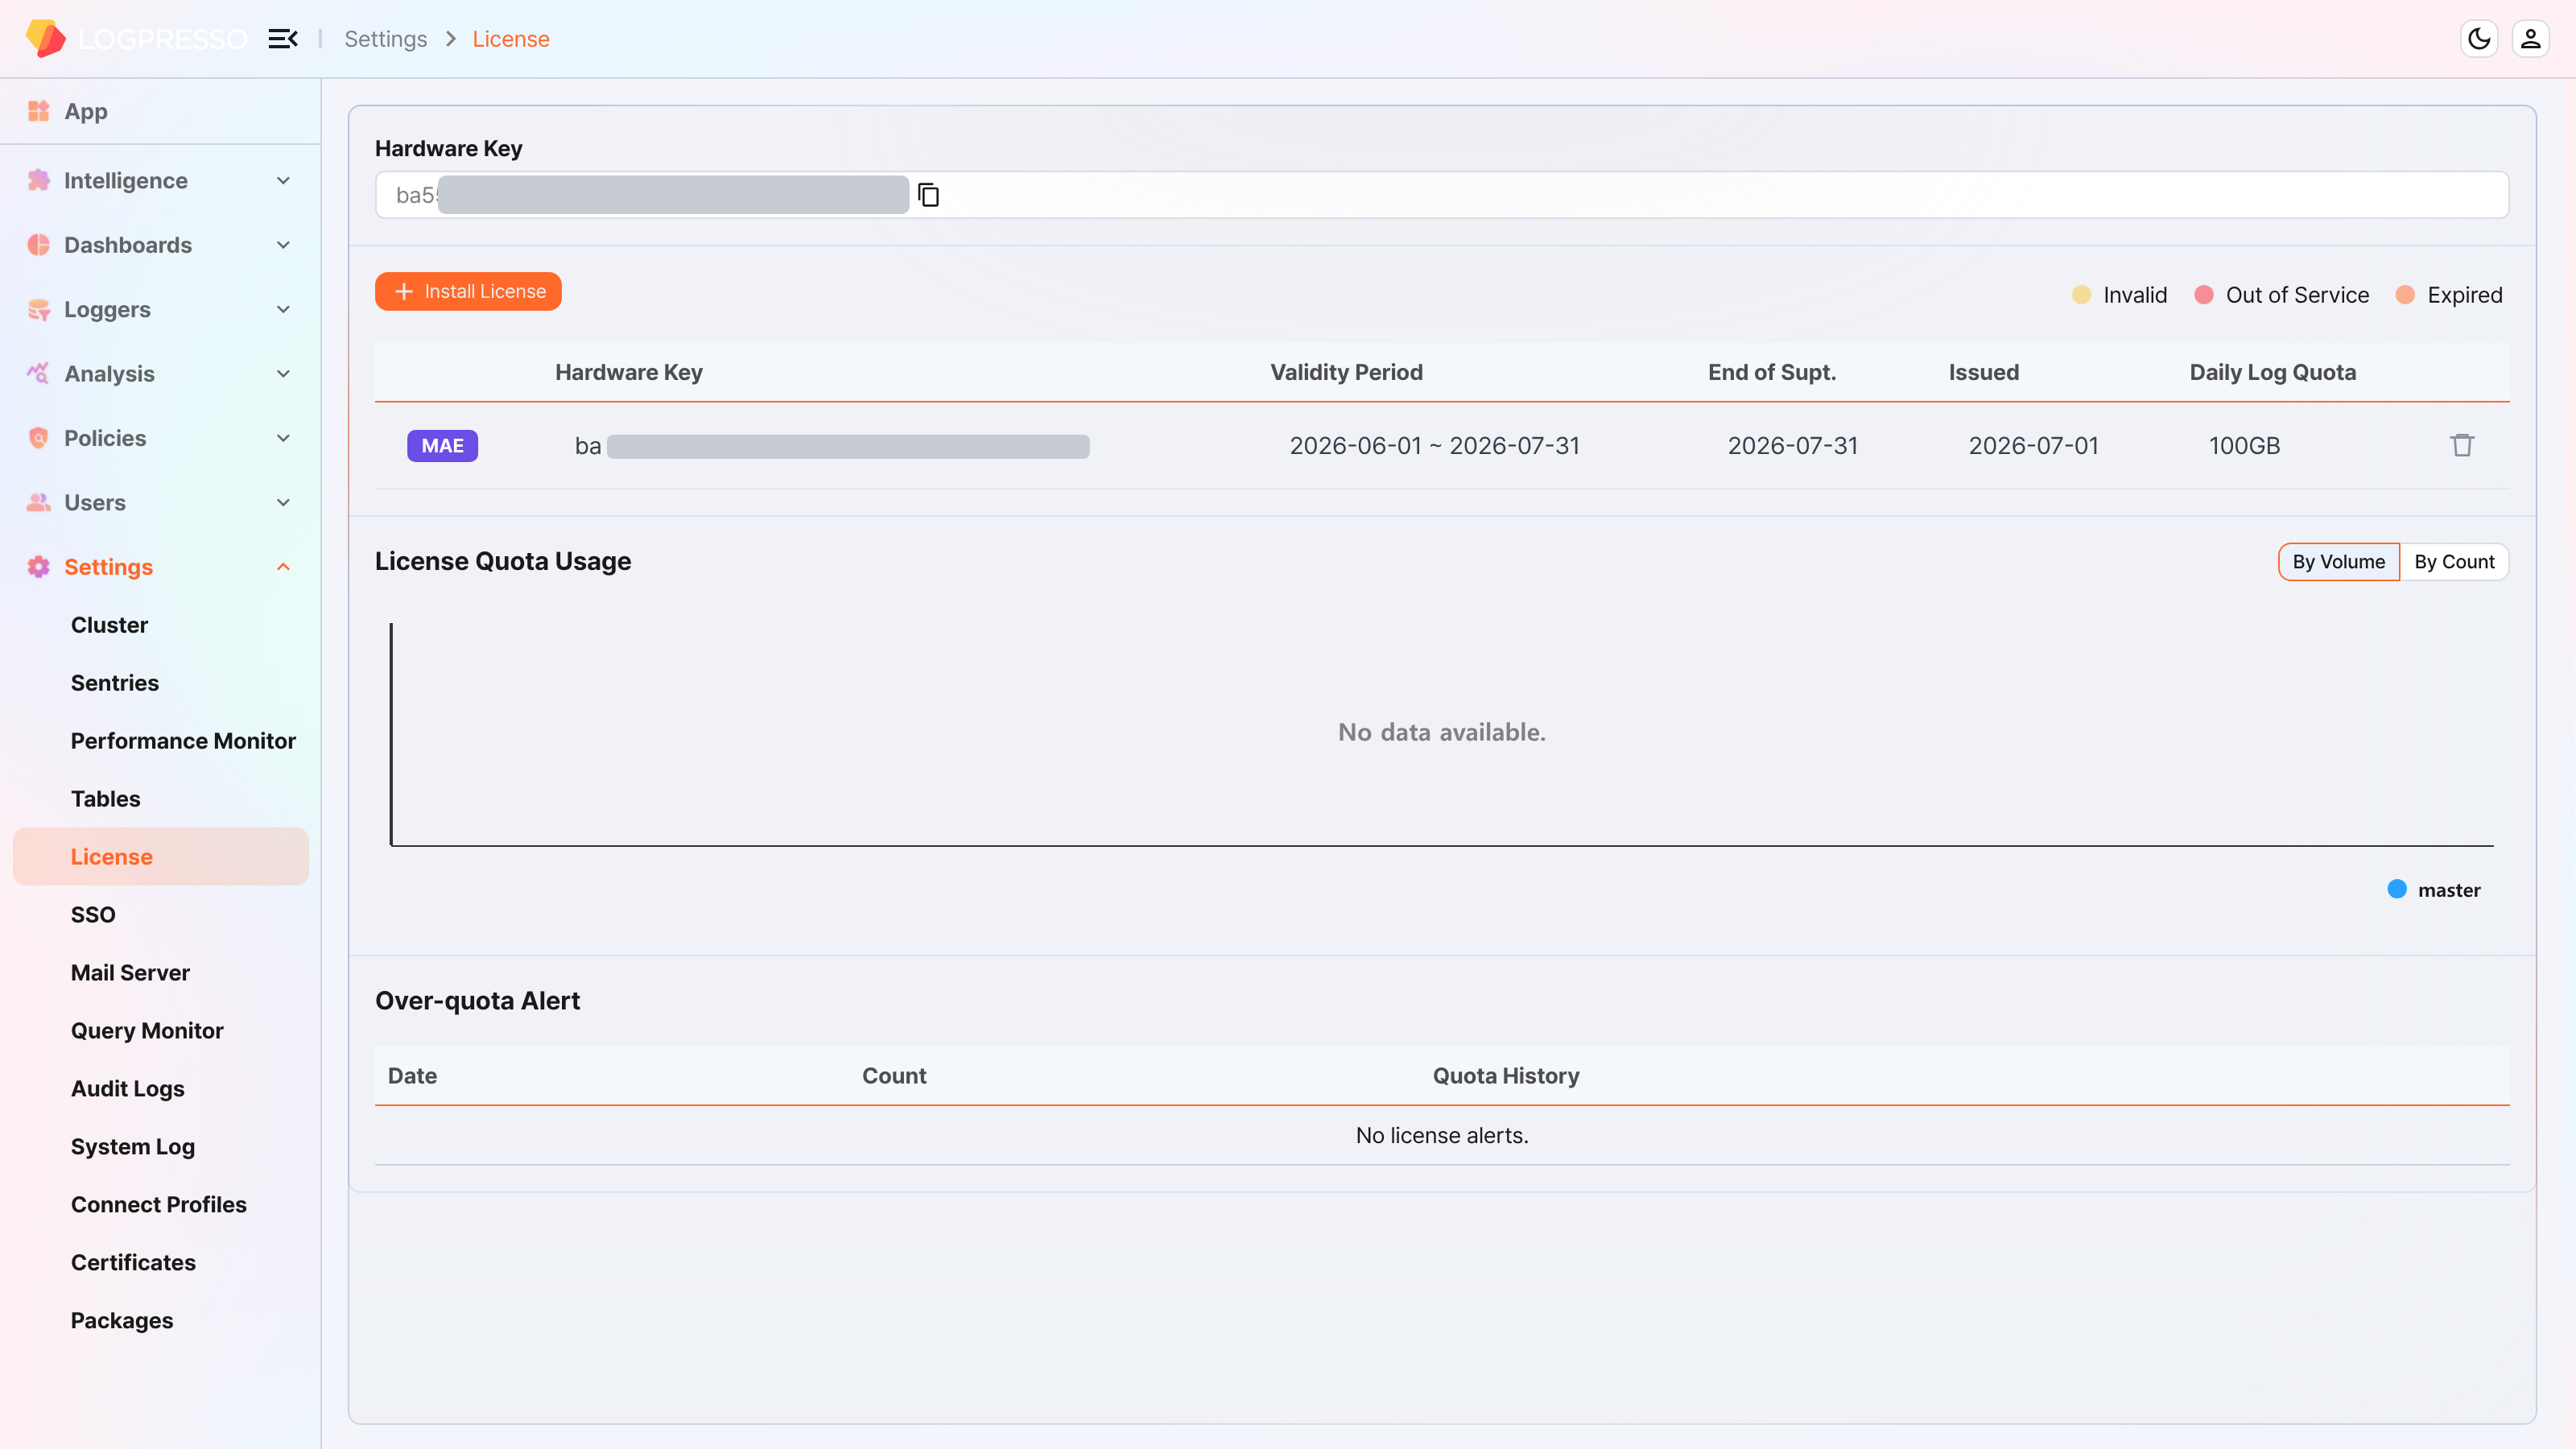
License registration
After logging in, register a license first.
Request a license
-
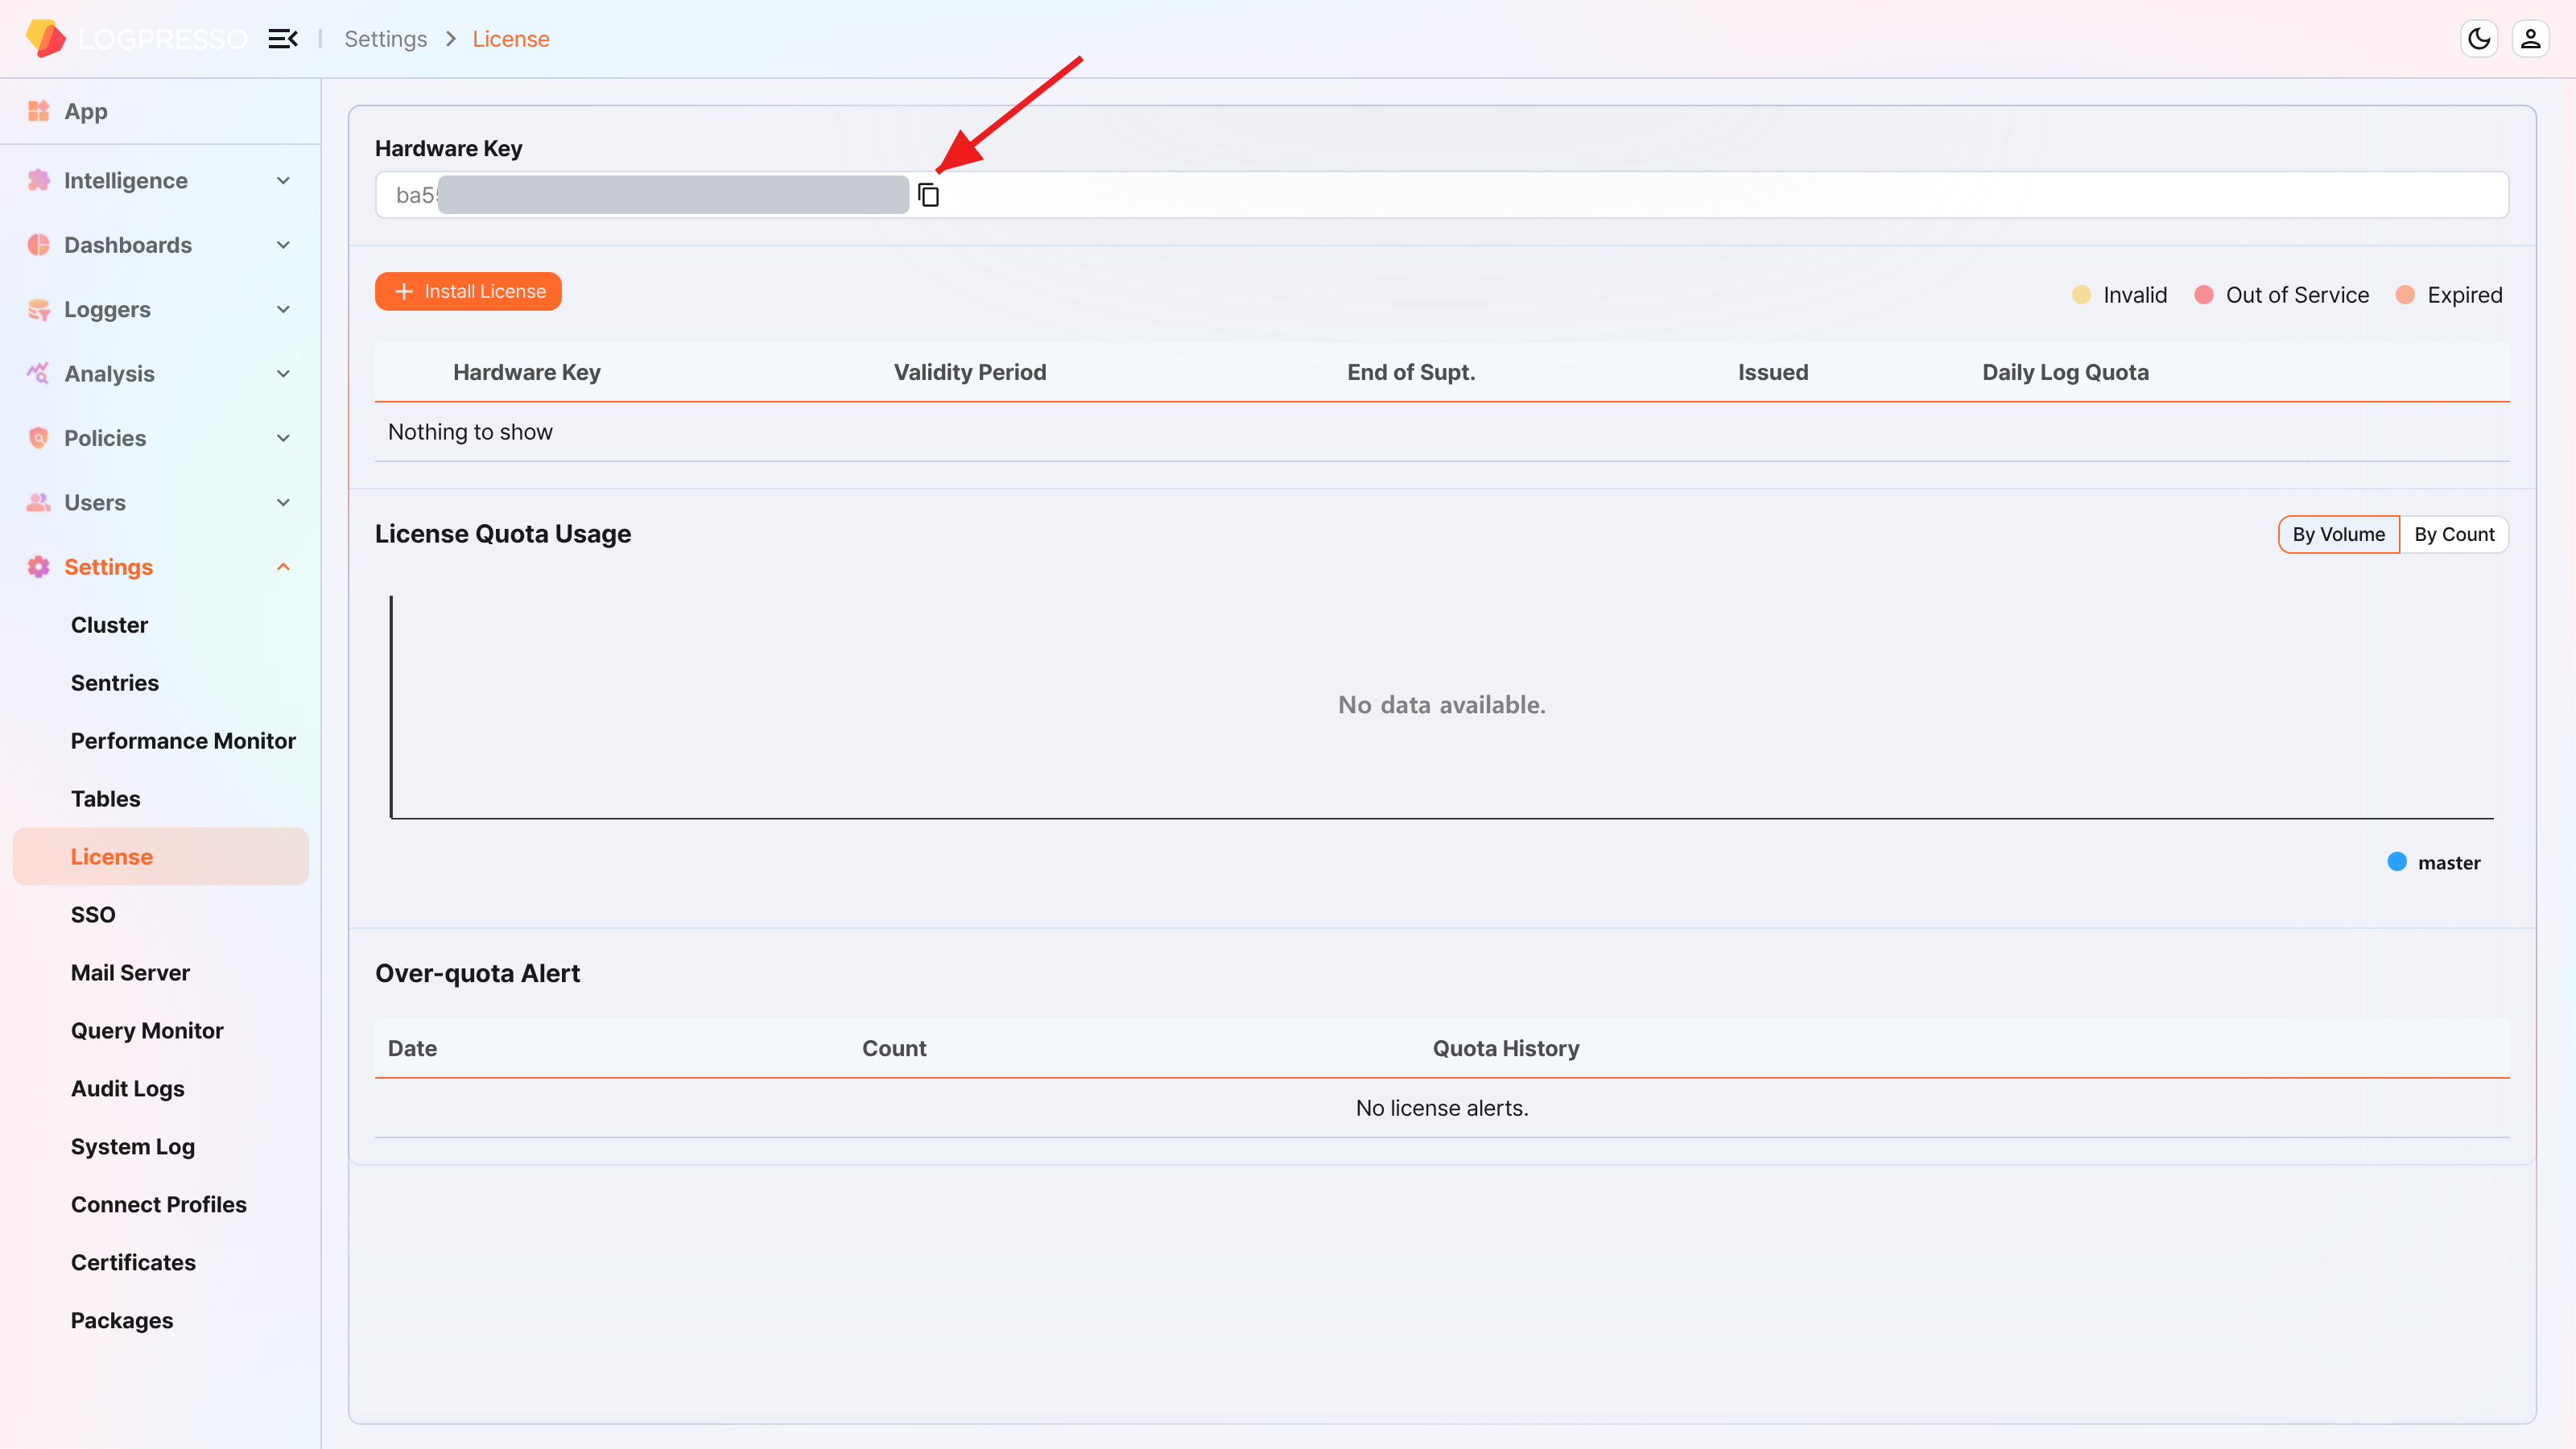
On the web console System > Licenses screen of Node A and Node B, check the Hardware Key and record it in a safe place.
-
On the Logpresso support portal, request license issuance for the hardware keys of Node A and Node B.
You must perform the subsequent tasks after the license has been issued.
Enter the license
-
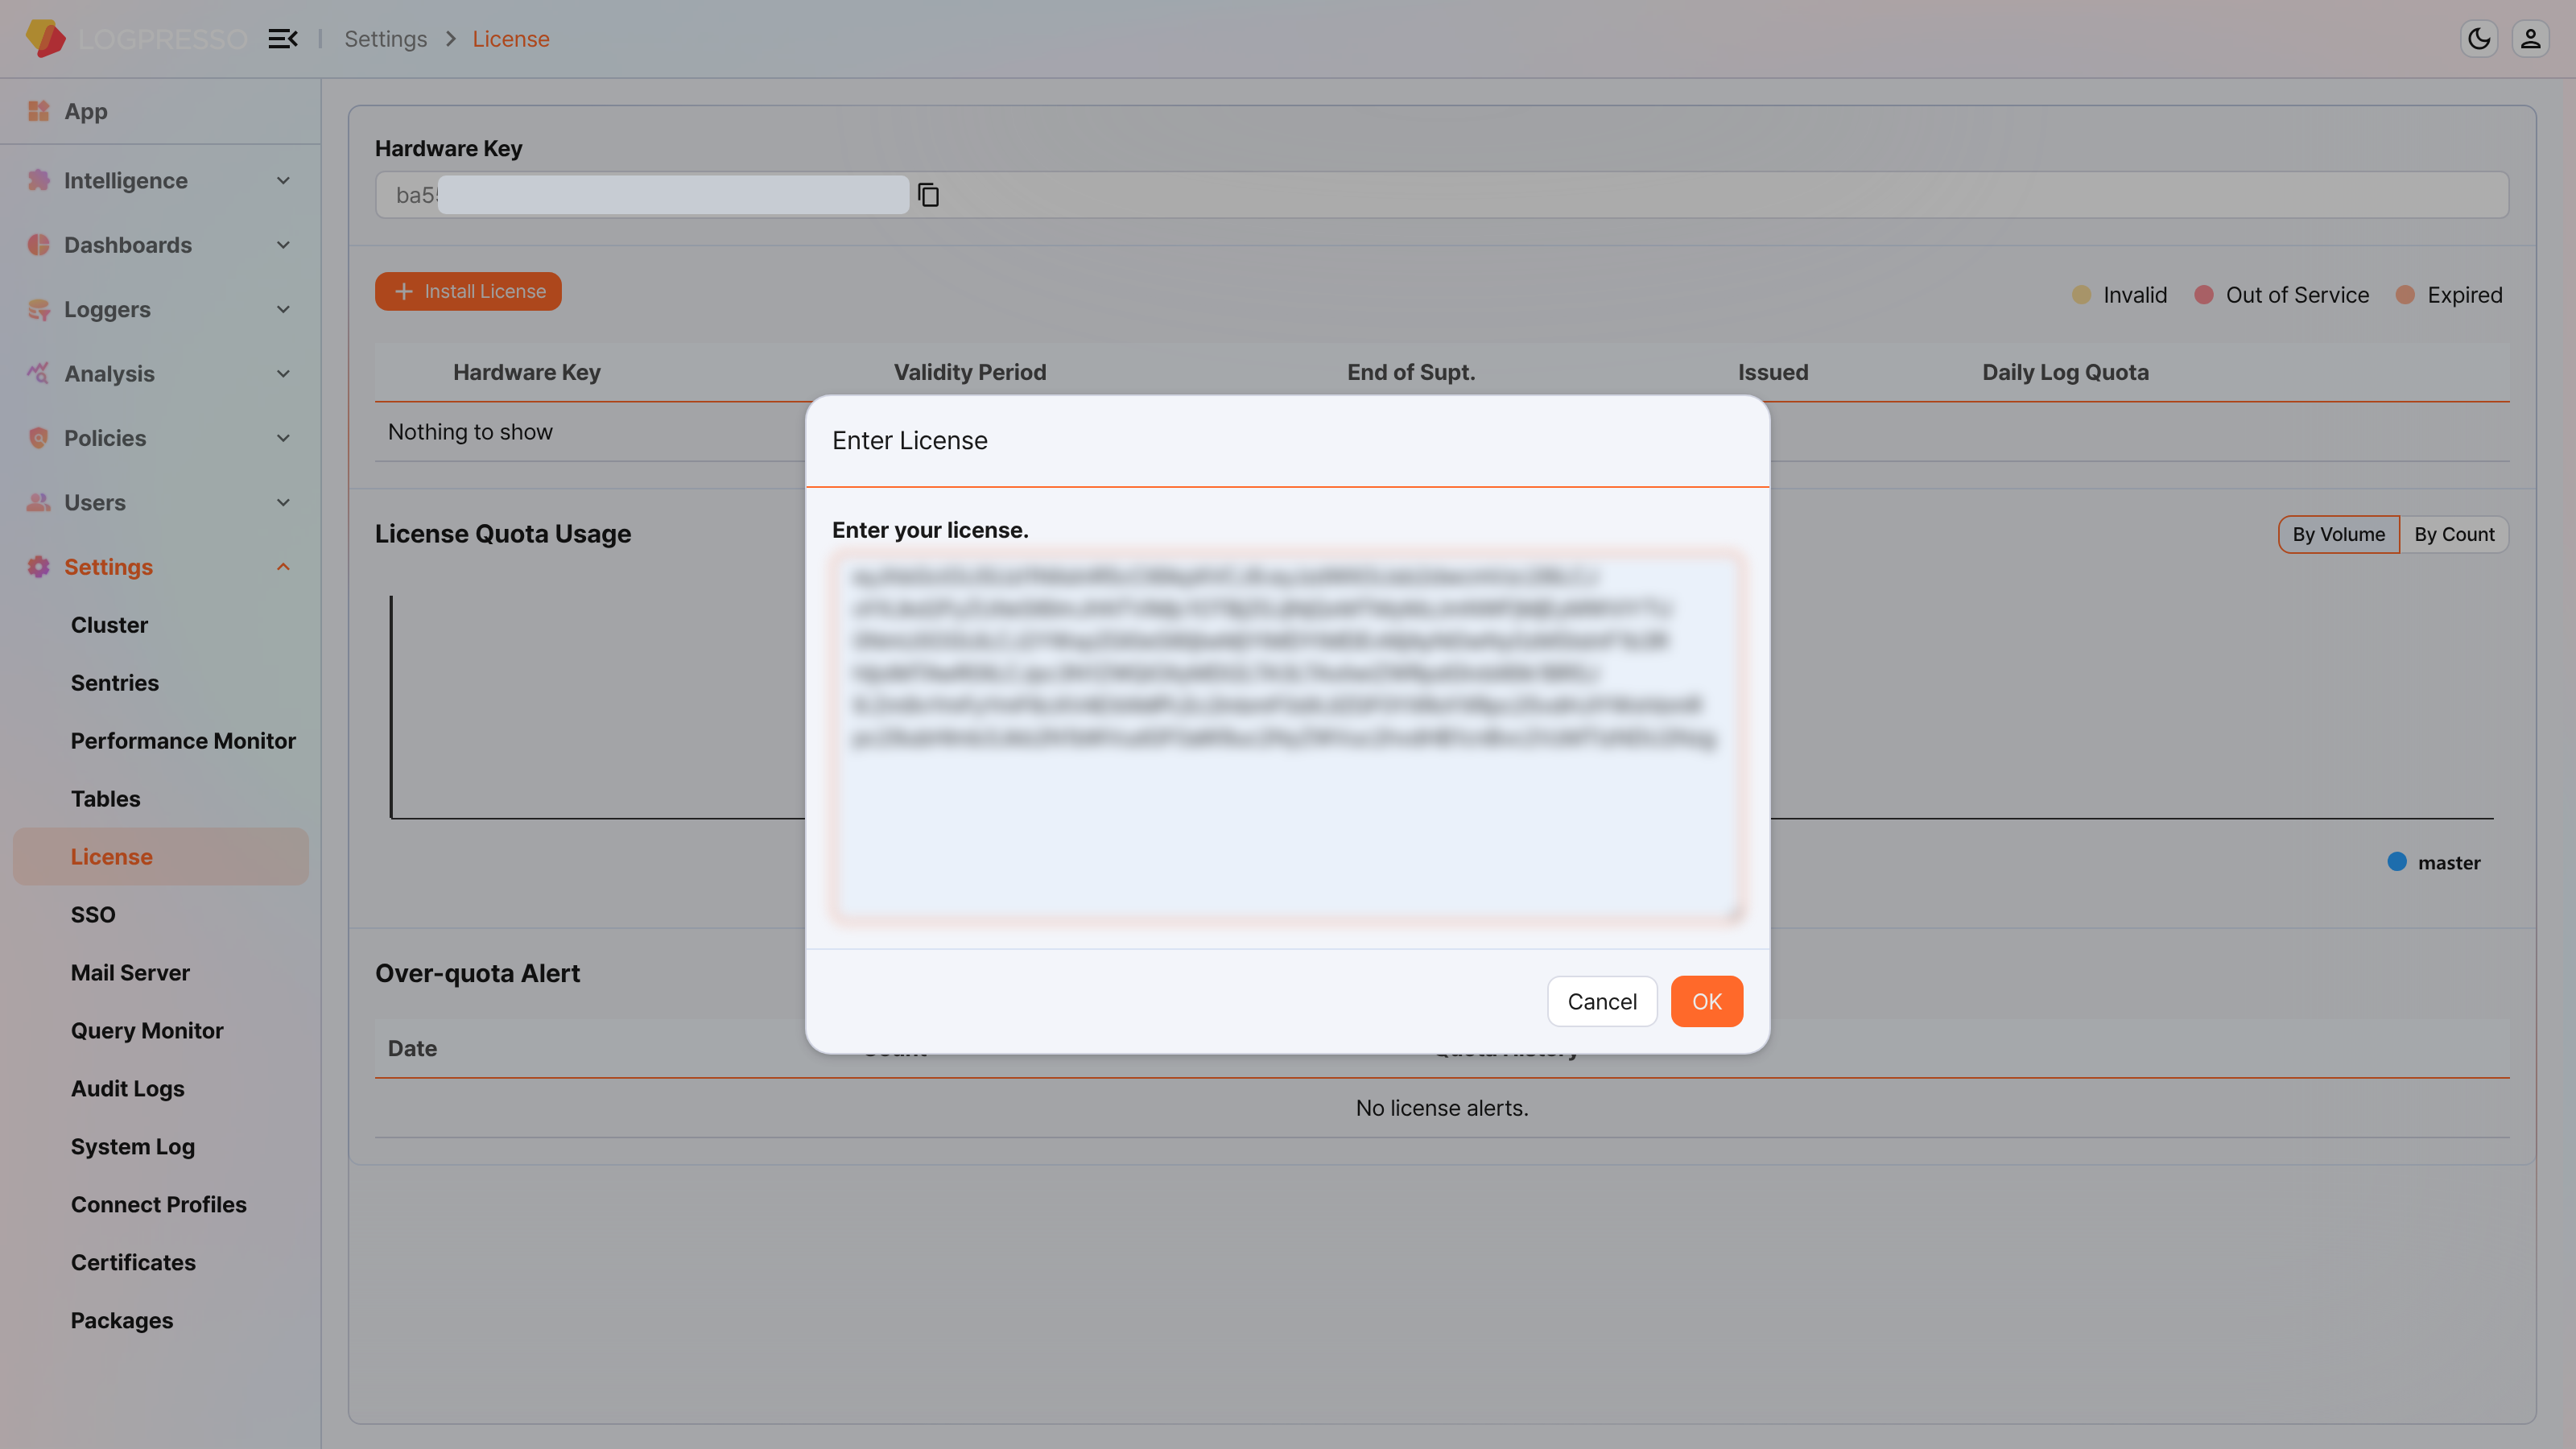
On the web console System > Licenses screen of Node A and Node B, click the Install License button.
-
Paste the issued license information into the input window and click the OK button.
-
Verify that the license is registered correctly.
Control Node pair setup
Register the Control Node pair
Register the Node Pair on the web console System > Clusters > Node screen of Node A. Here, we explain the method of deleting and reconfiguring the existing Node Pair.
-
On the web console of Node A, go to the System > Clusters menu.
-
Select the existing
controlnode and click the Delete button.
-
In the upper-right corner of the cluster node list, click the Add button and configure the Control Node pair. For a detailed description of each property, refer to Add a Node Pair in the user guide.
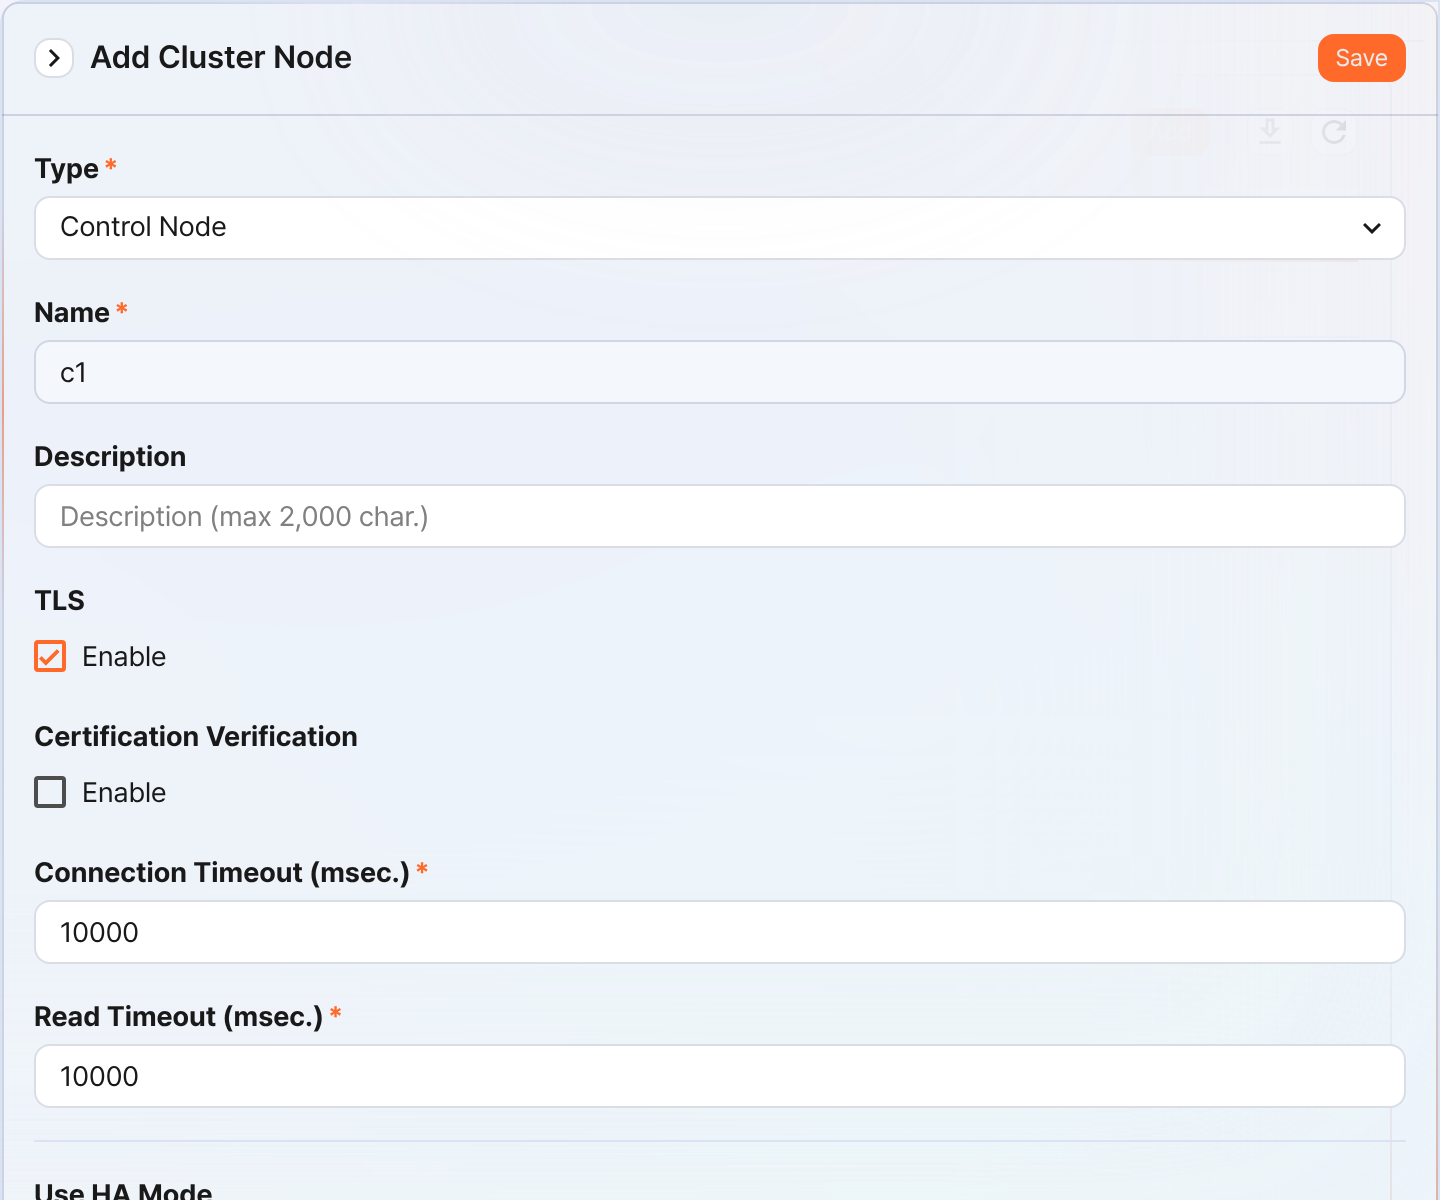
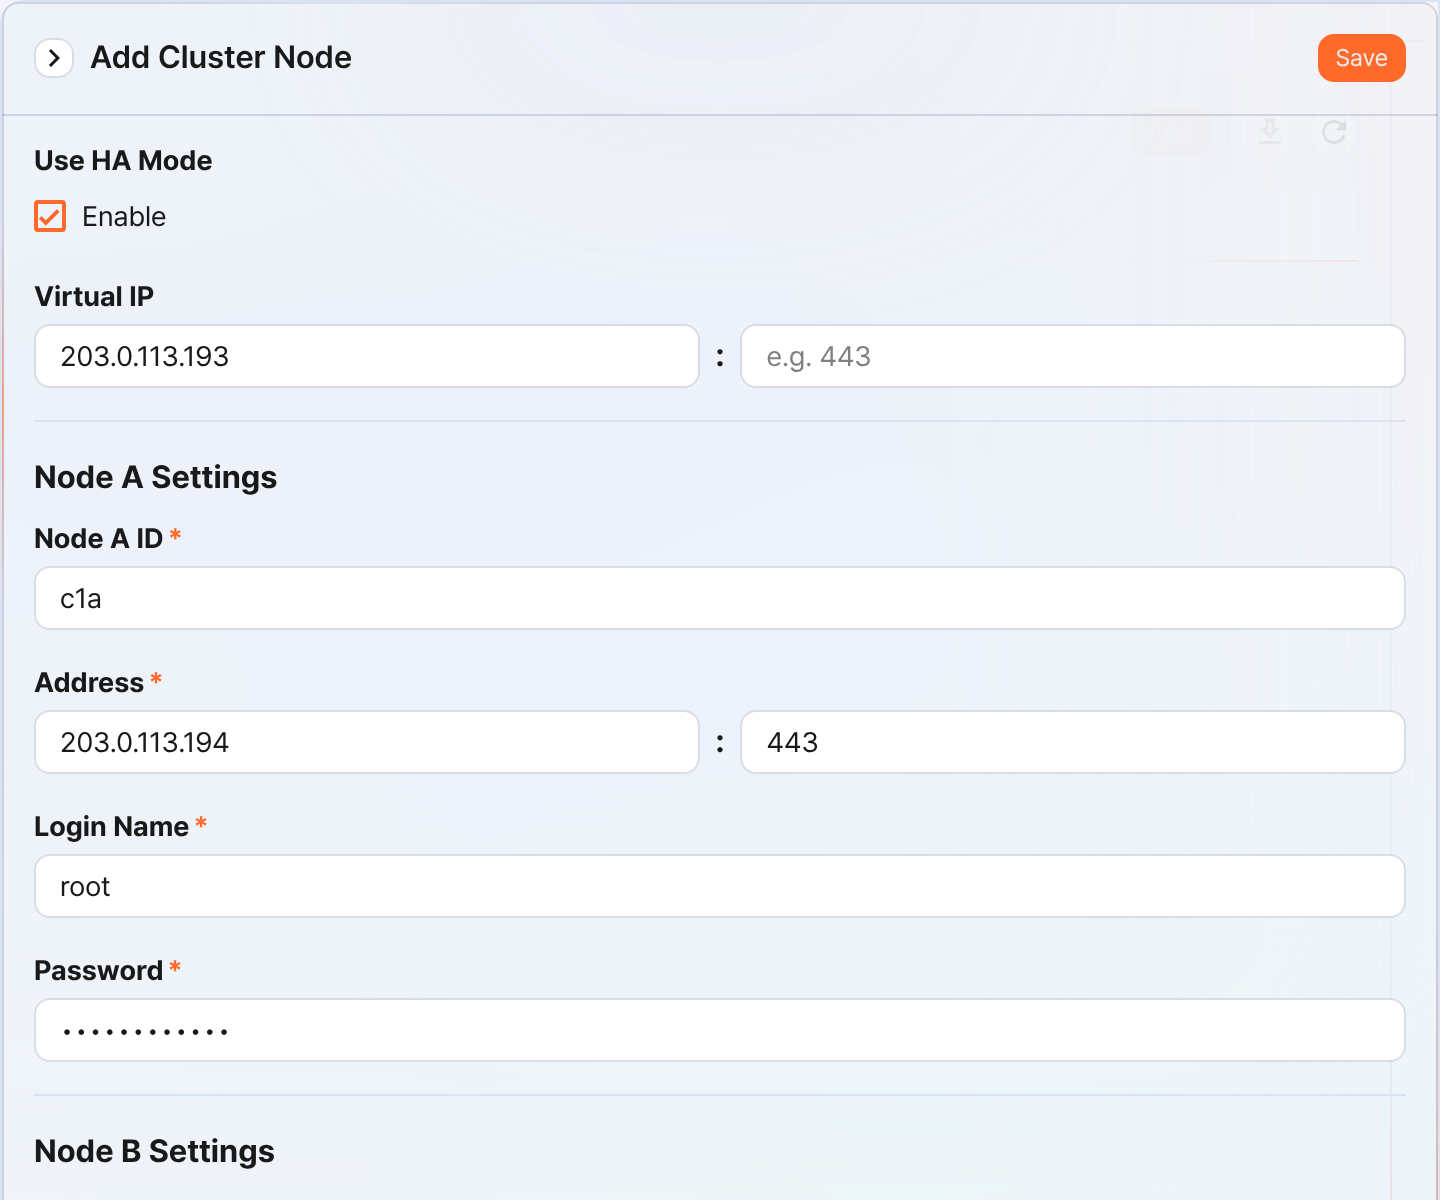

- Type: Select Control Node
- Name: Enter the Control Node pair identifier (for example,
c1)- You cannot change it after clicking the Save button.
- Description: A description of the Node Pair (can be omitted)
- TLS: Selected
- Certification Verification: Not selected
- Connection Timeout: Use the default value
- Read Timeout: Use the default value
- Use HA Mode: Selected
- Virtual IP: The IP address of the Control Node pair (for example,
203.0.113.193)- This IP address is used as the VIP in the HA script.
- Node A Settings
- Node A ID: Enter the Node A identifier (for example,
c1a) - Address: The actual IP address and communication port of Node A (for example,
203.0.113.194:443)- The port number of the Control Node is
443.
- The port number of the Control Node is
- Login Name: Enter
root - Password: Enter the Sonar federation account password
- Node A ID: Enter the Node A identifier (for example,
- Node B Settings
- Node ID: The Node B identifier (for example,
c1b) - Address: The actual IP address and communication port of Node B (for example,
203.0.113.195:443) - Login Name: Enter
root - Password: Enter the Sonar federation account password
- Node ID: The Node B identifier (for example,
-
After completing the input, click the Save button. Verify that the Control Node pair has been added as shown below.
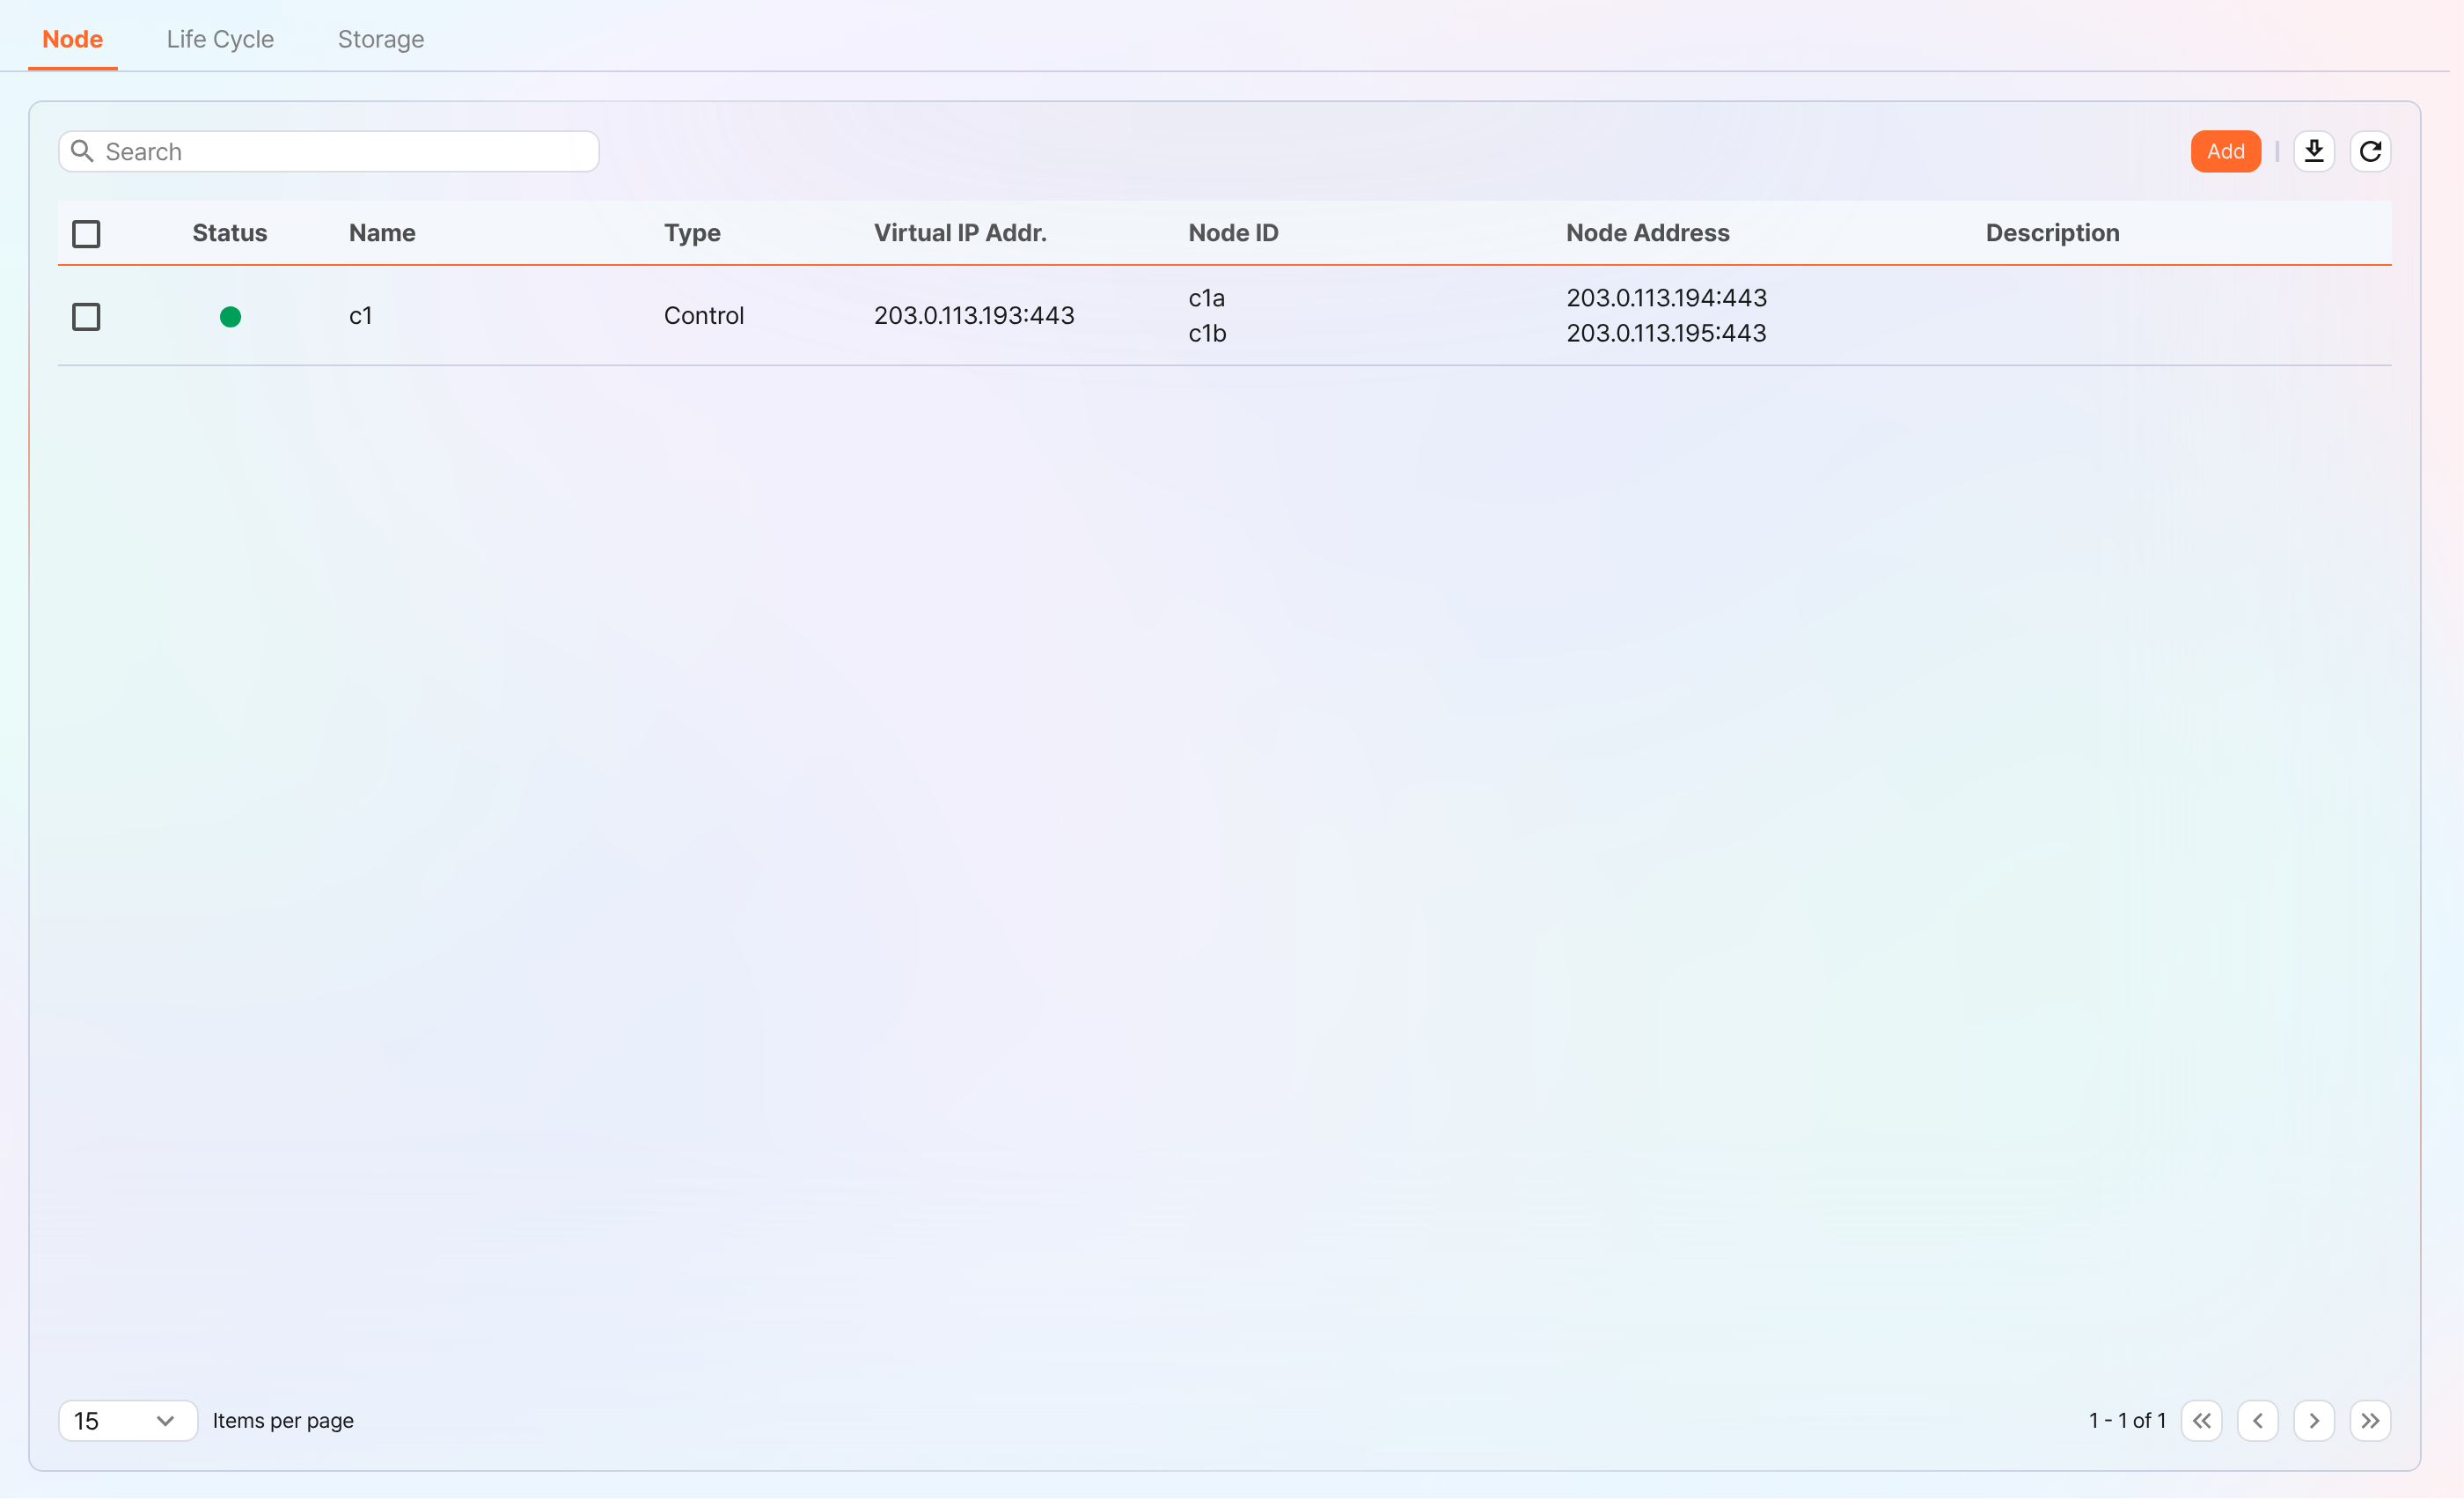
-
Click the Name of the added Control Node and check the GUIDs of Node A and Node B. If you specified the Name or Node ID incorrectly, you must delete the Node Pair and reconfigure it.
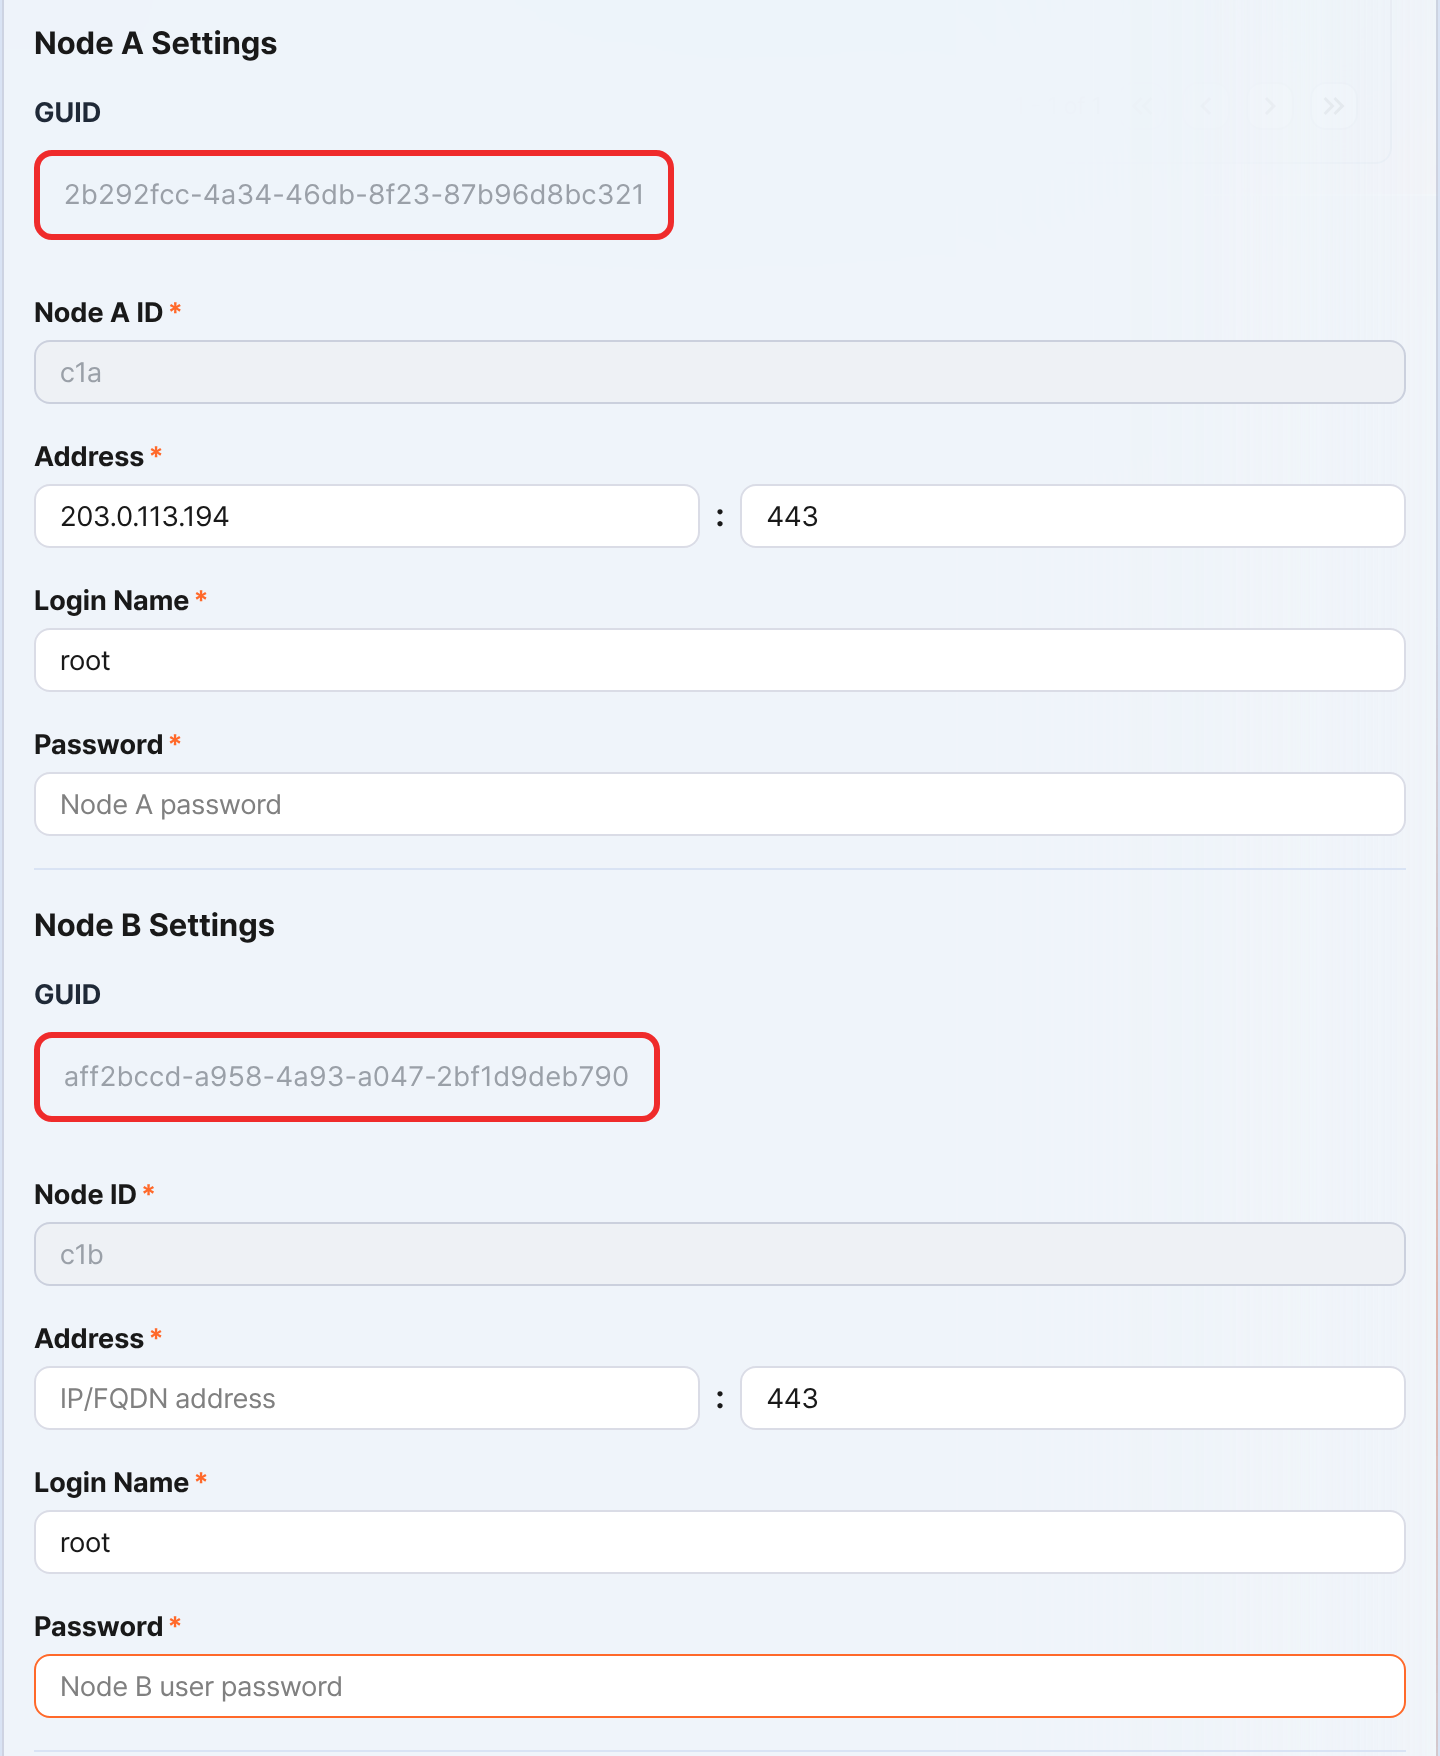
Record the GUIDs of Node A and Node B in a safe place. These values are used in Node GUID configuration.
Copy the key encryption key
Set the same key encryption key (KEK, Key Encryption Key) of Node A on Node B. Because the key encryption key does not allow replication between nodes, the administrator must copy it directly.
-
In the Logpresso Shell of Node A, run the following command and record the encryption key string in a safe place.
sonar.cipherKey -
Copy the encryption key string of Node A, and then in the Logpresso Shell of Node B, run the following command to configure the same encryption key.
KEY_STRINGis the encryption key string of Node A.sonar.setCipherKey KEY_STRING
Node GUID configuration
Set the GUID of Node A that was changed in the Control Node pair registration step and the newly created GUID of Node B identically in the Logpresso Shell.
-
In the Logpresso Shell of Node A and Node B, run the following command to set the GUID for policy synchronization of each node in the Logpresso engine.
GUID_STRINGis the GUID string of each node.sonar.setGuid GUID_STRING # Enter the GUID that matches each nodeYou can check the GUID for policy synchronization of each node with the following command.
sonar.nodeConfig -
In the Logpresso Shell of Node A and Node B, run the following command to set the GUID for cluster control in the Logpresso engine.
sonar.setControlGuid GUID_STRING # Enter the GUID that matches each nodeYou can check the GUID for cluster control of each node with the following command.
sonar.controlNodeGuid
Configure the master node connection
Configure the master node connection information used to synchronize policies and settings within the cluster. In the case of a Control Node, specify itself (127.0.0.1) as the master to load policies from MariaDB.
This configuration is separate from the Node Pair registration information you performed earlier in the web console. The node pair information is used when other nodes connect to this node. The master node connection information configured here is used when this node connects to the master, and is stored in the confdb of the Logpresso engine. Because a Control Node is its own master, specify 127.0.0.1.
-
In the Logpresso Shell of Node A and Node B, run the following command.
sonar.setMasterThe following describes the prompts output after running the command and the values to enter. The account used here is the federation account.
host? 127.0.0.1        # Specify itself as the master
port? 443              # Enter 443
account? root          # Enter root, the federation account
password?              # Enter the federation account password
connect timeout? 10000 # Press the Enter key to use the default value
read timeout? 10000    # Press the Enter key to use the default value
secure? true           # Enter true (the default is false)
skip cert check? true  # Enter true (the default is false)
Option Description Example host Control Node address 127.0.0.1 port Port to communicate with the Control Node 443 account Federation account login name root password Federation account password connect timeout Server connection wait time 10000 (ms) read timeout Response wait time 10000 (ms) secure Whether to apply TLS communication true skip cert check Whether to skip TLS certificate validation true -
Run the following command to verify that the node configuration has been applied.
sonar.nodeConfigThe following is an example output that you can check when the configuration is applied correctly.
guid: 7bdb297d-1d2a-400b-8efc-ce8d98580a13 host=127.0.0.1, port=443, account=root, connectTimeout=10000, readTimeout=10000, secure=true, skipCertCheck=true crypto_file_path: /opt/logpresso/data/logpresso-ca/certs/storage.pfx -
On the web console System > Clusters screen of Node A, verify that the Status is displayed in green.

Configure the data replication mode
When you configure a Node Pair, you can replicate table data between the two nodes. Here, "table" does not mean a database table, but a file-based table where the Logpresso engine stores data.
If the same data exists on both nodes, duplicate searches may occur during distributed query execution. To prevent this, you must set one of the data replication modes, ACTIVE or STANDBY, on each node.
- Active Node: Stores the original log tables and becomes the search target during distributed queries.
- Standby Node: Receives the log table data of the Active Node in real time through replication. The replicated tables use the same table ID as the original, and are excluded from searches during distributed queries, so duplicate searches do not occur.
The logpresso.setActiveNode command designates the peer node as active and sets itself as standby.
Node A configuration (active)
-
In the Logpresso Shell of Node A, run the following command to check the name of the pair node (Node B).
logpresso.nodeStatusesThe following is an example output. In the
Federation Nodessection,[c1b]is the name of Node B.Local ------------------ Node GUID: ffdade37-6d96-4d13-9843-88569d64db6a Instance GUID: 93e9d502-276f-468a-9311-019e1fed8a79 Federation Nodes ------------------ [c1b] node_guid=92eab23d-83e1-4ba2-91d6-48f5408b12a6, instance_guid=1a2eb7aa-85e2-4d73-a23e-9d8d1421605e, repl_mode=null, pair_guid=null, invalid_guid=false, alive=true, paired=true, failure=false, last connect=2025-06-09 13:51:39, last alive=2025-06-10 11:18:44, created=2025-06-09 13:48:37NoteThe Node GUID and Instance GUID displayed in the logpresso.nodeStatuses command output are identifiers that the Logpresso engine uses for log table replication and distributed queries. The Node GUID is used to identify the database and is recorded in the DB_GUID file for permanent storage. The Instance GUID is the identifier of the currently running process and changes each time the node process is started.
-
Run the following command to designate Node B as the standby node, which makes Node A the active node. In the command example,
c1bis the name of Node B that you checked above.logpresso.setStandbyNode c1b -
When you run the
logpresso.nodeStatusescommand again, you can see thatReplication Modeis set toACTIVEin theLocalsection.Local ------------------ Node GUID: ffdade37-6d96-4d13-9843-88569d64db6a Instance GUID: 93e9d502-276f-468a-9311-019e1fed8a79 Replication Mode: ACTIVE Pair Node: c1b Federation Nodes ------------------ [c1b] node_guid=92eab23d-83e1-4ba2-91d6-48f5408b12a6, instance_guid=1a2eb7aa-85e2-4d73-a23e-9d8d1421605e, repl_mode=null, pair_guid=null, invalid_guid=false, alive=true, paired=true, failure=false, last connect=2025-06-09 16:56:24, last alive=2025-03-27 13:35:12, created=2025-06-09 16:56:24
Node B configuration (standby)
-
In the Logpresso Shell of Node B, run the following command to designate Node A as active, which makes Node B the standby node.
c1ais the name of Node A that you checked from the result of thelogpresso.nodeStatusescommand.logpresso.setActiveNode c1a -
When you run the
logpresso.nodeStatusescommand, you can see thatReplication Modeis set toSTANDBYin theLocalsection.Local ------------------ Node GUID: ef5a8e0d-e80d-4b93-80a2-c8fec4b764ad Instance GUID: c1fb7d52-229b-464b-be06-4f7784001c17 Replication Mode: STANDBY Pair Node: c1a Federation Nodes ------------------ [c1a] node_guid=ffdade37-6d96-4d13-9843-88569d64db6a, instance_guid=93e9d502-276f-468a-9311-019e1fed8a79, repl_mode=ACTIVE, pair_guid=ef5a8e0d-e80d-4b93-80a2-c8fec4b764ad, invalid_guid=false, alive=true, paired=true, failure=false, last connect=2025-06-09 16:56:58, last alive=2025-03-27 13:37:34, created=2025-06-09 15:54:59
Configure license sharing between nodes
Configure all nodes in the cluster environment to be covered by the same license. The license registered on the Control Node is also applied to the Data Nodes and Forwarder Nodes. Here, we explain how to propagate the license registered on the Control Node to the other nodes.
-
In the Logpresso Shell of Node A and Node B, run the following command to set the license master. Both nodes must become license masters.
logpresso.setLicenseMode master -
Run the following command to check the license master status.
logpresso.licenseModeWhen set correctly, the output is as follows.
MASTER
Enable distributed query
Distributed Query is a feature that queries table data distributed across multiple nodes as a single unified query. When you run a query on a Control Node, the Control Node distributes the necessary query to the Data Node pair and the query is executed on the Data Nodes. The Control Node aggregates the execution results of each Data Node and returns the final result. Distributed query must be enabled on all nodes.
-
In the Logpresso Shell of Node A and Node B, run the following command respectively to enable distributed query.
logpresso.enablePlanner -
Run the following command to check the distributed query status.
logpresso.plannerStatusWhen enabled correctly, the output is as follows.
Running: true
Configure the WebSocket frame
If the distributed query result is large or there is a lot of data to send to the web browser, transmission may fail with the default WebSocket frame size.
-
In the Logpresso Shell of Node A and Node B, run the following command to check the current setting value.
webconsole.maxFrameSizeThe default value is 8MB, and the command execution result is as follows.
8,388,608 bytes -
Run the following command to change the frame size. The value set in the example is 84MB.
webconsole.setMaxFrameSize 83886080 -
Run the
webconsole.maxFrameSizecommand again to check the changed value.83,886,080 bytes
Configure the query cache
To optimize query performance, table metadata, inverted indexes, and bloom filters are cached in memory. The role of each cache is as follows.
- Table cache: Caches log data read from disk during queries so that when the same data is re-queried, it is returned directly from memory without disk I/O.
- Inverted index cache: Caches the list of document IDs that contain a specific search term for full-text search.
- Bloom filter 0/1 cache: A bloom filter is a probabilistic data structure that quickly determines whether a specific search term exists in a given segment. Bloom filter 0 is used for fast determination, and bloom filter 1 is used for precise determination.
In the Logpresso Shell of Node A and Node B, run the following commands to set the cache sizes.
logpresso.tableCacheConfig max_weight CACHE_SIZE               # Table cache
logpresso.indexCacheConfig inverted max_weight CACHE_SIZE      # Inverted index cache
logpresso.indexCacheConfig bloomfilter0 max_weight CACHE_SIZE  # Bloom filter 0 cache
logpresso.indexCacheConfig bloomfilter1 max_weight CACHE_SIZE  # Bloom filter 1 cache
For CACHE_SIZE, enter the values in the following table considering the daily throughput and memory capacity. The input unit of the cache is bytes.
| Daily throughput | RAM | HEAP | DM | max_weight | inverted | bloomfilter0 | bloomfilter1 |
|---|---|---|---|---|---|---|---|
| 10GB/day | 32GB | 8GB | 9GB | 643,825,664 | 6,442,450,944 | 1,073,741,824 | 213,909,504 |
| 50GB/day | 64GB | 16GB | 26GB | 1,073,741,824 | 19,327,352,832 | 4,294,967,296 | 613,416,960 |
| 100GB/day or more | 128GB | 34GB | 68GB | 3,221,225,472 | 46,170,898,432 | 10,737,418,240 | 1,073,741,824 |
- max_weight: Table cache
- inverted: Inverted index cache
- bloomfilter0: Bloom filter 0 cache
- bloomfilter1: Bloom filter 1 cache
- When entering values, do not use commas (
,). The commas are shown to separate units for readability.
Converting the caches to GB units results in the following table.
| Daily throughput | RAM | HEAP | DM | max_weight | inverted | bloomfilter0 | bloomfilter1 |
|---|---|---|---|---|---|---|---|
| 10GB/day | 32GB | 8GB | 9GB | 614MB | 6GB | 1GB | 204MB |
| 50GB/day | 64GB | 16GB | 26GB | 1GB | 18GB | 4GB | 585MB |
| 100GB/day or more | 128GB | 34GB | 68GB | 3GB | 43GB | 10GB | 1GB |
Restart the service
To apply the changed settings, you must restart the Logpresso service. The order of operations is as follows.
- Stop order: standby → active
- Start order: active → standby
By default, Node A is active and Node B is standby. When you start the active node first during system operation, you can quickly restore the original data service, and the standby node can establish a replication connection immediately when it starts. In an environment where a virtual IP address (VIP) is configured (explained later), if you do not follow this order, an unnecessary VIP switchover may occur.
To stop a node,
-
On the standby node (Node B), run the following command to stop the Logpresso service.
sudo systemctl stop logpresso -
Once Node B is stopped, run the same command on active Node A to stop the service.
To start a node,
-
On Node A, run the following command to start the Logpresso service.
sudo systemctl start logpresso -
Once Node A starts normally, run the same command on Node B to start the Logpresso service.
-
After logging in to the web console of Node A, go to the System > Performance Monitor menu and verify that the status of each Control Node is displayed in green.
Network redundancy
A Control Node pair has the two nodes share a single virtual IP address (VIP, Virtual IP Address) as the representative address, distributing load at the network level and automatically switching the connection in case of a failure. Because external clients such as Data Nodes, Forwarder Nodes, and web browsers access the Control Node through the VIP, service continuity can be maintained regardless of whether an individual node fails.
You can configure network redundancy in the following two ways.
Load balancer (recommended)
Use a load balancer such as an L4 switch to distribute traffic coming into the VIP to Control Node A and Control Node B. Refer to the following when configuring the load balancer.
- Health check: Configure the load balancer to periodically health-check port 443 (TCP) of each Control Node to determine whether the node is alive.
- Failover: Configure the load balancer to automatically exclude a node that fails the health check from traffic distribution and to forward traffic only to healthy nodes.
HA script
In an environment where you cannot use a load balancer, you can configure VIP switchover with the HA script provided by Logpresso. Request the HA script from the Logpresso technical support team.
Access the web console via the virtual IP address
Once the setup is complete, you can access the web console via the virtual IP address in a web browser (for example, https://203.0.113.193).