Batch Rules
Overview
A batch rule runs Logpresso queries periodically or on a set schedule to analyze correlations between data collected from various systems and detect events. This allows for in-depth analysis of event relationships, activities, and patterns. Batch Rules are typically applied to data stored in tables. The following figure illustrates how a batch rule operates.
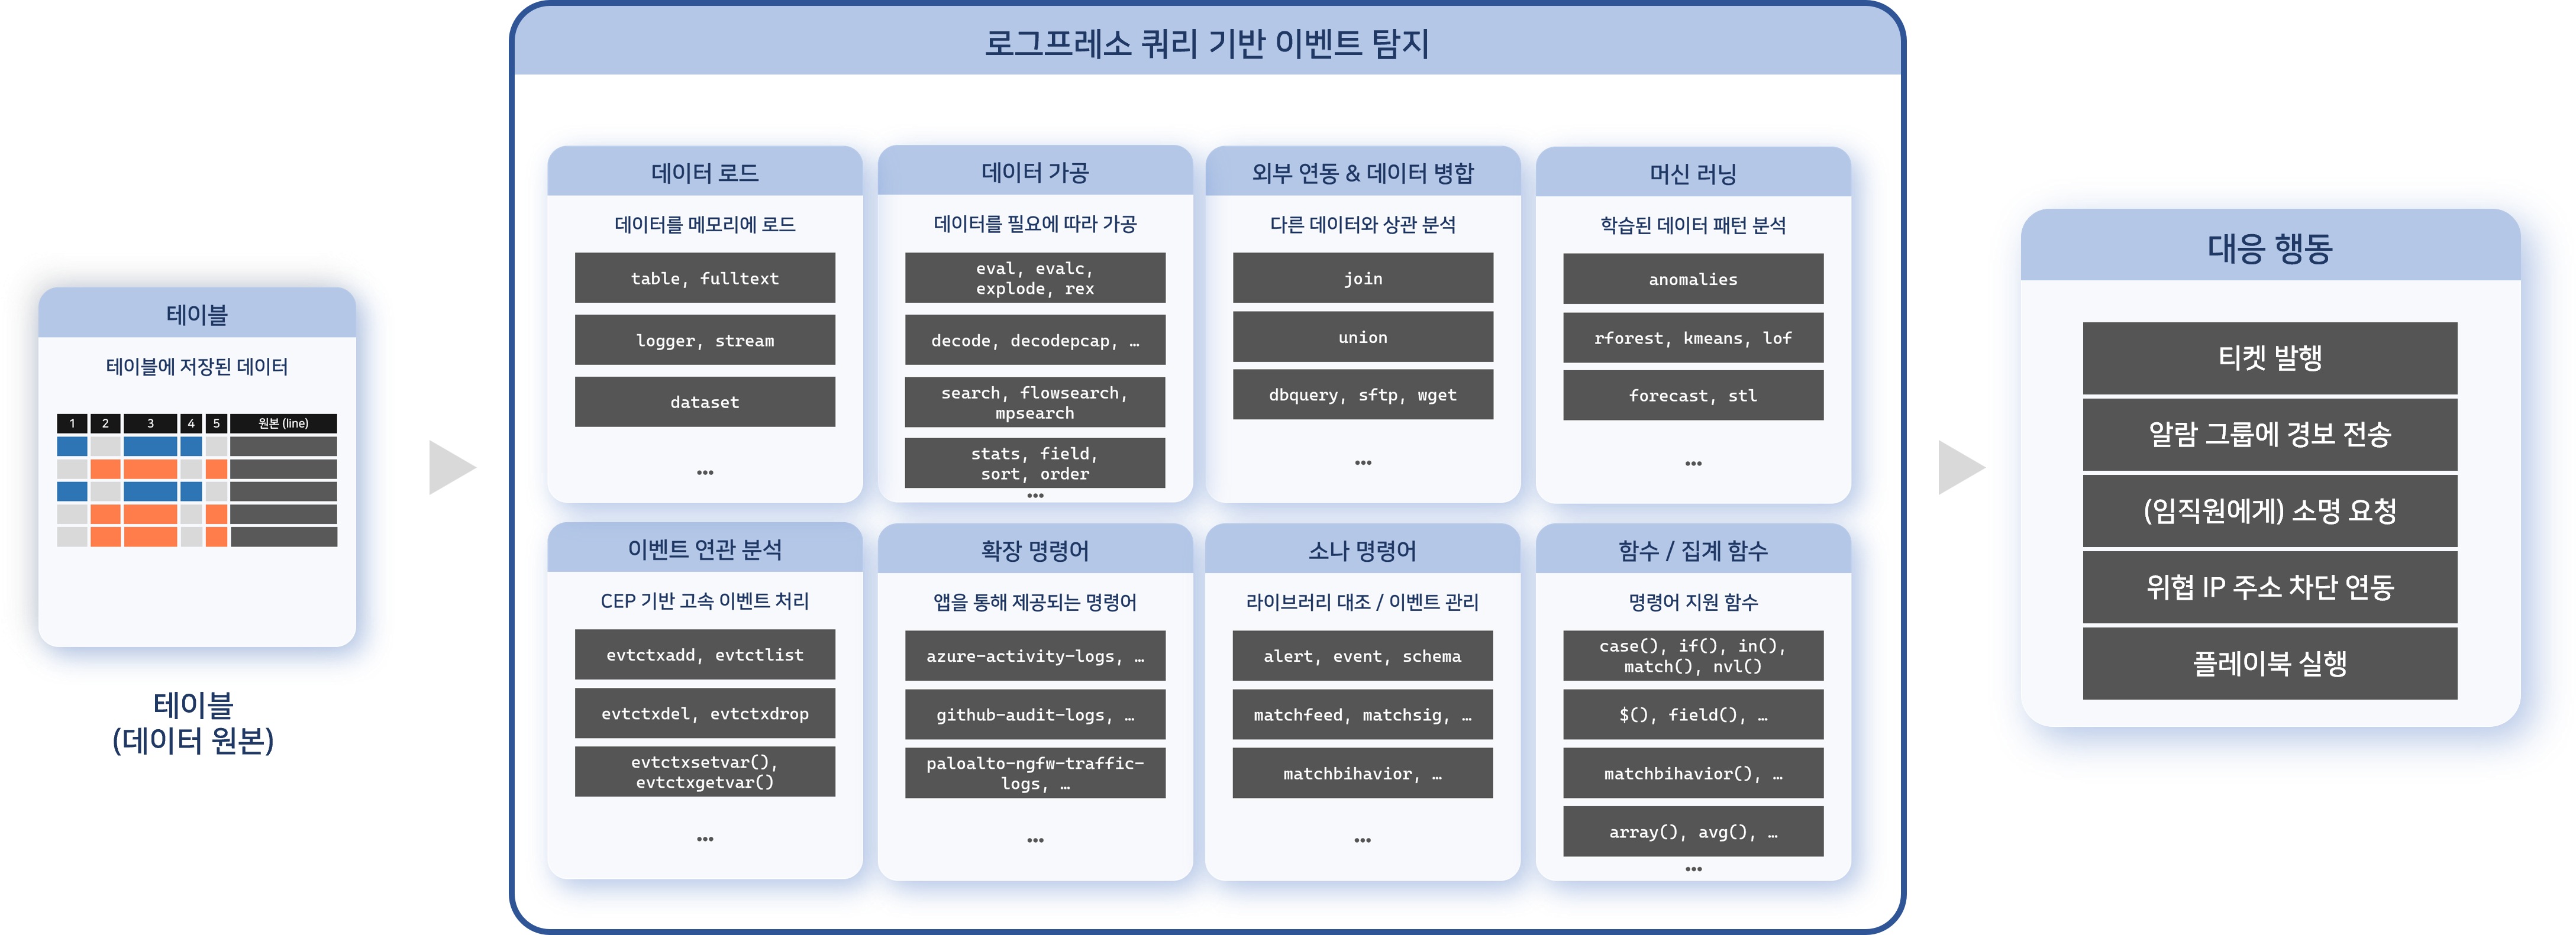
Batch rules utilize Logpresso queries commands and functions, enabling flexible scenario creation. For example, you can analyze the activities of specific users to predict potential threats and detect suspicious behavior.
In most cases, batch rules generate tickets or request an explanation from the acter when an event is detected. To prevent alert fatigue for analysts and security teams, Logpresso Sonar provides mechanisms to reduce duplicate ticketing. Events with identical content can be processed as a single ticket based on the alarm message or a defined duplicate criteria field.
Search Batch Rule
You can view or search the list of batch rules in Policies > Batch Rules.
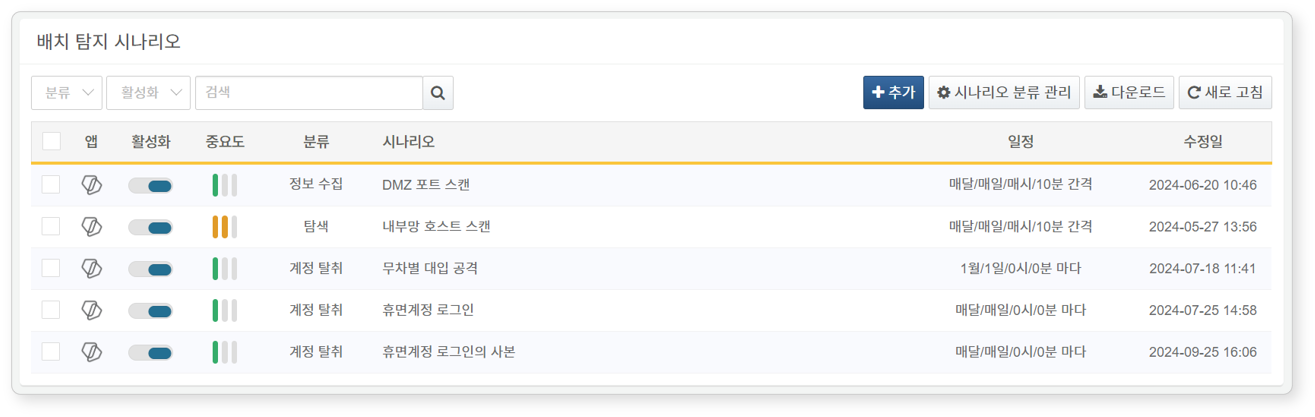
- App: Icon indicating the related app. Default rules or user-added rules are represented by Logpresso icon, and rules from installed apps are represented by their app icons.
- Enabled: Toggle button to enable/disable the rule (
 : Enabled,
  : Disabled)
 - Status: Rule status according to the Enabled setting (Green: enabled, Gray: disabled)
- Priority: Importance of the rule (high, medium, low)
- Category: Category information
- Rule: Name of the batch rule
- Type: Log schema set for the rule
- Modified At: Date the batch rule was last modified (or created)
To find a specific batch rule from the list, use the search tool in the toolbar. The search tool finds the rules where the keywords you enter are included in the rule's Name, Description, or Query fields. The search is not case-sensitive.
Enable and Disable Stream Rule
To enable or disable a batch rule, click the toggle button in the Enabled column of the rule (: Enabled, : Disabled).
Download Batch Rule List
To save the list of batch rules to your local PC, click Download in the toolbar and select the desired file format to download.
Refresh Batch Rule List
To view an up-to-date list of batch rules, click Refresh in the toolbar.
Add Batch Rule
To add a batch detection rule:
-
Go to Policies > Batch Rules and click Add in the toolbar.
-
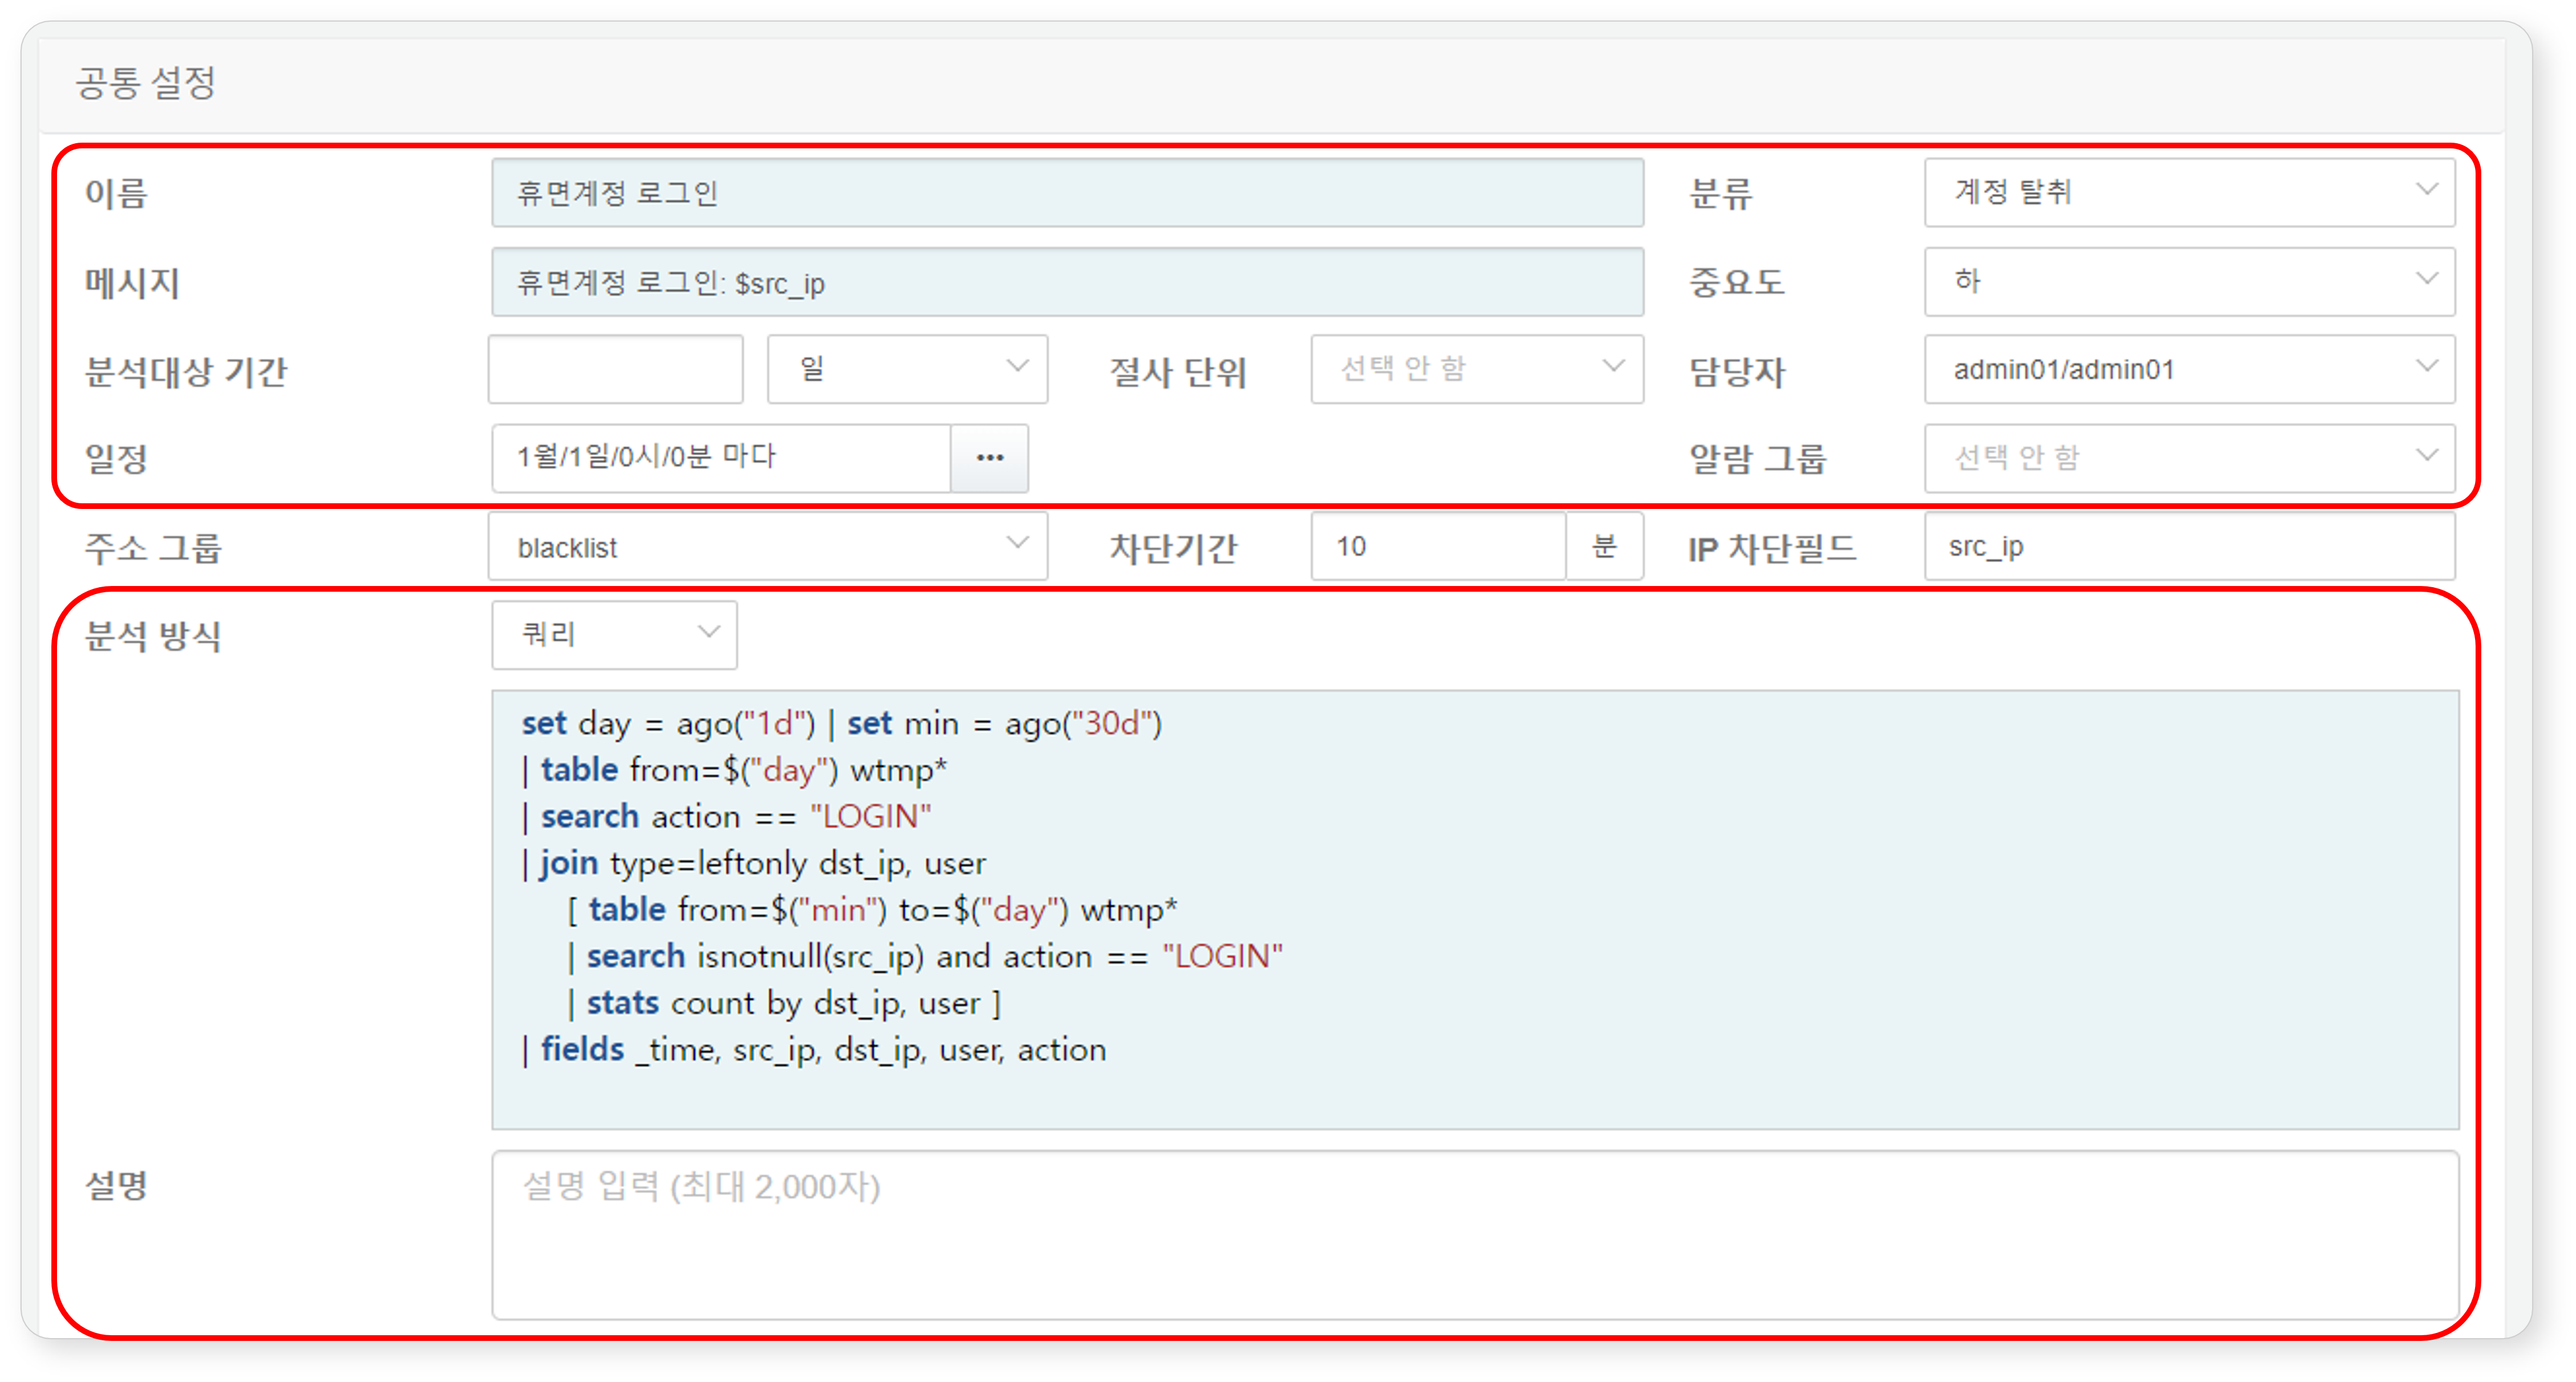
On the Add Batch Rule screen, enter the following basic settings:
-
Name: Unique name for the batch rule (up to 50 characters). Rule names cannot be duplicate.
-
Category: Batch rule category. You can add a rule category by clicking Categories in the toolbar. If no category is set, no ticket will be issued.
-
Message: Title assigned to the ticket upon event detection
- Use field names defined in the log schemas in the format
$fieldor$field$, the message is generated by fetching the field value from the log that was the basis for the event detection (e.g.,$src_ip). For fields containing Korean characters, always use the$FieldName$format. - If Detect Duplicates on field is not set in Advanced settings, it will prevent duplicate tickets from occurring based on whether the generated message (up to 2,000 characters) is identical or not.
- Use field names defined in the log schemas in the format
-
Priority: Severity of detected events (high, medium, low).
-
Time Window: If Analysis Method is set to Query, this defines the time range for data analysis. It Defines the time range for data analysis by calculating values for the
fromandtoparameters. Enter a numeric value with a time unit (seconds, minutes, hours, days). The default is set to None.-
To use this function, the query must include
from=$("from") to=$("to")within the command fetching data (e.g.,table). -
For example, if the Time Window is set to 30 days, a query such as
table from=$("from") to=$("to") FW_*retrieves data from tables whose names start with "FW_ within the last 30 days from the execution time. (Range: 1–3,153,600,000)
-
-
Truncation: Time precision applied to the retrieved data. Select a time unit from the following options: None, Seconds, Minutes, Hours, or Days. The default is None.
- If Time Window is 5 minutes and Truncation unit is Seconds, milliseconds will be discarded and timestamps will be rounded to the nearest second.
-
Assign to: User account to assign the issued ticket to. You can select more than one account. If unspecified, the ticket is created without an assignee.
-
Schedule: Execution interval of the detection rule. Click the ... button to configure the schedule using CRON syntax.
-
Alarm Group: Alarm group to receive alarms when an event is detected.
NoteAlarm reception settings must be configured within the selected Alarm Group.
-
Analysis Method: Mmethod of data analysis to be executed according to the schedule (Default: Query).
-
Dataset: Choose a training dataset from the Dataset list.
-
Query: Enter a query (up to 5,000 characters).
<!-- 실시간 배치 탐지 시나리오는 메시지 또는 중복 기준 필드에 입력된 필드를 기준으로 중복된 티켓 발생 여부를 판단합니다. 쿼리 결과의 그룹 키로 사용. 쿼리 결과는 메시지 또는 중복 기준 필드키 필드를 기준으로 정렬된 후 그룹화되어 하나의 이벤트 및 티켓을 생성합니다. 하는 데 사용. 메시지의 필드이름 매크로는 키 필드 값으로 대체되고, 동일한 키 필드 값을 가진 다수의 레코드는 티켓의 근거 자료로 취합됨. -->
-
-
Description: Detailed description of the batch rule (up to 2,000 characters).
-
-
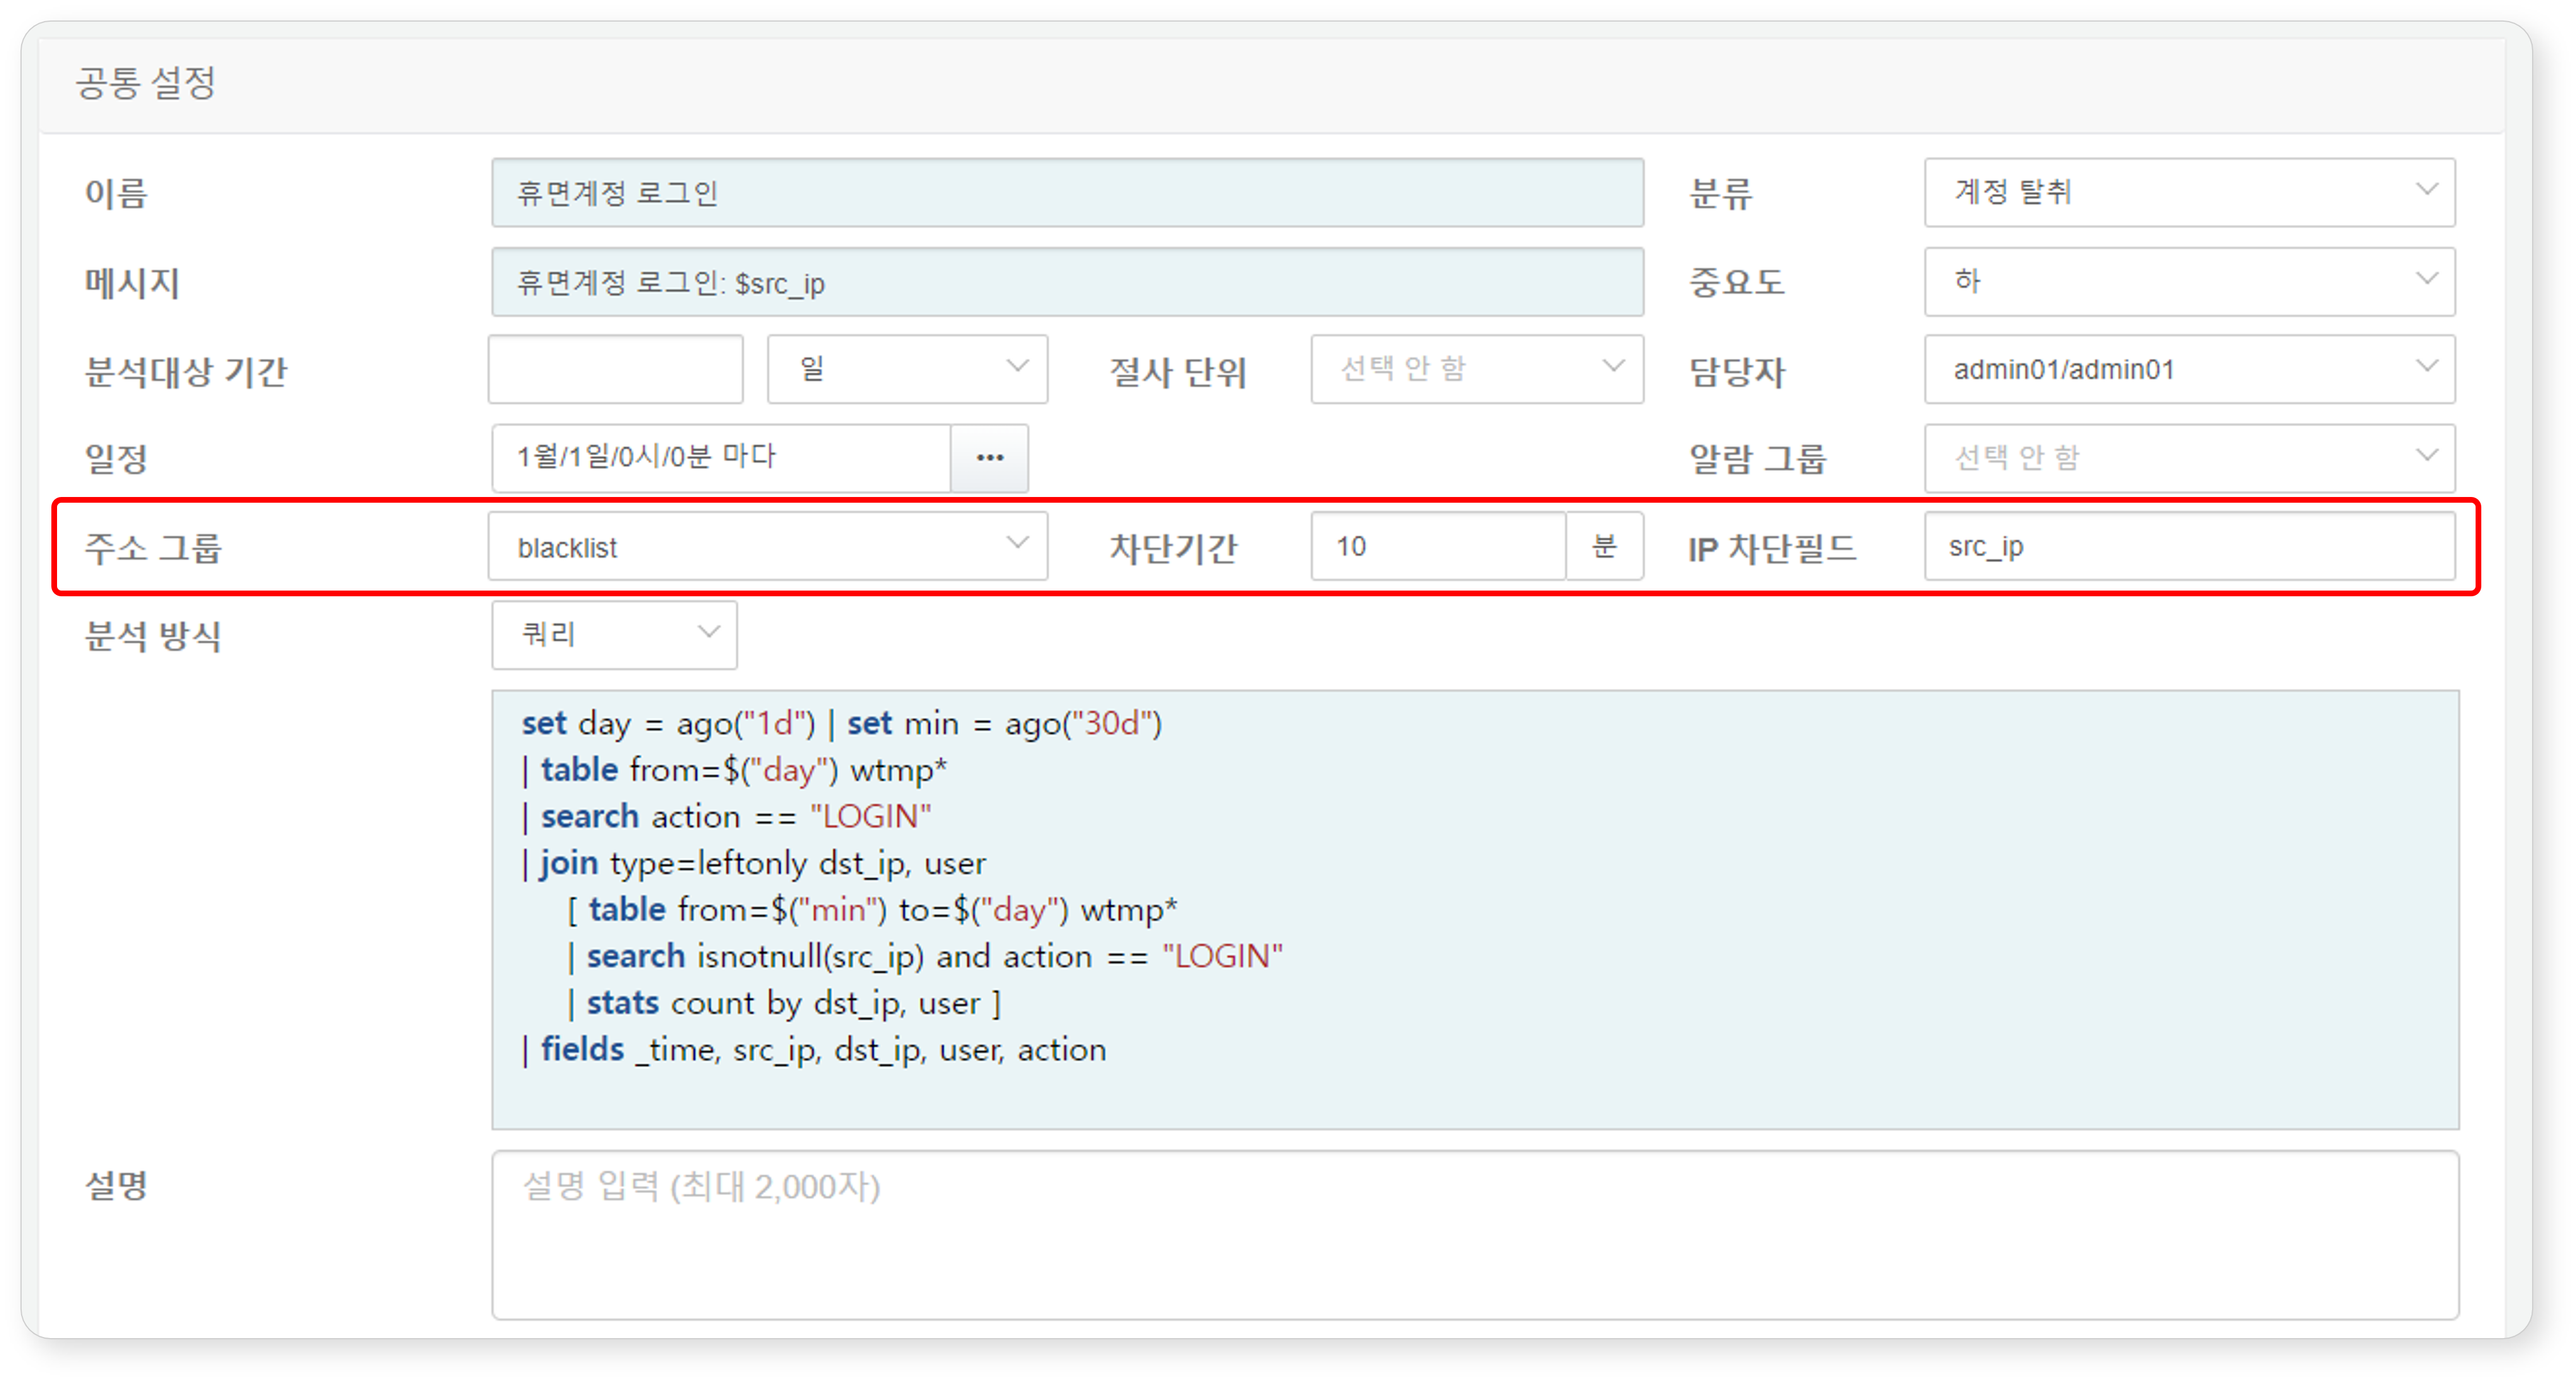
To separately manage the attacker's IP address or abnormal actor's IP address, or to forward address group information to firewalls or IPSs, configure the following settings:
-
Address Group: Address group to which the value (IP address) of the field specified as IP Field is added.
-
Retention: Duration (in minutes) to retain the IP address in the address group. Once the specified blocking period expires, the IP address is automatically removed from the address group. If unspecified, the IP address remains permanently (range: 1–100,000,000).
-
IP Field: Field name containing the IP address to be added to the address group upon event detection. Enter the name of the IP-related field defined in the log schema (e.g.,
src_ip,dst_ip) (up to 50 characters).NoteFor integration with third-party security systems for blocking actions, refer to 'System > Response Targets.'
-
-
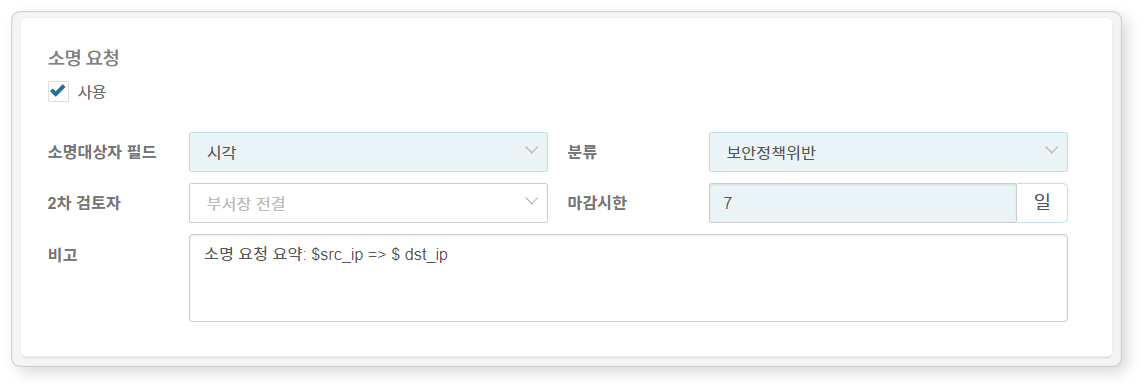
If the detected event involves an employee of the organization, you can request an explanation from the employee.
-
Explanation Request: Whether to request an explanation from the employee or personnel involved in the detected threat or event. (default: disabled).
-
Employee: Field containing the employee ID of the employee responsible for the detected evnet.
When a threat is detected, an explanation request email is automatically sent to the employee mapped to the specified employee ID. In this case, make sure that employee information (employee ID, account, email) is configured under Policies > Employees.
-
Category: The classification of the explanation request. If necessary, additional categories can be configured under Response > Explanation > Categories.
-
Auditor: The secondary reviewer of the explanation submitted (if not set, defaults to "Department Head"). For more details about primary and secondary reviewers, refer to Explanations.
-
Due Date: The deadline for submitting an explanation (default: 7 days). After the deadline, the employee will no longer be able to submit an explanation.
-
Note: Additional information to include in the explanation request email. The input text will be inserted into the email/SMS template where the
$user_notemacro is located. If you insert field names defined in the log schema using the$FieldNamemacro format, the field values will be substituted in the message. You can view the additional notes in the detailed explanation view under Response > Explanations. (Up to 10,000 characters)
NoteTo request an explanation, a field named "emp_key" is required. If this field does not exist, click **Query** in Step 5 and create an "emp_key" field by writing a query that maps user accounts or IP addresses to employee IDs.
-
-
To issue a ticket upon event detection, configure the Advanced settings.
-
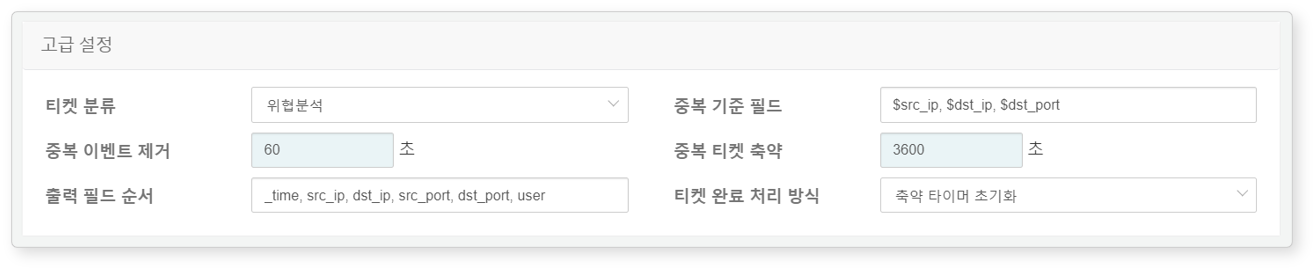
Ticket Category: Ticket Category required to classify tickets during security operations. (Default: None)
NoteTo automatically generate a ticket upon event detection, you must specify a ticket category.
-
Ticket issuance can also be controlled within playbooks triggered by events. If you intend to control ticket creation within a Playbook, do not set this option here. ```
-
Detect Duplicates on: Specify fields used to detect duplicate tickets, using the macro format (e.g.,
$field_name), separated by commas (,). Maximum length is 2,000 characters. If not specified, the Message string is used as the default criterion.```note For example, if the message field is configured as "C&C Server Connection: $src_ip -> $dst_ip," but you want to prevent excessive ticket generation when the same host connects to different C&C servers, set the duplicate detection key to `$src_ip`. ``` -
Detect Duplicates for: Duration during which duplicate events are ignored after a ticket is issued. (Default: 0, Range: 0–86,400 seconds).
- If set to "0": Behavior is determined by the Reassign Tickets for setting.
- If set to a nonzero value: Duplicate events are ignored for the specified duration and are not included as supporting data in the ticket.
-
Reassign Tickets for: Duration during which new tickets are not created for recurring events; instead, supporting data and occurrence counts are added to the existing ticket. (Default: 3,600 seconds, Range: 0–86,400 seconds) - If set to "0": A new ticket with the same title is created for each event occurrence. - If set to a nonzero value: Supporting data and occurrence counts are added to the existing ticket during the specified period.
-
Field Order: The order in which log data fields appear in the ticket’s supporting data. Enter field names in the desired order, separated by commas (,). Maximum length is 2,000 characters. Special characters and pipe (|) symbols are not allowed.
-
On Closing Ticket: How to handle tickets after they are closed when Reassign Tickets for is enabled (Default: Reset Ticekt Timer). - Keep Ticket Timer: Even after a ticket is closed, if the same threat event occurs before the merge timer expires, supporting data and occurrence count are added to the closed ticket. - Reset Ticket Timer: When a ticket is closed, the merge timer is also considered expired, and a new ticket is created for subsequent identical threat events.
-
You can simulate the execution of a batch rule at a specific point in the past or future. In the batch rule simulation section, set a execution time, and then click Run.
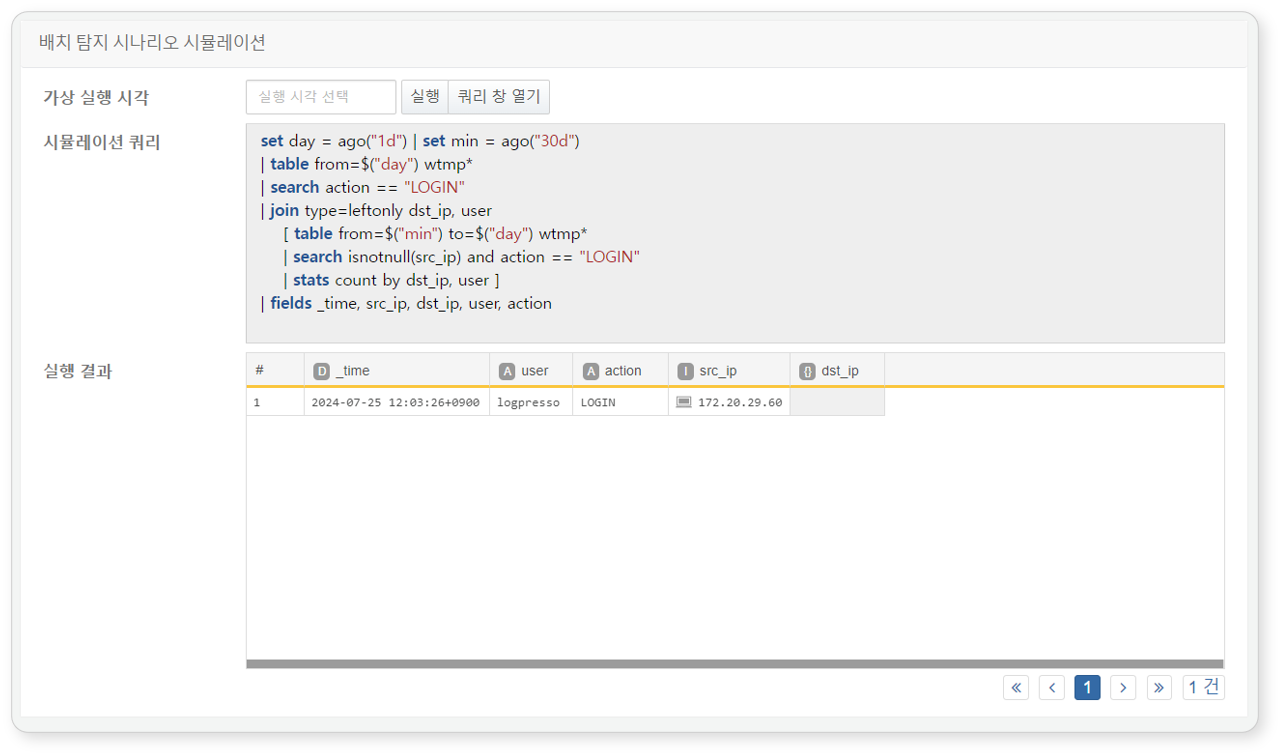 NoteThe batch rule simulation cannot be executed if the query contains an invalid syntax, references a nonexistent data table, or encounters other execution issues.
Duplicate Batch Rule
To duplicate an existing batch rule:
- In the list of batch rules, select the checkbox for the rule you want to duplicate.
- The action menu appears in the toolbar. Click Duplicate.
- In the Duplicate Batch Rule dialog box, review the selected rules and click Duplicate. To cancel, click Cancel.
- The duplicated rule is added in a disabled state with the name "Copy of [Original Rule Name]".
Edit Batch Rule
To edit a batch rule:
- In the list of batch rules, click the name of the batch rule you want to edit.
- In the Edit Batch Rule screen, update the information, then click OK. For descriptions of the editable properties, refer to Add Batch Rule.
Run Batch Rule
To run a batch rule manually:
- In the list of batch rules, click the name of the batch rule you want to run.
- The action menu appears in the toolbar. Click Run Now.
- If the rule detects an event, you can check the detection results in Response > Tickets or Analysis > Event Summary.
Delete Batch Rule
To delete a batch rule:
- In the list of batch rules, select the checkbox for the rule you want to delete.
- The action menu appears in the toolbar. Click Delete.
- In the Delete Batch Rule dialog box, review the selected rules and click Delete. To cancel, click Cancel.
Rule Categories
You can add, edit, or delete rule categories. For more details, refer to Stream Rules – Rule Categories.