Scheduled Queries
Scheduled queries are queries that run either periodically on a fixed schedule or at specific times, or are triggered by the result of another scheduled query. In a cluster environment, scheduled queries typically run on the control node, but they can also be configured to run on a data node if necessary.
Scheduled Query List
You can view the list of scheduled queries under Analysis > Scheduled Queries. If there are many scheduled queries, the list will be divided into multiple pages. A maximum of 15 scheduled queries can be displayed on one page.
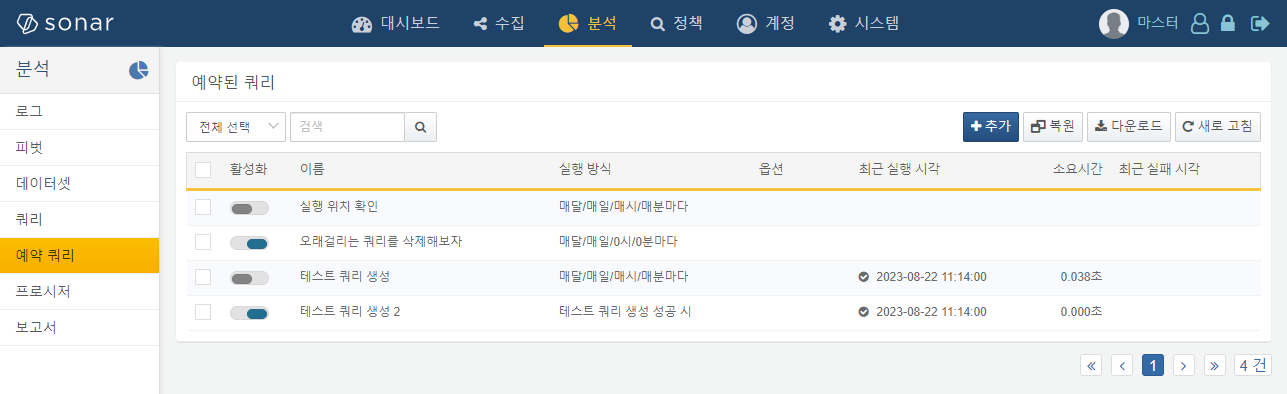
The scheduled query list displays the following information:
-
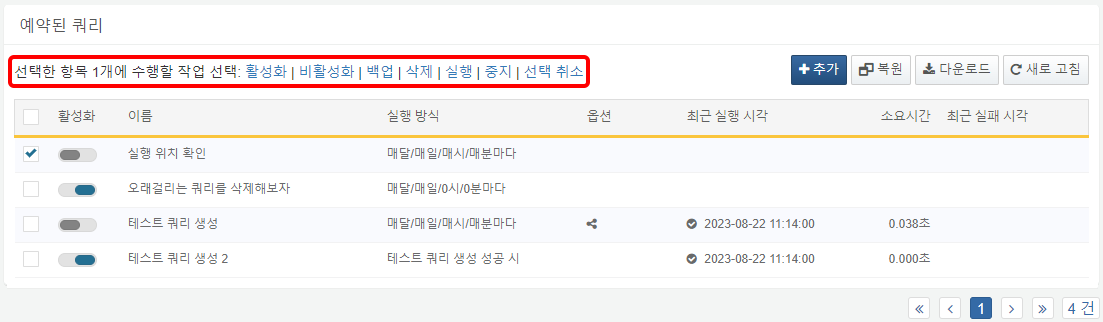
Checkbox: Used to select scheduled queries for management tasks. Clicking the checkbox will display a list of available actions as shown in the following image.
-
Enabled: Toggle switch to enable or disable the scheduled query. A blue icon (
 ) indicates that the query is enabled, while a gray icon (
 ) indicates it is disabled. Click the switch to toggle the activation status.
 -
Name: The name used to identify the scheduled query.
-
Execution Rule: Indicates how the query is executed. This displays the schedule or the name and execution results of another scheduled query that serves as the execution condition. If no execution method is specified, it is marked as Manual.
-
Options: Indicates whether output control settings are enabled. Output control is an option that determines whether the last row of the query output is passed as input to the next query. Scheduled queries with output control enabled will display the output control icon (
 ).
). -
Last Run: The most recent execution time and status information for the scheduled query.
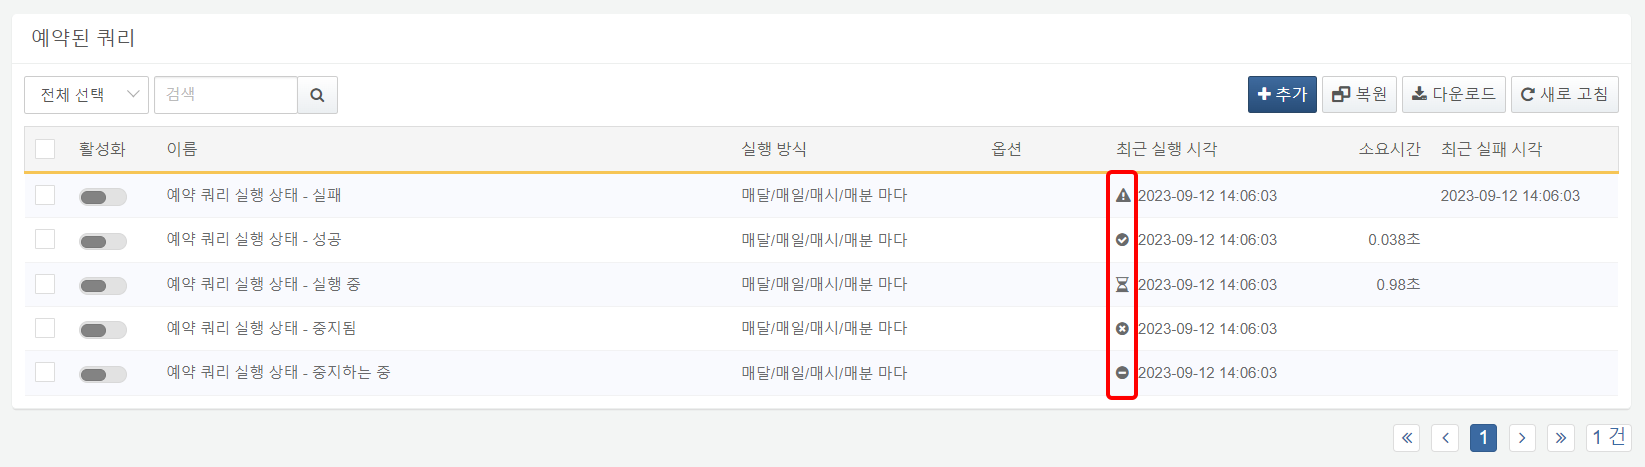
The execution status of the query is indicated by the following icons:
 : Success
 : Failure
 : Stopped
 : Running
 : Stopping
Hovering over the status icon in the Last Run field or the Last Failure will display a tooltip with the reason for the failure.
-
Elapsed: The time taken to execute the query. If the query is currently running, this shows the elapsed time since the query started.
-
Last Failure: The time when the most recent query execution failed.
Download Scheduled Query List
To download the scheduled query list:
-
Click Download on the toolbar.
-
In the Download Scheduled Query List dialog, specify the properties of the file to be downloaded and click OK.
- File Name: The name of the file to be downloaded.
- Columns: Select the fields to include in the downloaded list. The default is all fields selected.
- File Format: Choose one from CSV, JSON, HTML, Excel XML, or Microsoft Word (default: CSV).
- Encoding: Select the string encoding format for the file.
- Range: Select the range of scheduled queries to include in the file. By default, all scheduled queries are included. The first query at the top of the first page in the list is indexed as No. 1.
-
When the server sends the file to your web browser, save it and open the downloaded file to view the list of scheduled queries.
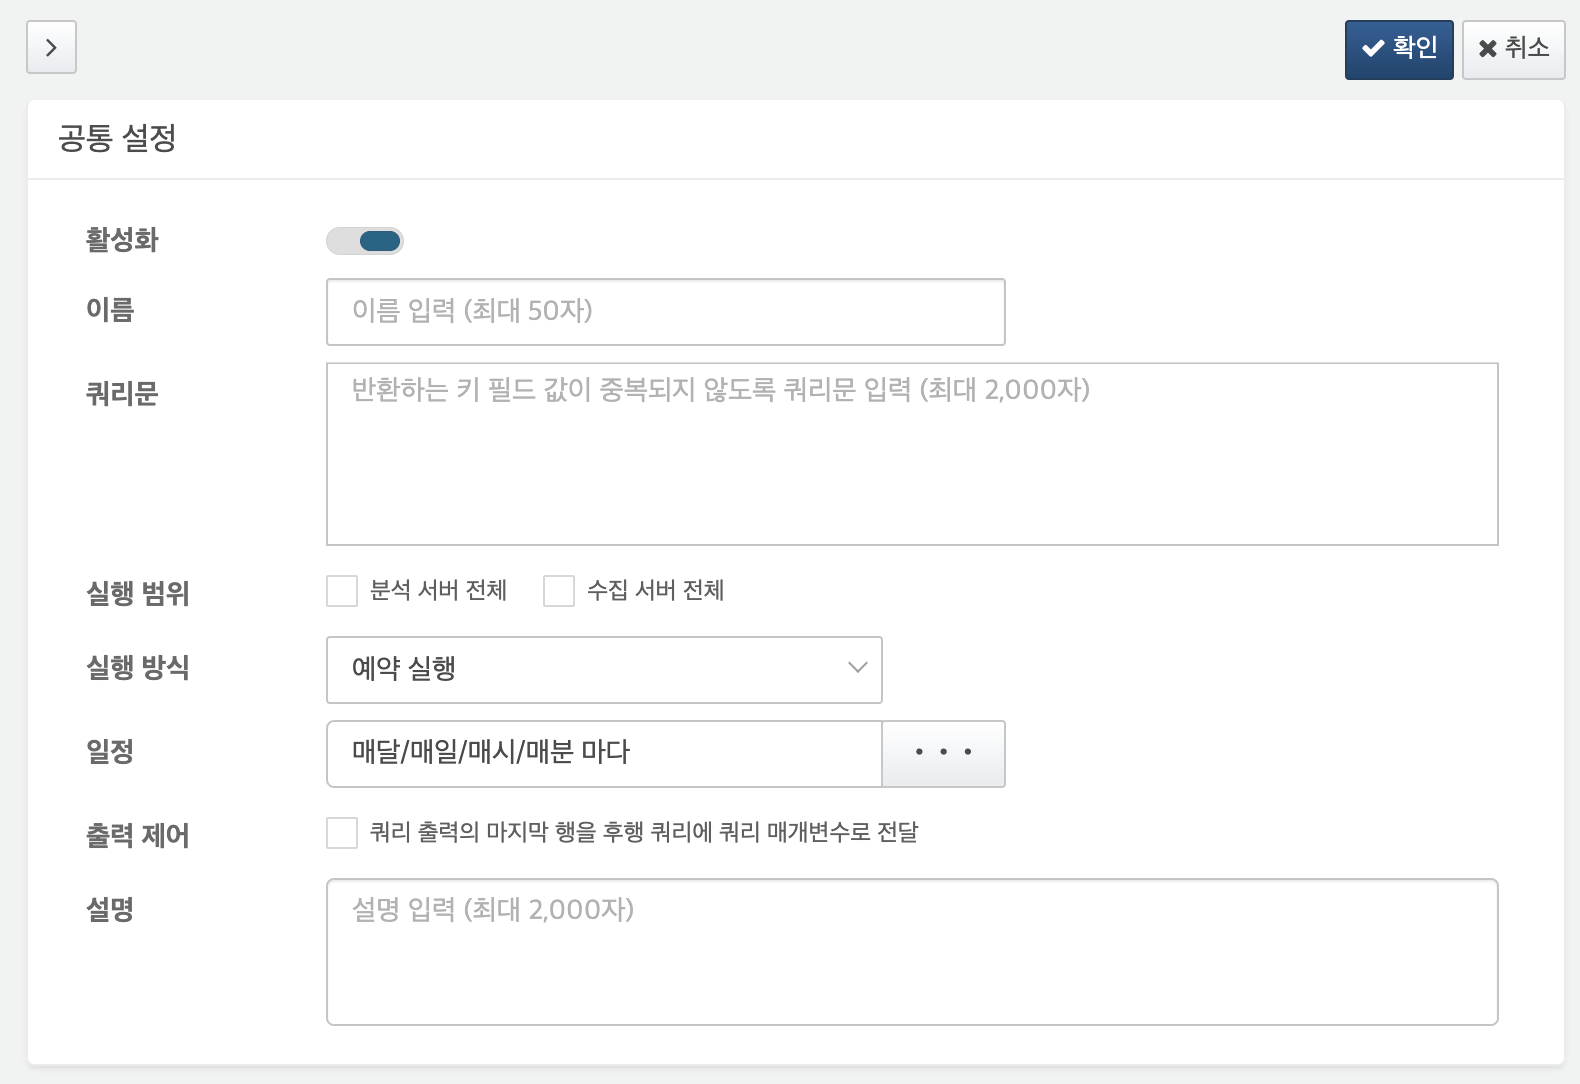
Add Scheduled Query
To add a scheduled query:
-
Click Add on the toolbar.
-
In the scheduled query panel, specify the properties of the scheduled query.
-
Enabled: Toggle whether the scheduled query is enabled.
-
Name: The name to display in the list. Korean characters and special symbols are allowed, but the name must be unique and not duplicate any existing scheduled query.
-
Query Statement: The Logpresso query to execute (up to 10,000 characters).
-
Scope: Select nodes where the query will be executed. Choose from All control nodes, All data nodes, or All Forwarders. If none are selected, the query will run only on active control nodes.
-
Execution Rule: Choose how the query should be executed.
- Schedule: Executes periodically according to the execution schedule.
- Condition: Executes based on the completion, success, or failure of another scheduled query.
-
Schedule: An option used when the Execution Rule is set to Schedule. The input format is the same as the CRON settings of Unix-based operating systems. You can check it using the command "
man 5 crontab" on Linux systems. You can either enter the settings directly or use the scrollbar to specify them. If the execution period is already running, it will not execute again.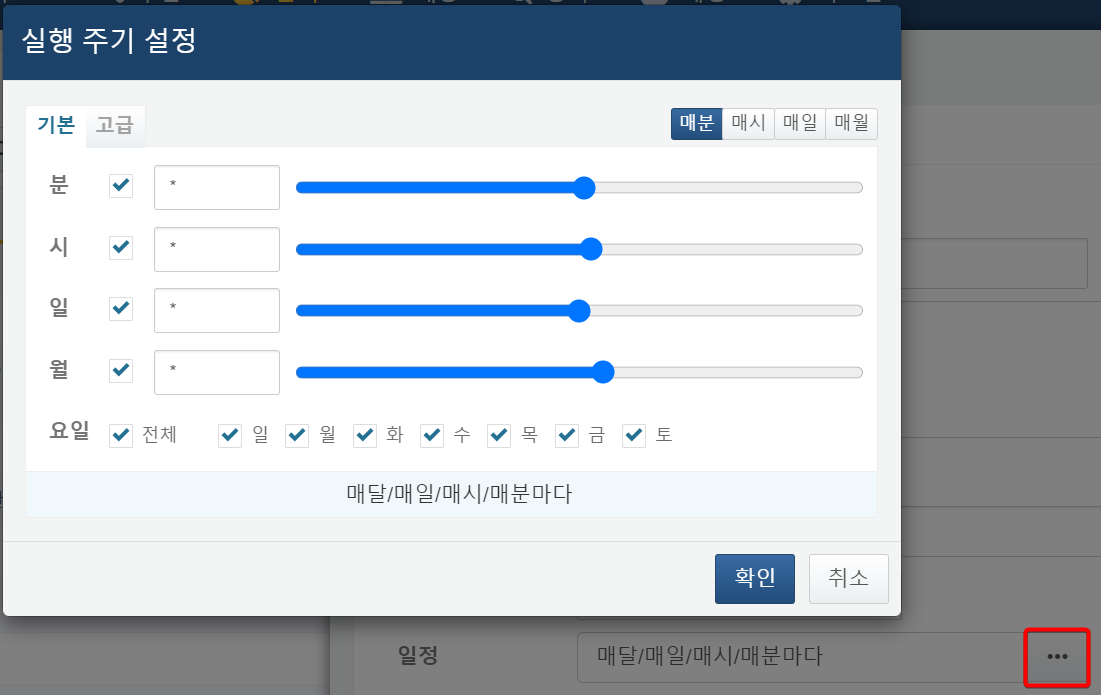
-
Condition: Used when Execution Rule is set to Condition. Select after finished, after succeeded, or after failed, and choose the preceding query from the scheduled query list.

- after finished: Executes the scheduled query regardless of the execution result (success or failure) of the preceding query.
- after succeeded: Executes the scheduled query only if the preceding query is successful.
- after failed: Executes the scheduled query only if the preceding query fails.
-
Pass Result: Enable this if the result of this scheduled query should be passed as a parameter to another scheduled query. For correct use, the query must return a single row, and the downstream query must define a parameter with the same name as the one populated by the upstream query.
-
Description: A description of the scheduled query.
-
-
Confirm that all settings are correct in the scheduled query panel.
- To save the query, click OK in the top right corner of the panel.
- To cancel without saving, click the > (close button) in the top left corner.
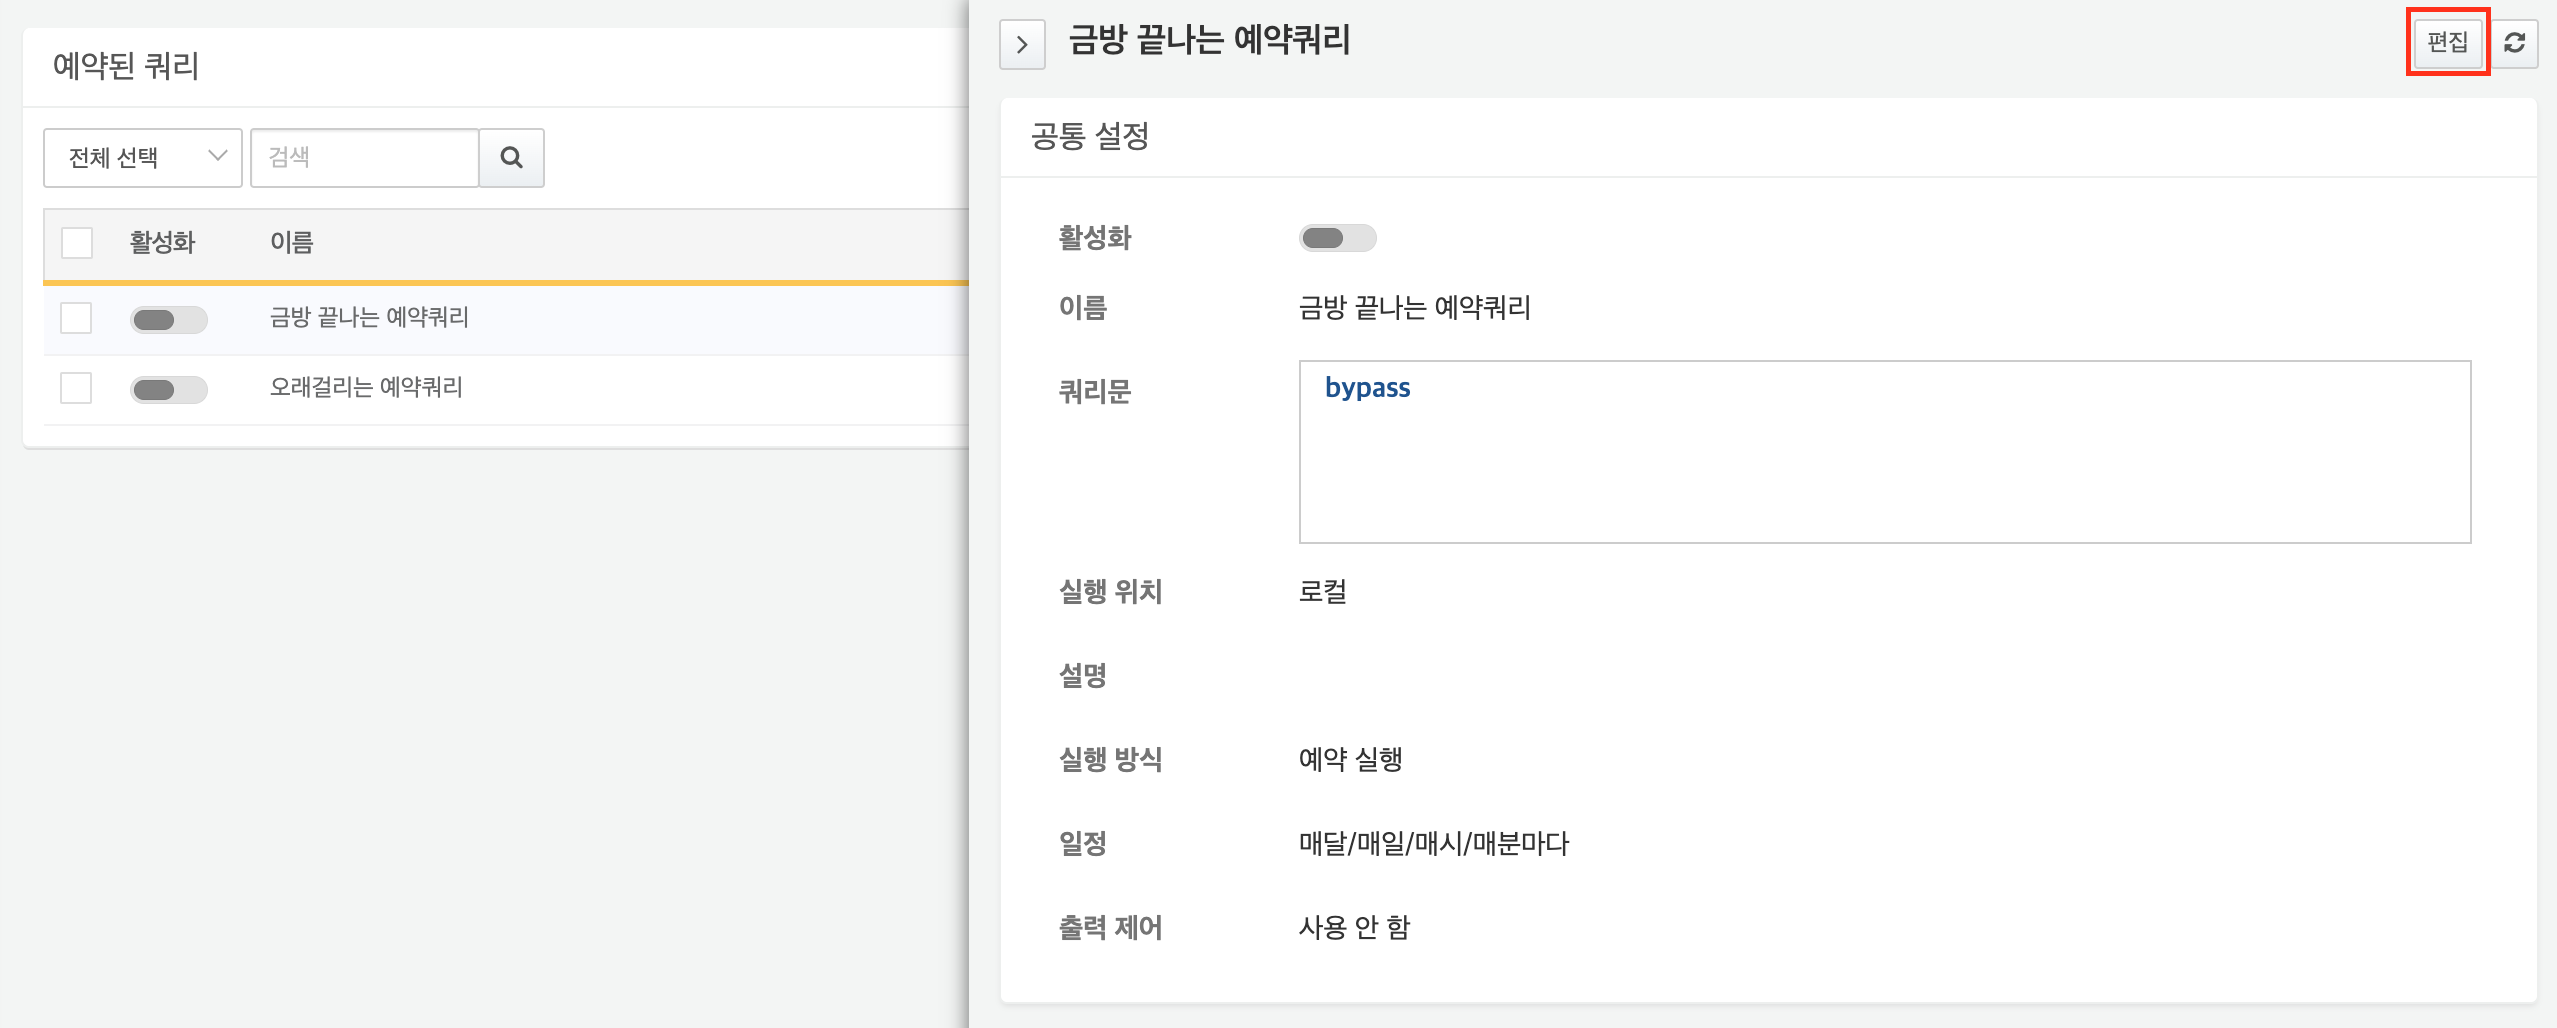
Edit Scheduled Query
To modify a scheduled query:
-
In the scheduled query list, click the name of the scheduled query you want to edit.
-
In the scheduled query panel, click Edit.
-
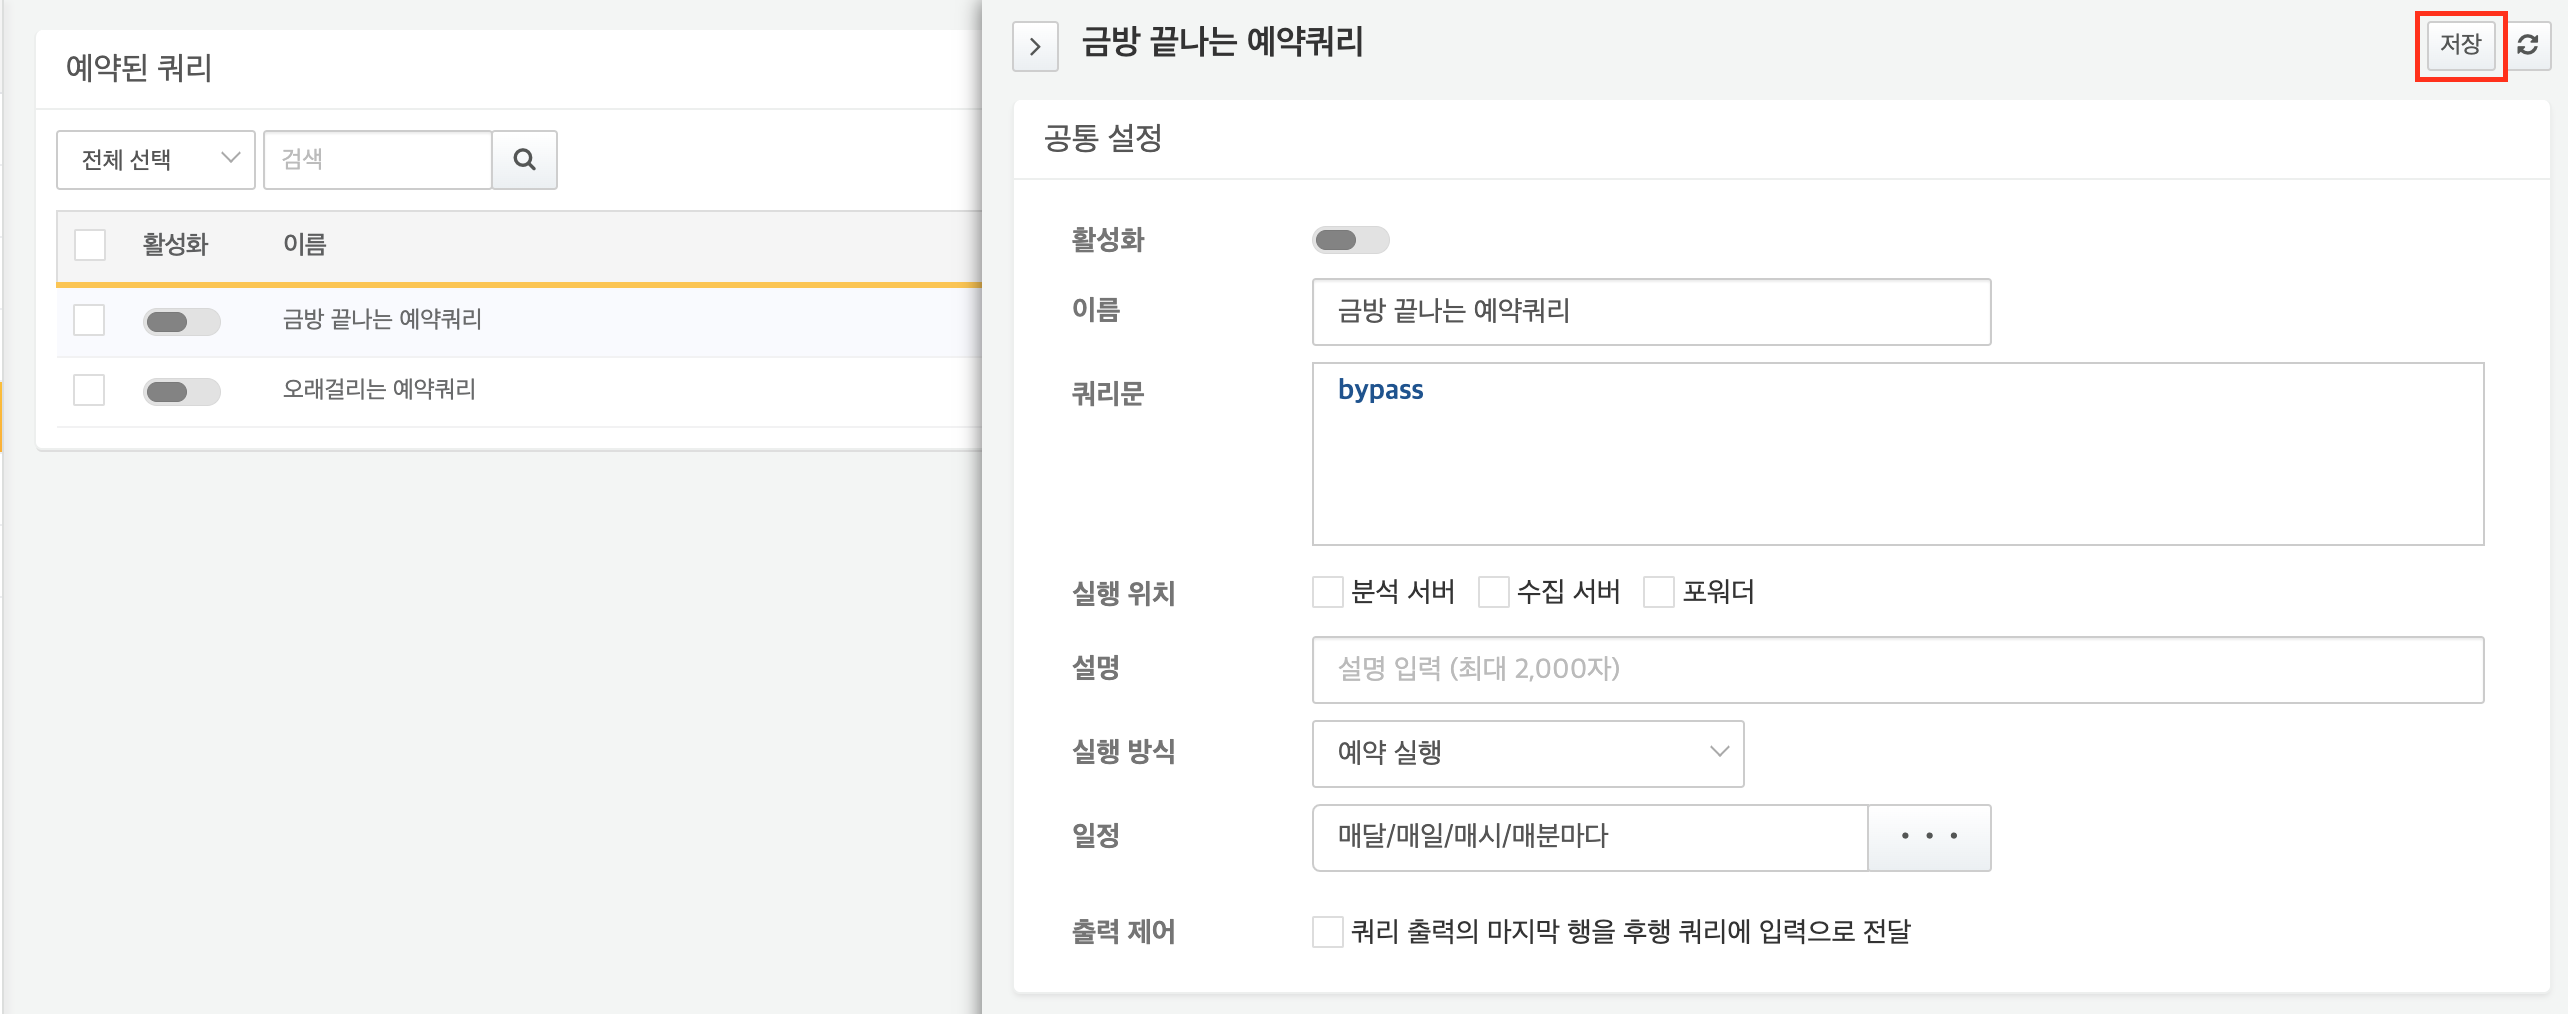
Modify the properties of the scheduled query.
-
Review the modifications.
-
To save the changes, click OK in the upper right corner of the panel.
-
To cancel the modifications, click the ">" (close button) in the upper left corner of the panel.
-
Enable/Disable Scheduled Query
You can determine whether a scheduled query is enabled by checking the color of the Enable switch. Enabled queries appear in blue (), while disabled queries appear in gray ().
To enable/disable a single scheduled query:
- Click the Enable switch of the scheduled query you wish to enable/disable in the scheduled query list.
To enable/disable multiple scheduled queries at once:
- Click the checkbox of the scheduled queries you wish to enable/disable in the scheduled query list.
- Click Enable or Disable from the actions list.
Deactivating a running scheduled query will stop the currently executing query.
Run Scheduled Query
You can manually run a scheduled query or stop a running scheduled query, regardless of its execution rule.
When a user manually runs a scheduled query:
- Even if the scheduled query is deactivated, it can still be executed manually.
- If the result of the preceding query is specified as a condition for executing subsequent query, and the subsequent query is active, it will also be executed automatically.
To manually run or stop a scheduled query:
-
Click the checkbox of the scheduled query you wish to run/stop in the scheduled query list. Clicking the checkbox in the header field will select all scheduled queries on the current page.
-
Click Run or Stop from the actions list.
-
If you attempt to run a query that is already in progress, the following dialog appears. Select how you want to proceed and click OK.
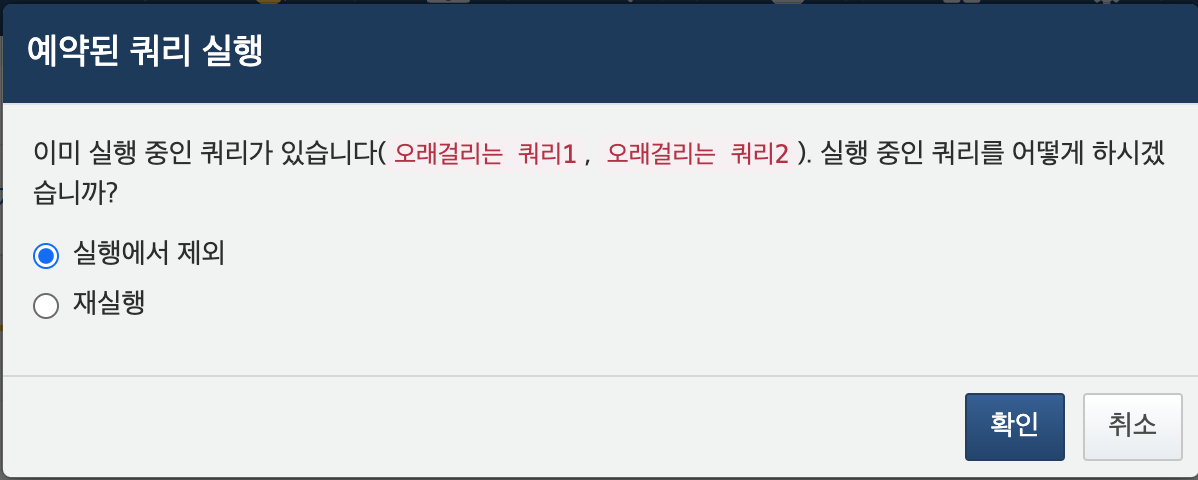
- Skip: Excludes queries that are already running and only executes the others.
- Re-run: Stops the currently running query and re-runs it along with the other queries.
-
Click Cancel to cancel the execution task.
-
-
In the Last Run field, check the icon to confirm the current execution status of the query.
Export Scheduled Query
To export a scheduled query to your local PC as a file:
- In the scheduled query list, check the box next to the queries you want to export. To select all queries on the current page, click the checkbox in the header row.
- In the action list, click Export. The server will send a file to your web browser.
- Once downloaded, verify that the file has been saved. The file name will follow the format:
scheduled-query-yyyymmdd-hhMMss.zip.
Import Scheduled Query
You can restore scheduled queries from a previously exported file, or import scheduled queries exported from another server to the current one.
To import a scheduled query:
-
Click Import on the toolbar.
-
In the Import Scheduled Query dialog, specify the path to the exported file and click OK.

-
Check the scheduled query list to confirm that the queries have been restored.
Delete Scheduled Query
To delete a scheduled query:
-
In the scheduled query list, check the box next to the query you want to delete. To select all queries on the current page, click the checkbox in the header row.
-
Click Delete on the toolbar.
-
In the Delete Scheduled Query confirmation dialog, verify that the name of the query to be deleted is correct.
-
Click Yes to proceed with the deletion, or click No to cancel.

-
If the scheduled query to be deleted is currently running, a prompt will appear asking how to proceed. Select how to proceed and click Delete.
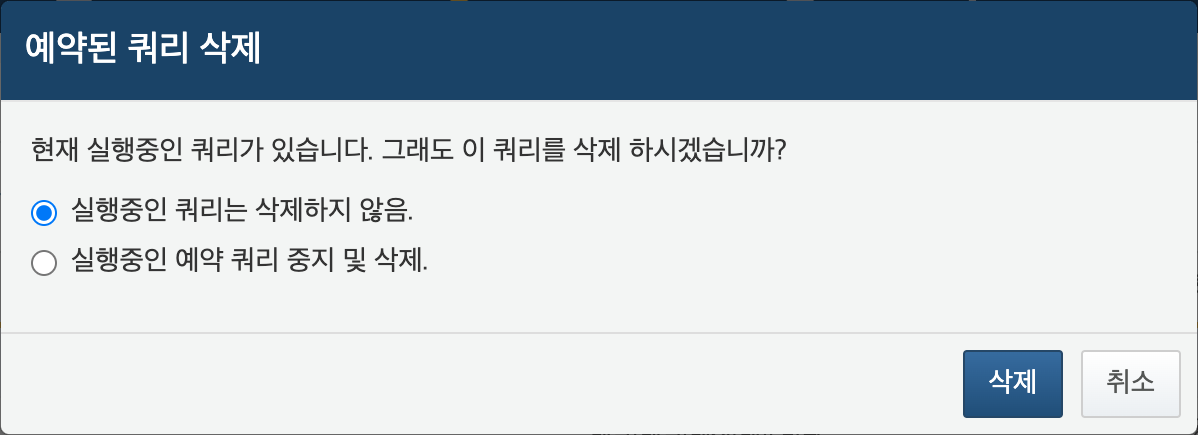
- Do not delete running queries: Deletes only the queries that are not currently running.
- Stop and delete running queries: Stops the running queries and deletes them along with the others.
-