Playbook
Overview
Playbooks automate security responses based on predefined scenarios, such as detecting events, issuing tickets, registering breach indicators, or handling user requests.
They execute predefined actions to streamline security operations. For example, playbooks can automatically block attack attempt IP using firewalls or investigate anomalous traffic and send alerts if a data breach is suspected.
The following figure illustrates how playbooks work:
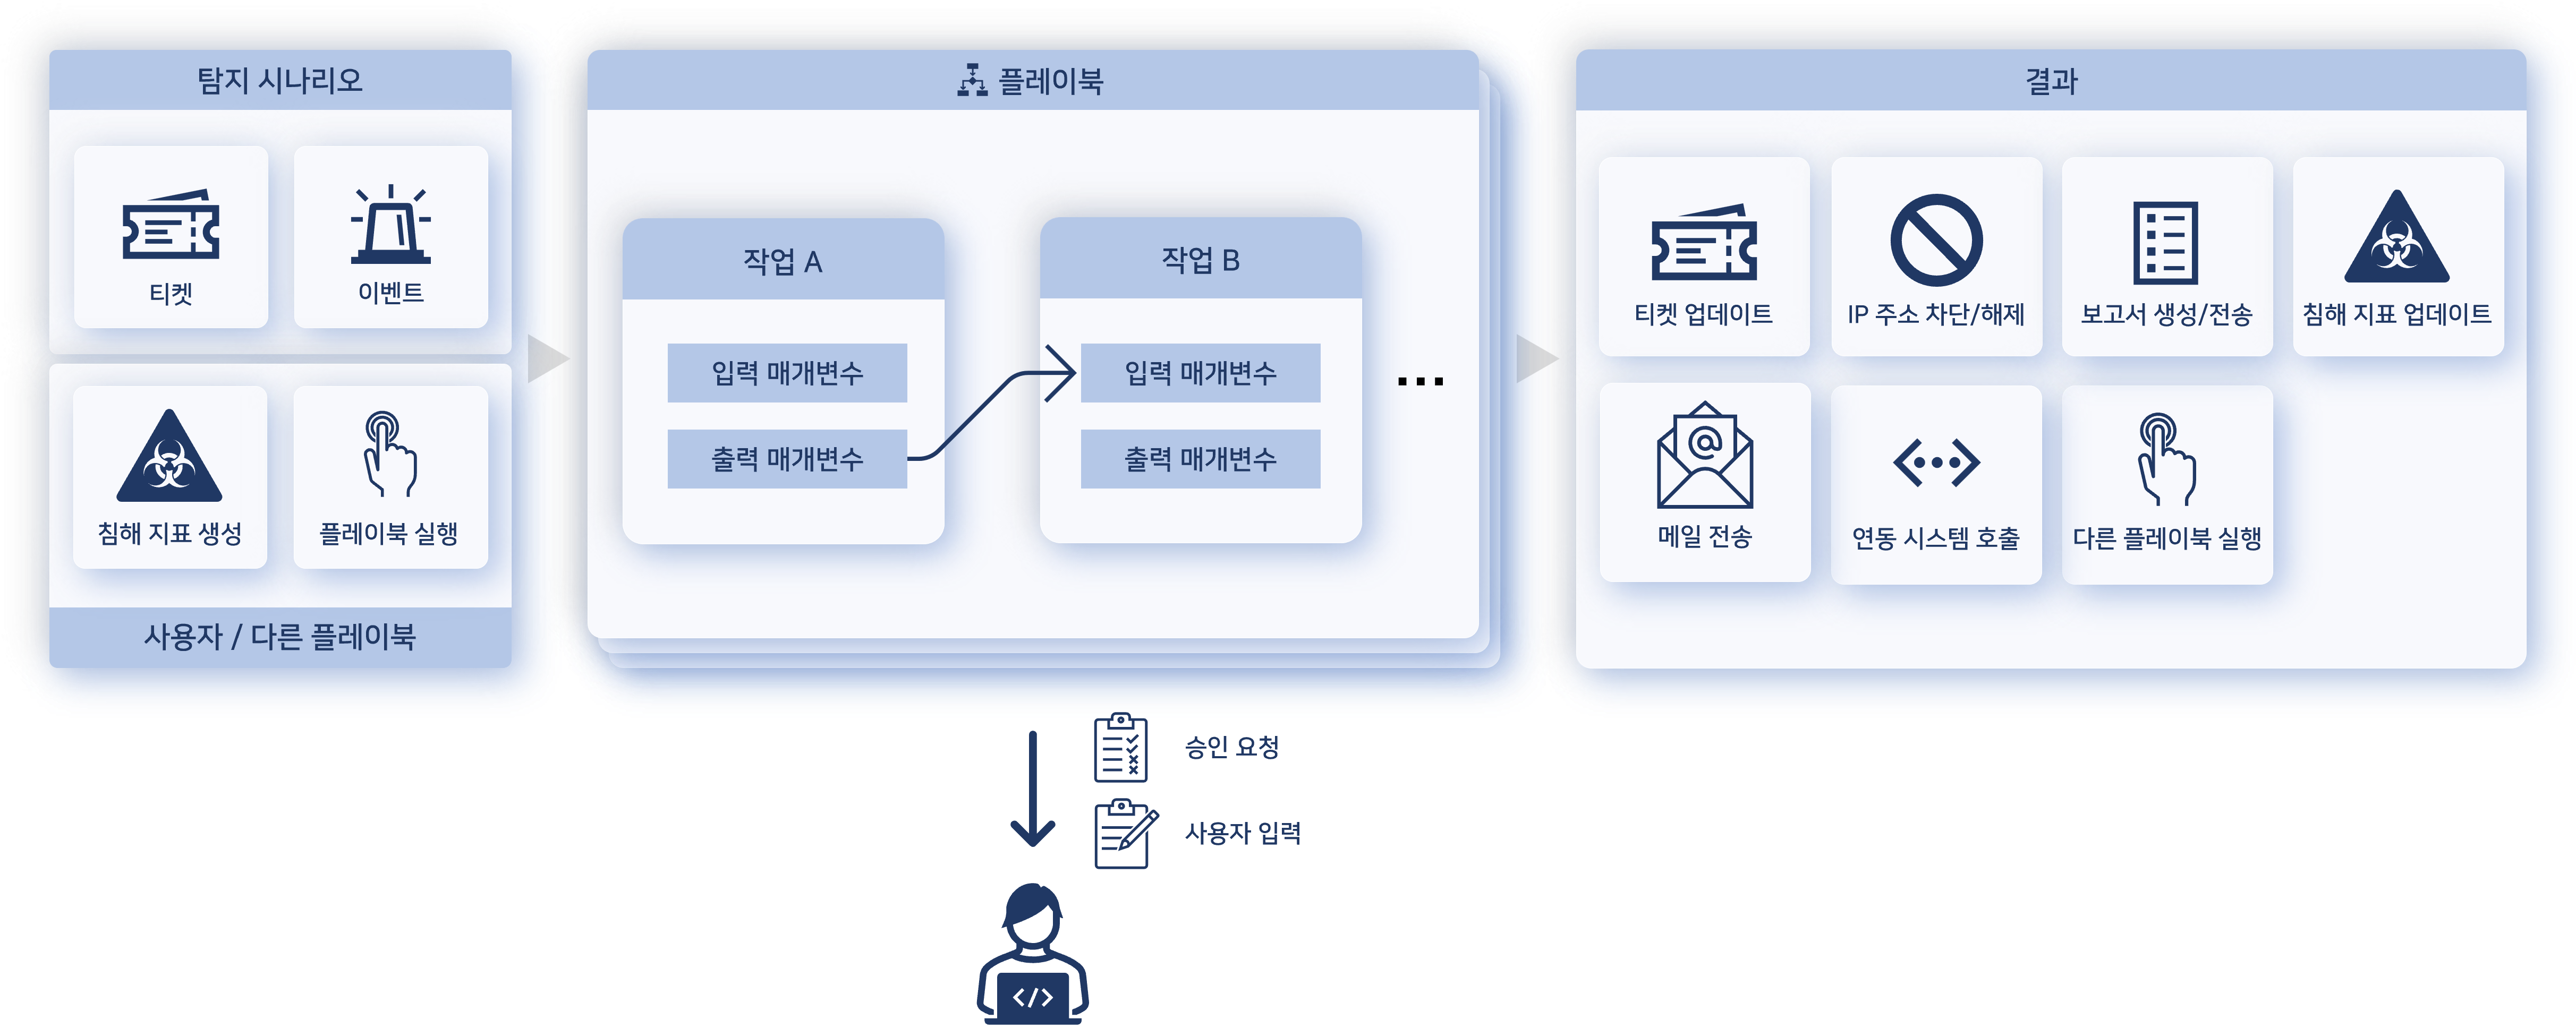
Playbooks run based on predefined conditions, executing tasks sequentially or through branching logic. Each task processes input data, performs an action, and passes results to the next task. The playbook completes when the final task finishes.
Some playbook actions require user input, such as approval or data entry. Actions needing user's approval can be found under Response > Approval Requests.
Key Benefits
- Automated Security Response
- Playbooks reduce manual effort by automating repetitive security tasks. For example, they can quarantine affected systems or analyze malicious files when an alert is triggered.
- Workflow Orchestration
- Playbooks integrate multiple security tools and systems. They can register alerts in a ticketing system, analyze logs, and share results across systems.
- Standardized Incident Response
- By following predefined procedures, playbooks ensure consistent and efficient incident handling, reducing response time.
- Real-time Threat Mitigation
- Playbooks enable real-time analysis and response, minimizing security incident impact.
- Reporting and Auditing
- Playbooks log execution history, allowing organizations to generate reports on security incident responses. This helps assess effectiveness and refine procedures when necessary.
Manage Playbook
Search Playbook
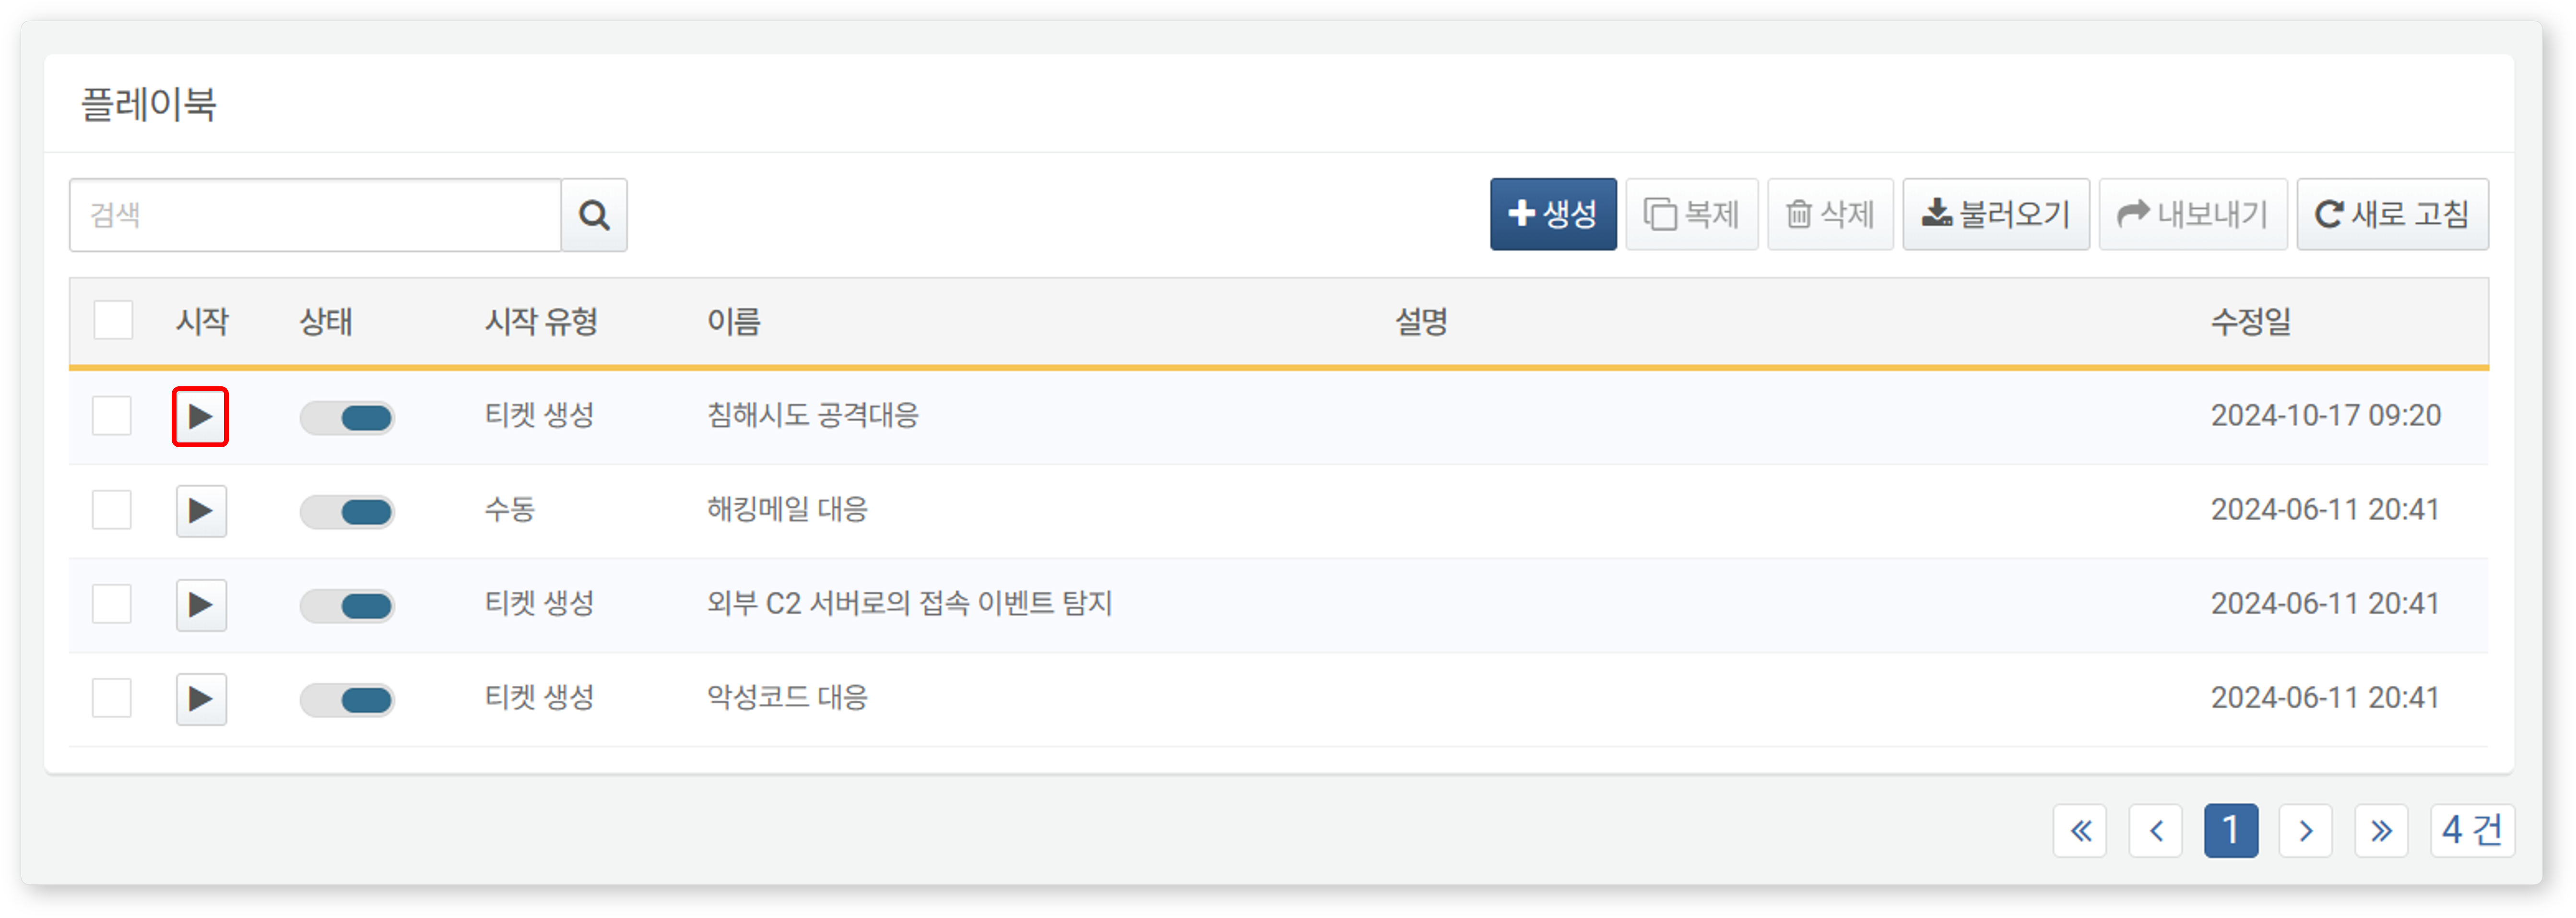
You can view and search the playbook list under Policy> Playbooks.
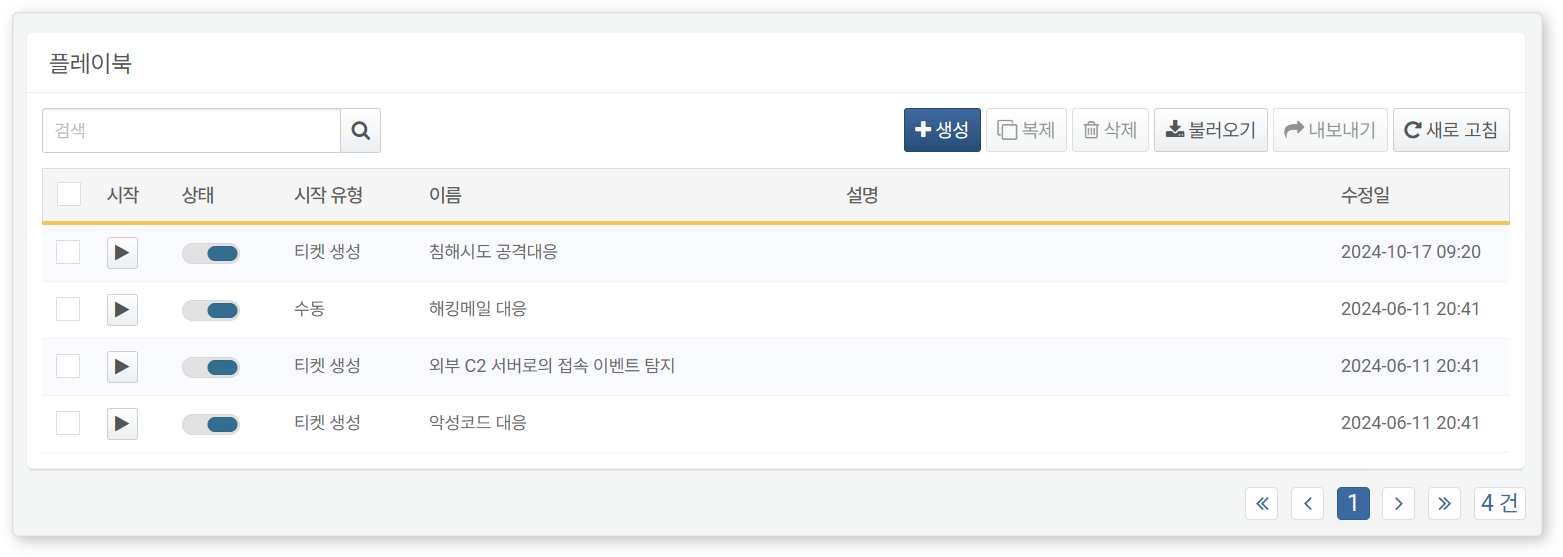
- Run: Runs playbook.
- Status: Toggle to enable the playbook (
 : Enabled,
  : Disabled)
 - Trigger: Trigger for the playbook (Manual, Ticket Creation, Event Creation, Breach Indicator Creation)
- Name: Unique playbook name
- Description: Playbook details
- Modified At: Date the playbook was created or last modified
To find a specific playbook, use the search tool in the toolbar. The search tool filters playbooks based on the entered keywords in the Name or Description fields. The search is not case-sensitive.
Refresh Playbook List
To update the playbook list with the latest information, click Refresh in the toolbar.
Import/Export Playbook
You can import/export playbooks as files for backup and restoration purpose.
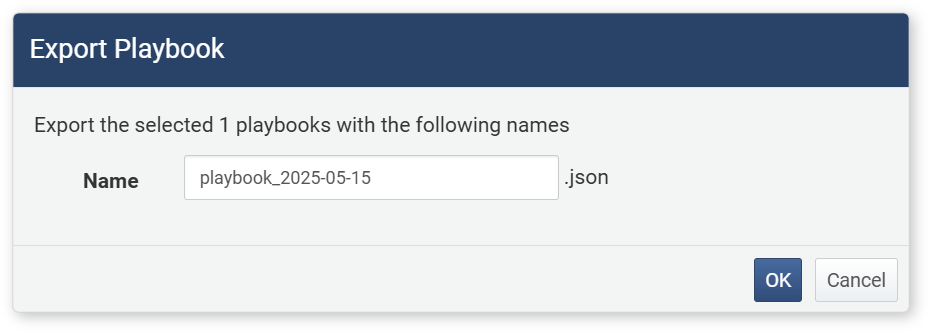
To export a playbook:
-
In the Playbook list, select the checkbox for the playbook to export. You can select multiple playbooks.
-
Click Export in the toolbar.
-
In the Export Playbook dialog box, enter a name for the export file and click OK.
To import a playbook:
-
Click Import in the toolbar.
-
In the Import Playbook dialog box, select the playbook file and click OK.
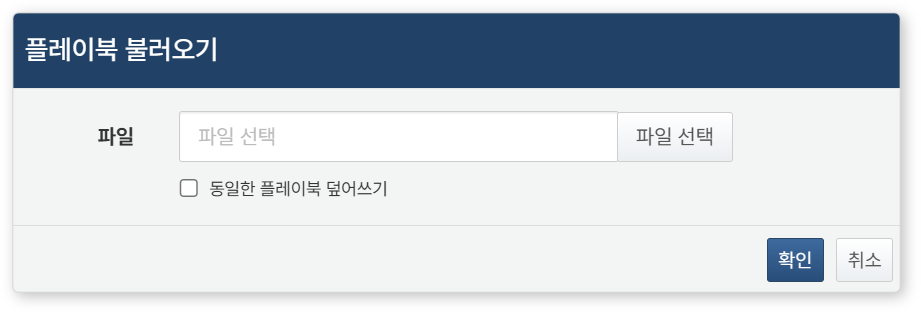
- Selecting Overwrite duplicate playbook replaces duplicate playbook (default: disabled). Duplicates are identified by GUID. If this option is not selected, playbooks with the same GUID will not be imported.
Add/Edit Playbook
To add or edit a playbook:
- In the Playbook list, click Add in the toolbar to add a new playbook. To edit an existing playbook, click its Name.
- In the Edit Playbook page, edit the playbook.
- After making changes, click Save or Save & Exit.
Run Playbook
To run a playbook manually:
-
In the Playbook list, click Run for the playbook you want to execute.
-
In the Run Playbook window, enter the required input parameters and click OK. If no input parameters are needed, the playbook runs immediately.
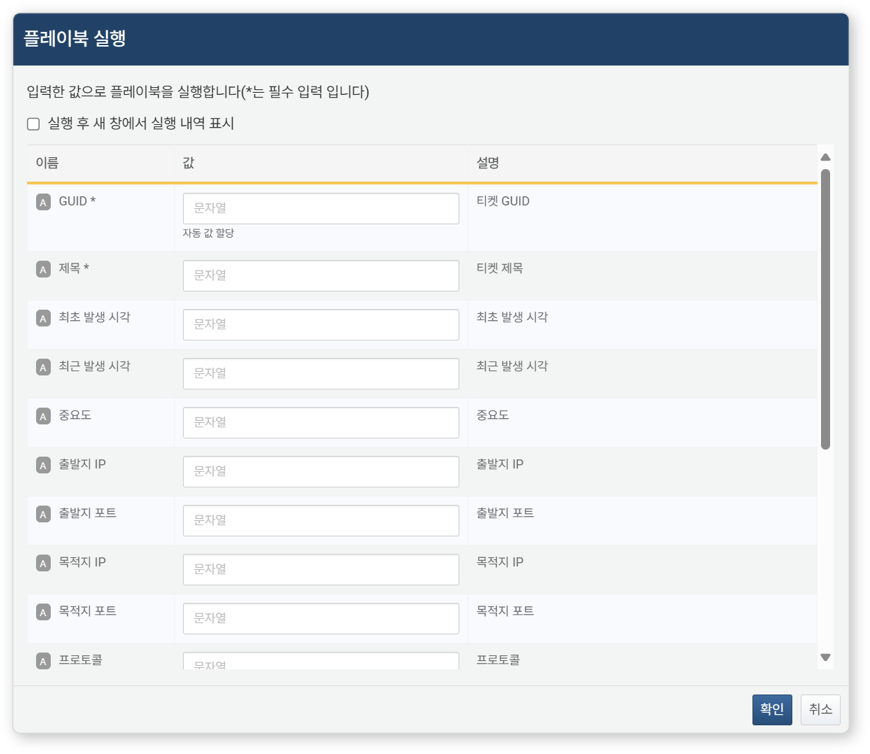
- Show execution log in a new window after running: Opens a new browser window to display execution logs (default: disabled).
- The list of input parameters varies based on the playbook's Trigger type.
-
Playbook execution logs can be viewed under Response > Response Logs.
Duplicate Playbook
Instead of creating a playbook from scratch, you can duplicate an existing one and modify it. To duplicate a playbook:
- Select the checkbox for the playbook you want to duplicate.
- Click Duplicate in the toolbar.
The duplicated playbook is saved with the name "Copy of [Original Name]". Rename and modify it as needed.
Delete Playbook
To delete a playbook:
- Select the checkbox for the playbook you want to delete.
- Click Delete in the toolbar.
- In the Delete Playbook dialog box, review the selected playbooks and click Delete to confirm. Click Cancel to abort.
Playbook Version Management
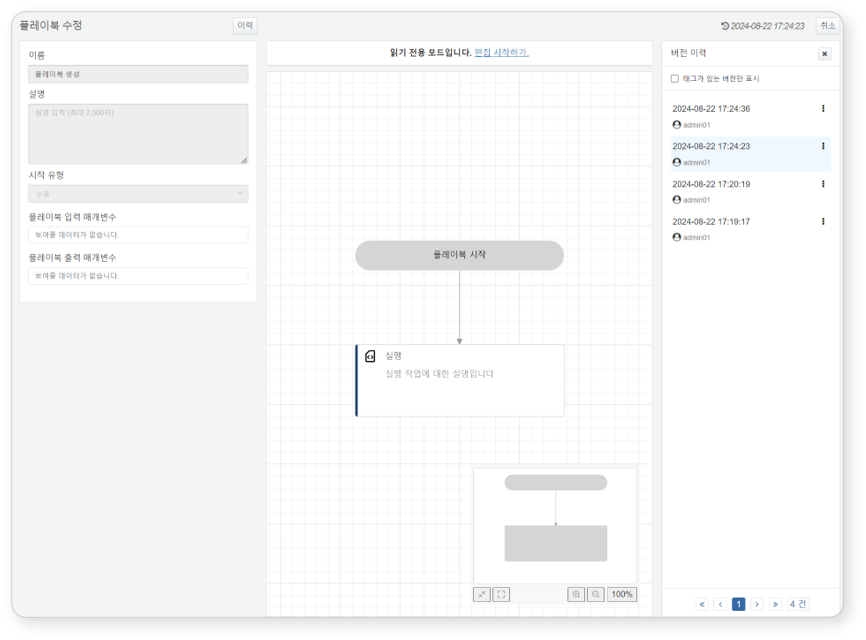
Each time you edit and save a playbook in the Edit Playbook page, the system stores a version with a timestamp. This allows you to track and manage changes effectively.
Version History
Click Versions to open or close the version history panel. If the panel is closed, clicking the button opens it; if it is open, clicking the button closes it.

Version Rollback
Clicking a past version in the version history panel loads that version’s configuration in read-only mode on the flowchart.
To edit the selected version, click Edit. Once saved, the playbook is stored as a new version with a timestamp, and the latest saved version will be used for execution.
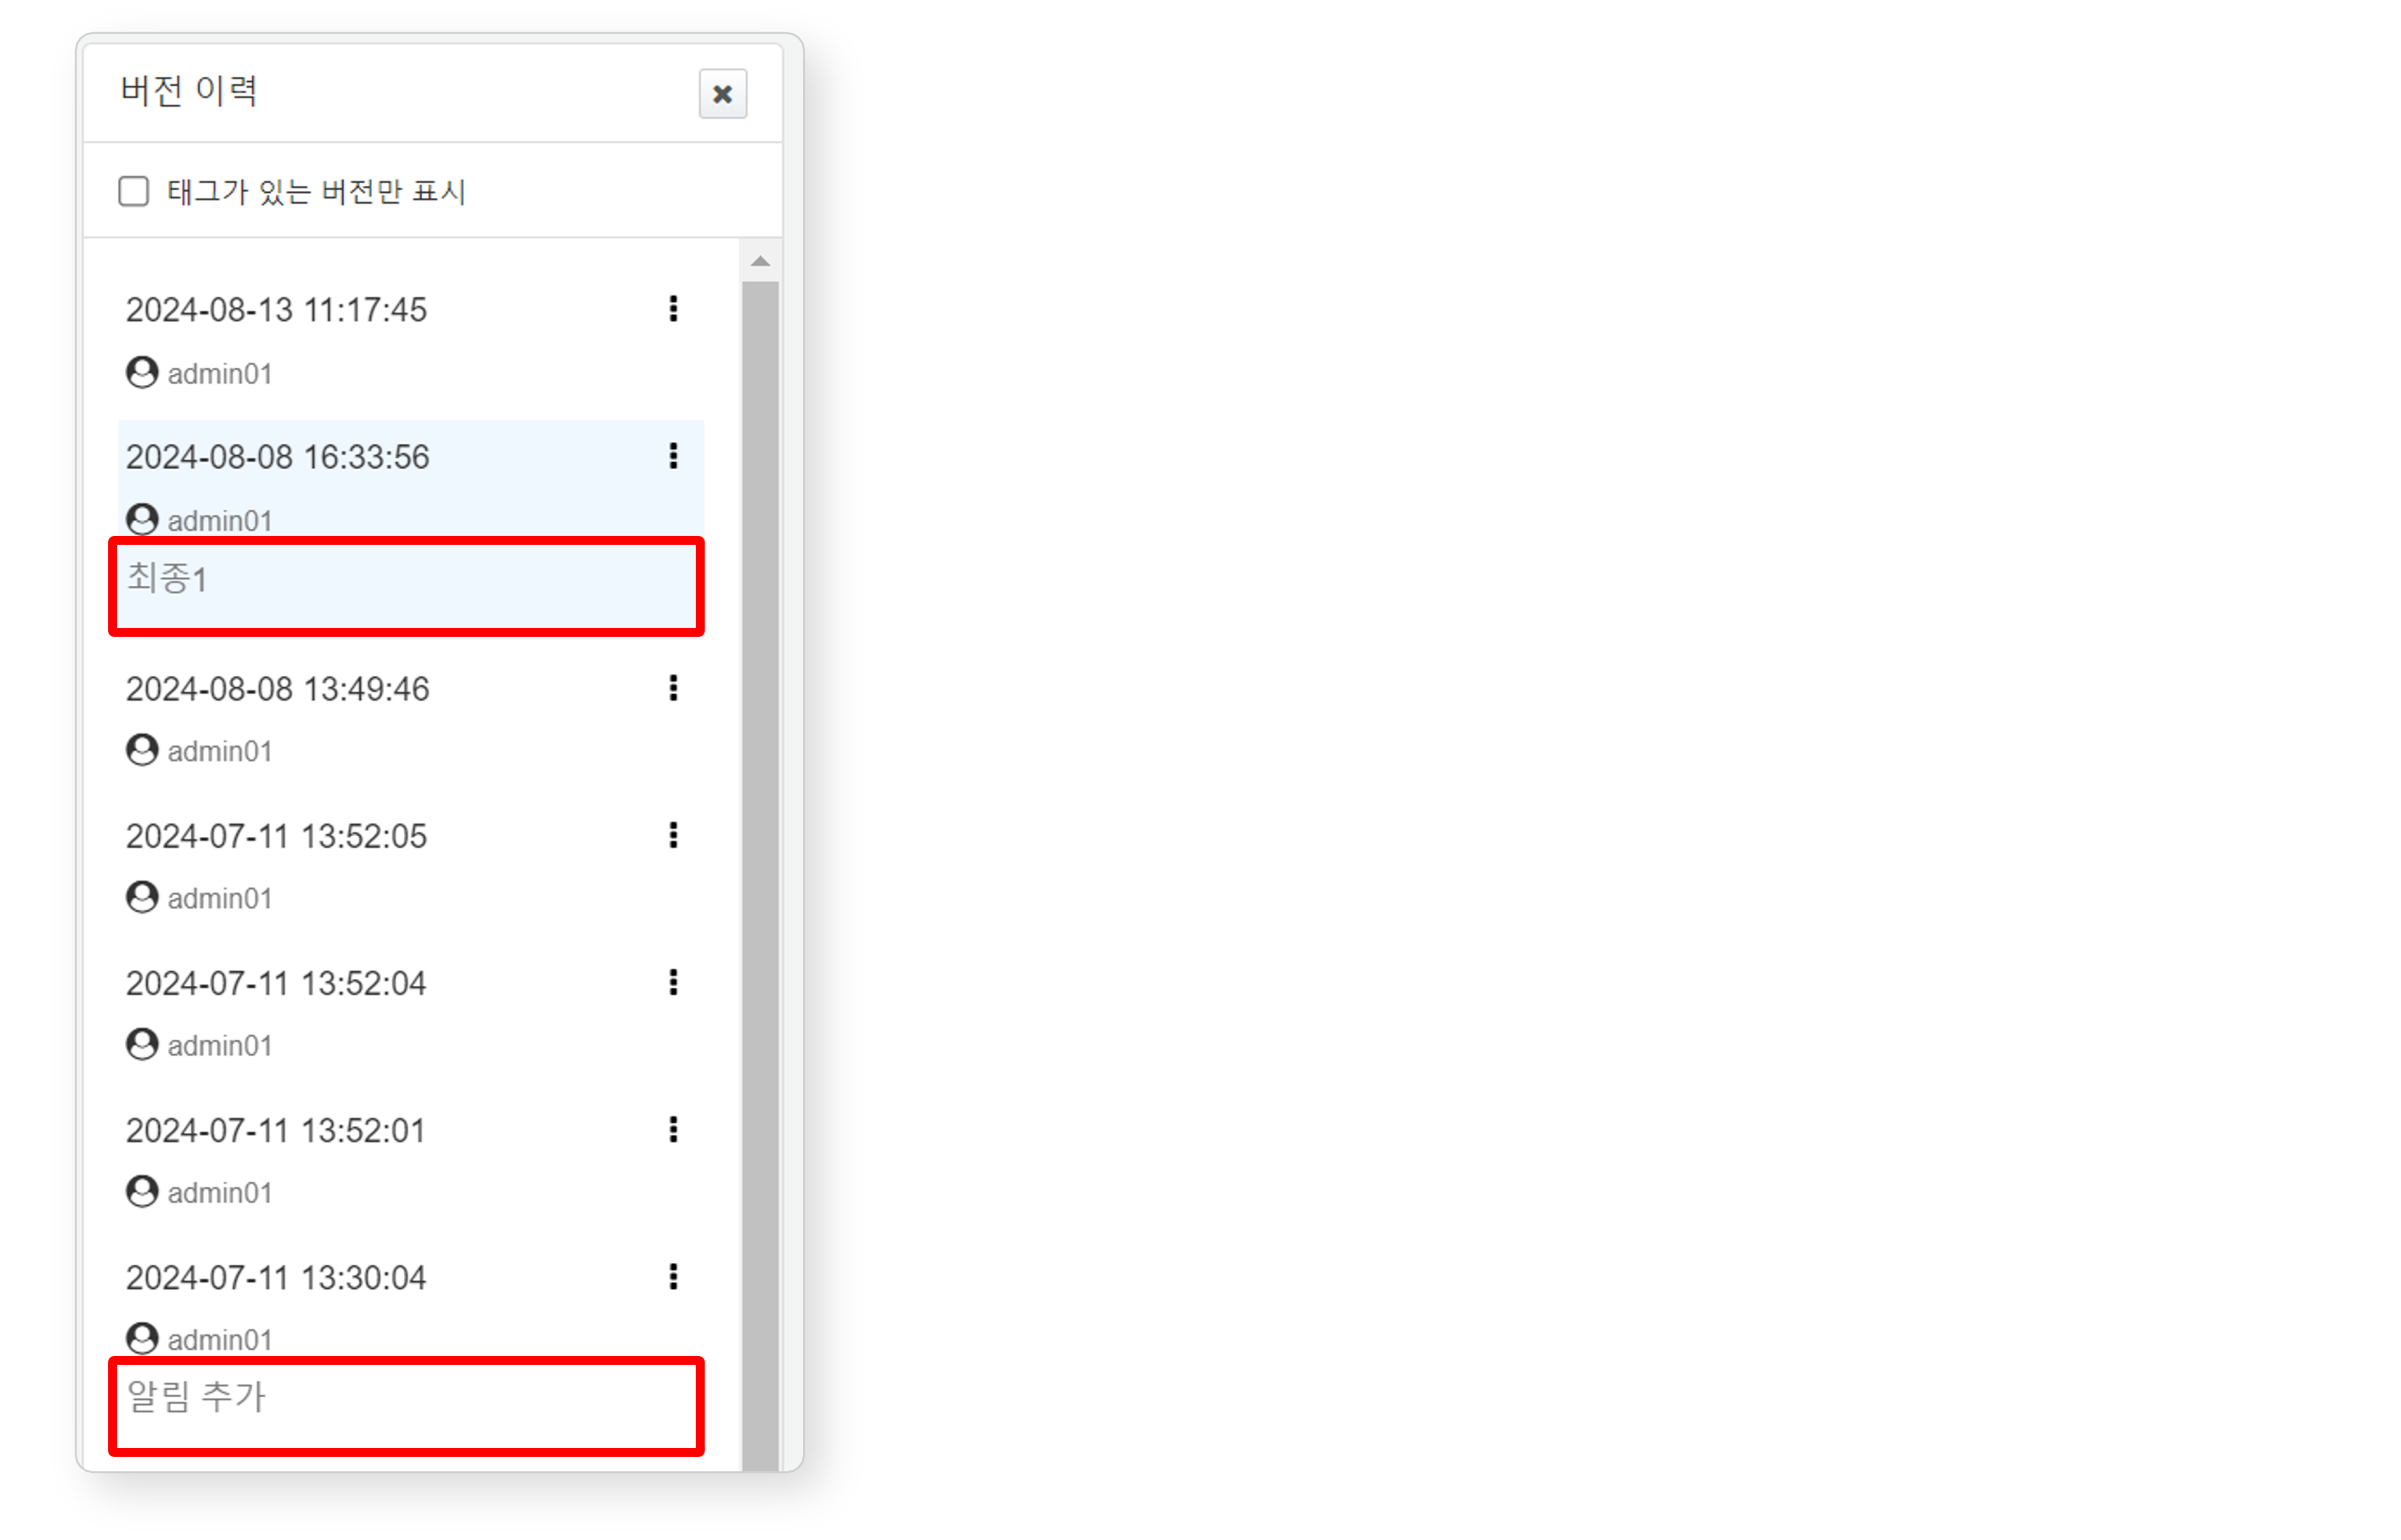
Version Tagging
You can assign and manage tags for specific version. Enabling Show Only Tagged Versions displays only tagged versions.
-
To add a tag
-
- Select the version to tag and click ⁝.
-
- In the options menu, select Add Tag.
-
- Enter the tag in the Add Tag window and click OK.
-
-
To edit a tag
-
- Select the version with the tag to edit and click ⁝.
-
- In the options menu, select Edit Tag.
-
- Modify the tag in the Edit Tag window and click OK.
-
-
To delete a tag
-
- Select the version with the tag to remove and click ⁝.
-
- In the options menu, select Delete Tag.
-
Playbook Edit Page
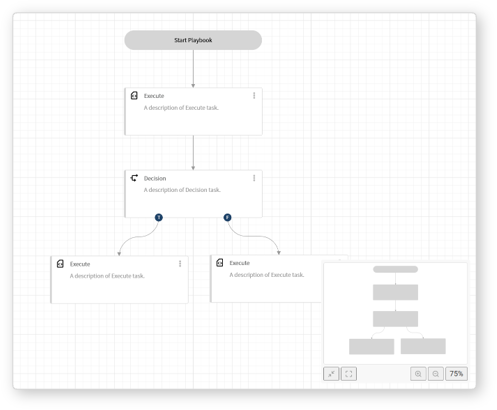
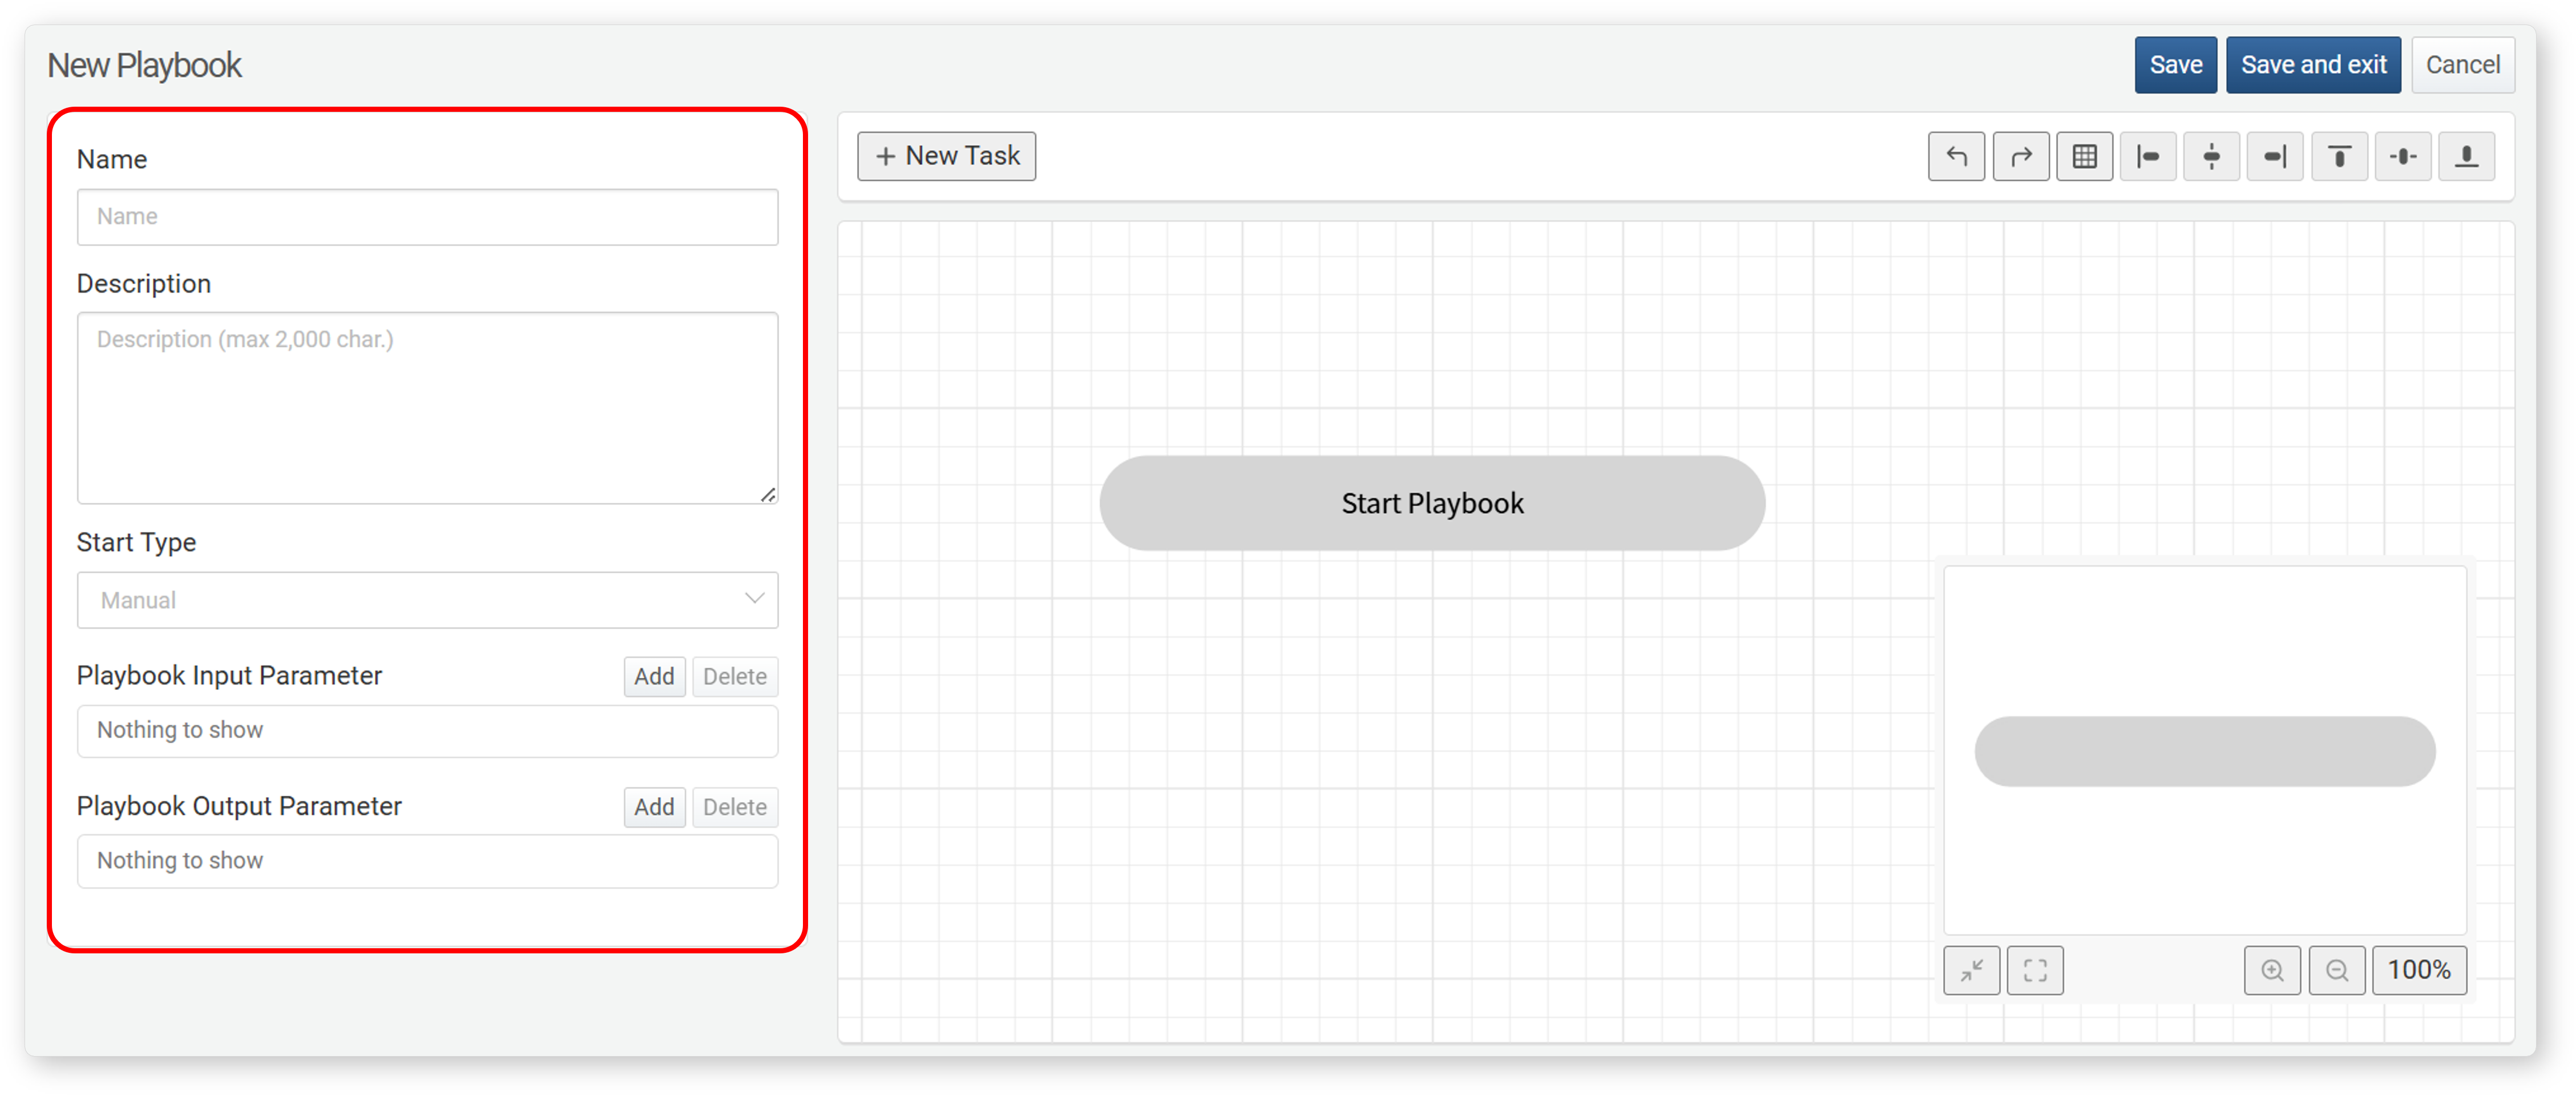
You can add and edit playbooks on the Edit Playbook page. When adding a playbook for the first time, the initial screen appears as follows:
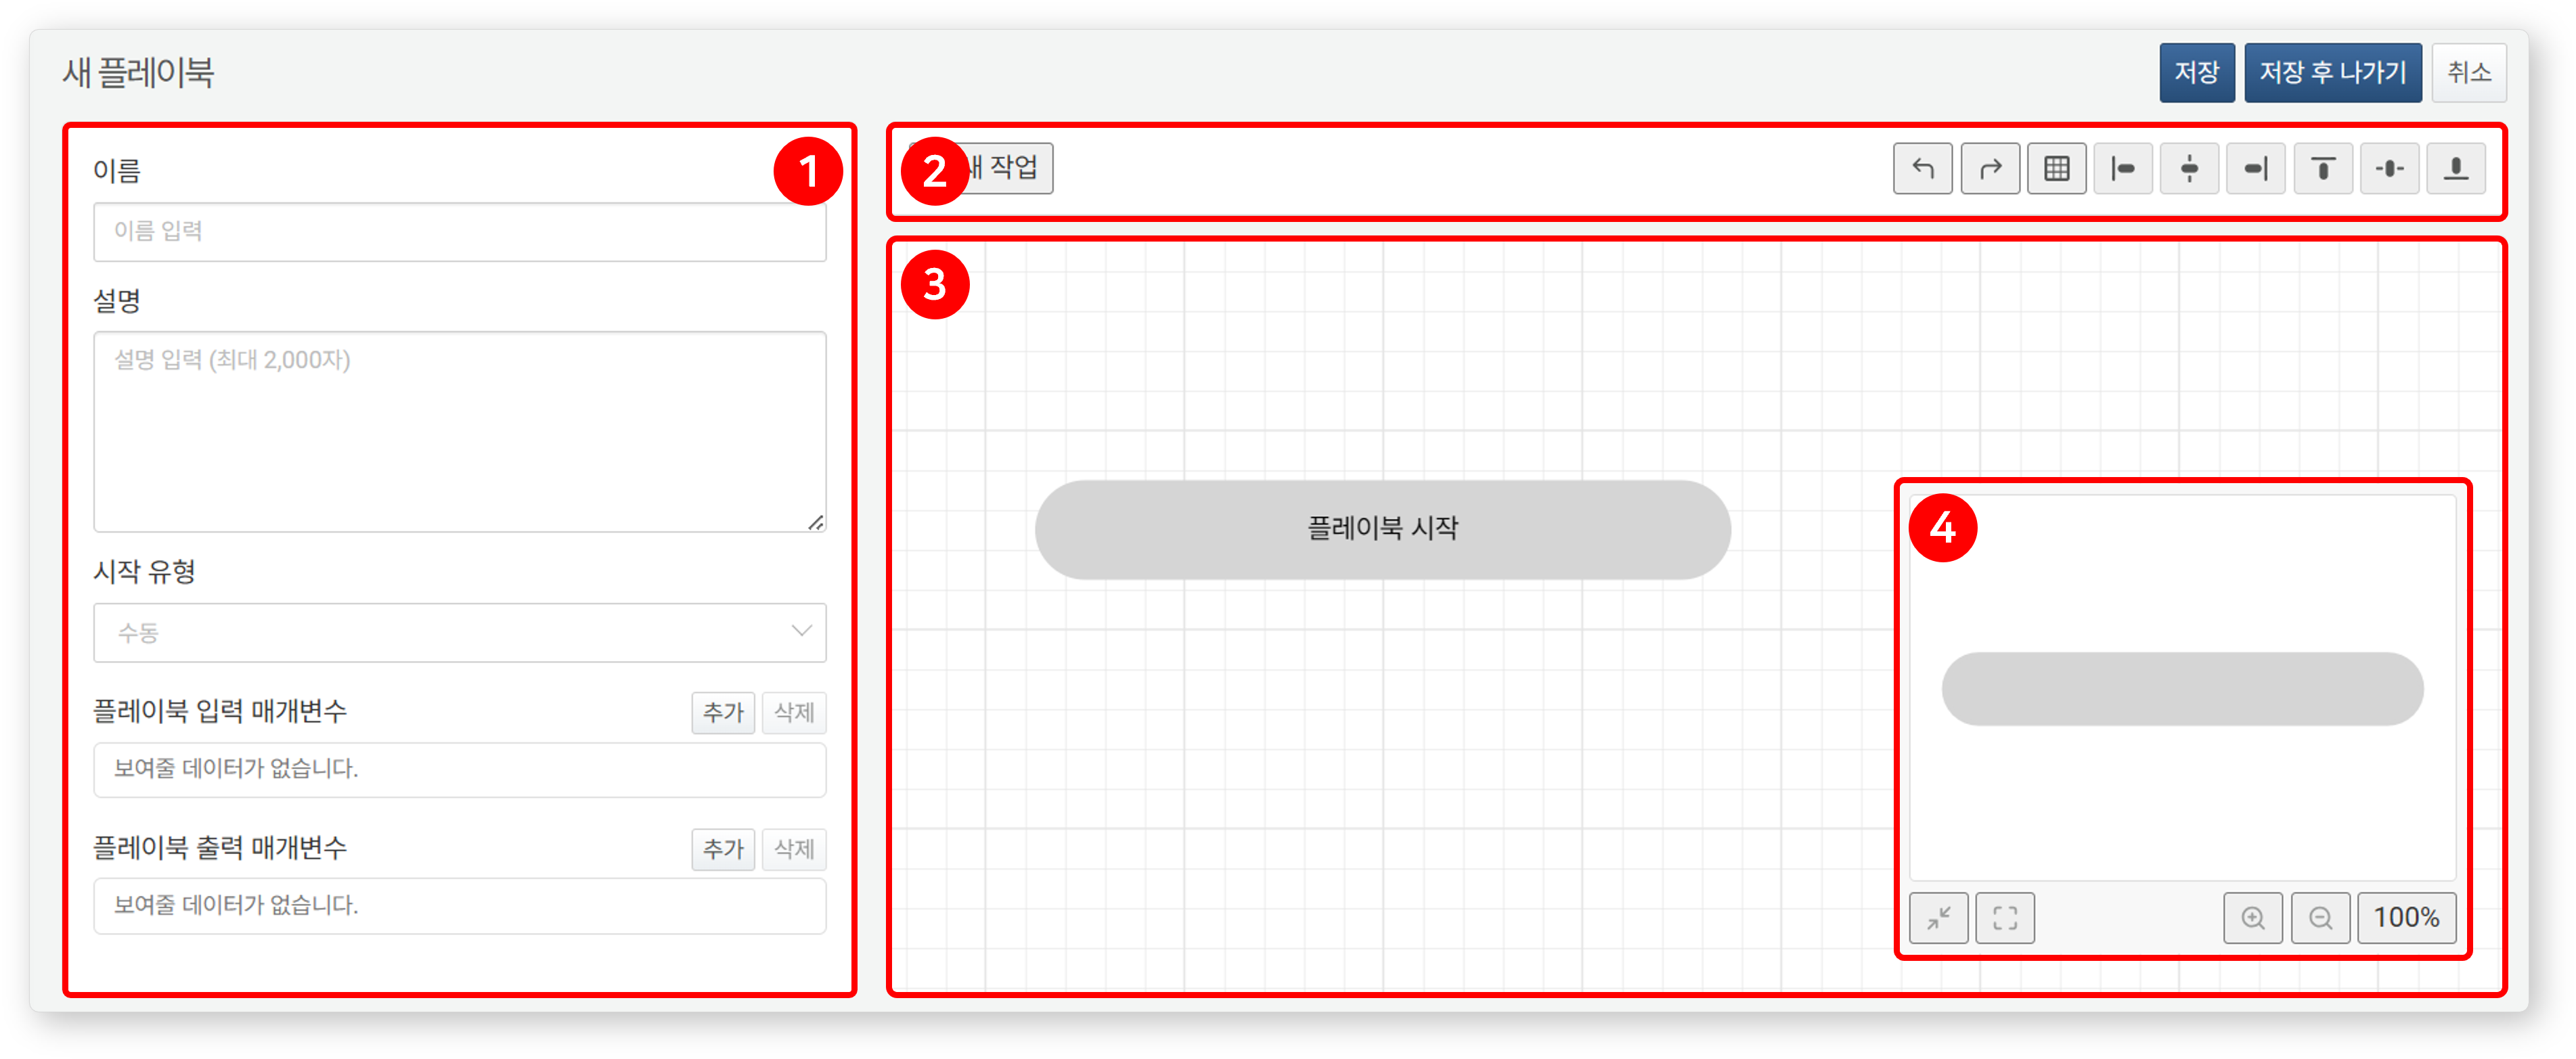
- (1) Property Panel
- Displays the Common Properties and Task-Specific Properties. After modifying properties, click Save at the bottom of the panel to apply changes.
- (2) Toolbar
- Provides tools for adding new tasks, undoing/redoing actions, toggling grid visibility, and aligning elements.

- New Task: Adds a new task object.
- Undo/Redo: Reverses or re-applies recent actions.
- Show/Hide Grid: Shows or hides the background grid.
- Align: Aligns multiple task objects (left, center, right, top, middle, bottom).
- (3) Task Flowchart
- This area is used to position and connect task objects to create the workflow. You can define execution sequences through User Interactions.
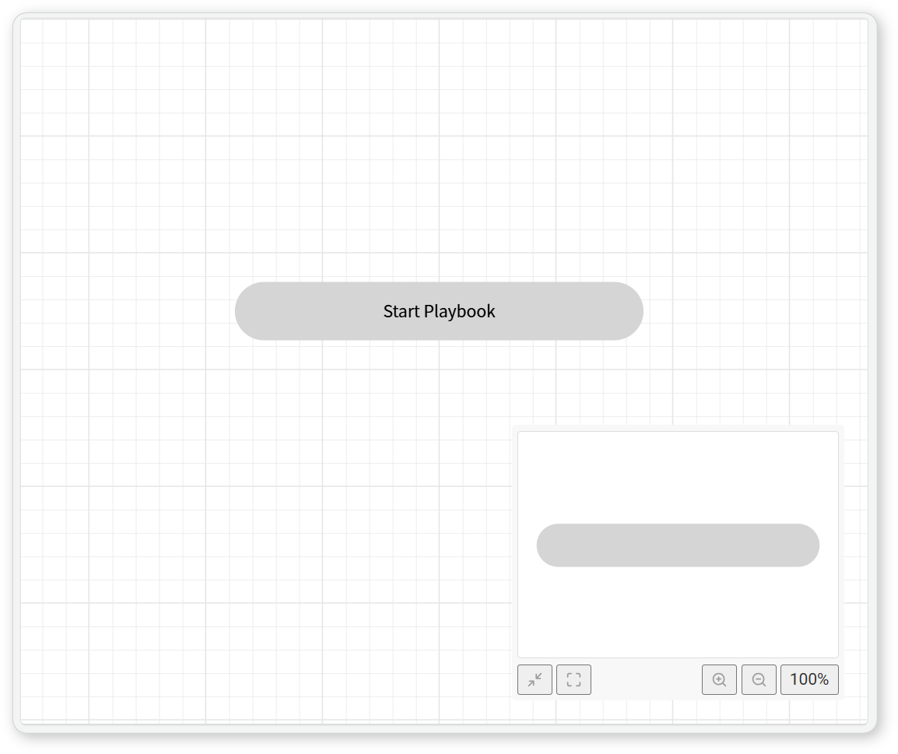
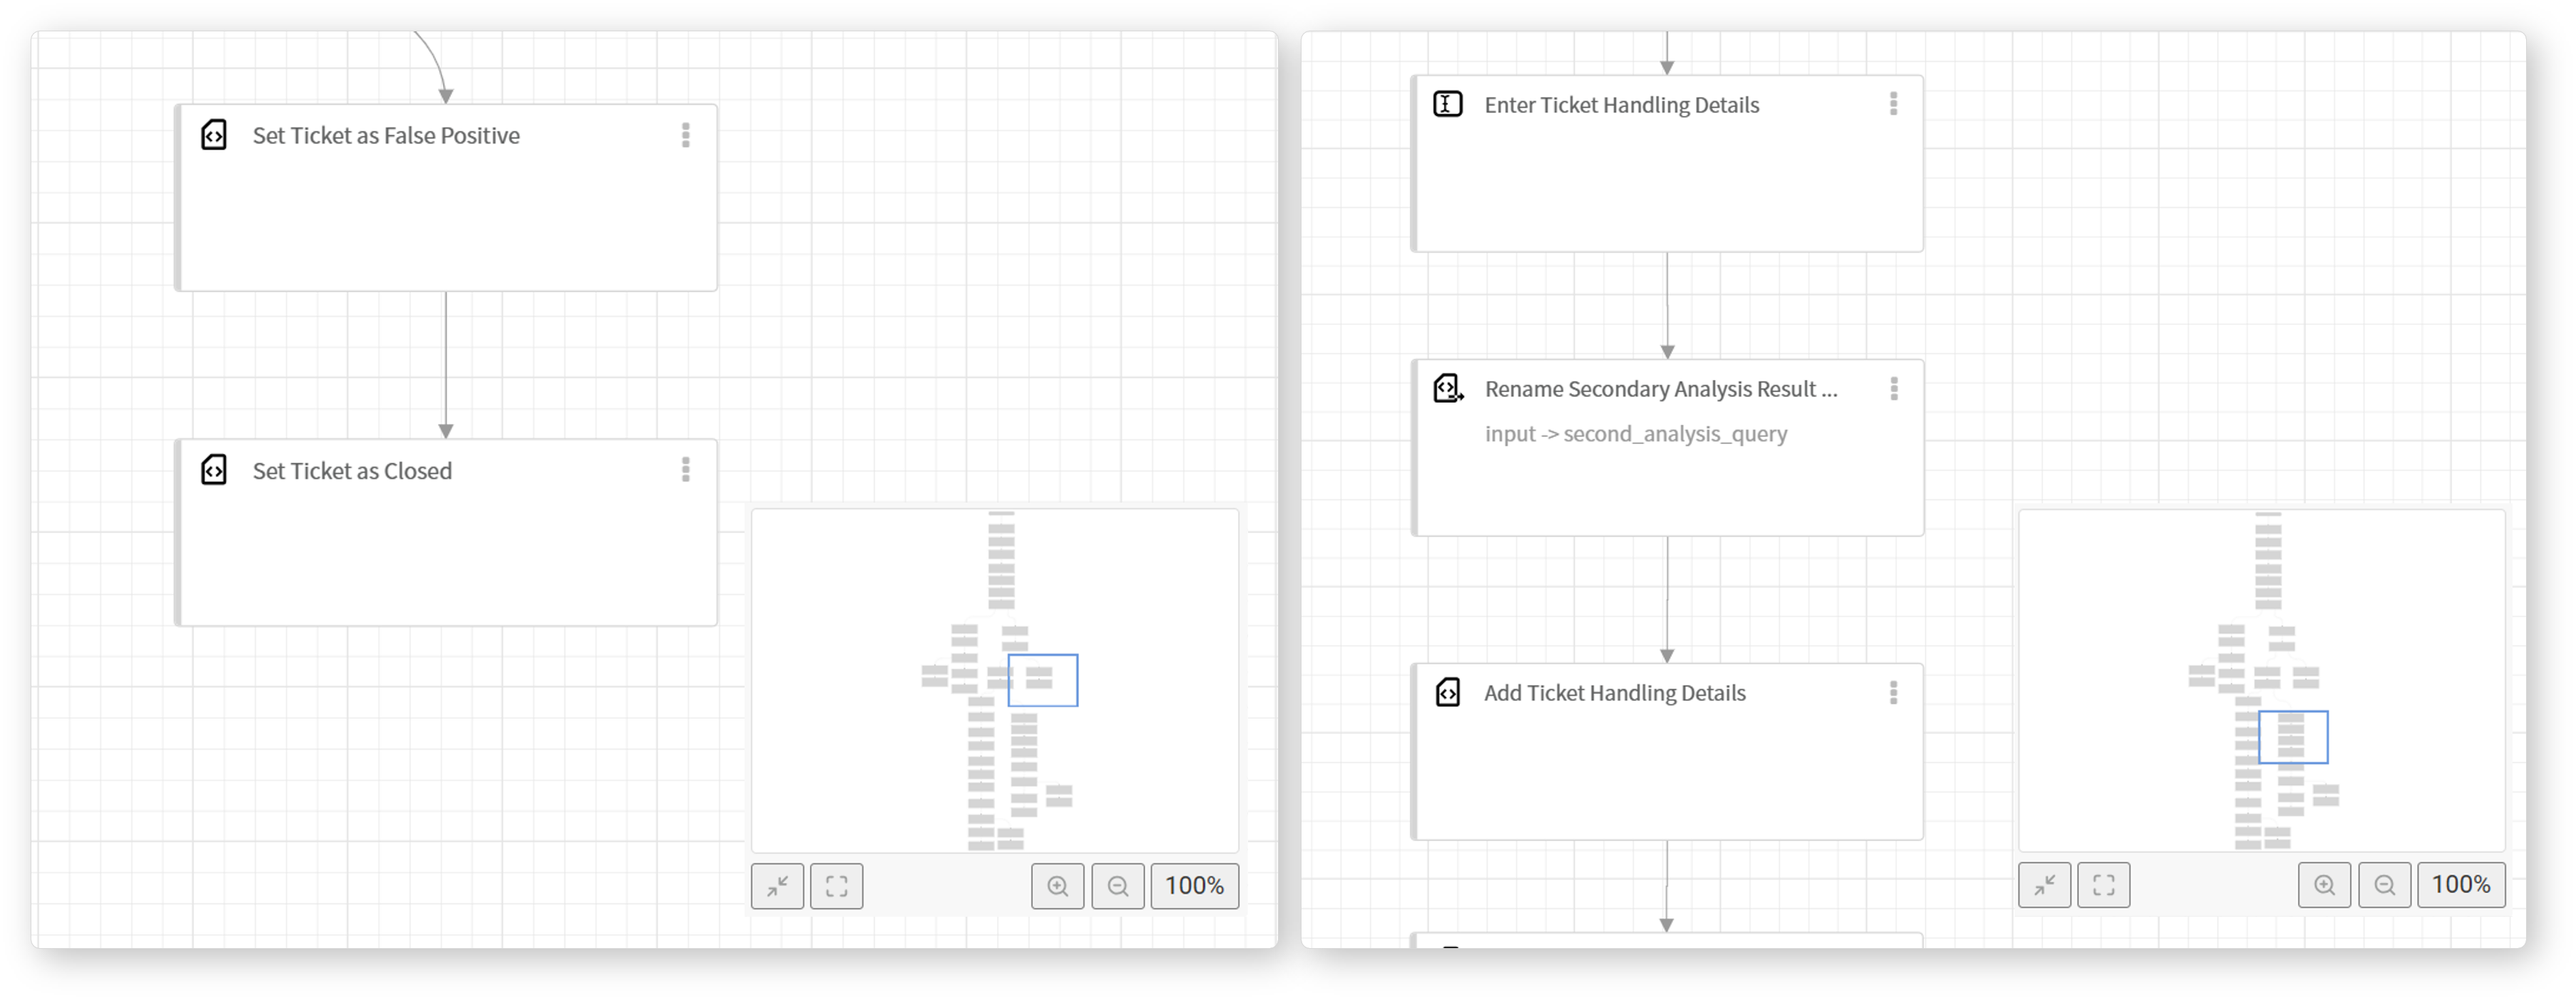
- (4) Map
- Provides an overview of tasks and connections within the playbook. Clicking a specific position adjusts the flowchart view accordingly.
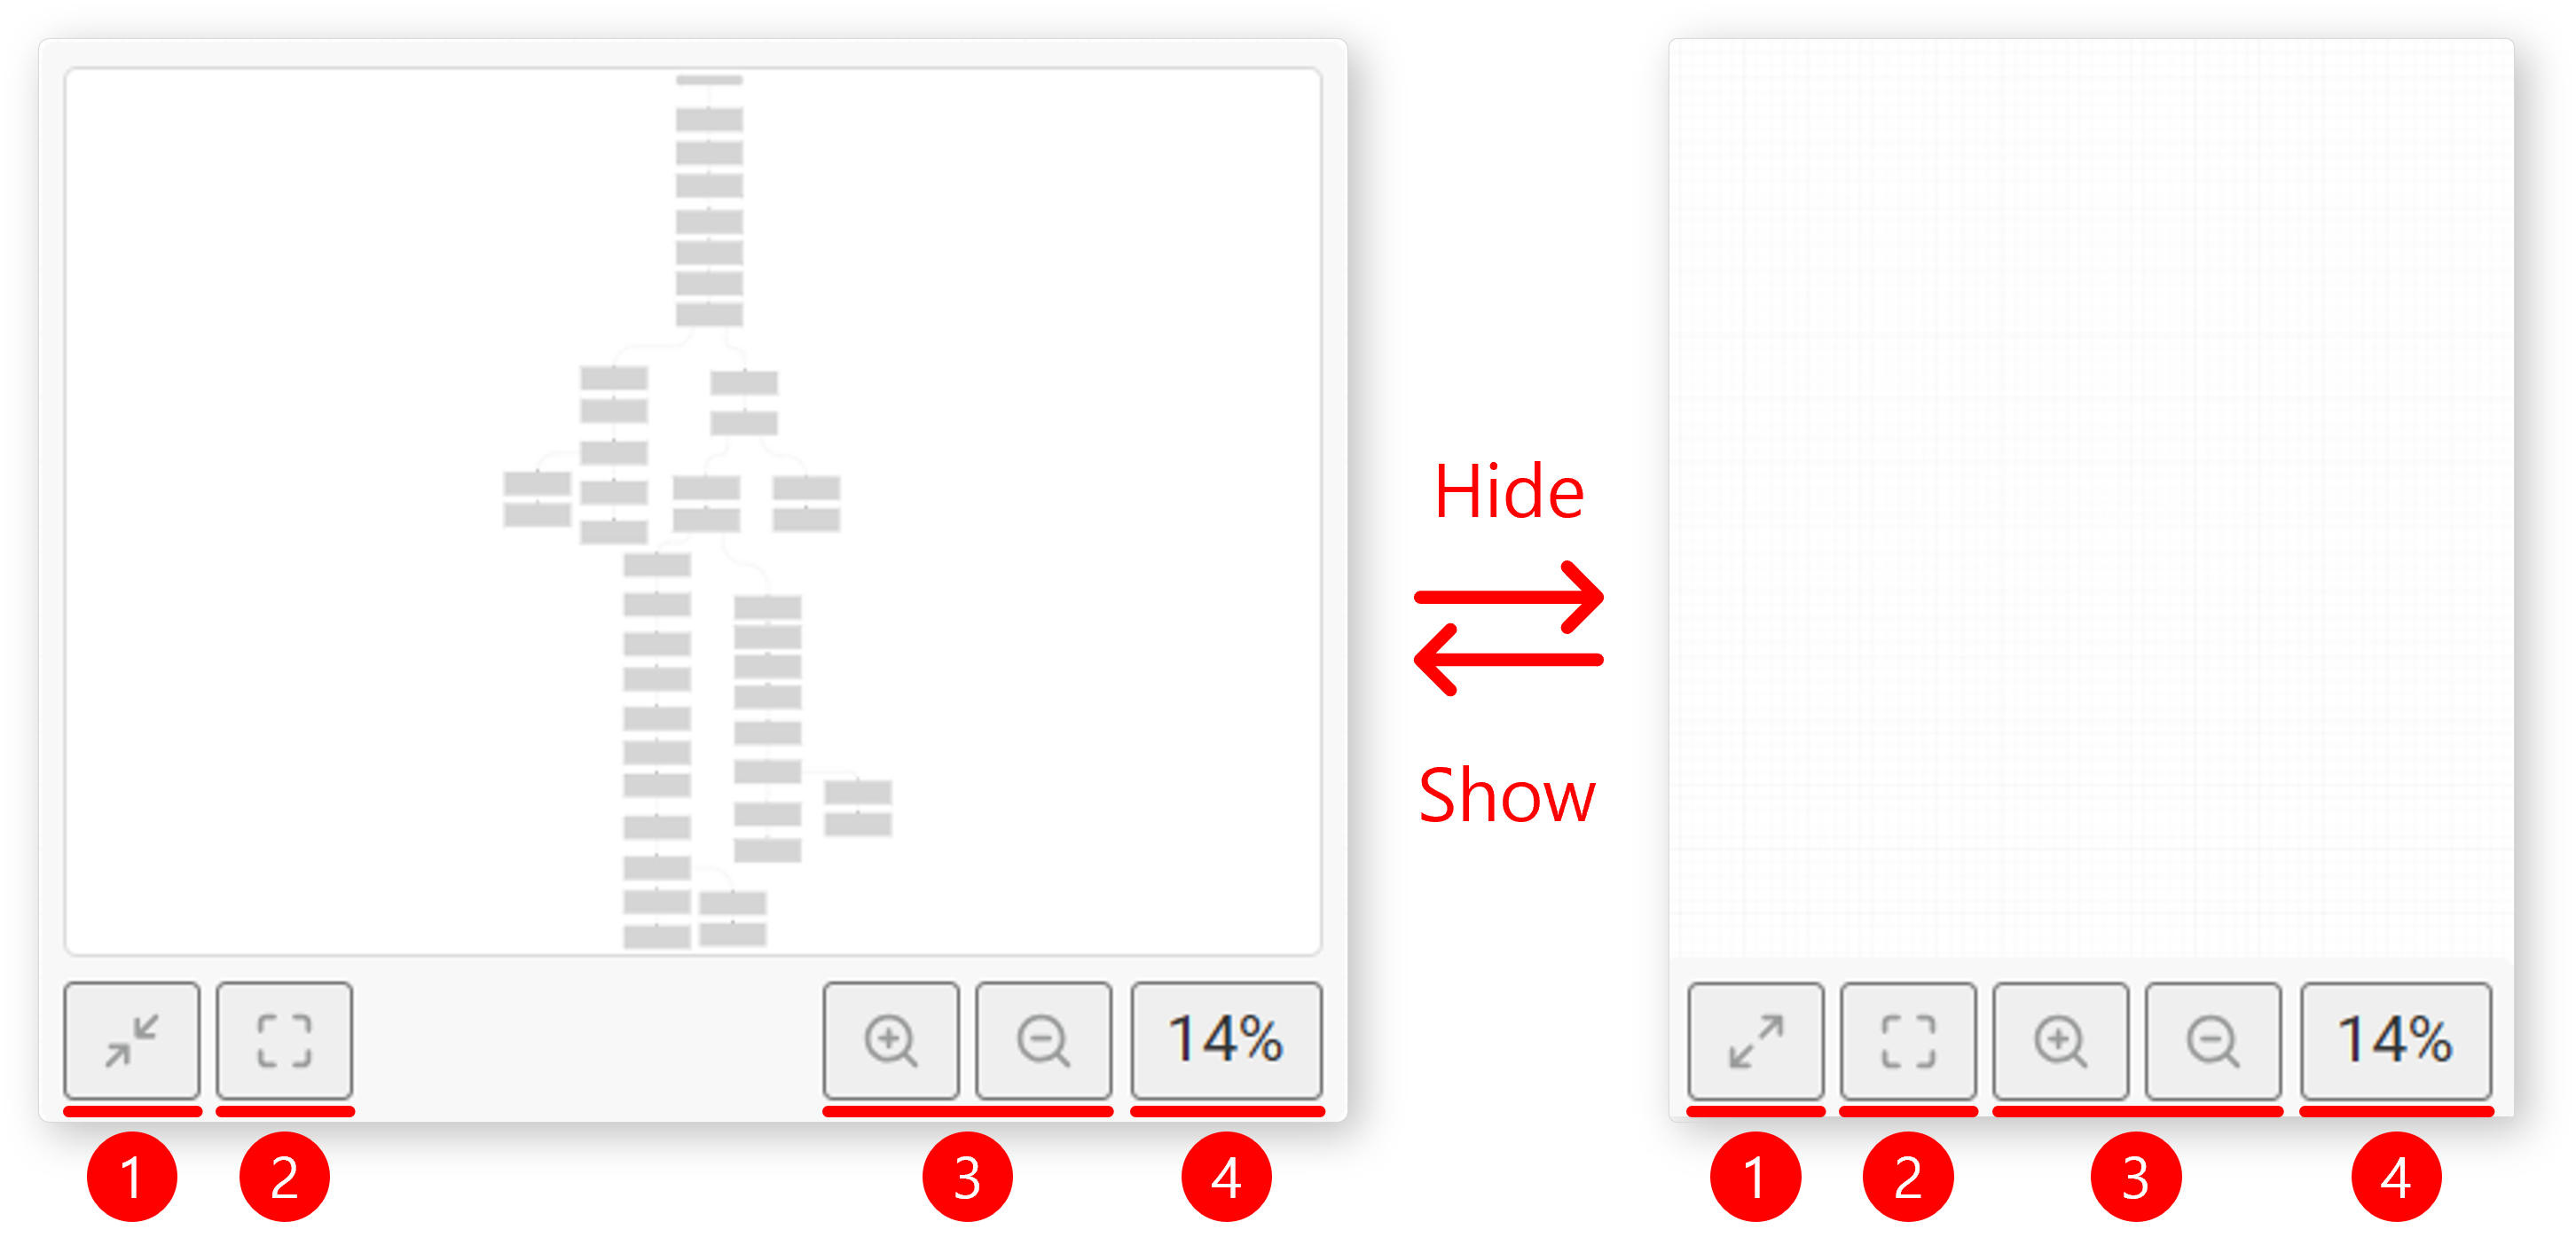
- Show/Hide Map: Toggles map visibility.
- Fit to Screen: Adjusts the flowchart size to fit within the screen.
- Zoom In/Out: Adjusts the zoom level of the flowchart.
- Zoom Percentage: Displays the current zoom level. Clicking it resets the view to 100%.
User Interactions
Users can interact with the flowchart using the following actions:
- Click: Selects an object.
- Click & Right-Click: Opens the context menu for editing properties.
- Drag & Drop: Moves objects or creates connections.
- Mouse Wheel Scroll: Zooms in or out.
Click & Right-Click
-
Show Connection Points: Clicking on a task displays its connection points. These points allow users to create new connections by dragging from one task to another.
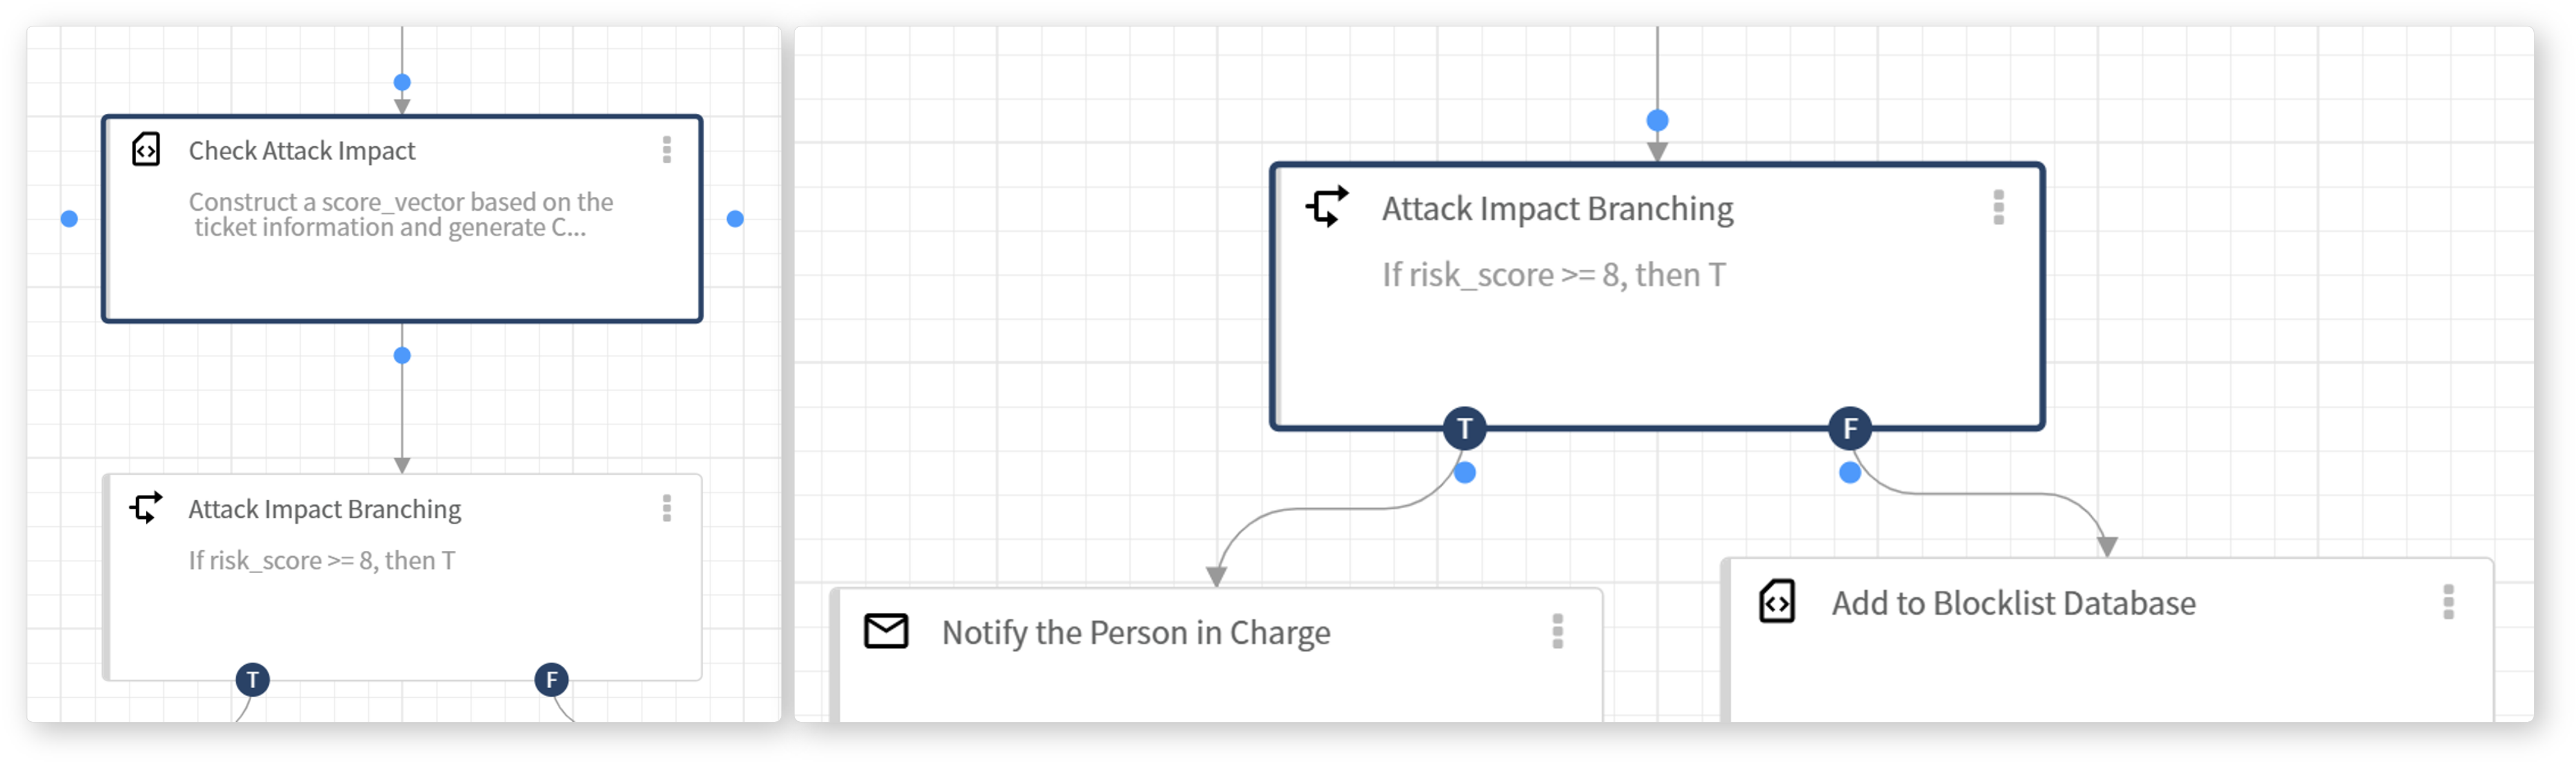
- Standard Tasks: Have a single connection point for linking to the next task.
- Branching Tasks: Have multiple connection points to create conditional execution paths.
-
Edit Task Properties: Right-clicking on a task opens a properties menu that allows users to modify the task's properties.
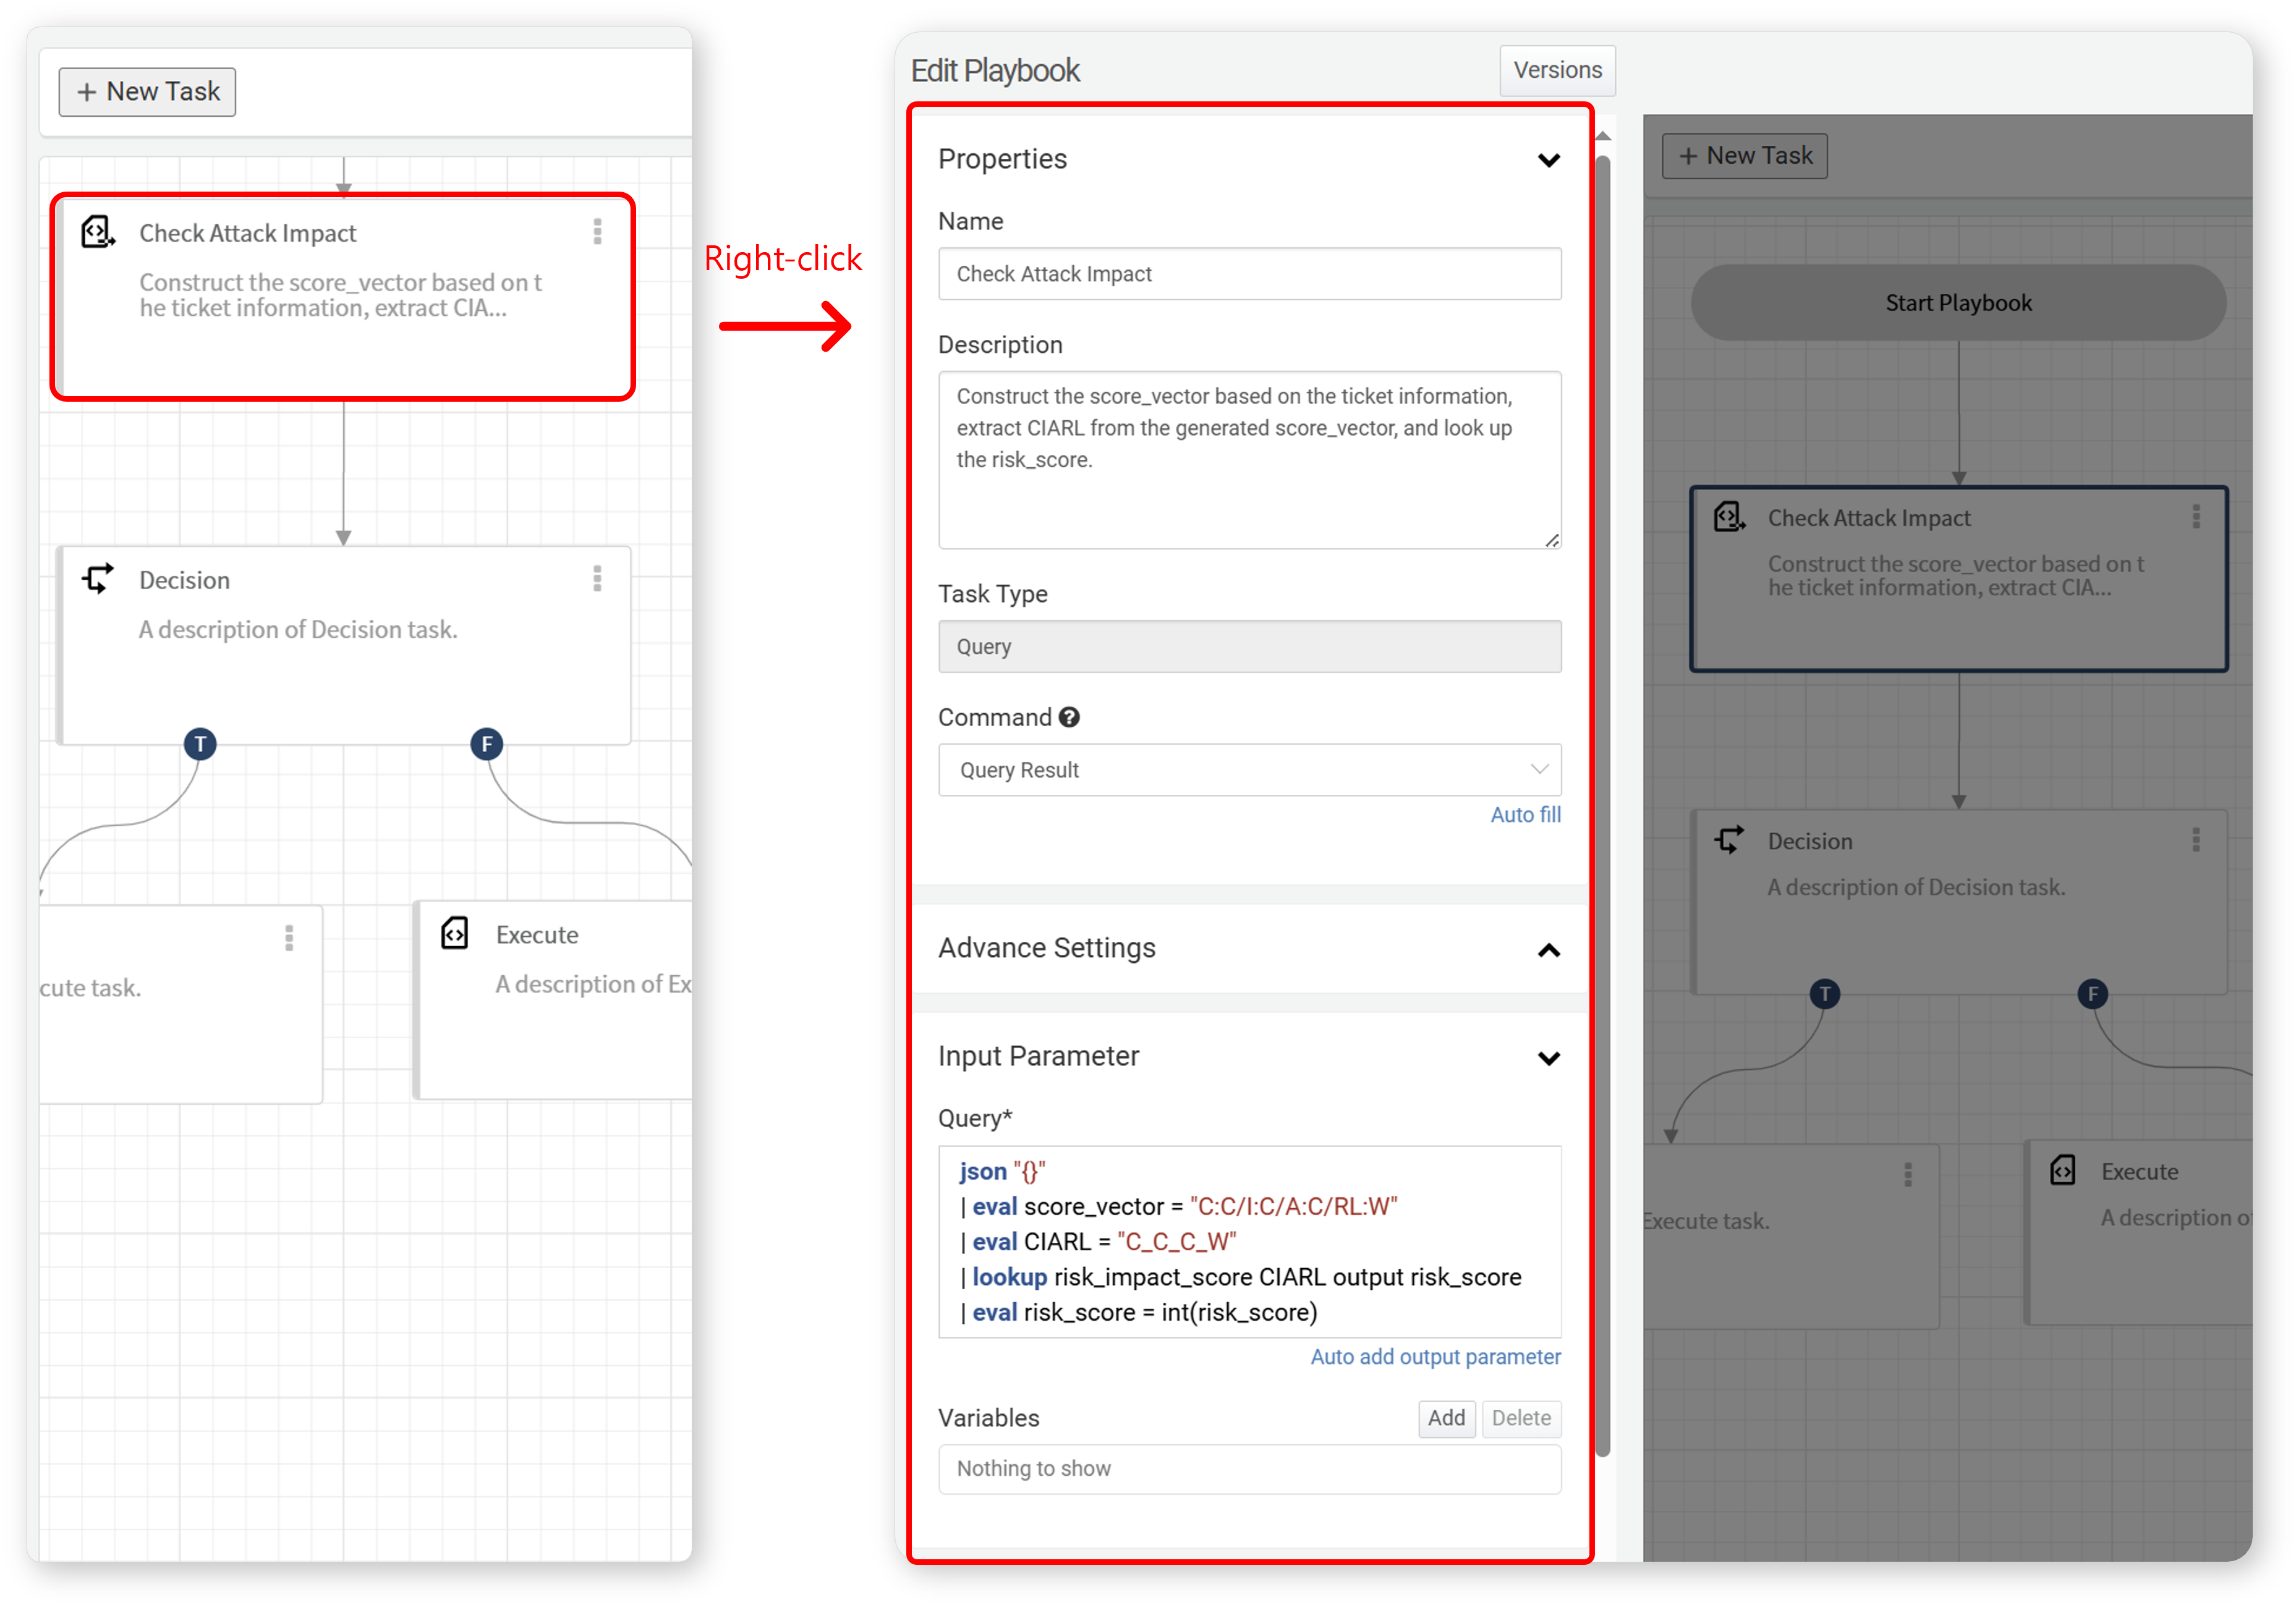
-
Select Connection Line: Clicking on a connection line highlights it in dark blue. Clicking Delete or Space key removes the connection.
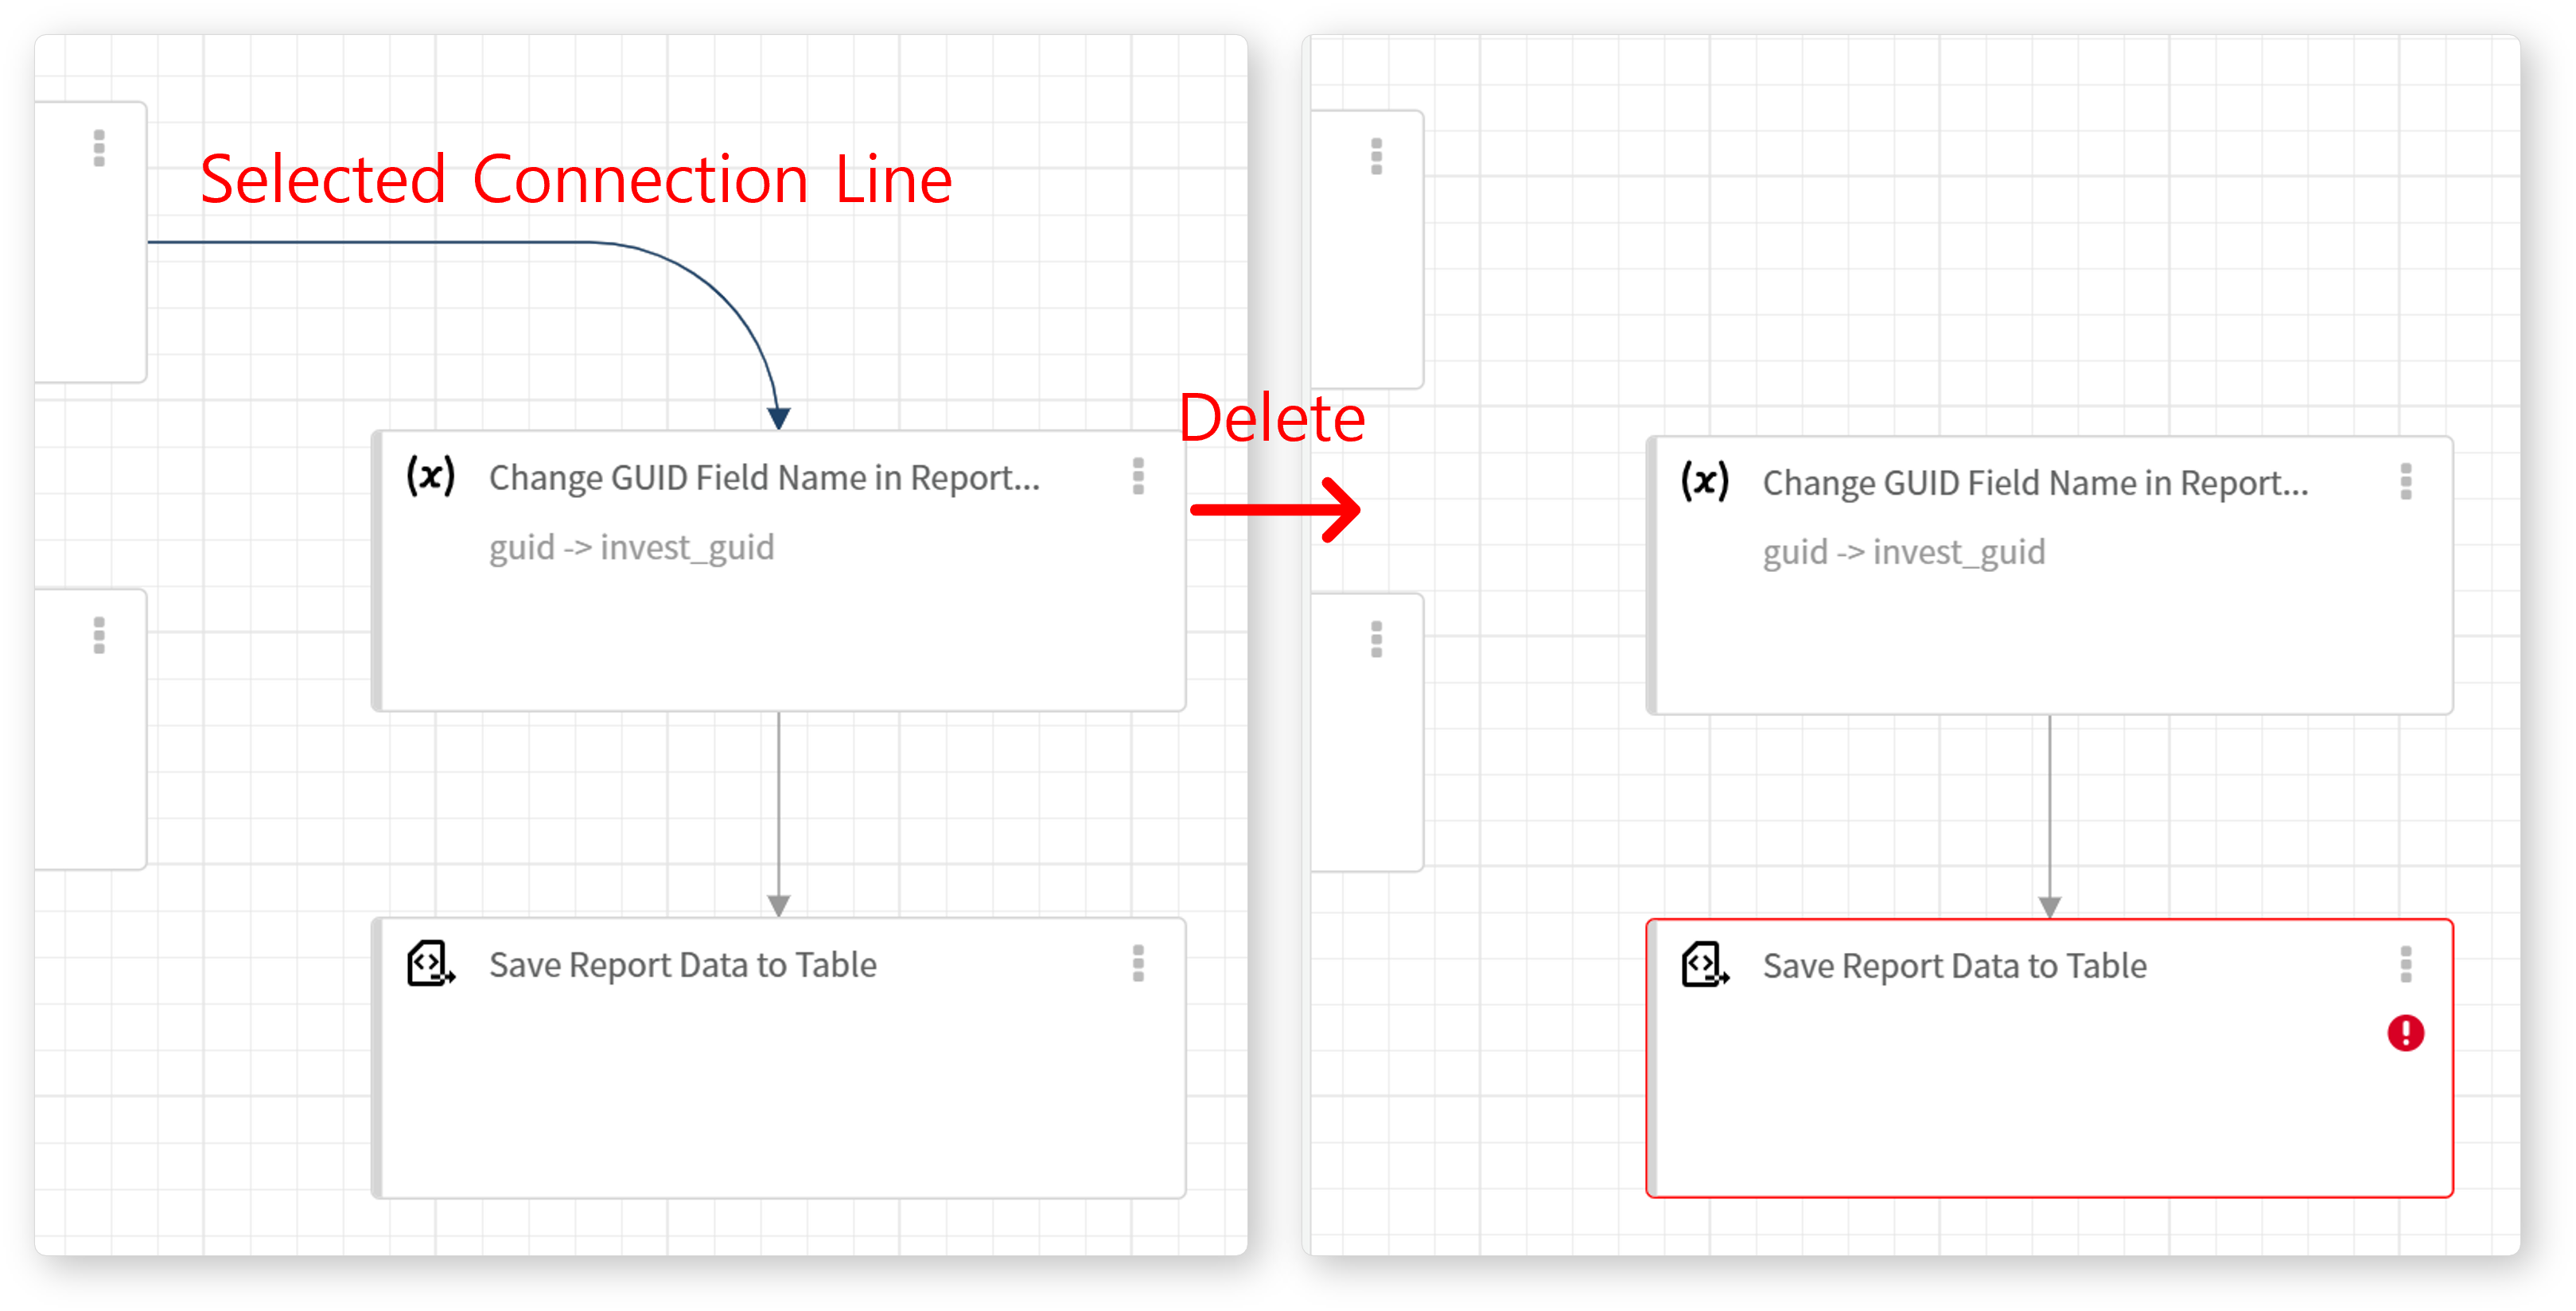
-
Select Multiple Tasks (Shift + Click): Holding Shift while clicking allows users to select multiple tasks simultaneously. Selected tasks can be moved or deleted as a group. Pressing Delete or Space key removes all selected tasks.
Drag & Drop
-
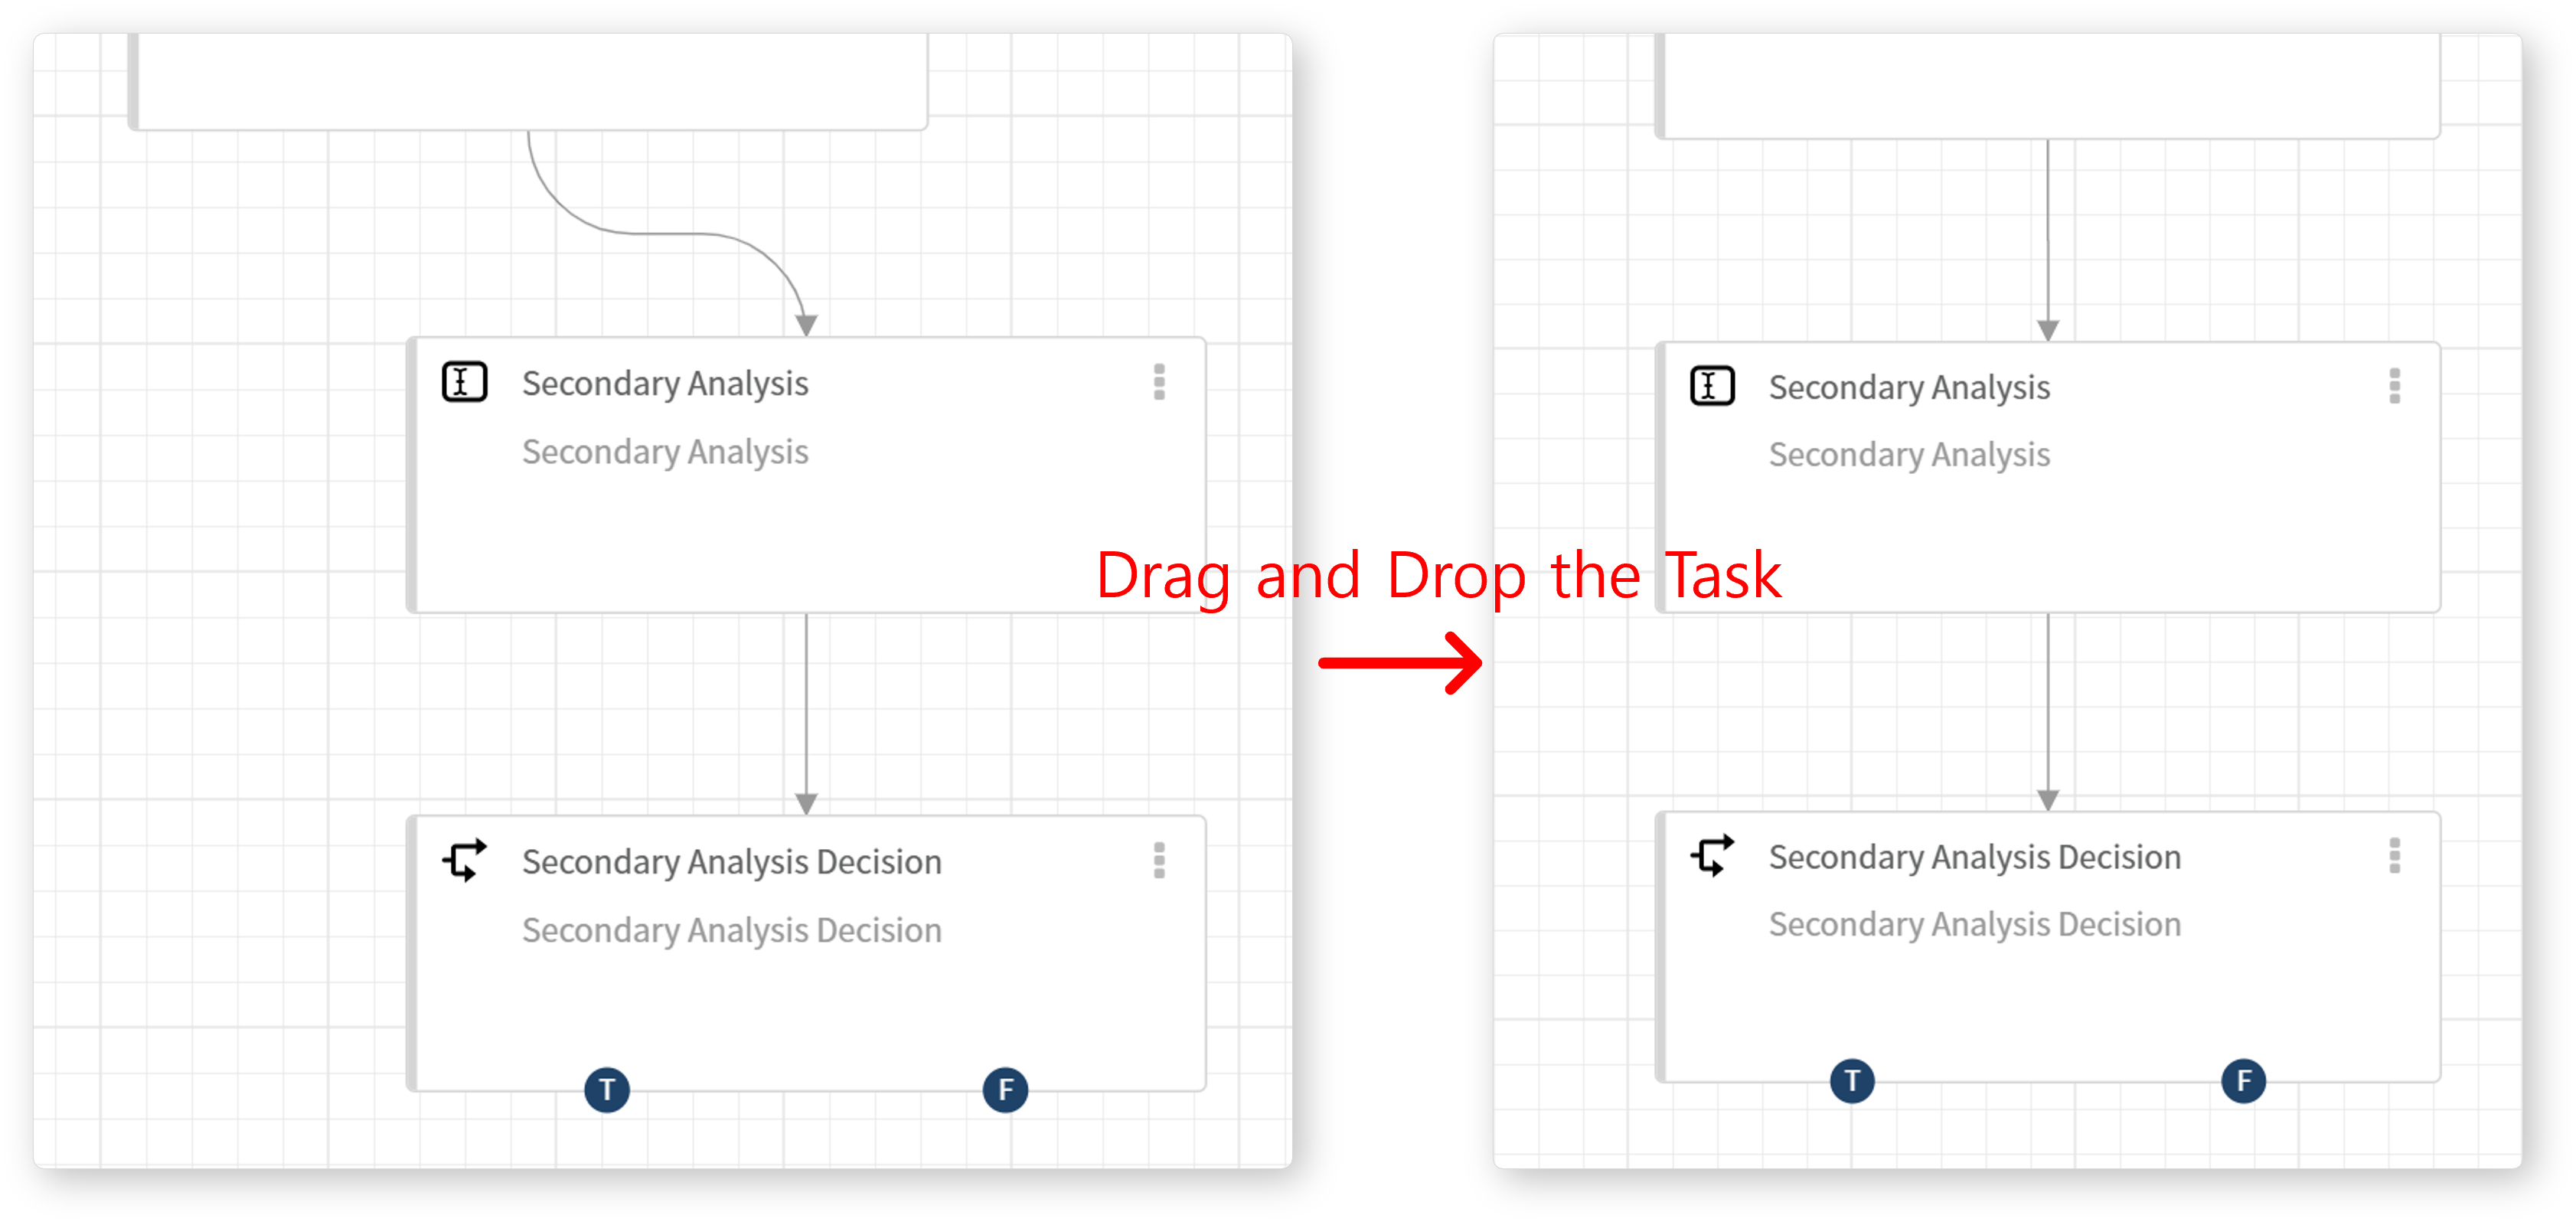
Move Task Objects: Dragging a task object relocates it to a new position. The connections between tasks remain intact.
-
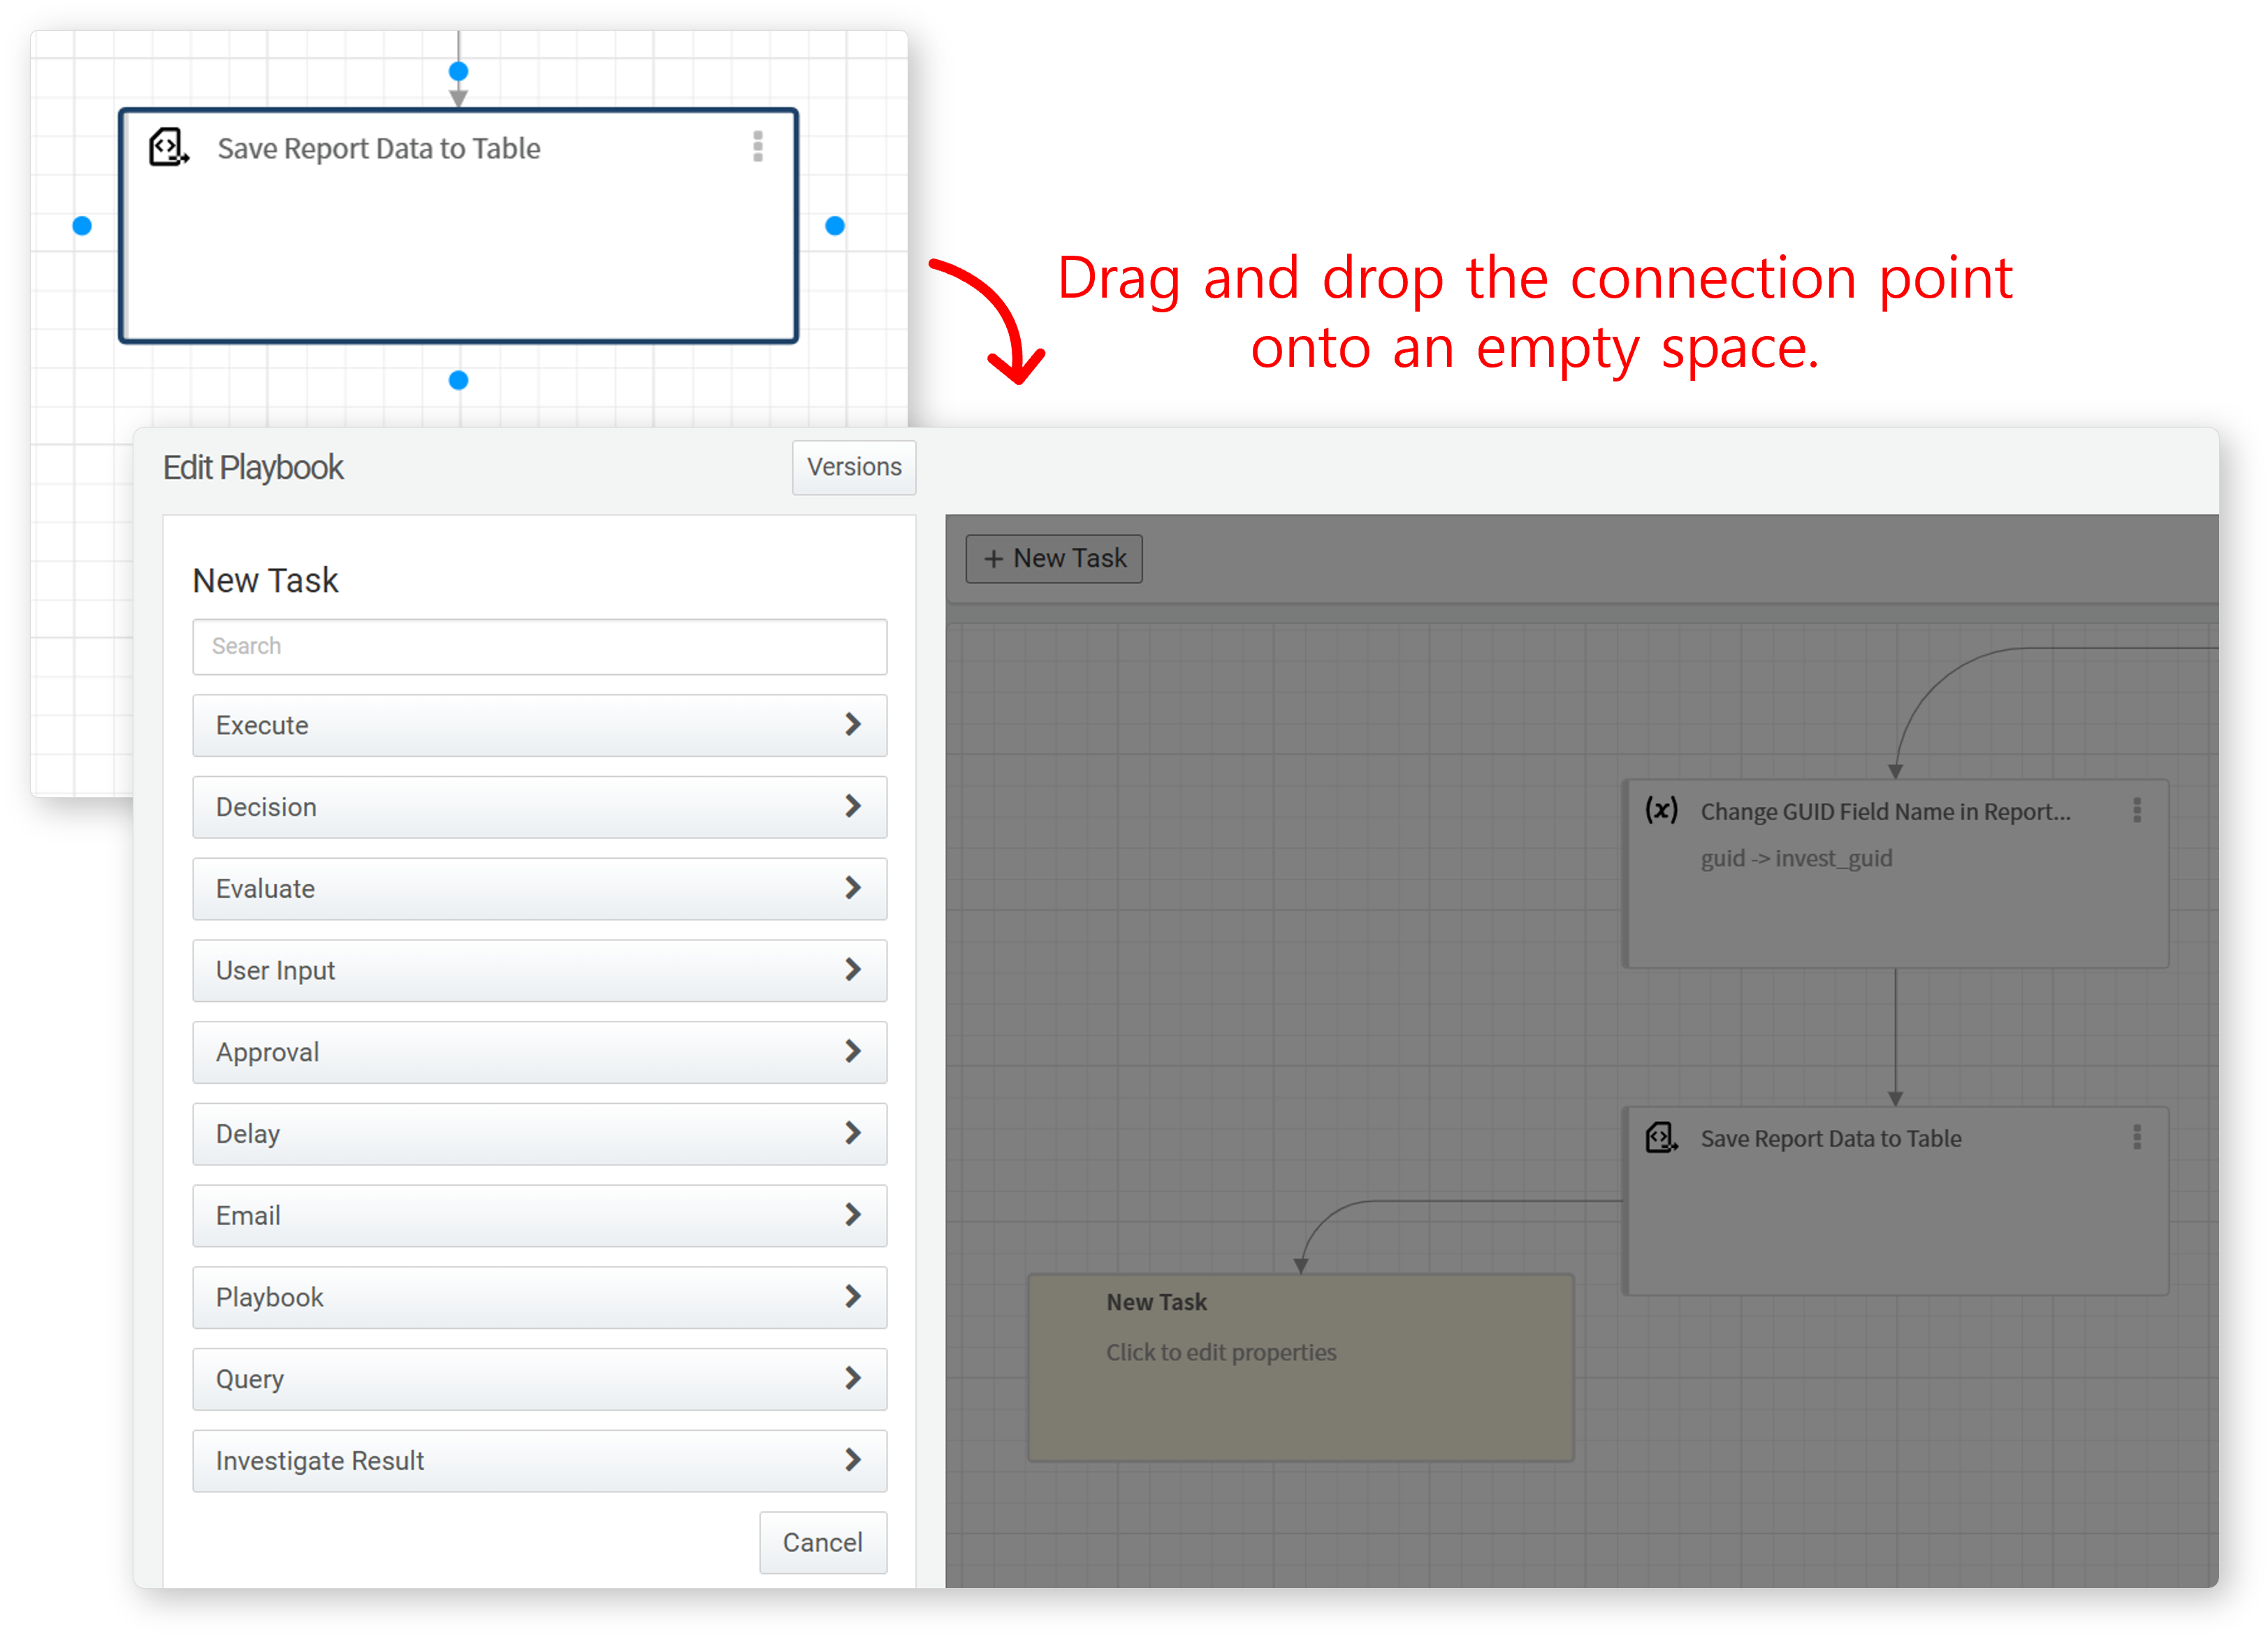
Create New Task: Dragging from a connection point to an empty area automatically creates a new task. A properties panel appears, allowing users to configure the new task immediately.
-
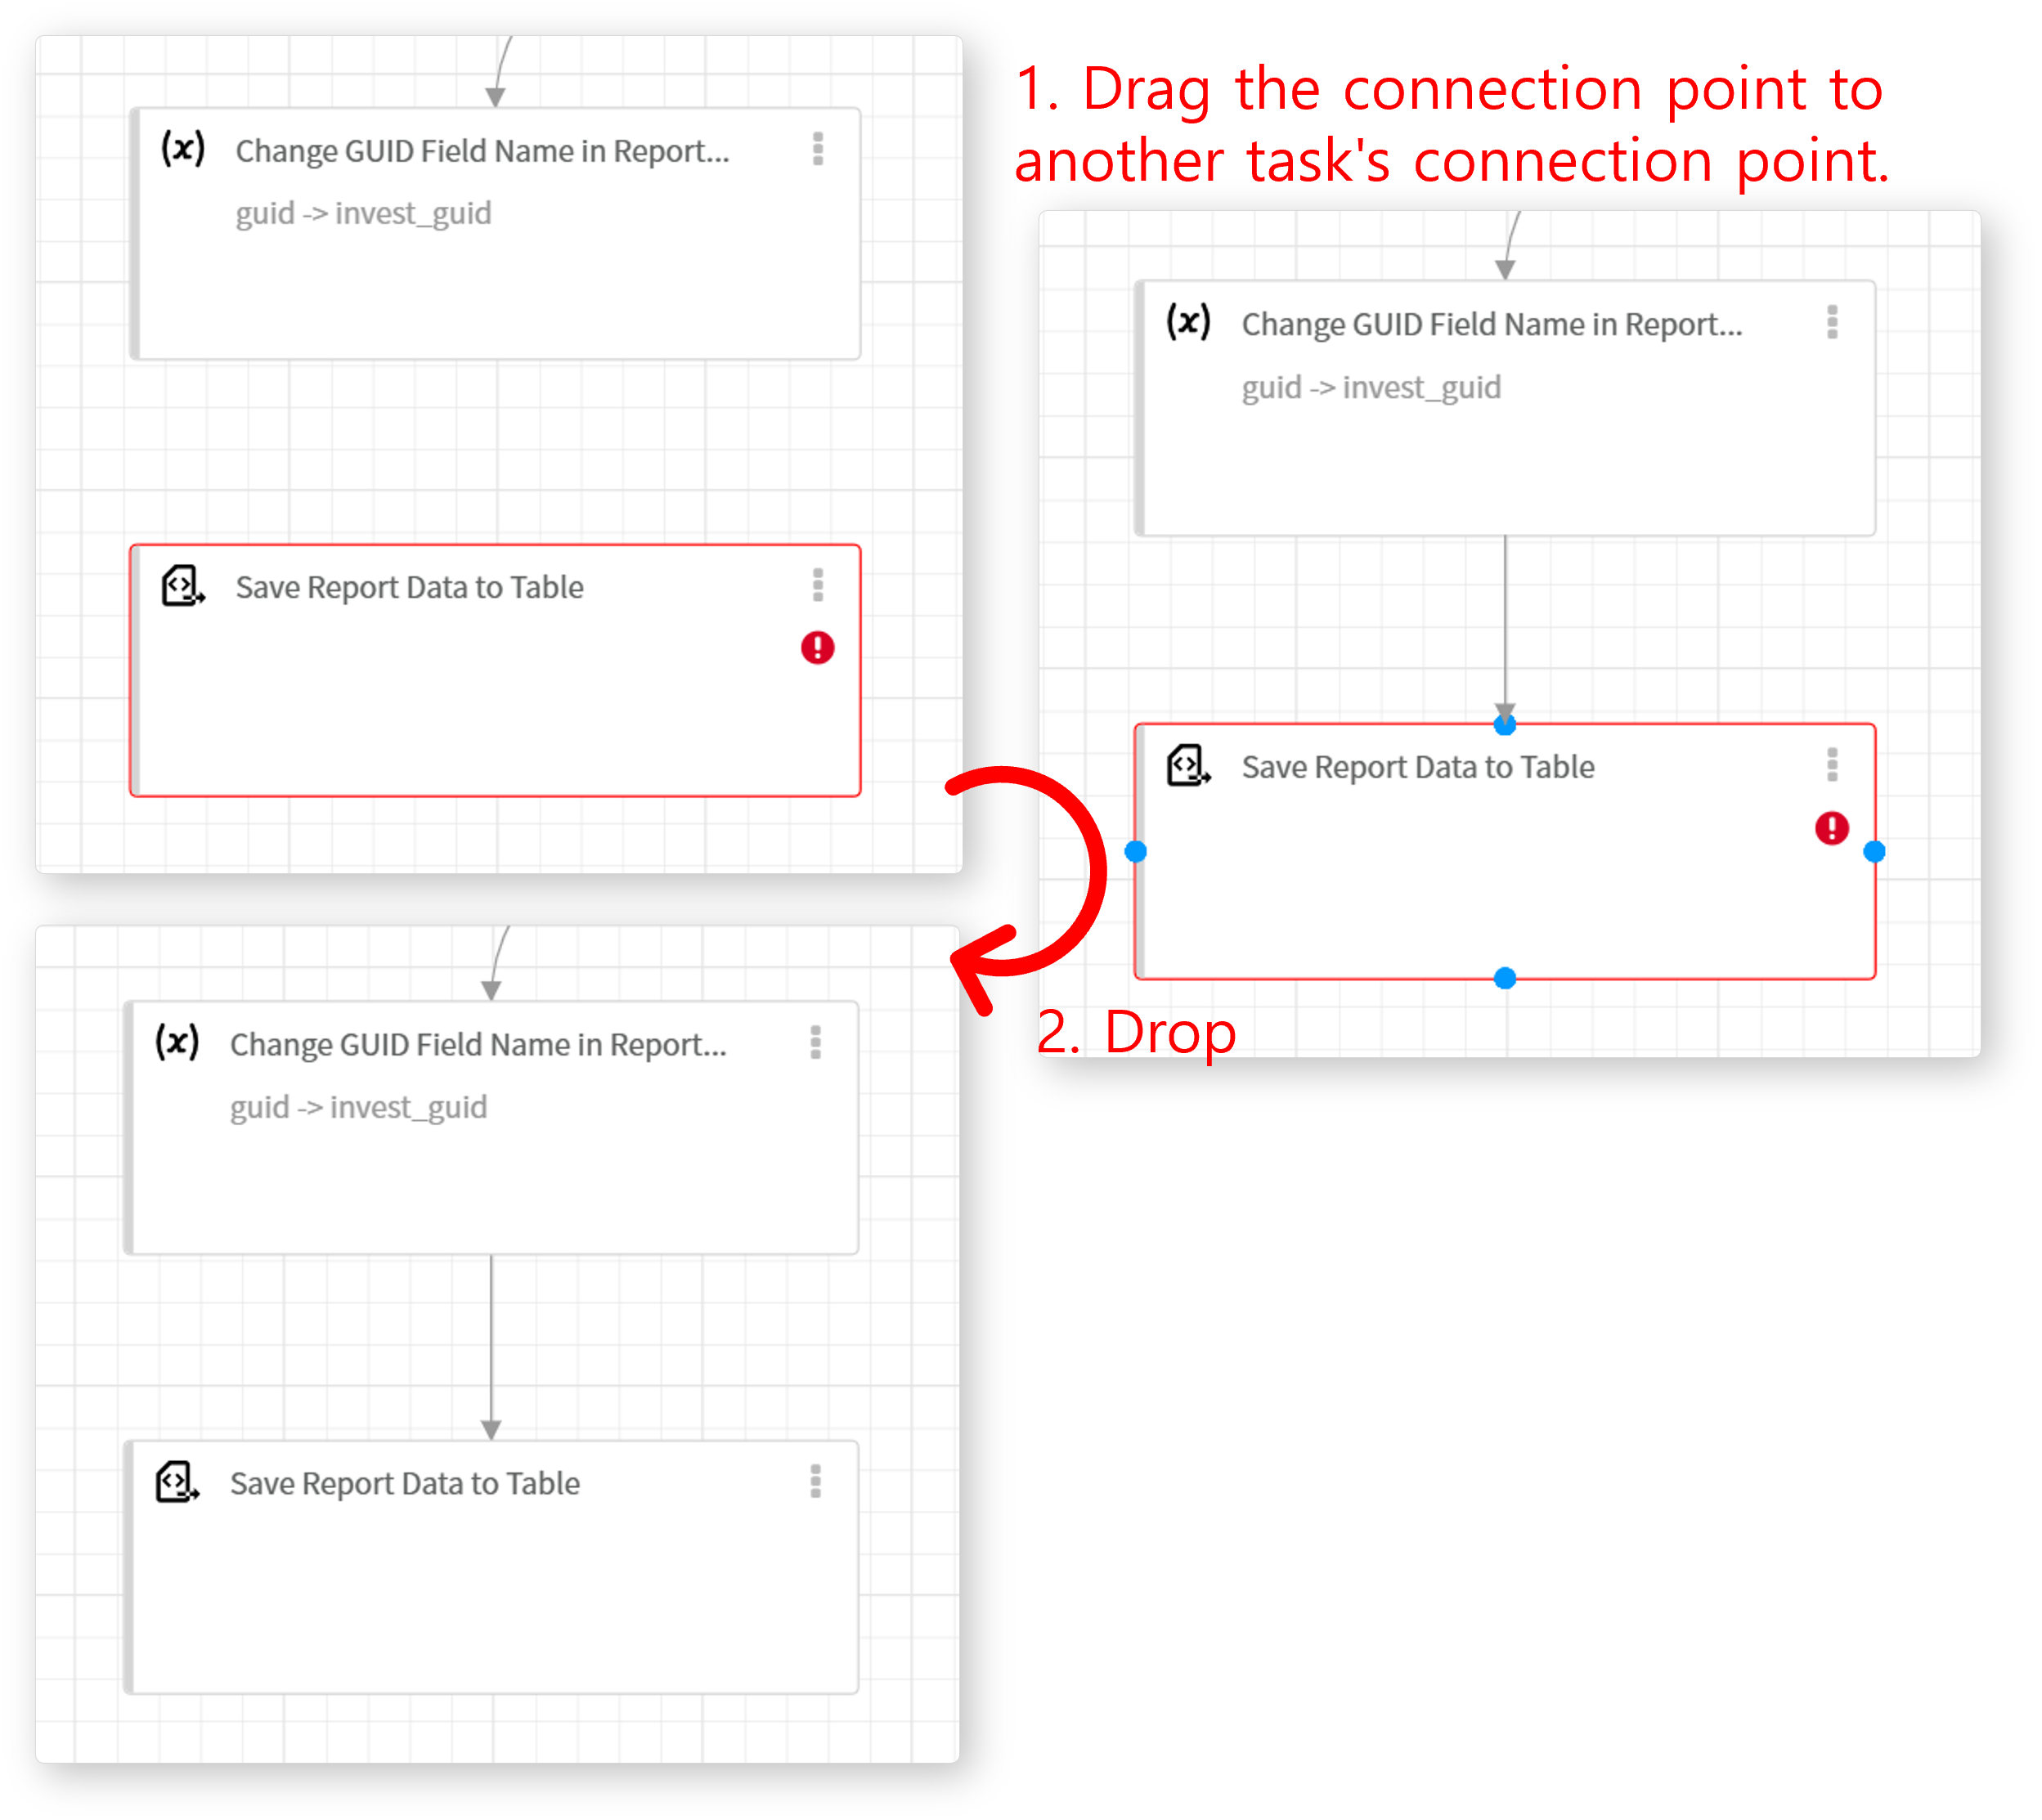
Link Tasks: Dragging a connection point to another task establishes a link between them.
-
Move Flowchart View: Dragging the background or map shifts the view of the playbook editor. The blue-bordered rectangle in the map represents the visible area of the flowchart.
-
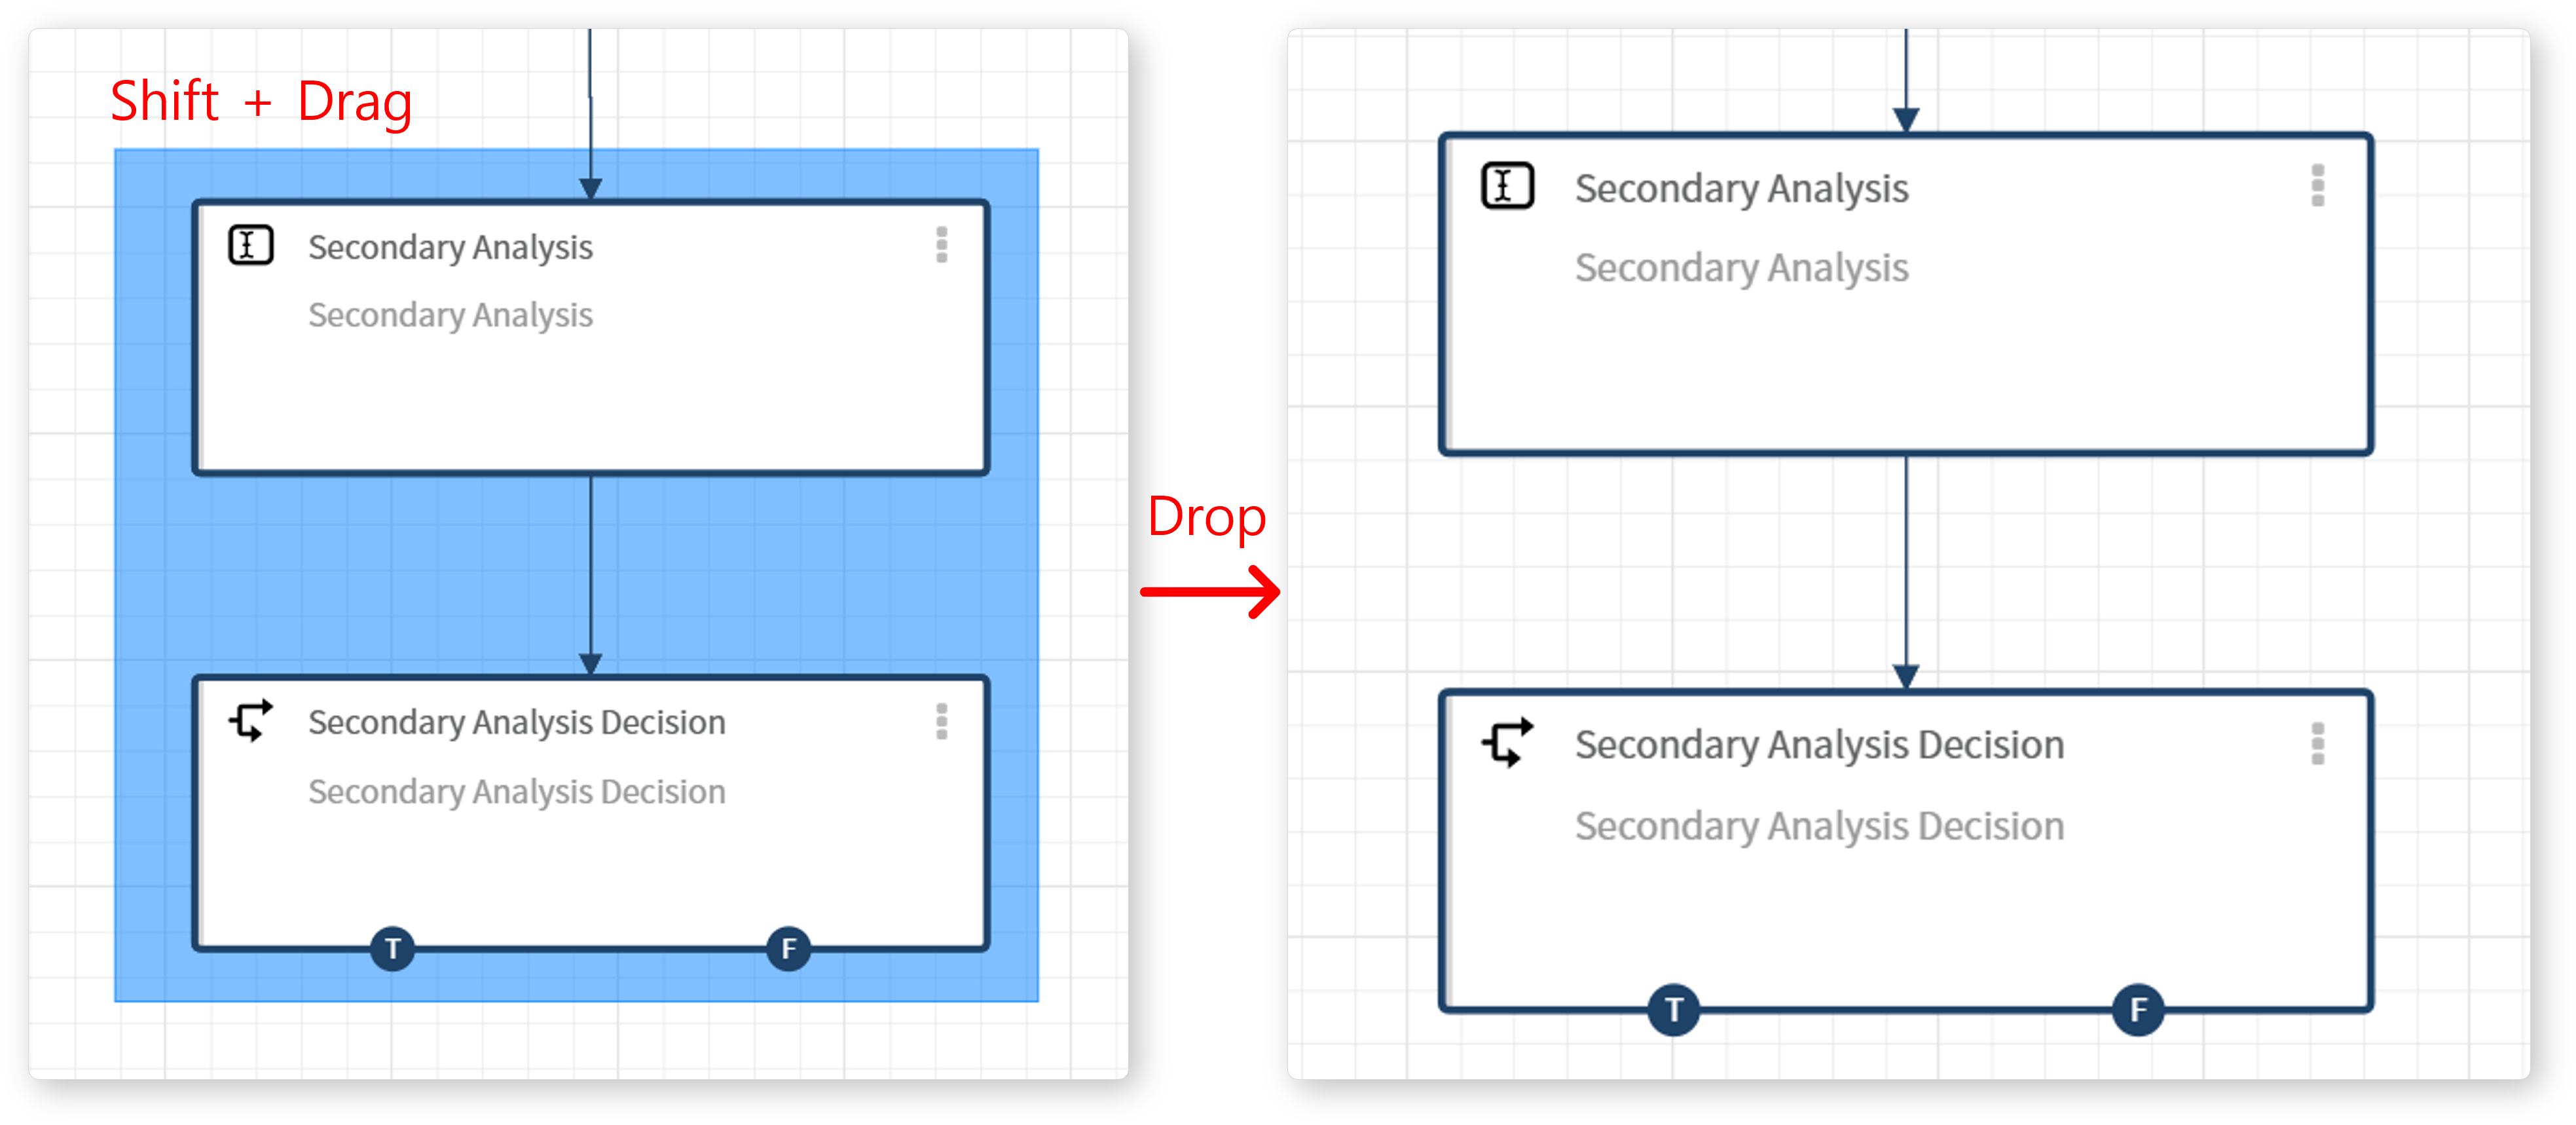
Select Multiple Tasks (Shift + Drag): Holding Shift while dragging creates a selection box. Tasks within the box are selected when the mouse button is released.
Mouse Wheel Scroll
-
Zoom In/Out: Scrolling up zooms in, while scrolling down zooms out.
Shortcuts
Shortcuts allow users to execute commands quickly by pressing specific key combinations. The playbook edit page provides the following shortcuts:
| Windows/Linux | macOS | Function |
|---|---|---|
| ESC | ESC | Deselect, cancel playbook/task property editing |
| Ctrl+Z | Cmd+Z | Undo |
| Ctrl+Y or Ctrl+Shift+Z | Cmd+Shift+Z | Redo |
| Ctrl+A | Cmd+A | Select all tasks and connections in the flowchart |
| + or = | + or = | Zoom in on the flowchart |
| - | - | Zoom out of the flowchart |
| G | G | Show/hide grid |
| F | F | Fit the flowchart to the screen |
| M | M | Show/hide the map |
| Delete or Backspace | Delete or Backspace | Delete the selected task/connection |
Task Connection Rules
A playbook operates by linking tasks in a defined sequence. Tasks can branch into multiple tasks or merge into a single task.
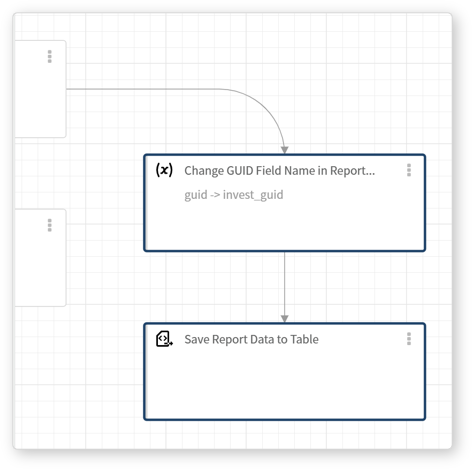
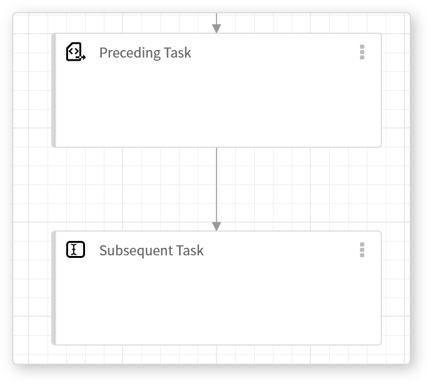
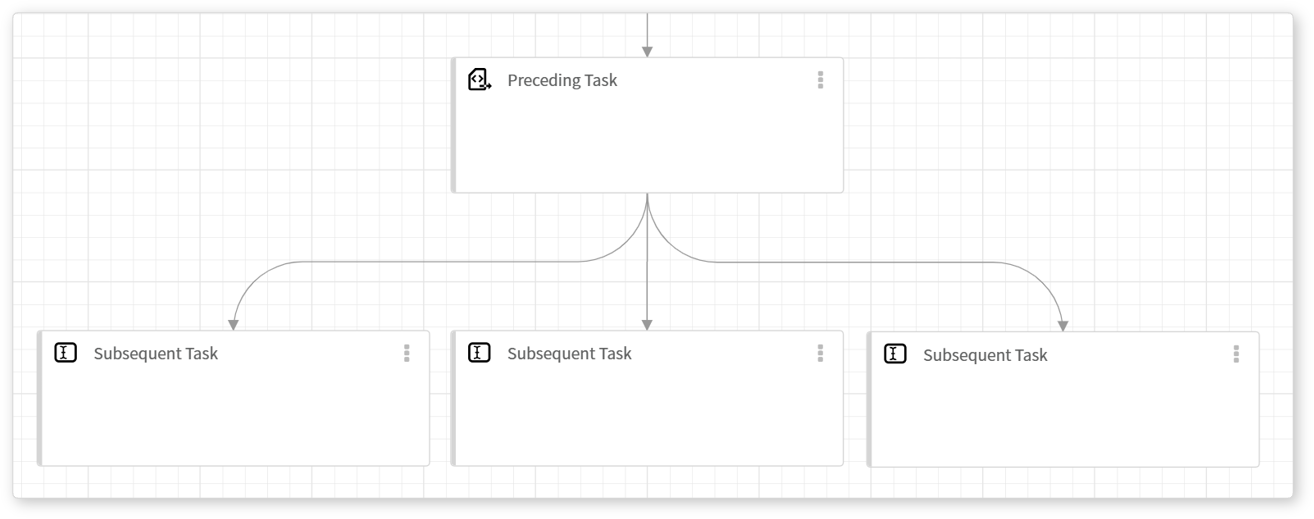
- (1) All tasks must be connected.
- Except for the first task, every task must be connected to at least one preceding task. The example below shows a basic task flow where one task follows another. When the preceding task is completed, the subsequent task executes.
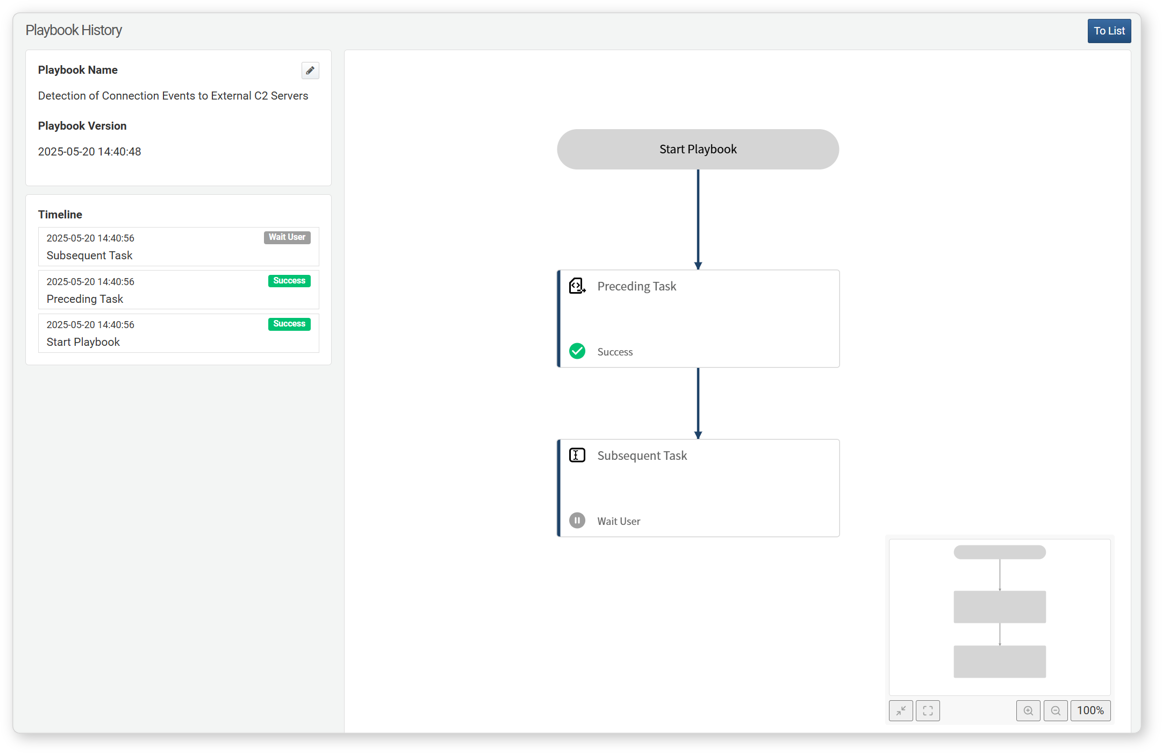
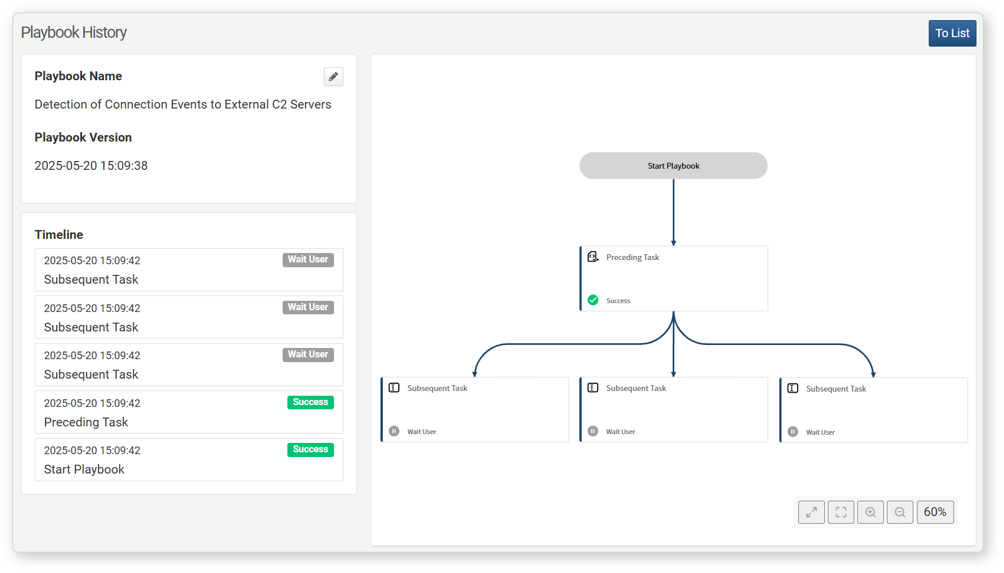
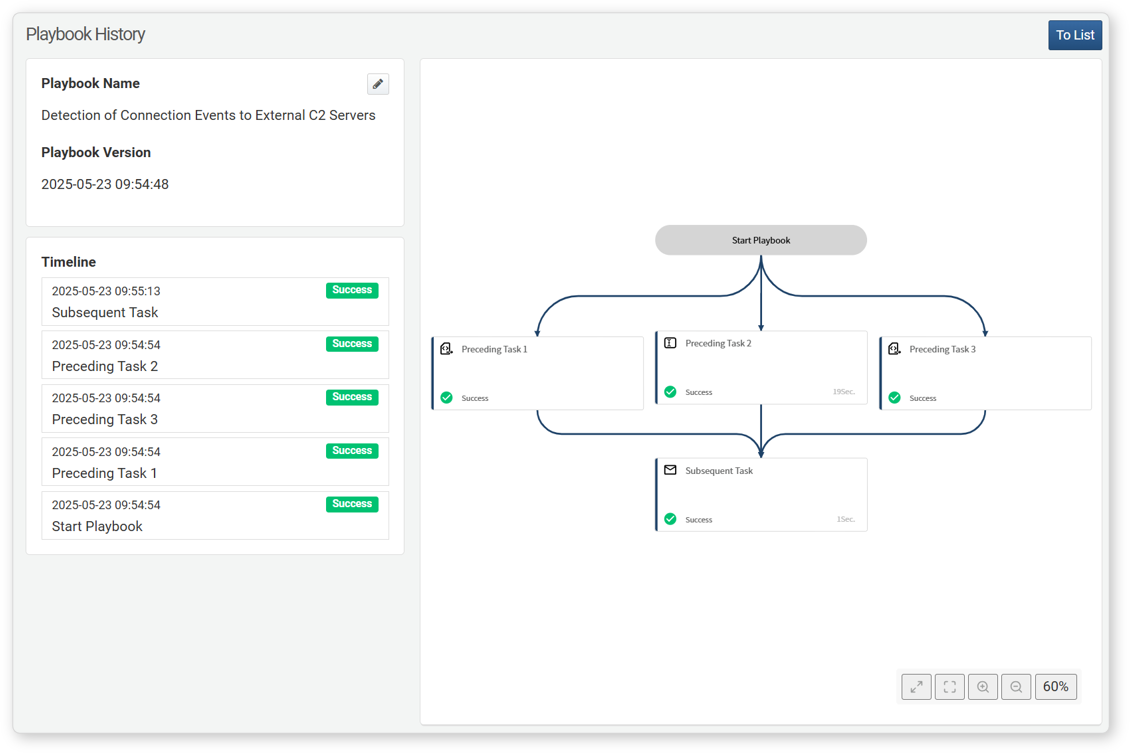
The execution results of a playbook can be reviewed under Response > Response Logs. The following example shows a state where the preceding task is completed, and the subsequent task is awaiting user input.
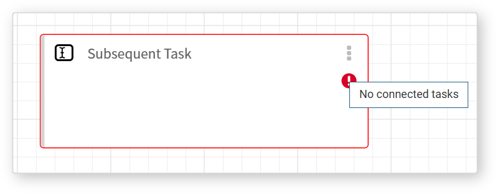
Tasks without any connections will display a warning. Unconnected tasks are considered a logical error, preventing the playbook from being saved.
- (2) 1:N parallel connection
- A single task can be connected to multiple subsequent tasks. When the preceding task is completed, all subsequent tasks execute in parallel.
Following image illustrates how tasks 1, 2, and 3 begin execution simultaneously once the preceding task is completed.
- (3) N:1 connection
- A multiple preceding tasks can be merged into a single subsequent task. The subsequent task will execute only after all preceding tasks are completed.
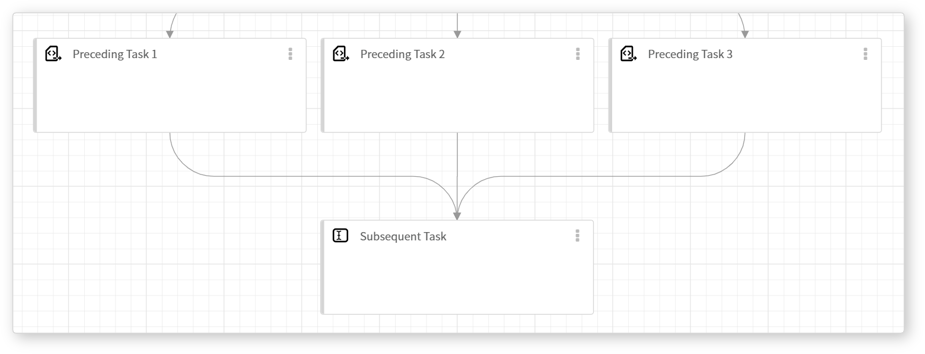
Following example shows a case where tasks 1 and 3 are completed, but task 2 is still pending, preventing the execution of the subsequent task.
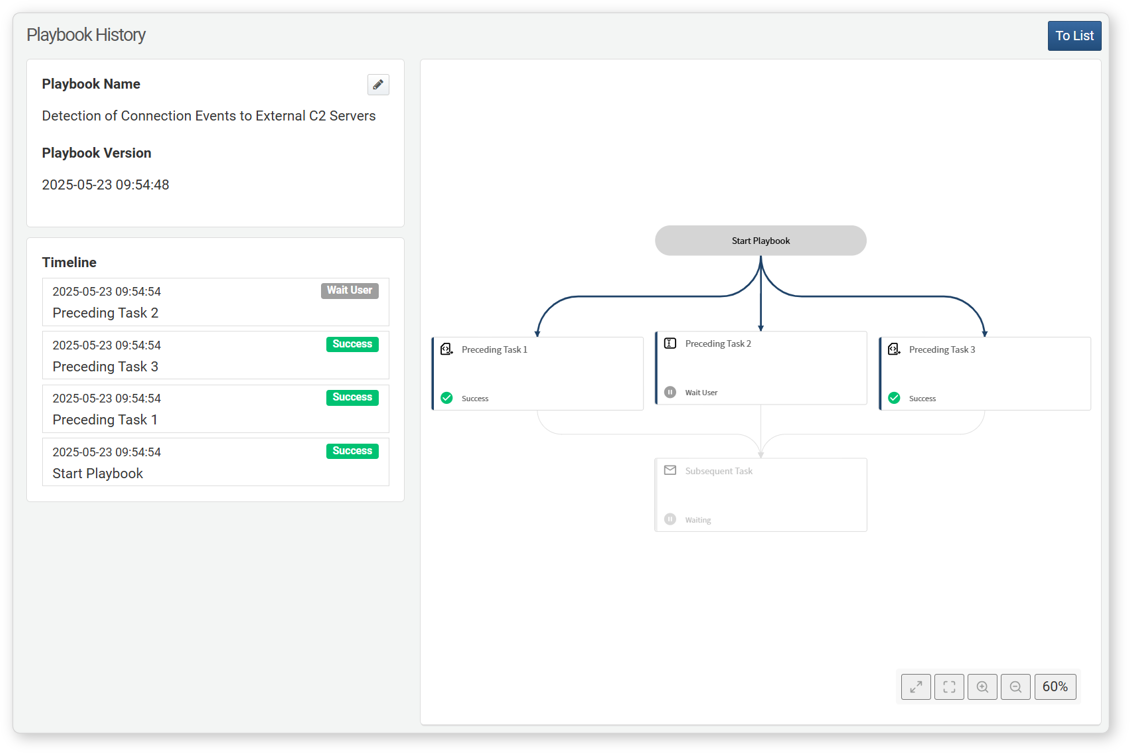
Once task 2 is completed, all preceding tasks are finished, allowing the subsequent task to execute.
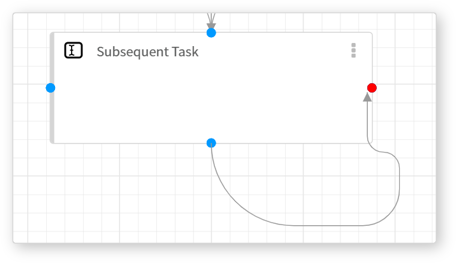
- (4) Infinite loops are not allowed.
- Infinite loops prevent the playbook from completing execution, so they are not allowed. If a task attempts to connect back to itself, the connection handle will turn red, indicating that the connection is invalid.
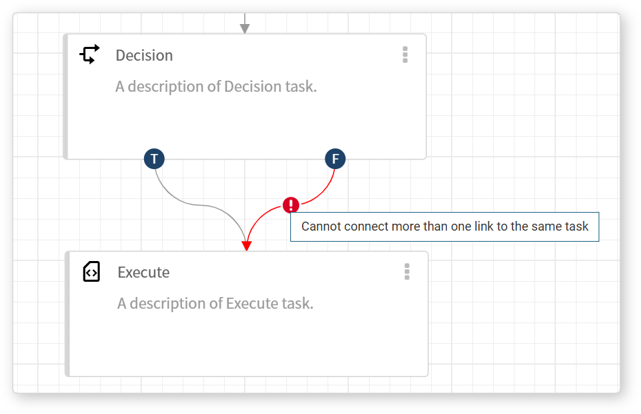
- (5) Two different branches cannot be merged.
- Branching and Approval Request tasks split the workflow into
true(T) andfalse(F) paths based on conditions or approvals. Merging these mutually exclusive paths into a single task creates a logical contradiction, preventing the playbook from being saved.
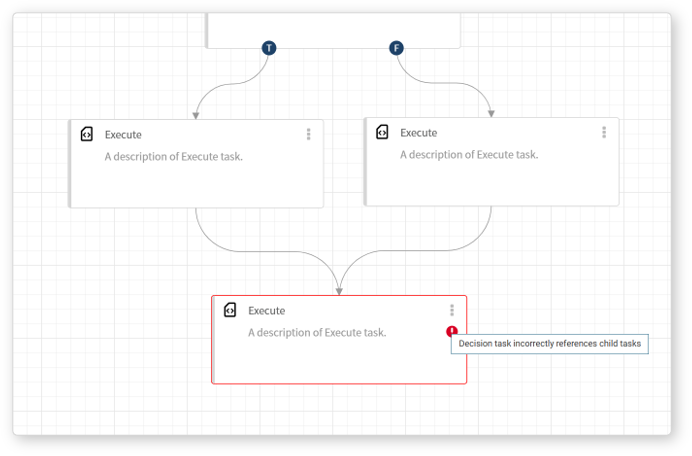
When attempting to merge logically conflicting task flows, a warning will be displayed, as shown in the following image.
Following example illustrates a case where two logically conflicting paths attempt to merge into a single task. A warning appears on the merging task.
Playbook Properties
All playbooks share common properties. Except for the GUID, all properties can be viewed or modified in the properties panel.
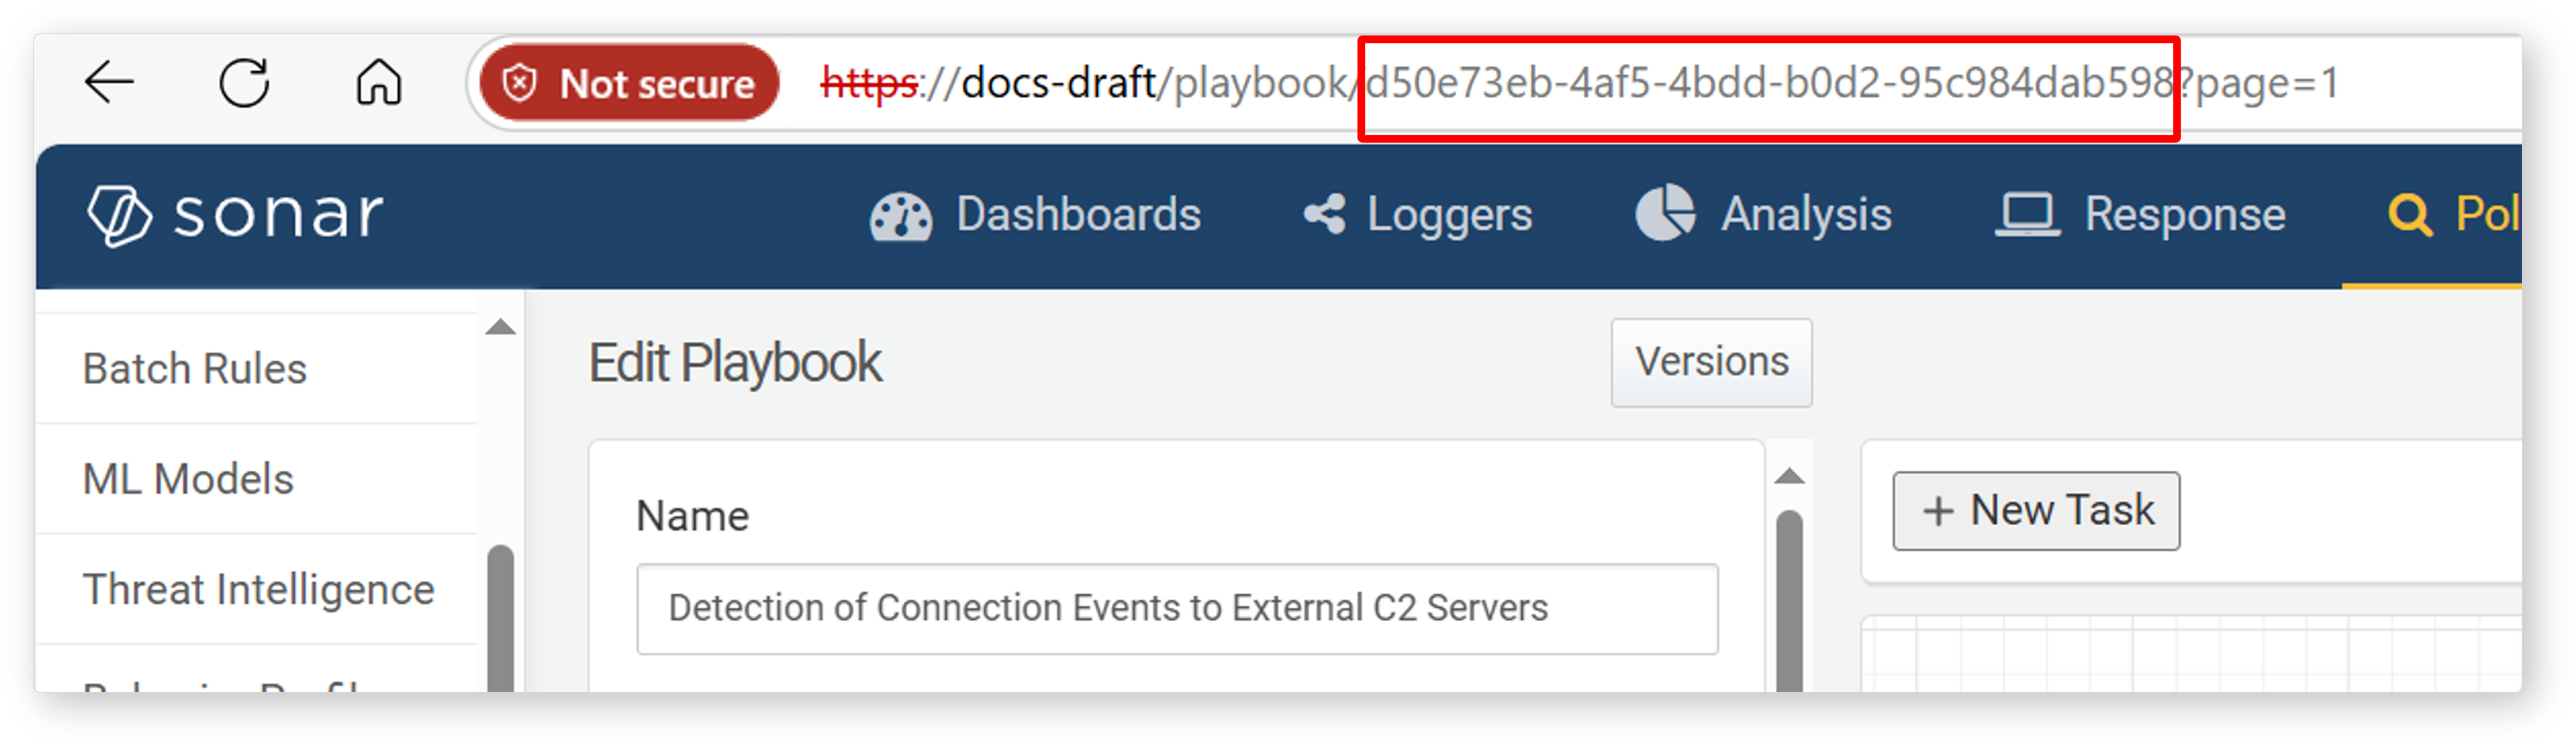
GUID
The GUID of a playbook is a unique property that cannot be viewed or edited in the properties panel. It is automatically assigned to the playbook when the playbook is created and can be found in the web browser's address bar.
A GUID is a unique identifier, meaning that even if two playbooks have different names, they are considered the same if they share the same GUID. Playbooks provided through Apps are assigned predefined GUIDs.
Name
The name of a playbook is a unique property and cannot exceed 50 characters.
Description
The description of a playbook cannot exceed 2,000 characters.
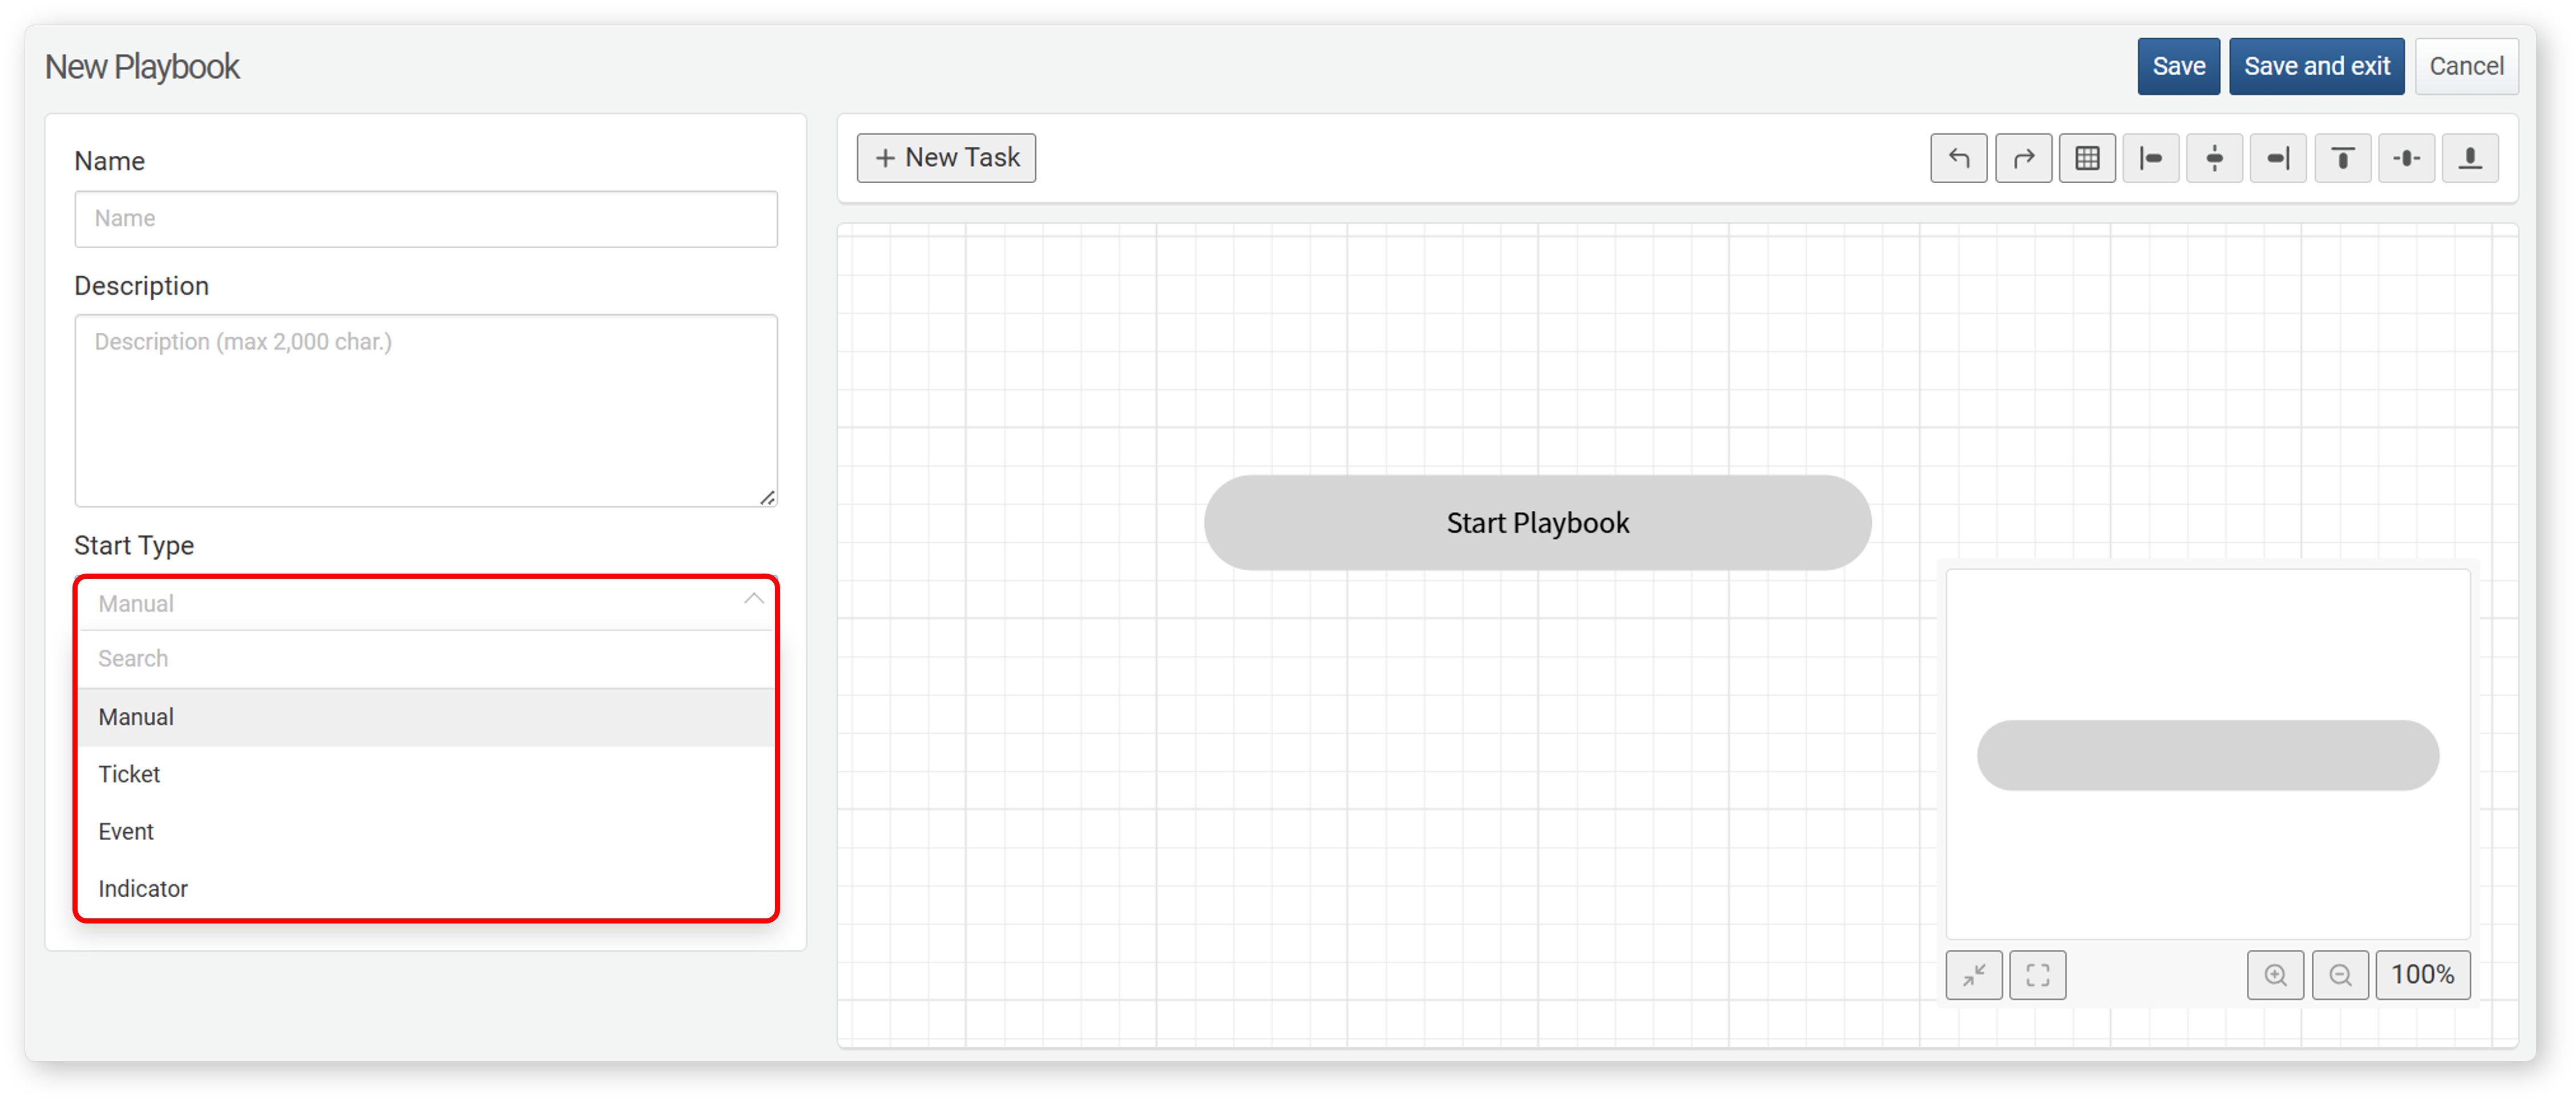
Trigger
The trigger type is a property that defines the execution conditions of a playbook, determining when it should run. Regardless of the trigger type, users can manually execute a playbook at any time.
| Trigger Type | Property | Description |
|---|---|---|
| Manual | Input/Output Parameters | Executed manually by the user or triggered by another playbook. |
| Ticket | scenarios | Executes when a ticket is generated in one or more specified scenarios. |
| Event | scenarios | Executes when an event occurs in one or more specified scenarios. |
| Indicator | Trigger Condition | Executes when a specific indicator of compromise is added. |
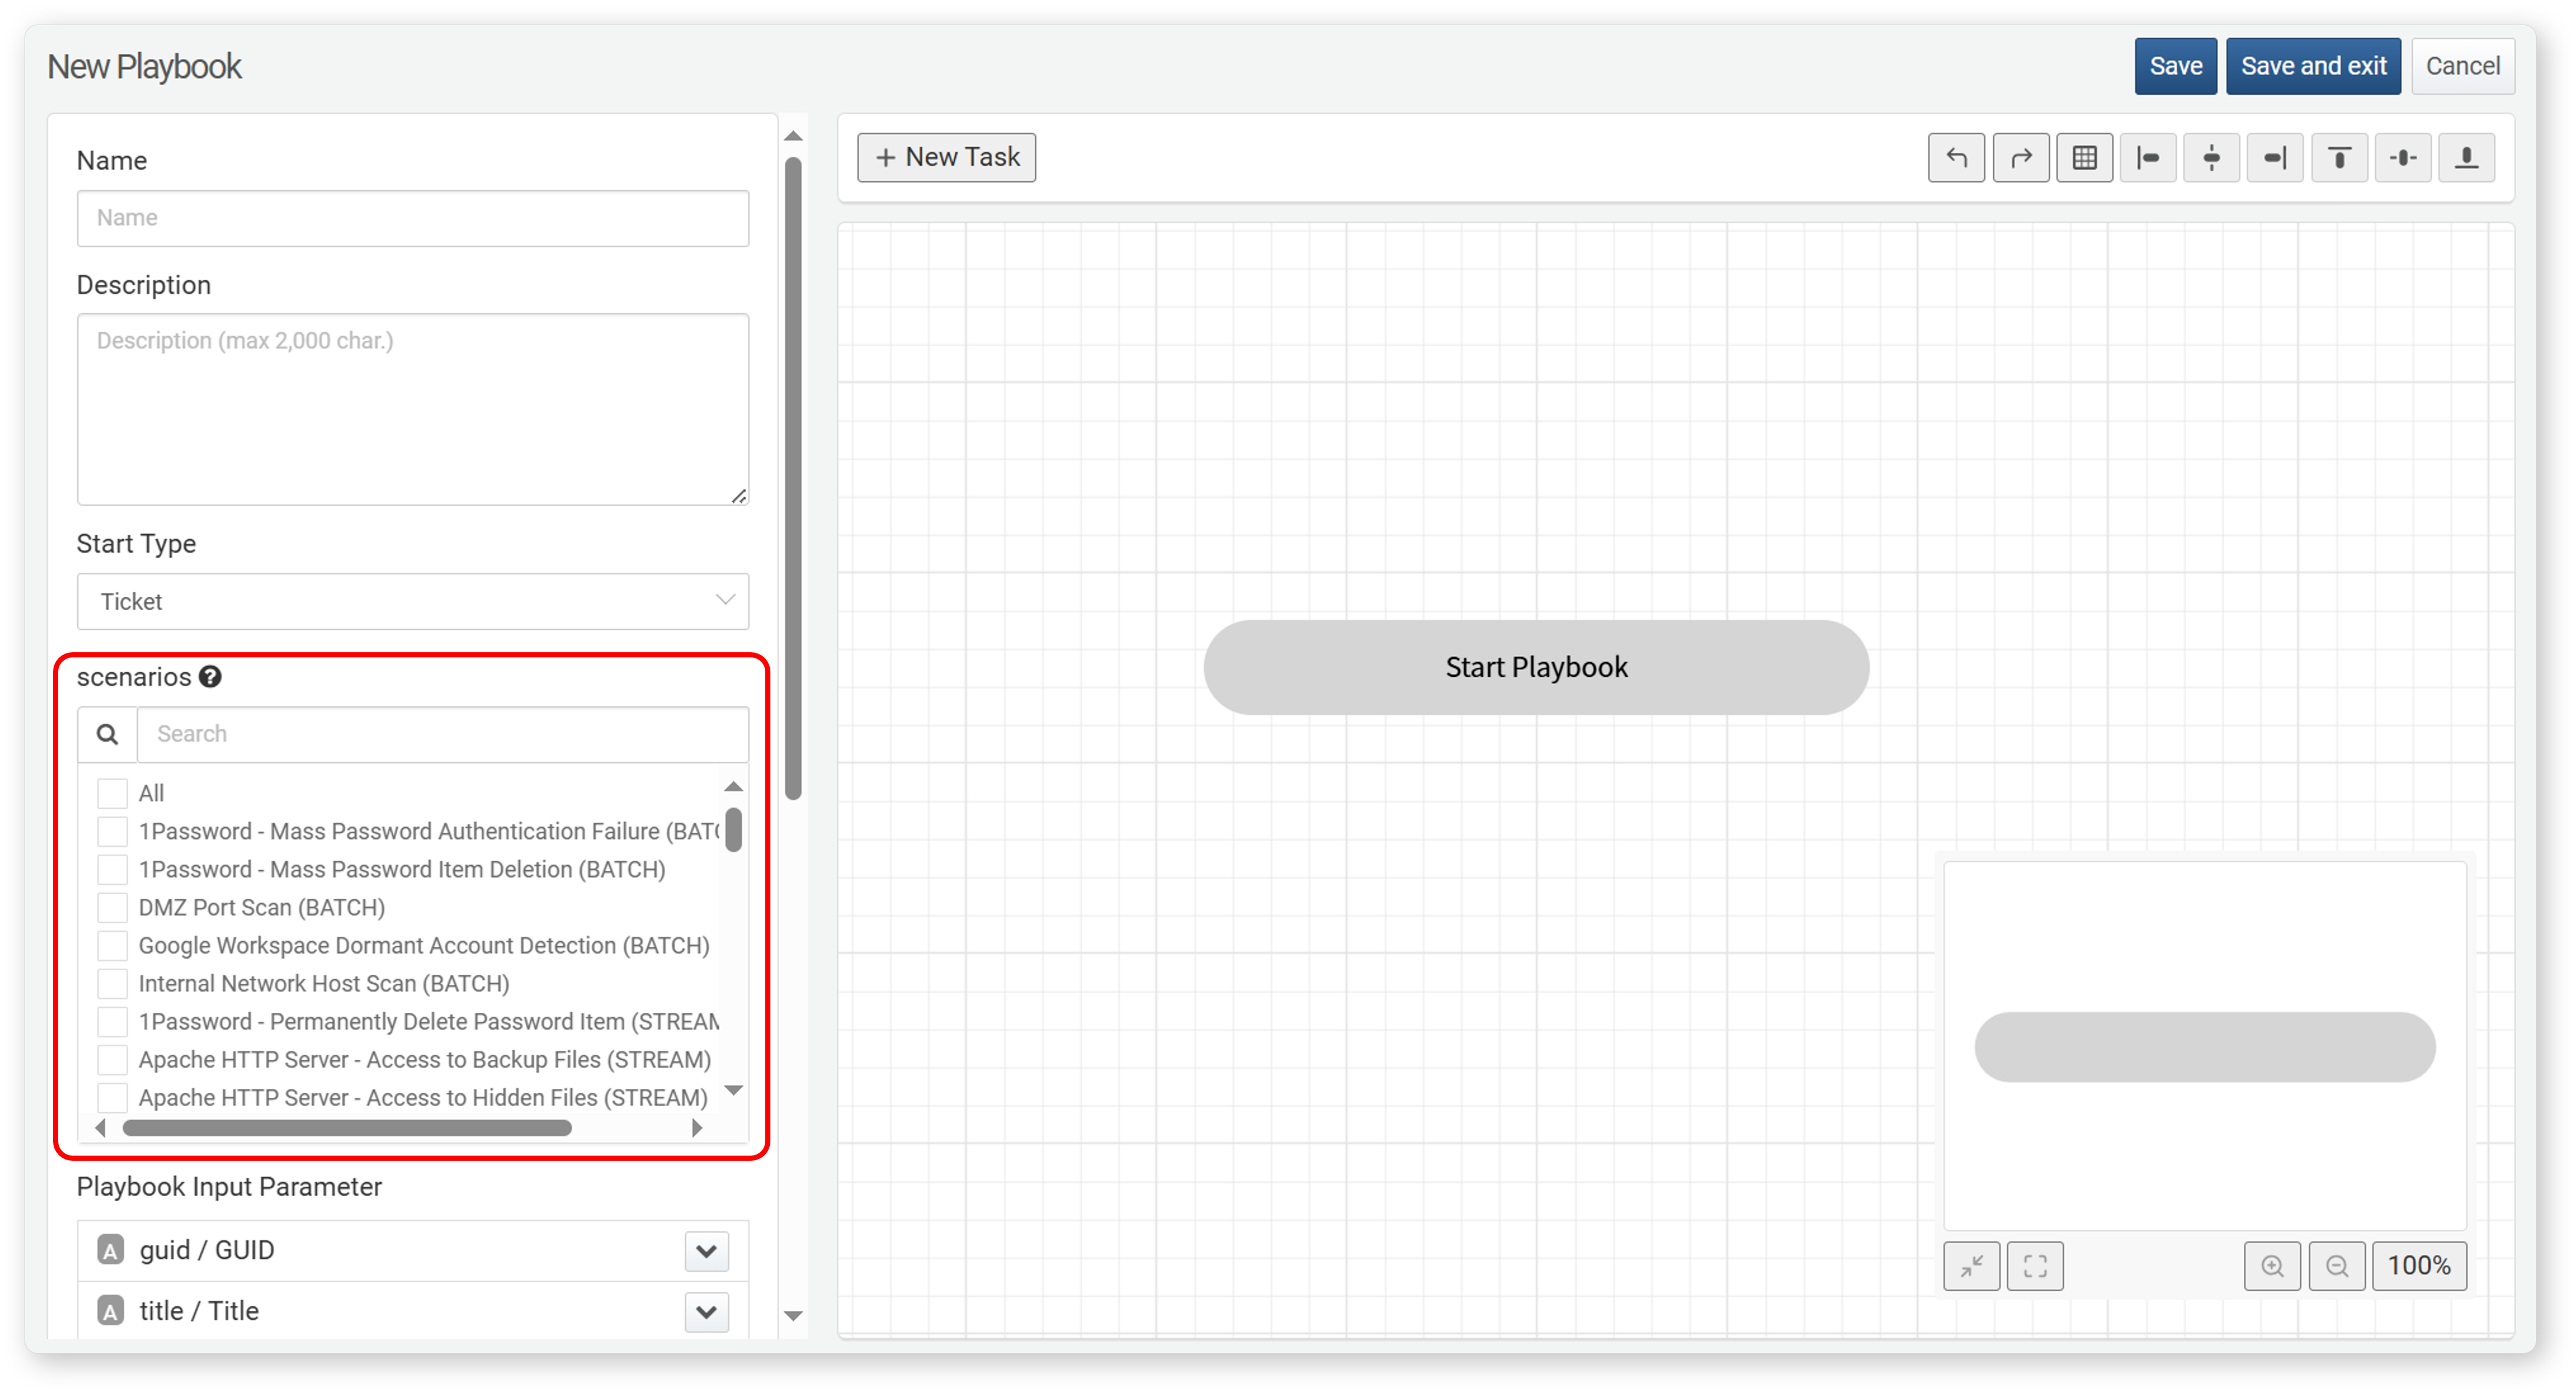
Rules
The Rules (scenarios) lists the applicable rules when the Trigger is set to Ticket creation or Event creation. Select the rules in which the playbook should be executed.
Input/Output Parameters
Playbook input parameters and playbook output parameters play a key role in the playbook workflow.
- Input Parameters: Used as inputs for the workflow.
- Output Parameters: Used to return values once all tasks are completed.
Input Parameters
When the Trigger type is Ticket, Event, or IOC creation, the following input parameters are available:
| Input Parameter | Name | Ticket | Event | IoC |
|---|---|---|---|---|
| guid | GUID | O | O | |
| title | Title | O | ||
| first_seen | First Seen | O | O | |
| last_seen | Last Seen | O | O | |
| priority | Priority | O | O | |
| src_ip | Source IP | O | O | |
| src_port | Source Port | O | O | |
| dst_ip | Destination IP | O | O | |
| dst_port | Destination Port | O | O | |
| protocol | Protocol | O | O | |
| user | User | O | O | |
| host_ip | Host | O | O | |
| mail_from | Mail Sender | O | O | |
| mail_to | Mail Reciever | O | O | |
| mail_cc | Mail CC | O | O | |
| url | URL | O | O | O |
| md5 | MD5 | O | O | O |
| IP Address | IP Address | O | ||
| Domain | Domain | O | ||
| Email Address | O |
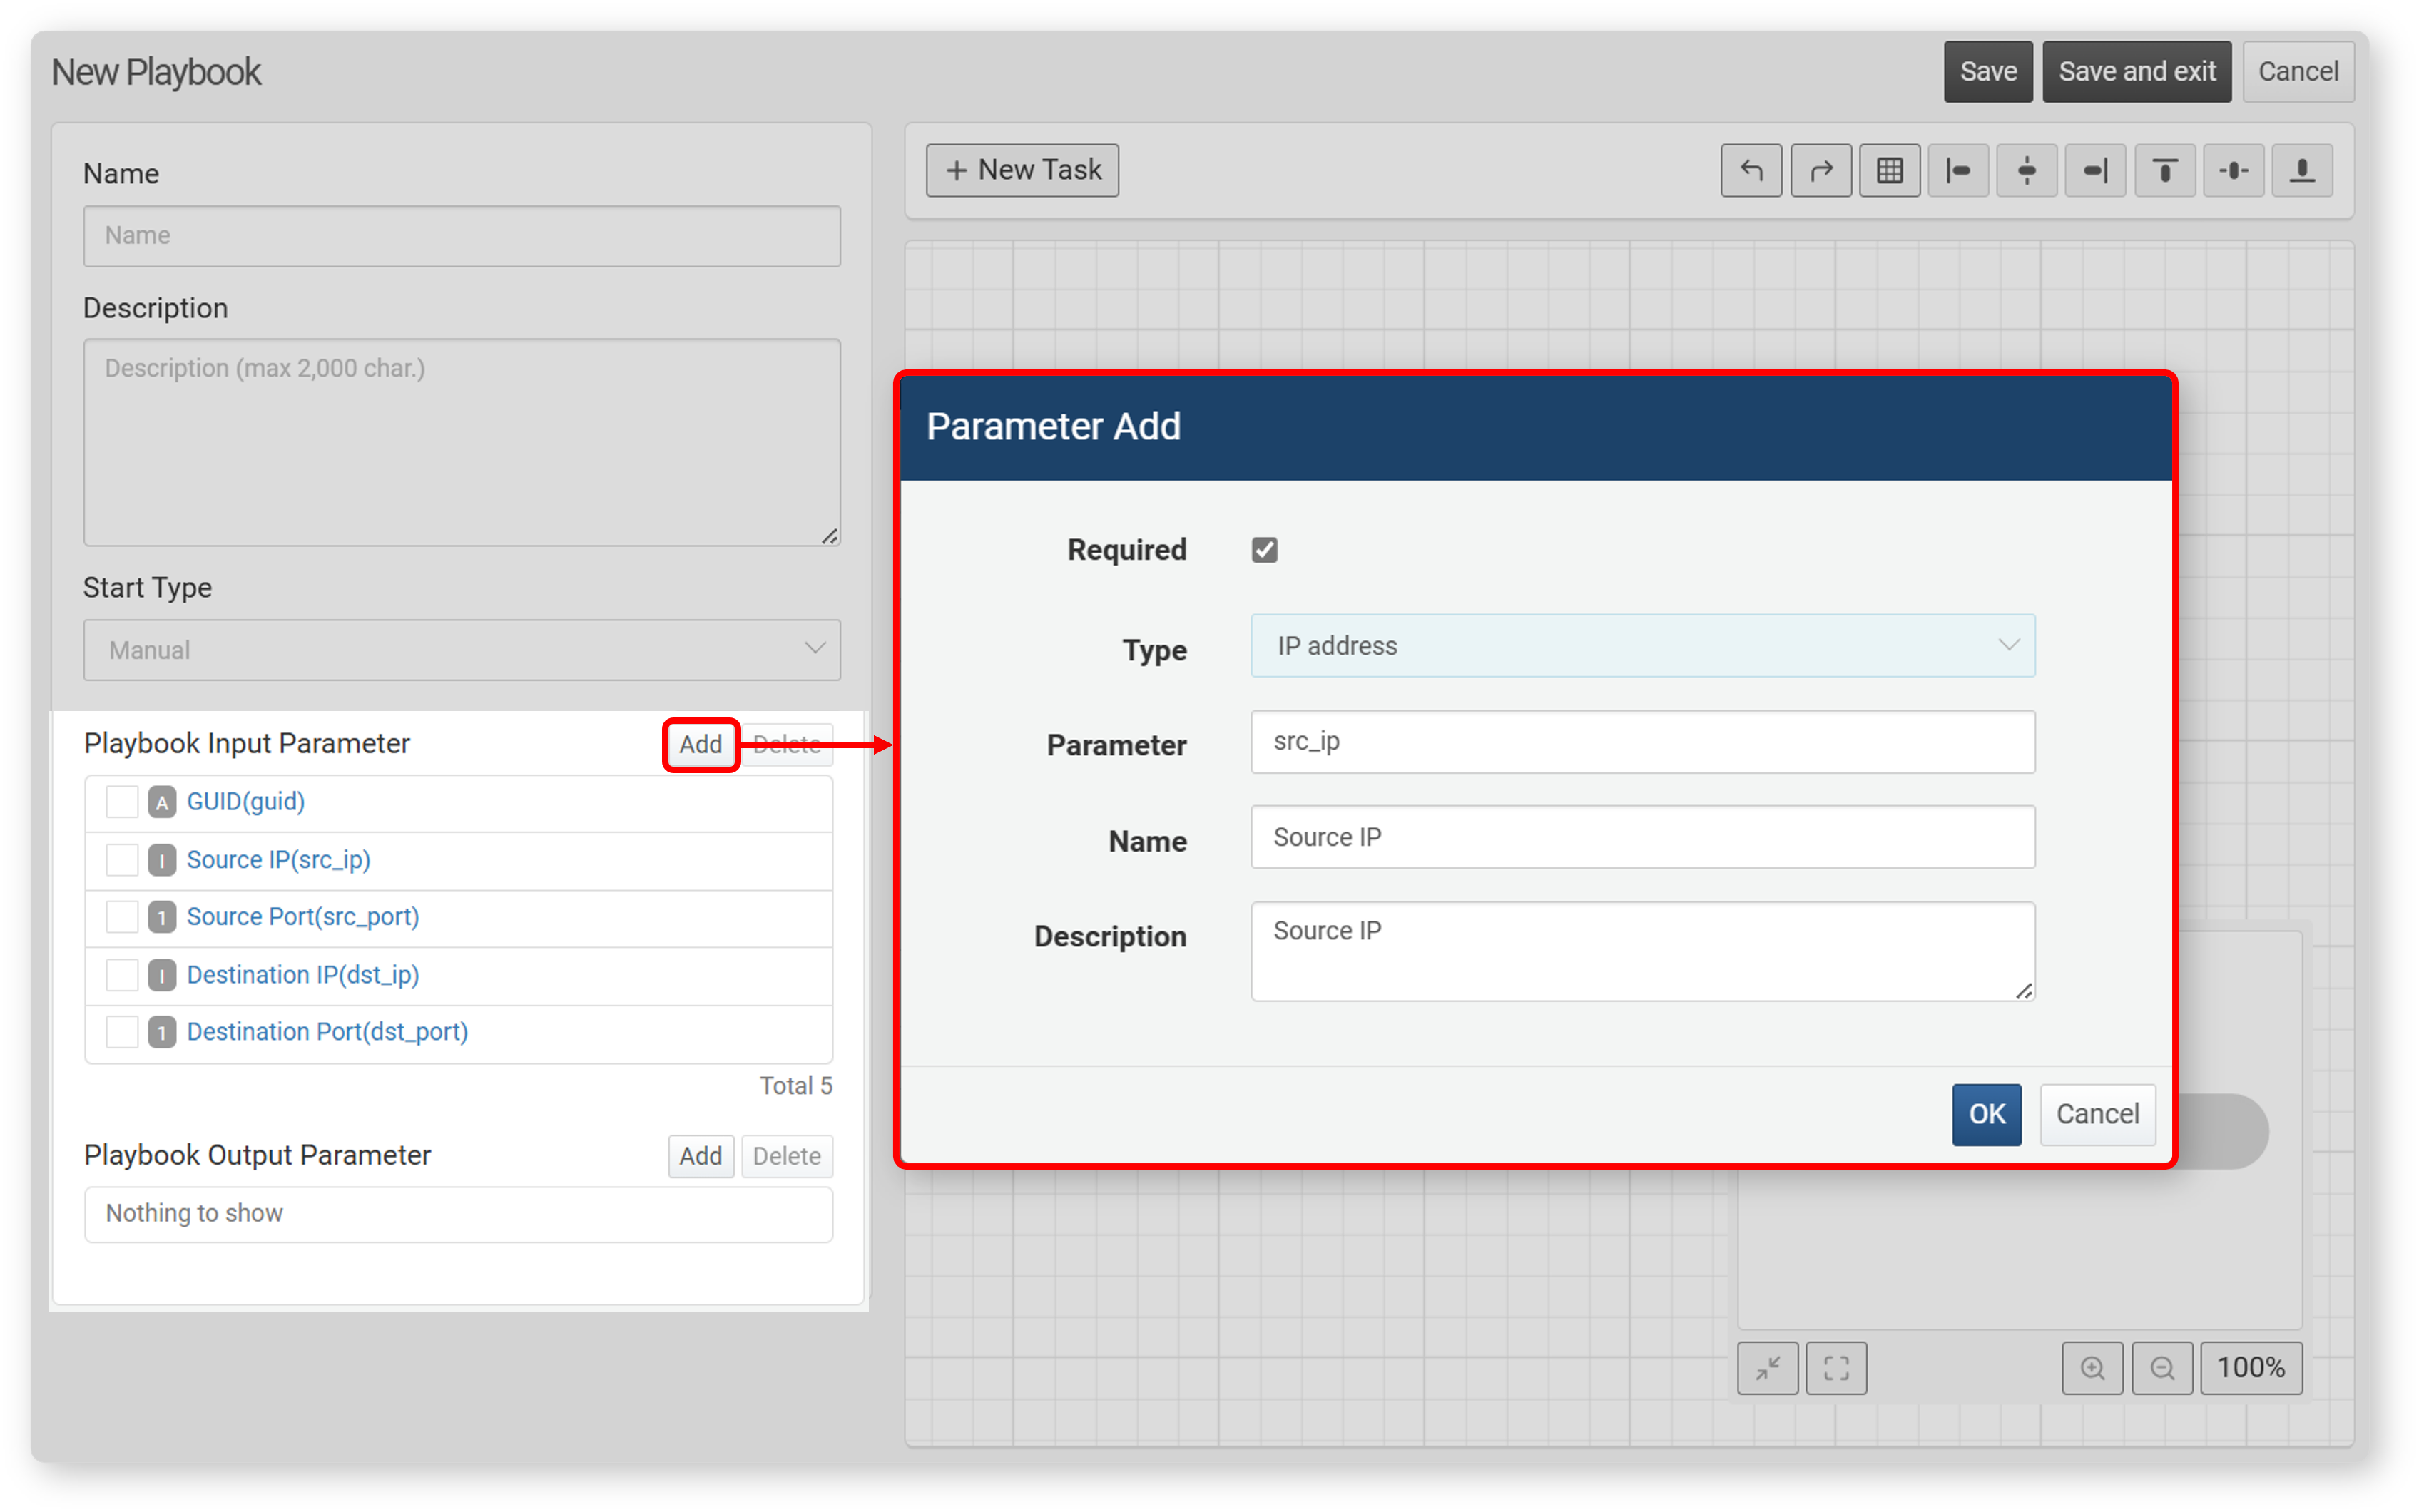
However, if the trigger type is Manual, input parameters must be defined manually. To add an input parameter, go to the playbook input parameter section in the property panel and click Add.
-
Required: Select to mark the parameter as mandatory.
-
Type: Data type (String, Date, Integer, Float, IP Address, Boolean)
-
Parameter: Field name to be designated as a parameter
-
Name: Display name of the parameter
-
Description: Explanation of the parameter
-
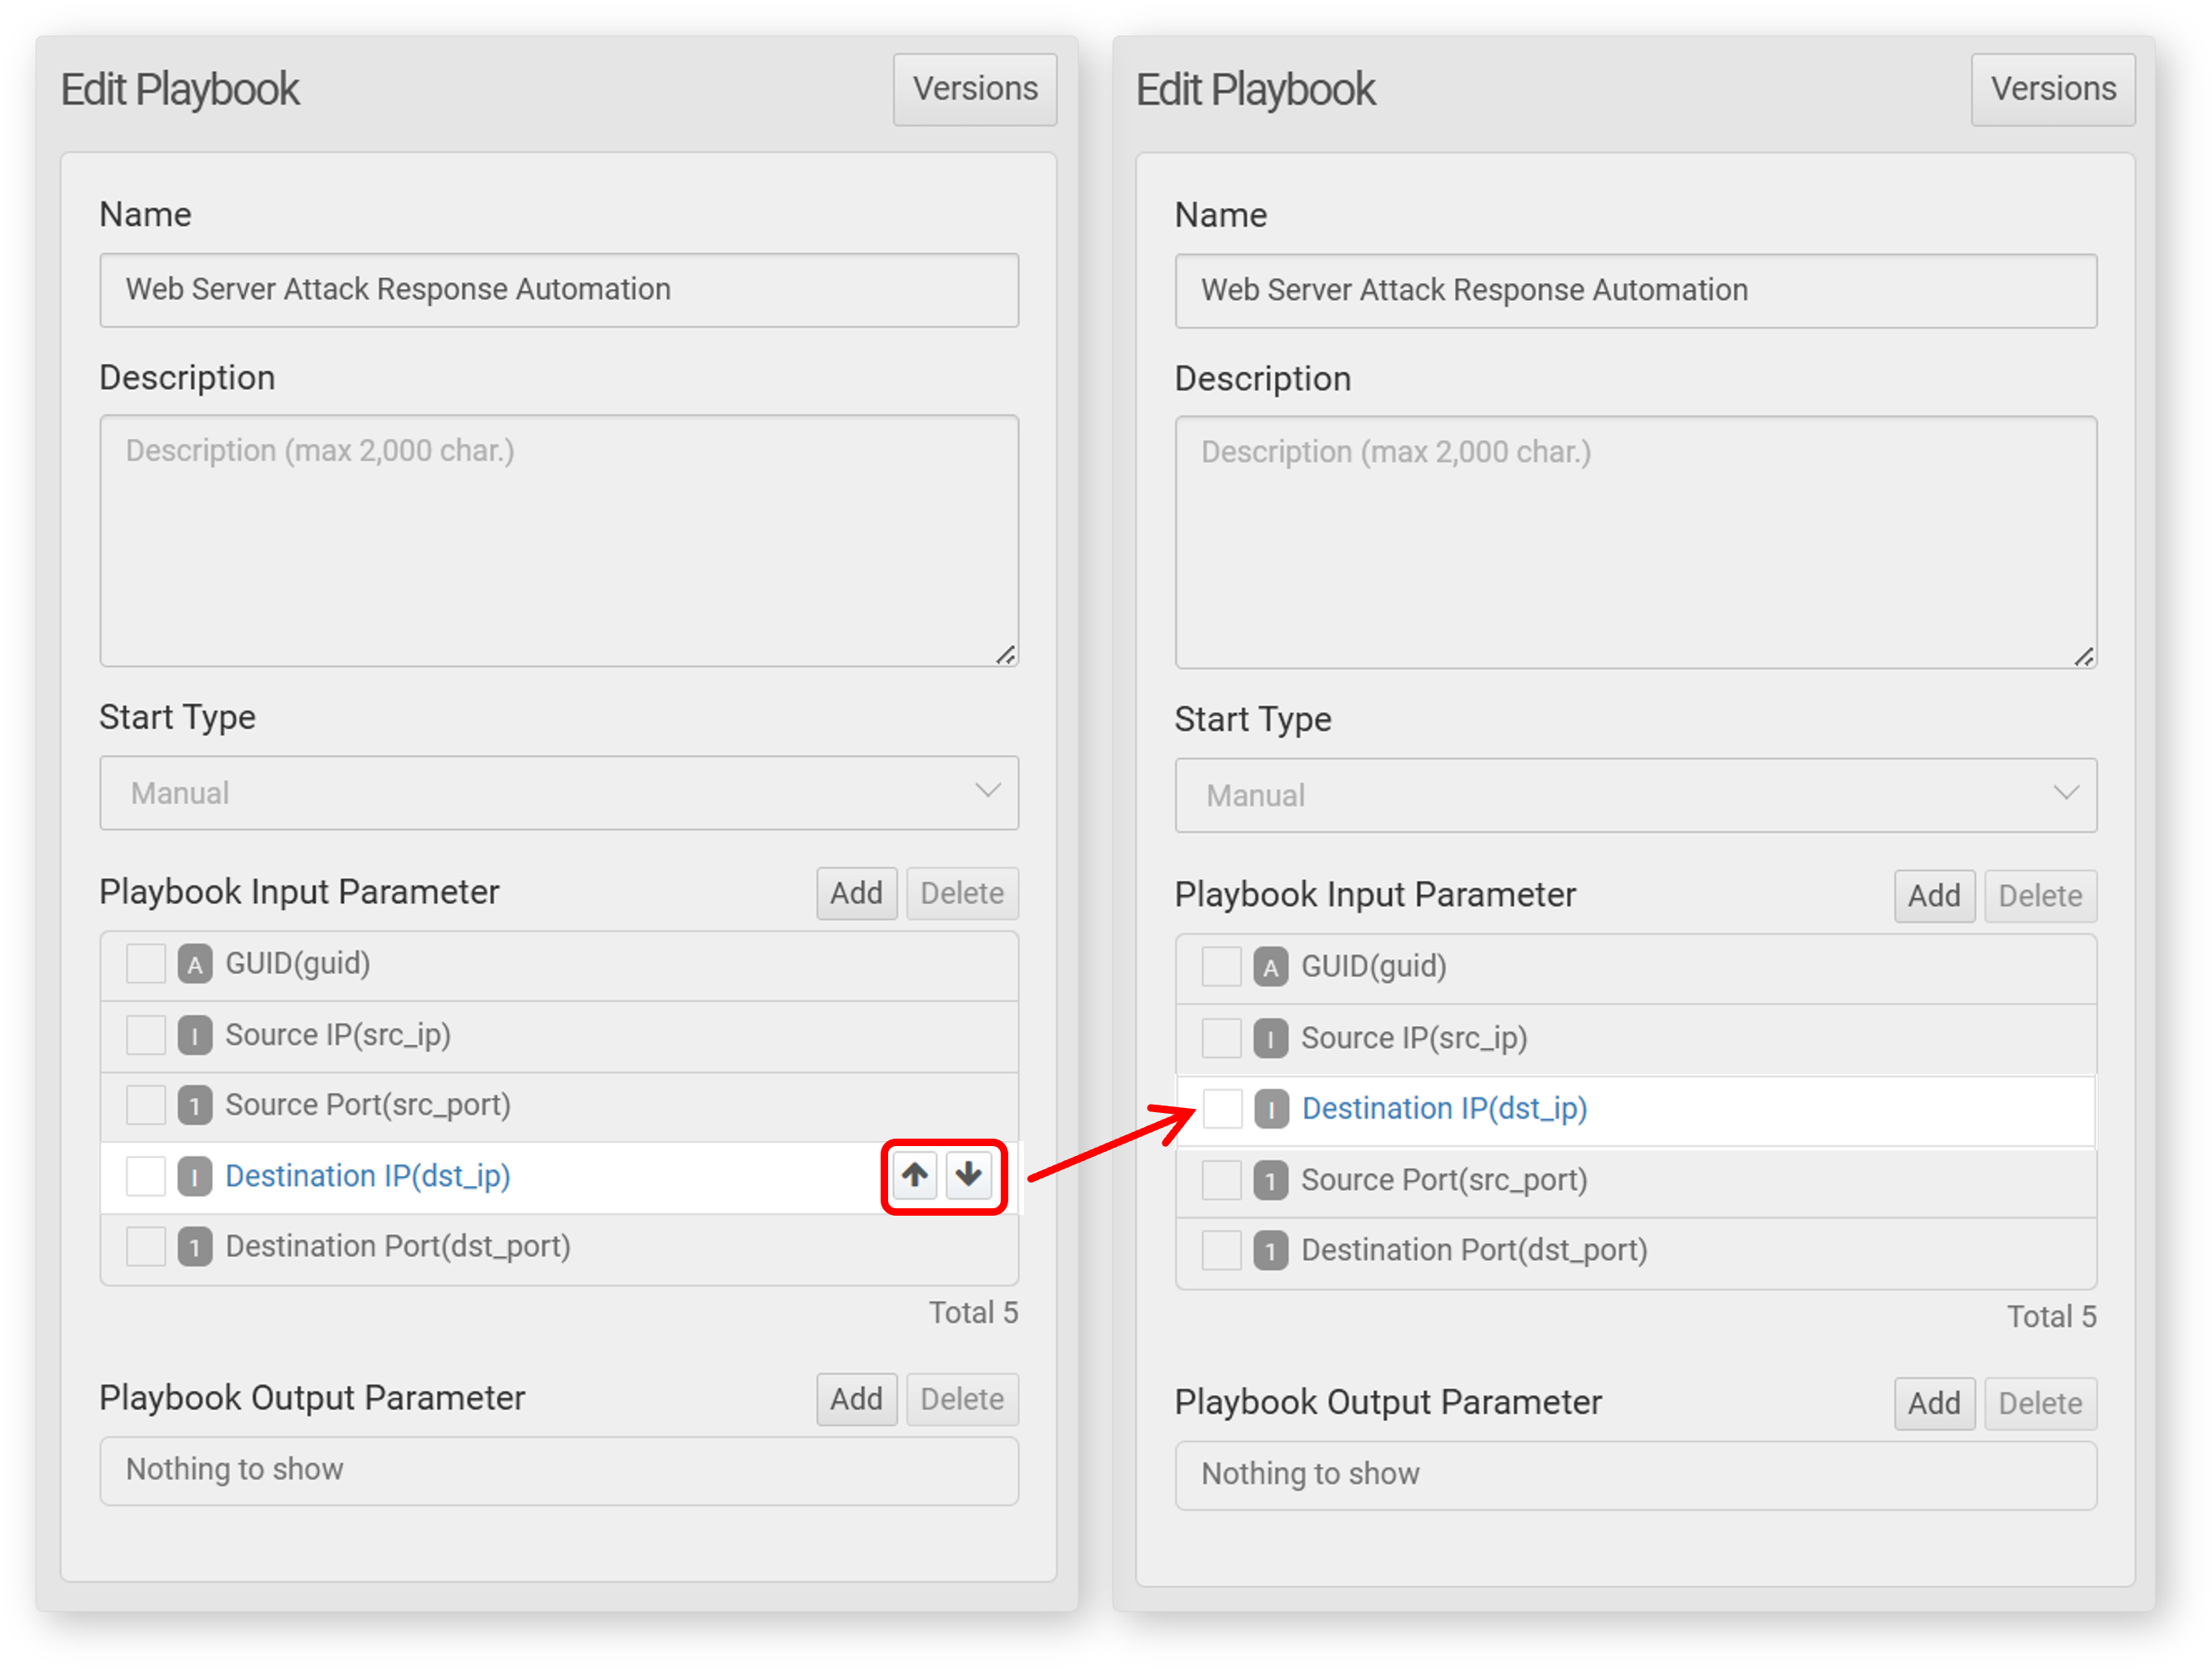
To edit an input parameter, click its Name.
-
To change the order of input parameters, hover over the input parameter row. When the arrow button appears, click it in the desired direction.
-
To delete an input parameter, select the checkbox in the row of the parameter to be deleted and click Delete.
Output Parameters
Output parameters can be selected from the Input Parameter. To add an output parameter, click Add in the Output Parameter section.
Output parameters cannot be modified after creation. To change an output parameter, you must first delete it and then add a new one. To delete an output parameter, select the checkbox in the row of the parameter to be deleted and click Delete.
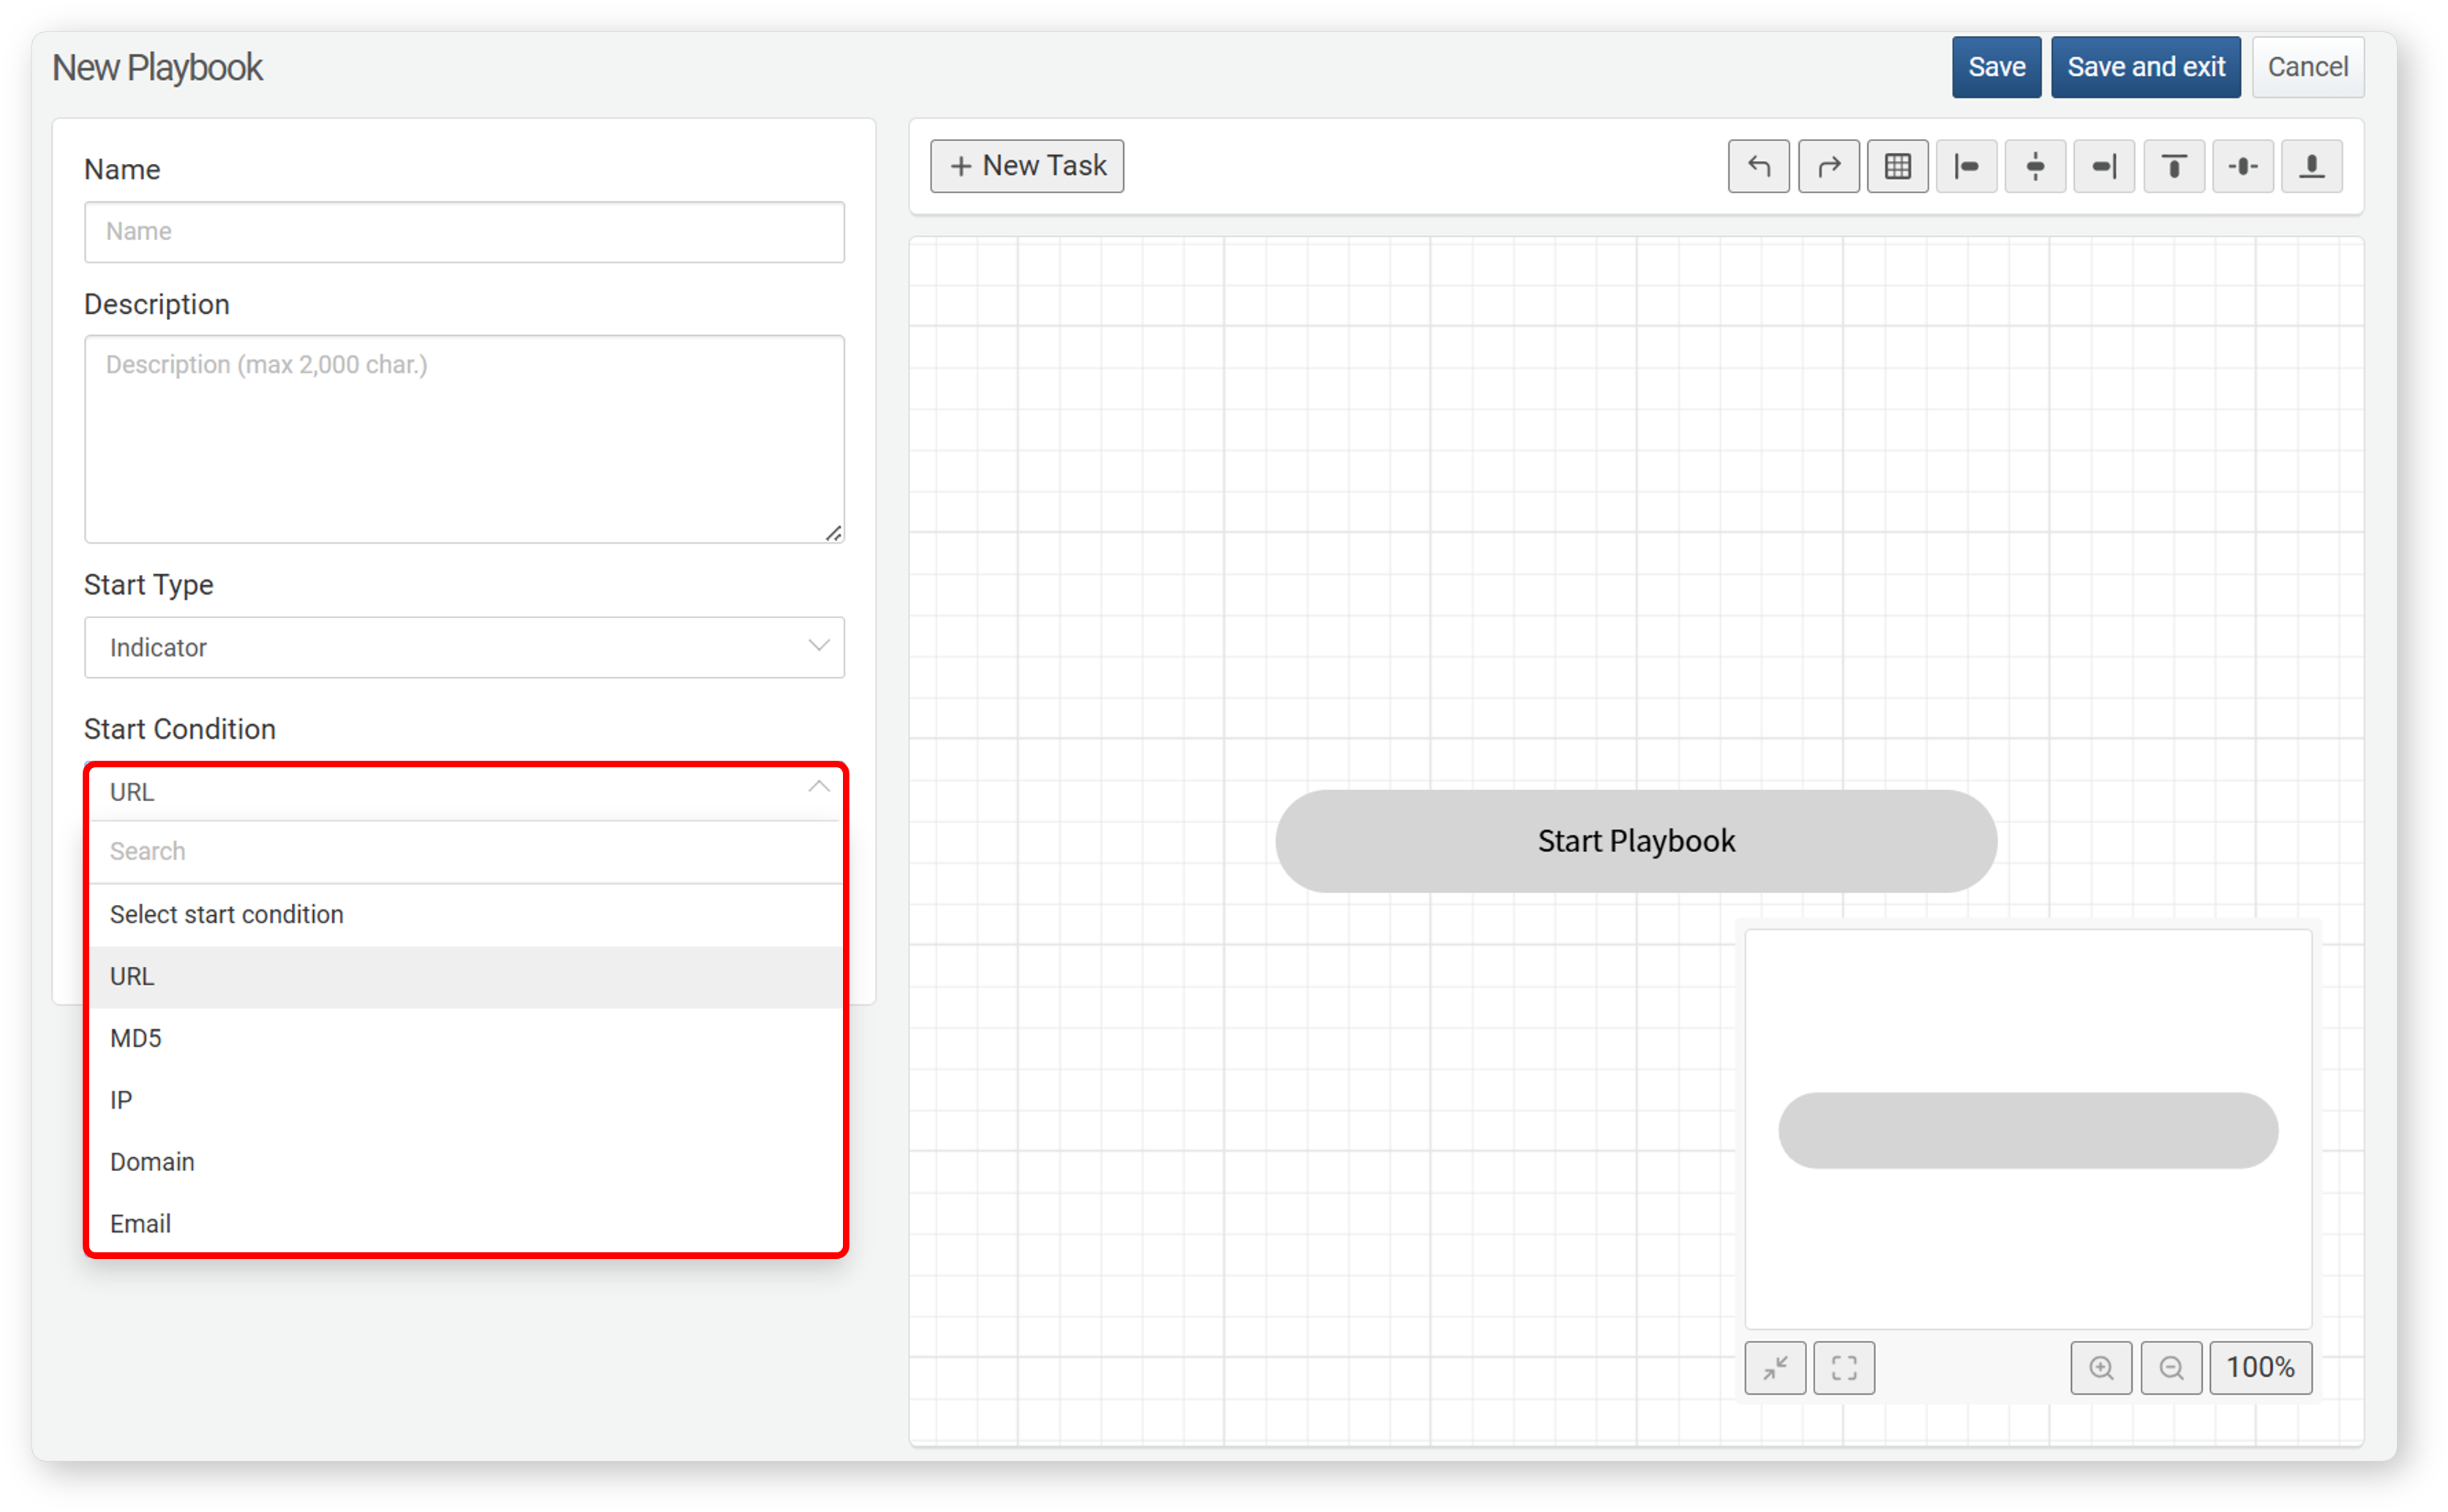
Trigger Conditions
Trigger conditions are properties defined when the playbook's Trigger type is set to Indicator(IOC) creation. Select one of the IOC types (URL, MD5, IP Address, Domain, Email Address) from the list. When an indicator matching the selected type is registered, the playbook is executed automatically.
Common Task Properties
All tasks have the following common properties. You can view and modify these properties in the Properties Panel.
| Property | Description |
|---|---|
| Name | A unique name that identifies the task within the playbook |
| Description | A brief explanation of the task |
| Task Type | The category of the task based on its function |
| Command | The command executed by the task. Most tasks perform a single command. |
| Command Set | (For tasks of type Execution) A list of available commands |
| Playbook | (For tasks of type Call Playbook) The sub-playbook to be executed |
| Advanced Settings | Configurations such as timeout, retry intervals, retry count, and actions upon task failure. |
| Input Parameters | Parameters that receive values from preceding tasks or playbook input parameters. Varies by task. |
| Output Parameters | Parameters that stores values to be passed to subsequent tasks. Varies by task. |
- Command Set consists of default command sets and those provided by apps.
- Required fields in Input Parameters are marked with an asterisk (*).
Name and Description
: Each task in a playbook has a unique Name and Description properties. Tasks are represented as boxes in the playbook workflow, and these properties help identify them.
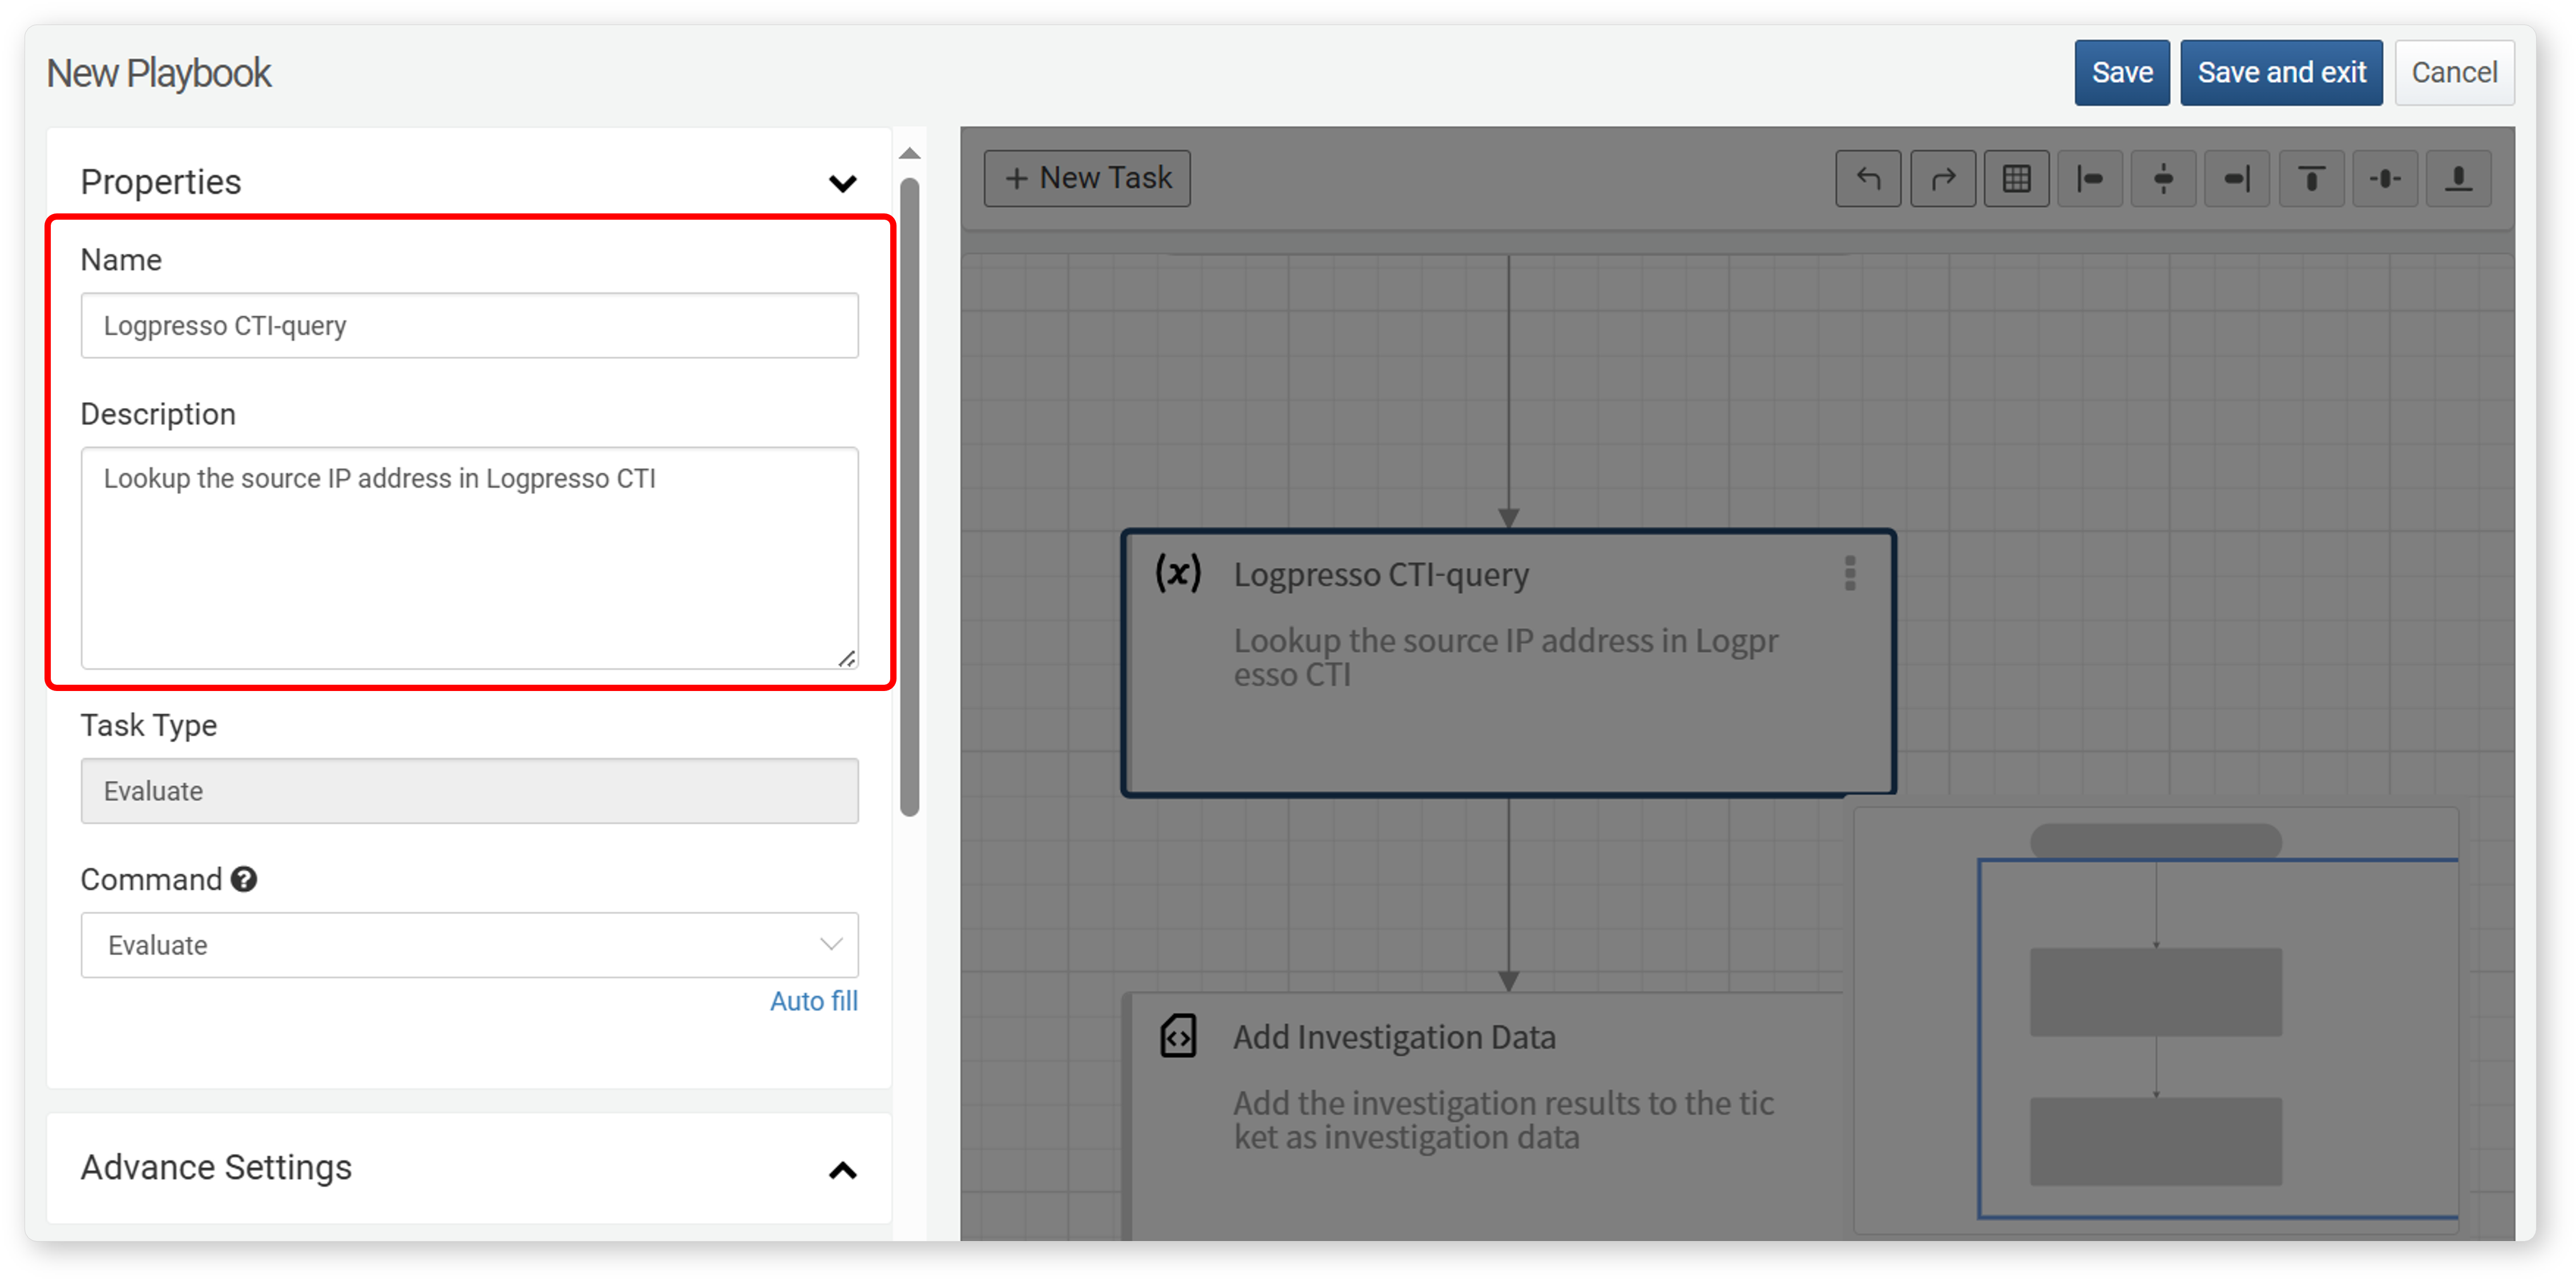
In the properties panel, clicking Auto-fill under the command section automatically assigns default values for Name and Description based on the task type. You can modify them as needed.
Advanced Settings
: Advanced settings provide options to control task behavior.
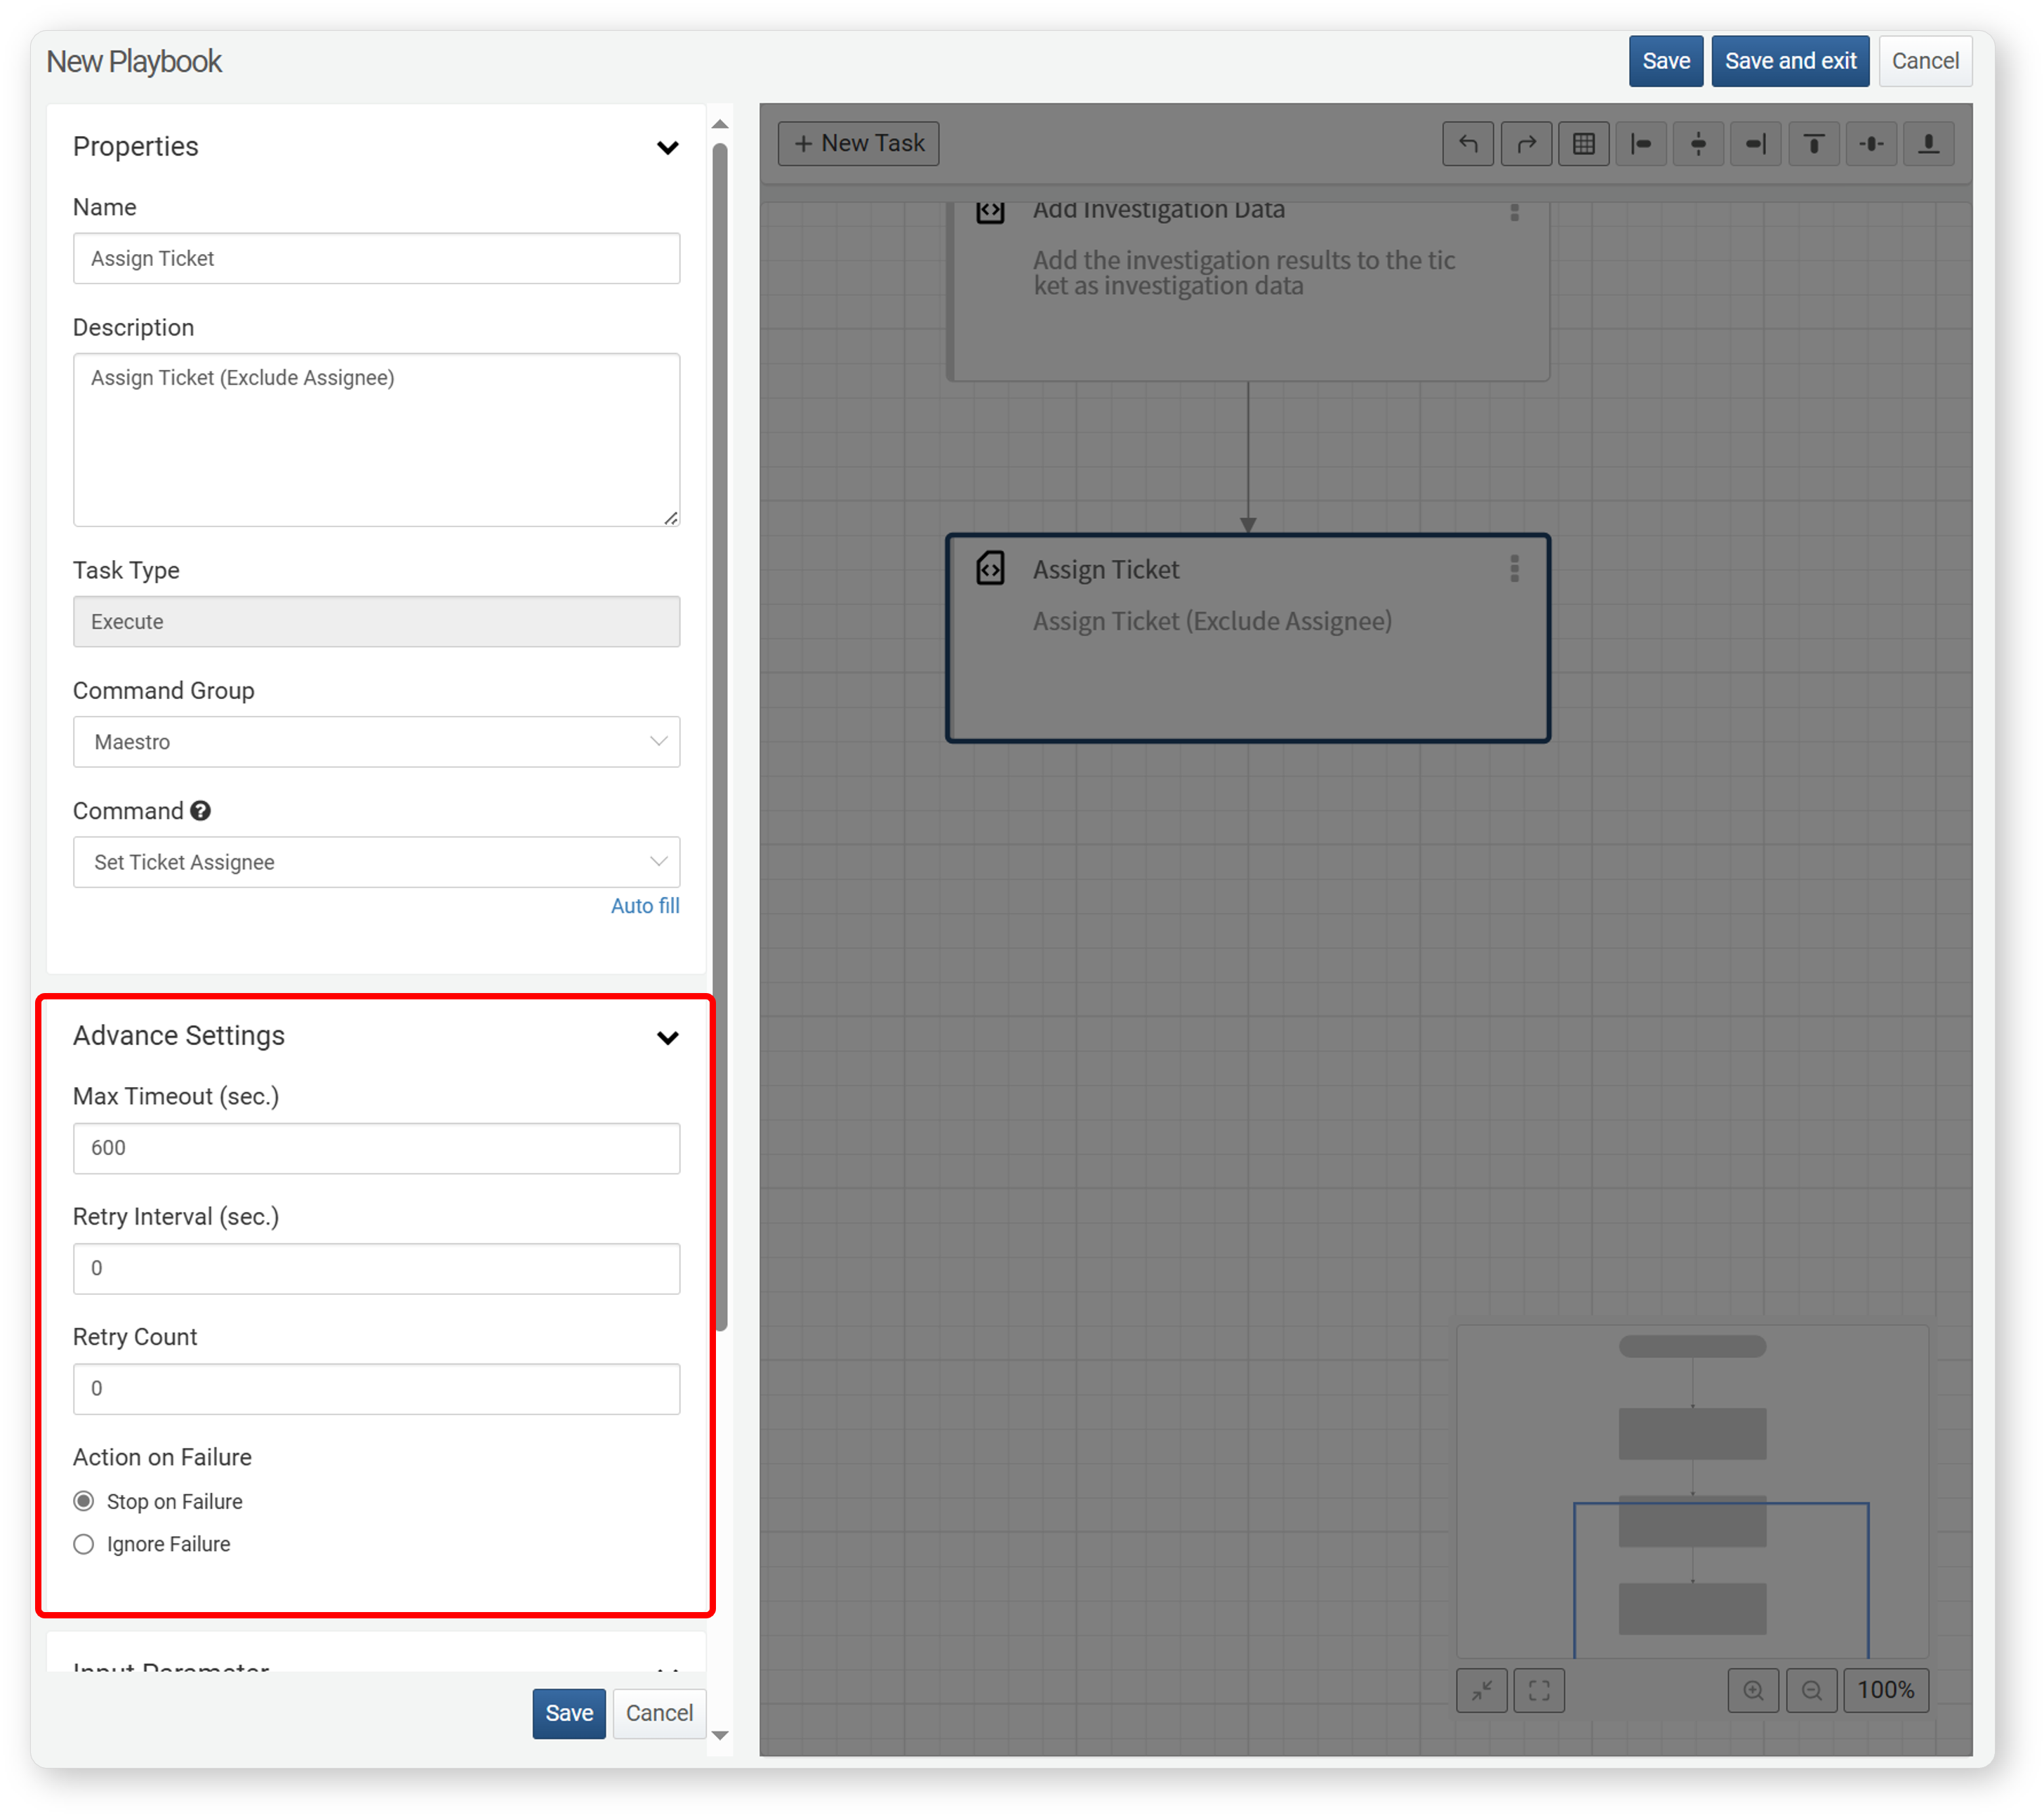
-
Maximum Timeout (sec.): The maximum wait time for task completion (default: 600 seconds).
-
Retry Interval (sec.): The interval between retries for timed-out tasks (default: 0 seconds).
-
Retry Count: The number of retry attempts (default: 0). If the task completes within the retry limit, it is considered successful.
-
Action on Failure: The action to take if the task fails: Stop Playbook, Continue to Next Task (default: Stop Playbook)
NoteThe "Action on Failure" option is available from version 4.0.2404.0.
Task-Specific Properties
A task is the smallest functional unit that makes up a playbook. Each task performs a different function based on its type. The table below summarizes the task types:
| Task | Description |
|---|---|
| Execute | Runs a command defined in the command set. |
| Decision | Branches the workflow based on the evaluation of a comparison expression (true/false). |
| Evaluate | Assigns the value of an expression to a parameter. |
| User Input | Captures user input and assigns it to an output parameter. |
| Approval | Branches the workflow based on user approval results. |
| Pause | Waits for a specified duration before proceeding to the next task. |
| Send Email | Sends an email based on a predefined template |
| Call Playbook | Call and executes another playbook. |
| Query | Runs a query and retrieves the results. |
| Investigate | Runs a query and adds the results to a ticket as investigation data. |
Execute
This task automates various actions using a command set. When you install a Logpresso app, the playbook can use the command set provided by that app.
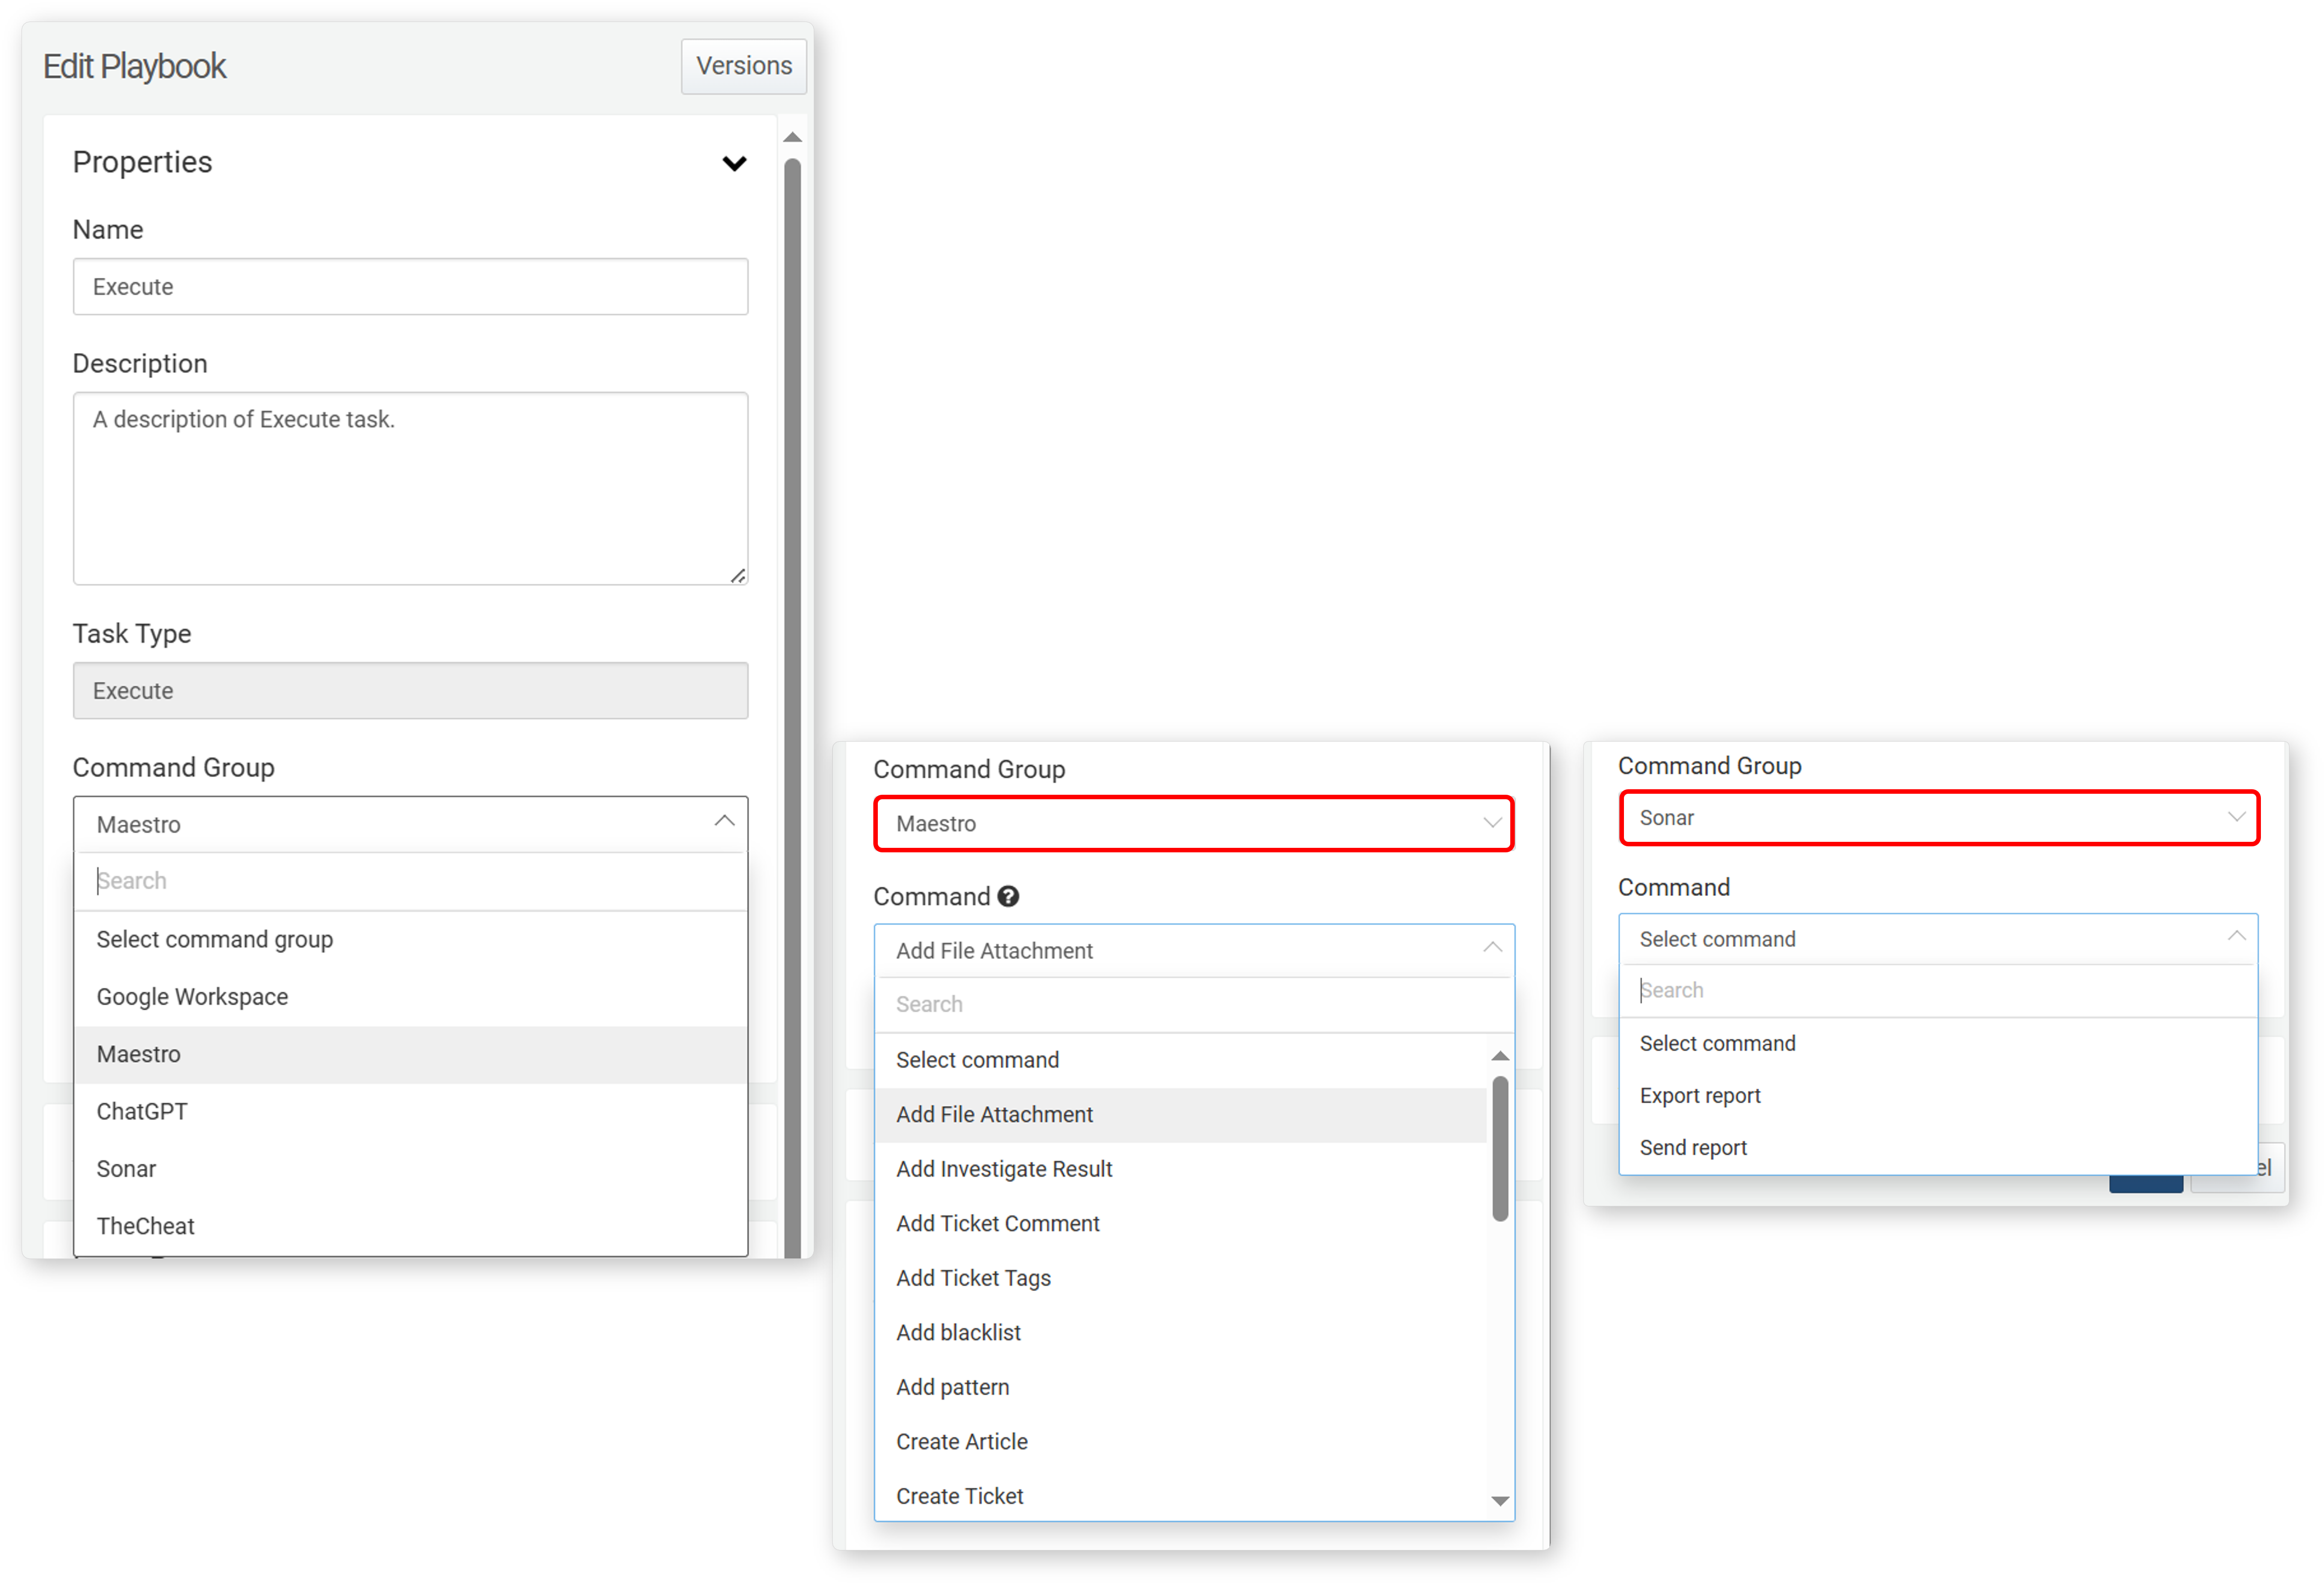
- Command Set
-
A command set is a collection of commands that the task can execute. In addition to built-in command sets, installing a app that supports playbooks expands the available command sets.
- Command
-
Select a command from the available list. Once a Command is selected, you can define its input parameters and then view its output parameters.
-
The Logpresso Maestro command set provides the following commands:
| Command | Description |
|---|---|
| Create Article | Adds an article-type ticket and returns its GUID to output parameter. |
| Validate Directory | Checks a local directory in the Logpresso Sonar system. |
| Add Blocklist | Removes a specific IP address from a designated address group. |
| Remove Blocklist | Adds a specific IP address to a designated address group. |
| Create Ticket for Event | Creates a ticket for an event and returns its GUID. |
| Get Investigation Result | Retrieves investigation data from a ticket and returns the investigation data GUID. |
| Add Investigation Result | Adds query results as investigation data and returns the investigation data GUID. |
| Validate File Attachments | Verifies the local file path and size in the Logpresso Sonar system. |
| Add File Attachments | Attaches a file to a ticket and returns its GUID, size, and name. |
| Update IP Indicator | Creates or updates an IP address indicator. |
| Update MD5 Indicator | Creates or updates a MD5 indicator. |
| Update URL Indicator | Creates or updates a URL indicator. |
| Update Domain Indicator | Creates or updates a domain indicator. |
| Update Email Indicator | Creates or updates an email indicator. |
| Set Ticket Incident | Updates the incident status of a ticket. |
| Set Ticket Status | Changes the status of a ticket. |
| Create Ticket | Creates a new ticket and returns its GUID. |
| Set Ticket FP | Updates the false positive status of a ticket. |
| Set Ticket Priority | Updates the priority of a ticket. |
| Add Ticket Comment | Adds a comment to a ticket. |
| Set Ticket Tag | Assigns a tag to a ticket. |
| Add Ticket Tag | Creates a new ticket and returns its GUID. |
| Set Ticket Assignee | Assigns an assignee or approver to a ticket. |
| Add Pattern | Adds a pattern to a pattern group. |
| Command | Description |
|---|---|
| Eamil Report | Generates a report using a registered template based on data from the specified date range and sends it via email. |
| Generate Report | Generates a report using a registered template based on data from the specified date range and saves it. |
Create Article
When the command is Create Article, this action creates a ticket of the article type and returns the ticket's GUID to an output parameter.
Input Parameters
| Input Parameter | Description |
|---|---|
| Article Title* | Title of the ticket to be created |
| Format | Input format for the content (PLAIN or MARKDOWN). Defaults to MARKDOWN if unspecified. |
| Article Content* | Content of the article |
| Priority | One of LOW, MEDIUM, or HIGH. Defaults to LOW if unspecified. |
- Parameter: Choose from the list of input parameters received from a previous task.
- String: Enter a string enclosed in double quotes (
").
Output Parameter
| Output Parameter | Name | Description |
|---|---|---|
| ticket_guid | Ticket GUID | GUID of the created Ticket |
Validate Directory
When the command is Validate Directory, this action checks whether a directory exists on the local system of the server running the playbook. If the directory does not exist, the task fails.
Input Parameter
| Input Parameter | Description |
|---|---|
| Path* | Directory path starting with "file://" |
Remove Blocklist
When the command is Remove Blocklist, this action removes a specified IP address from a designated address group.
Input Parameters
| Input Parameter | Description |
|---|---|
| group* | GUID of the address group |
| ip* | IP address to be removed from the group. |
Add Blocklist
When the command is Add Blocklist, this action adds an IP address to a designated address group.
Input Parameter
| Input Parameter | Description |
|---|---|
| Address Group GUID* | GUID of the address group |
| IP Address* | IP address to be added to the group. |
| Description | Additional details about the IP address |
| Retention(min) | Retention period for the IP address in the group |
Create Ticket for Event
When the command is Create Ticket for Event, this action creates a new ticket for a specified event and returns the ticket's GUID as an output parameter.
Input Parameters
| Input Parameter | Description |
|---|---|
| Ticket Repository GUID* | GUID of the ticket repository |
| Event GUID* | GUID of the event referenced by the ticket. |
| Ticket Title | Title of the ticket |
| Priority | One of LOW, MEDIUM, or HIGH. Defaults to LOW if unspecified. |
Output Parameter
| Parameter | Name | Description |
|---|---|---|
| ticket_guid | Ticket GUID | GUID of the created ticket |
Get Investigation record
When the command is Get Investigation Record, this action retrieves investigation records for a ticket.
Input Parameter
| Input Parameter | Description |
|---|---|
| Investigation Result GUID* | GUID of the investigation result to be retrieved |
Add Investigation Record
When the command is Add Investigation Record, this action executes a query, adds the result as an investigation record to a ticket, and returns the investigation record's GUID as an output parameter.
Input Parameter
| Input Parameter | Description |
|---|---|
| Ticket GUID* | GUID of the ticket to add investigation data to. |
| Title* | Title of the investigation record |
| Query* | Query used to generate the investigation record. |
| Description | Additional details about the investigation record |
If you are entering the query as a string, escape special characters (e.g., \") to ensure proper recognition. Below is the example of an escaped query string:
```query
json \"{}\"
\n| eval src_ip = \"%s\"
\n| join type=left src_ip
    [ table *:sonar_ioc_logpresso_cti_ip
    \n| eval src_ip = ip
    \n| fields src_ip, first_seen, last_seen, description, action, metadata ]
```
Output Parameter
| Parameter | Name | Description |
|---|---|---|
| guid | Investigation record GUID | GUID of the investigation record |
Validate File Attachments
When the command is Validate File Attachments, this action verifies the size of a file in the local file system of the server where the playbook is executed.
Input Parameters
| Input Parameter | Description                               |
| --------------- | ----------------------------------------- |
| Path\*          | Directory path starting with "`file://`". |
| File Size\*     | File size in bytes                        |
: This action checks whether the file at the specified path matches the defined size.
Add File Attachments
When the command is Add File Attachments, this action attaches a file to an existing ticket and returns the file's GUID, size, and name as output parameters.
Input Parameters
| Input Parameter | Description |
|---|---|
| Ticket GUID* | GUID of the ticket to which the file will be attached. |
| File Path* | File path starting with file://, https://, or http:// |
Output Parameters
| Parameter | Name | Description |
|---|---|---|
| file_guid | File GUID | GUID of the attached file |
| file_size | File Size | File size in bytes |
| file_name | File Name | Name of the attached file |
Update IP/MD5/URL/Domain/Email Indicator
When the command is Update IP/MD5/URL/Domain/Email Indicator, this action creates or updates an indicator of compromise (IoC) for an IP, MD5 hash, URL, domain, or email address.
Input Parameters
| Input Parameter | Description |
|---|---|
| IoC Identifier* | The unique value identifying the indicator (IP, MD5, URL, domain, or email address) |
| Reputation* | One of UNKNOWN(unknown), BENIGN(safe), SUSPICIOUS(suspicious), MALICIOUS(malicious). Defaults to UNKNOWN. |
| Threat Level | One of HIGH, MEDIUM, LOW, or BENIGN(Safe) |
Set Ticket Incident
When the command is Set Ticket Incident, it changes the incident status of a specified ticket.
Input Parameters
| Input Parameter | Description |
|---|---|
| Ticket GUID* | GUID of the ticket for which the incident status will be set. |
| Incident Status* | Set to true for incident or false for FP. |
Set Ticket Status
Create Ticket
When the command is Create Ticket, it creates a new ticket and returns the ticket's GUID.
Input Parameters
| Input Parameter | Description |
|---|---|
| Ticket Repository GUID* | GUID of the ticket repository |
| Ticket Title* | Title of the ticket |
| Source IP | Source IP address |
| Source Port | Source port |
| Destination IP | Destination IP address |
| Destination Port | Destination port |
| Protocol | Protocol |
| User | Account associated with the ticket |
| Host | Host associated with the ticket |
| Sender | Email sender |
| Recipient | Email recipient |
| CC | Email CC recipient |
| URL | URL related to the ticket |
| MD5 | MD5 hash related to the ticket |
| Asset IP | Asset IP address |
| Asset Name | Device name (host name) of the asset with the given IP |
| Site | Site associated with the ticket |
| Priority | One of LOW, MEDIUM, or HIGH. Defaults to LOW if unspecified. |
Set Ticket FP
When the command is Set Ticket FP, it updates the false positive status of an existing ticket.
Input Parameters
| Input Parameter | Description |
|---|---|
| Ticket GUID* | GUID of the ticket to update |
| FP* | Set to true for true positive or false for false positive. |
Set Ticket Priority
When the command is Set Ticket Priority, it updates the priority of an existing ticket.
Input Parameters
| Input Parameter | Description |
|---|---|
| Ticket GUID* | GUID of the ticket to update |
| Priority | One of LOW, MEDIUM, or HIGH. Defaults to LOW if unspecified. |
Add Ticket Comment
When the command is Add Ticket Comment, it adds a comment to a ticket.
Input Parameters
| Input Parameter | Description |
|---|---|
| Ticket GUID\ | GUID of the ticket |
| Format | One of PLAIN (plain text), JSON, or MARKDOWN (Markdown syntax). Defaults to MARKDOWN if unspecified. |
| Comment* | Content of the comment |
Set Ticket Tag
When the command is Set Ticket Tag, it sets tags for a ticket.
Input Parameters
| Input Parameter | Description |
|---|---|
| Ticket GUID\ | GUID of the ticket |
| Tag GUID* | Comma-separated list of tag GUIDs |
- When entering multiple tag GUIDs, separate them with commas, but do not insert spaces after the commas (for example, 339ee35f-91c0-4eb9-a04e-9d614d295546,cc70f5cf-d9ad-4d6e-8e6d-17297904cea9).
Add Ticket Tag
When the command is Add Ticket Tag, it adds tags to a ticket.
Input Parameters
| Input Parameter | Description |
|---|---|
| Ticket GUID\ | GUID of the ticket |
| Tag GUID* | Comma-separated list of tag GUIDs |
Set Ticket Assignee
When the command is Set Ticket Assignee, it assigns a responsible person or approver to a ticket.
Input Parameters
| Input Parameter | Description |
|---|---|
| Ticket GUID\ | GUID of the ticket |
| User GUID* | GUID of the account. Accepts an array input. |
| Ticket Assign Type* | APPROVERor ASSIGNEE |
Add Pattern
When the command is Add Pattern, it adds a pattern to a pattern group.
Input Parameters
| Input Parameter | Description |
|---|---|
| group* | GUID of the pattern group |
| expr* | Pattern string |
| rule | Pattern rule name |
Email Report
When the command is Email Report, it generates a report for the specified period using a predefined template and sends it via email.
Input Parameters
| Input Parameter | Description |
|---|---|
| Template GUID* | GUID of the report template |
| Format* | Report file format. One of docx, html, or pdf. |
| From* | Start time of the reporting period in yyMMddHHmmss format. |
| To* | End time of the reporting period in yyMMddHHmmss format. |
| Mail To* | Email address of the recipient |
Generate Report
When the command is Generate Report, it generates a report for the specified period using a predefined template and saves it as a file.
Input Parameters
| Input Parameter | Description |
|---|---|
| Template GUID* | GUID of the report template |
| Format* | Report file format. One of docx, html, or pdf. |
| From* | Start time of the reporting period in yyMMddHHmmss format. |
| To* | End time of the reporting period in yyMMddHHmmss format. |
| Mail To* | Email address of the recipient |
| File Path* | File path for saving the generated report (e.g., /opt/logpresso/report.pdf). |
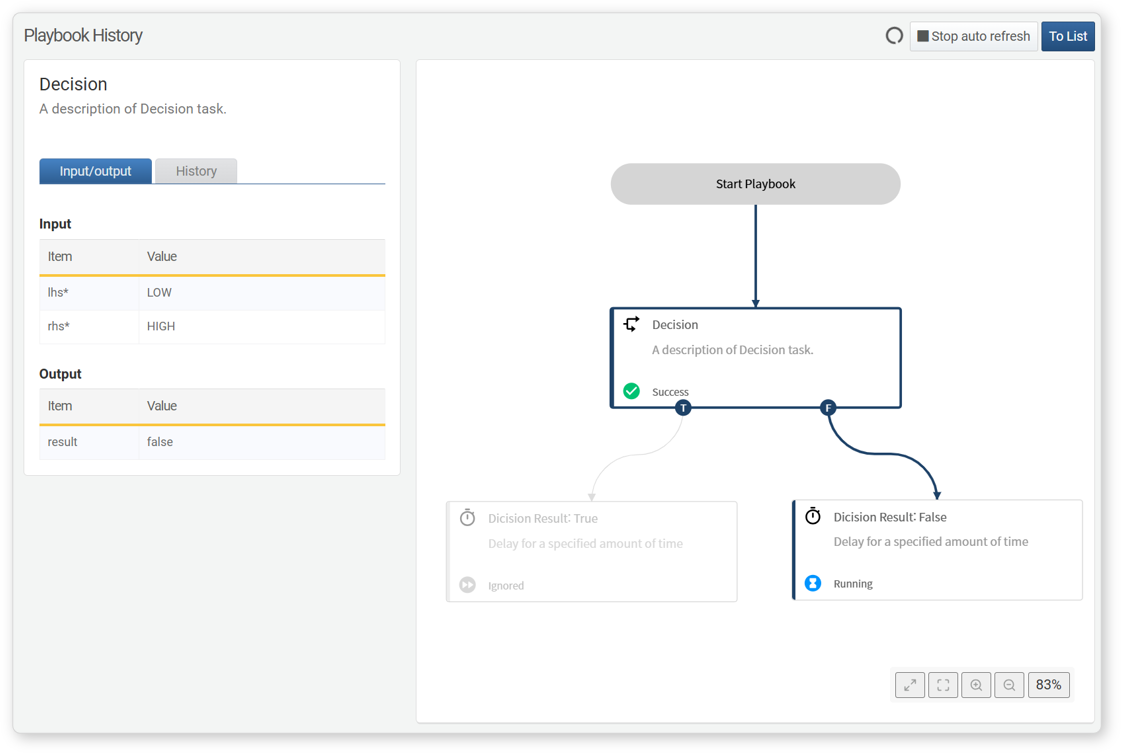
Decision
This task executes different actions based on the evaluation of a comparison operation or expression, returning the decision result (true/false) as the output parameter result.
Decision task can be categorized based on the command selected:
Comparison Null Check Expression
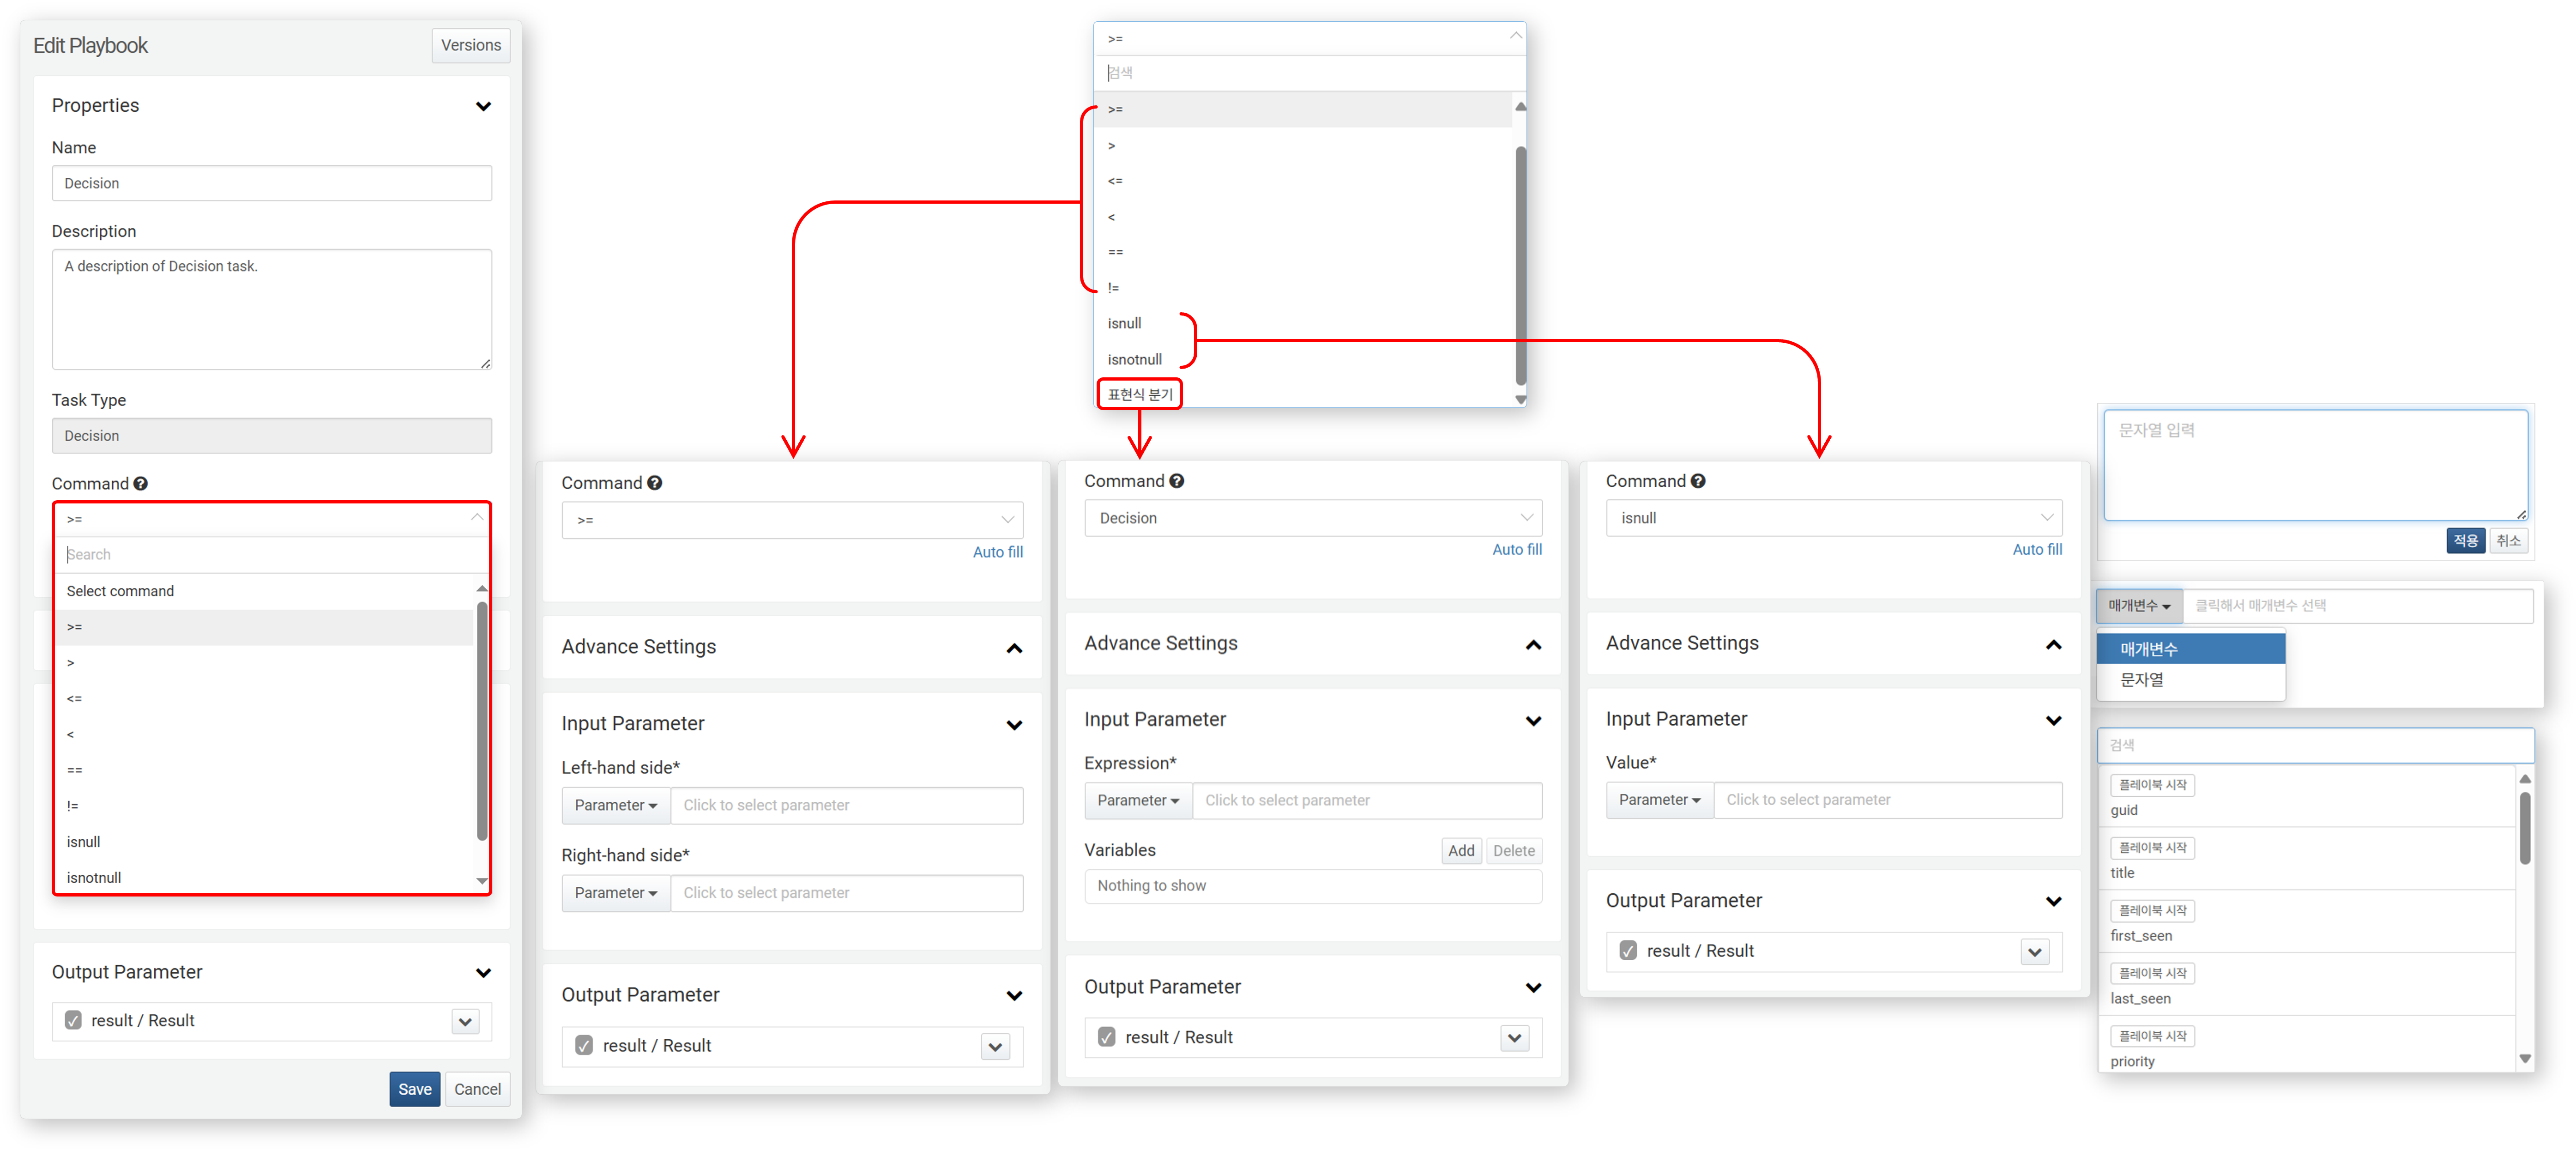
Comparision
Compares the Left-Hand Side and Right-Hand Side, then determines the task flow based on the result.
- Command
- Select a comparison operator to evaluate the input parameters (Left-Hand Side and Right-Hand Side).
| Operator | Description |
|---|---|
>= | Returns true if the left-hand side is greater than or equal to the right-hand side. |
> | Returns true if the left-hand side is greater than the right-hand side. |
<= | Returns true if the left-hand side is less than or equal to the right-hand side. |
< | Returns true if the left-hand side is less than the right-hand side. |
== | Returns true if both operands are equal. |
!= | Returns true if both operands are not equal. |
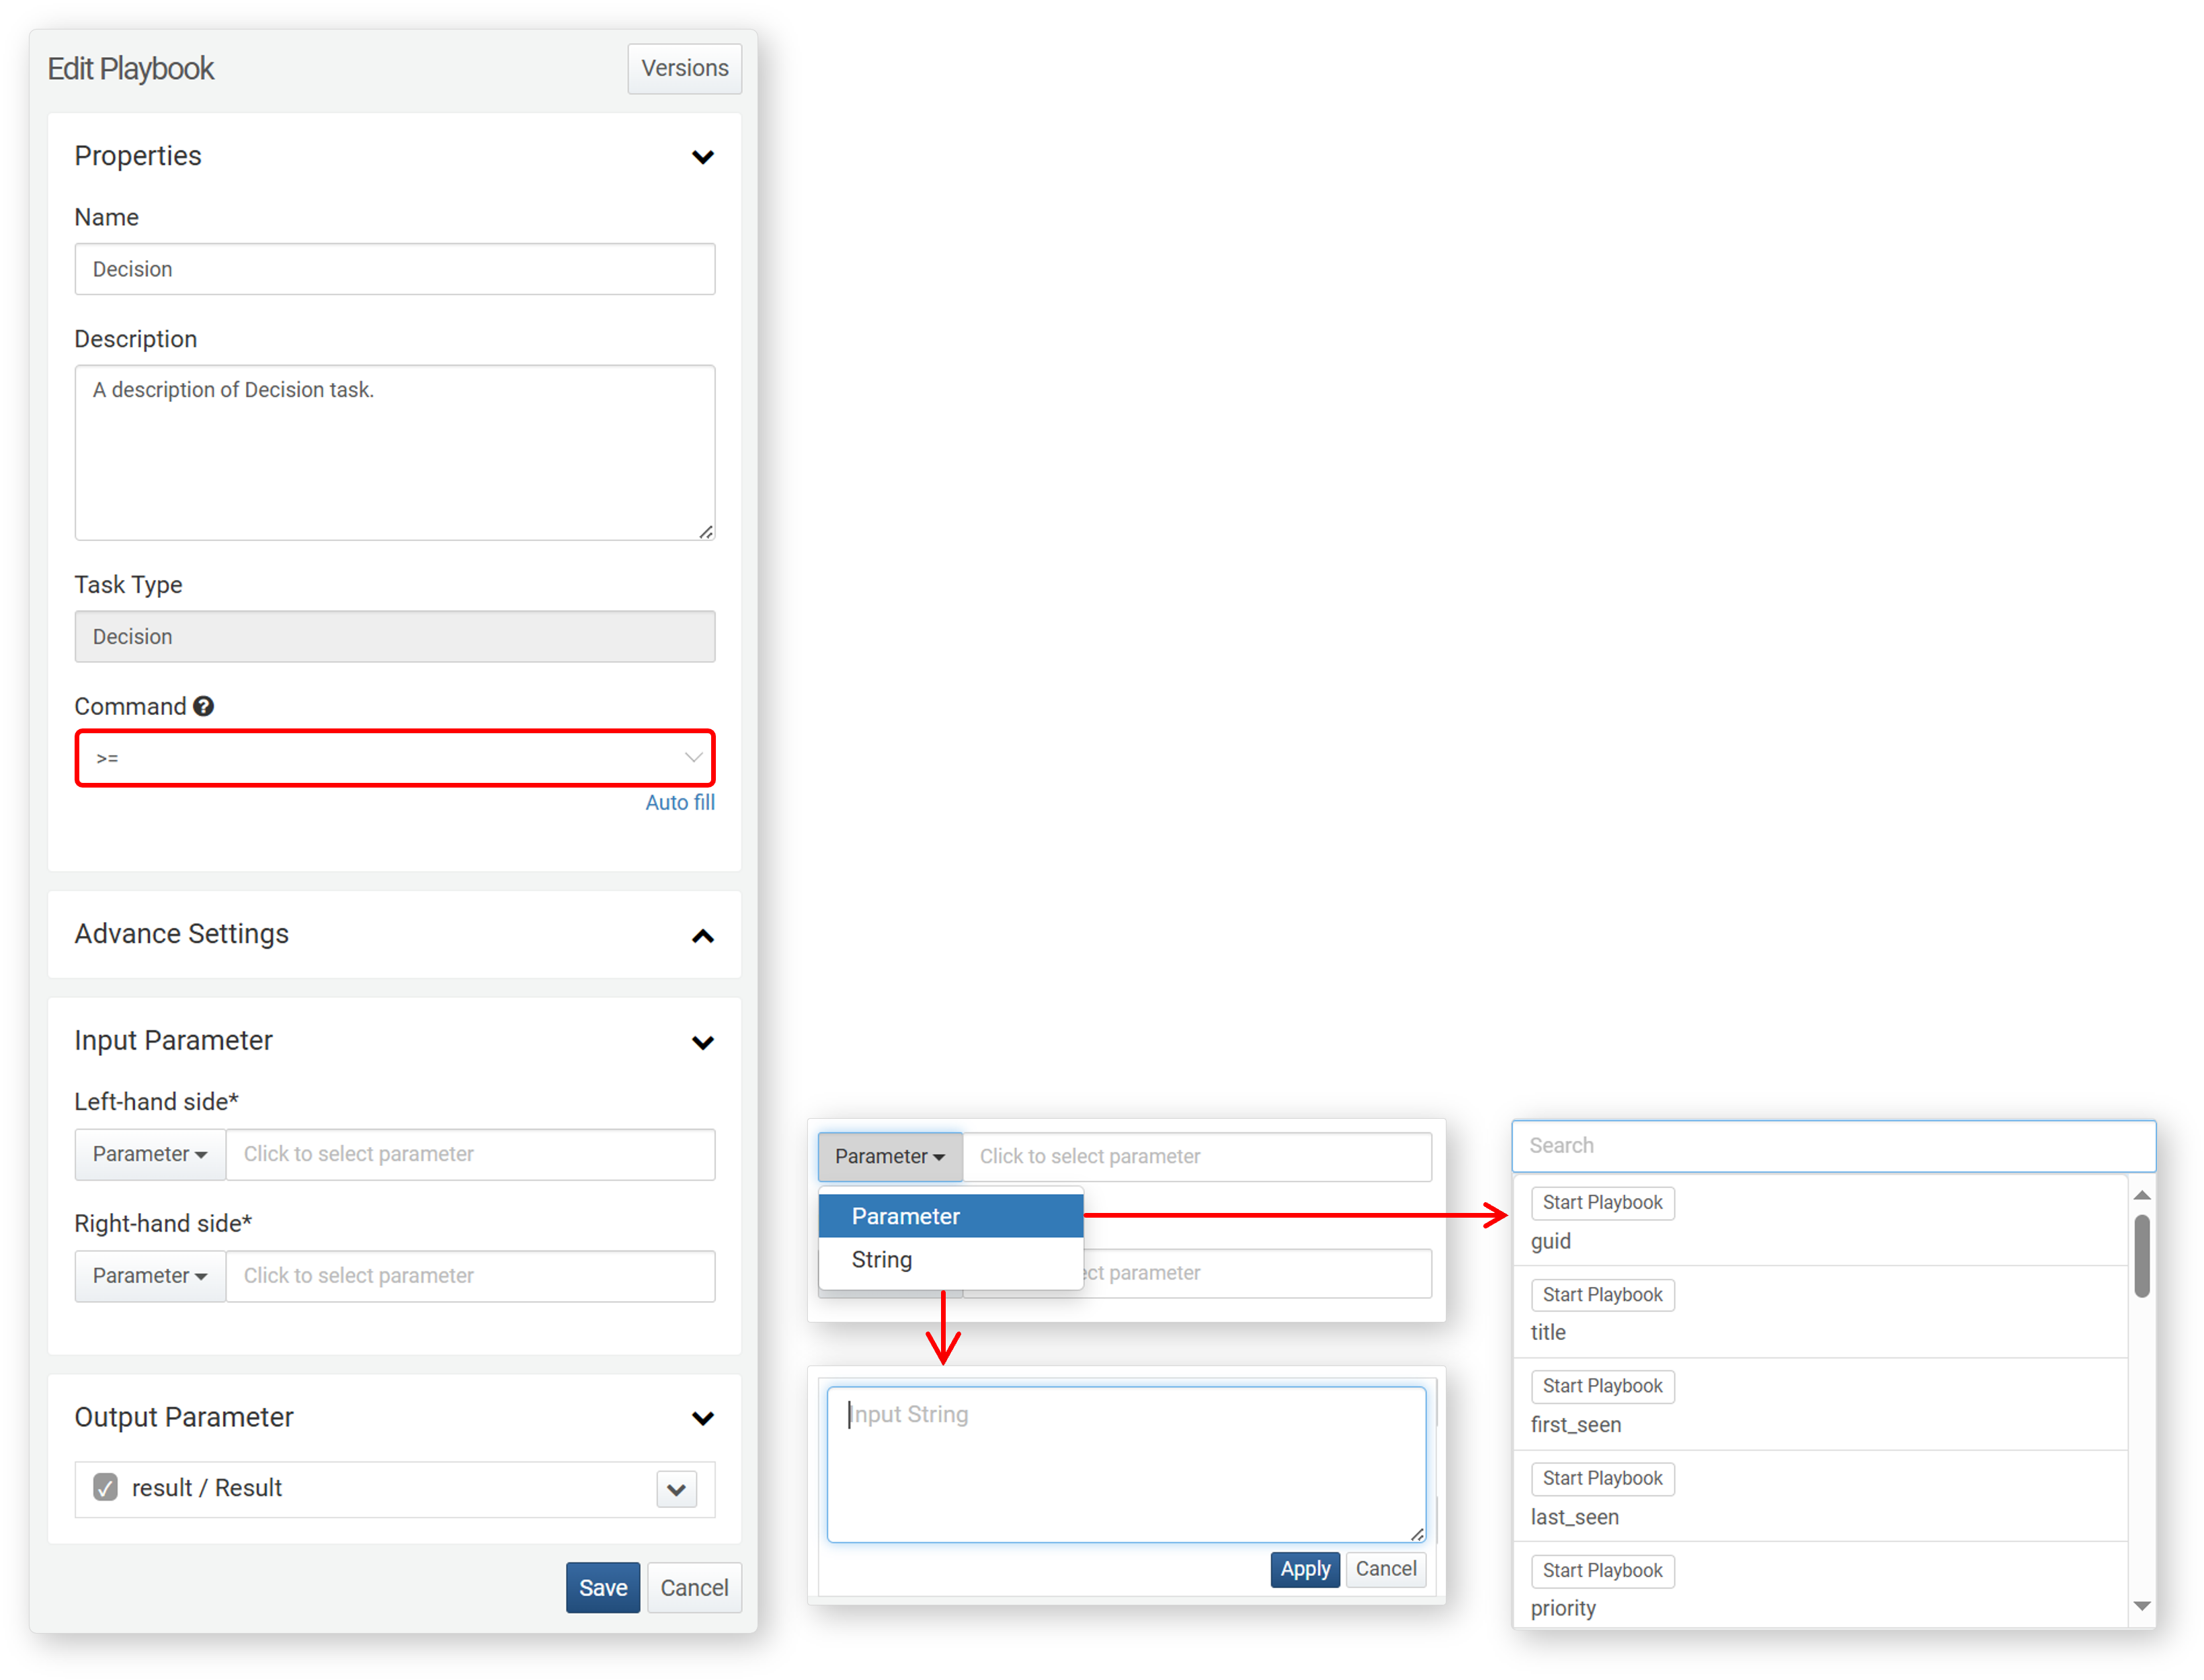
- Input Parameters
- Define the left-hand side and right-hand side.
| Input Parameter | Description |
|---|---|
| left-hand side* | left-hand side for comparison. Select a parameter or enter a string. |
| right-hand side* | right-hand side for comparison. Select a parameter or enter a string. |
- Parameter: Choose from the list of input parameters received from a previous task.
- String: Enter a string enclosed in double quotes (
").
Null Check
Evaluates an input parameter using the isnull() or isnotnull() function to determine the task flow.
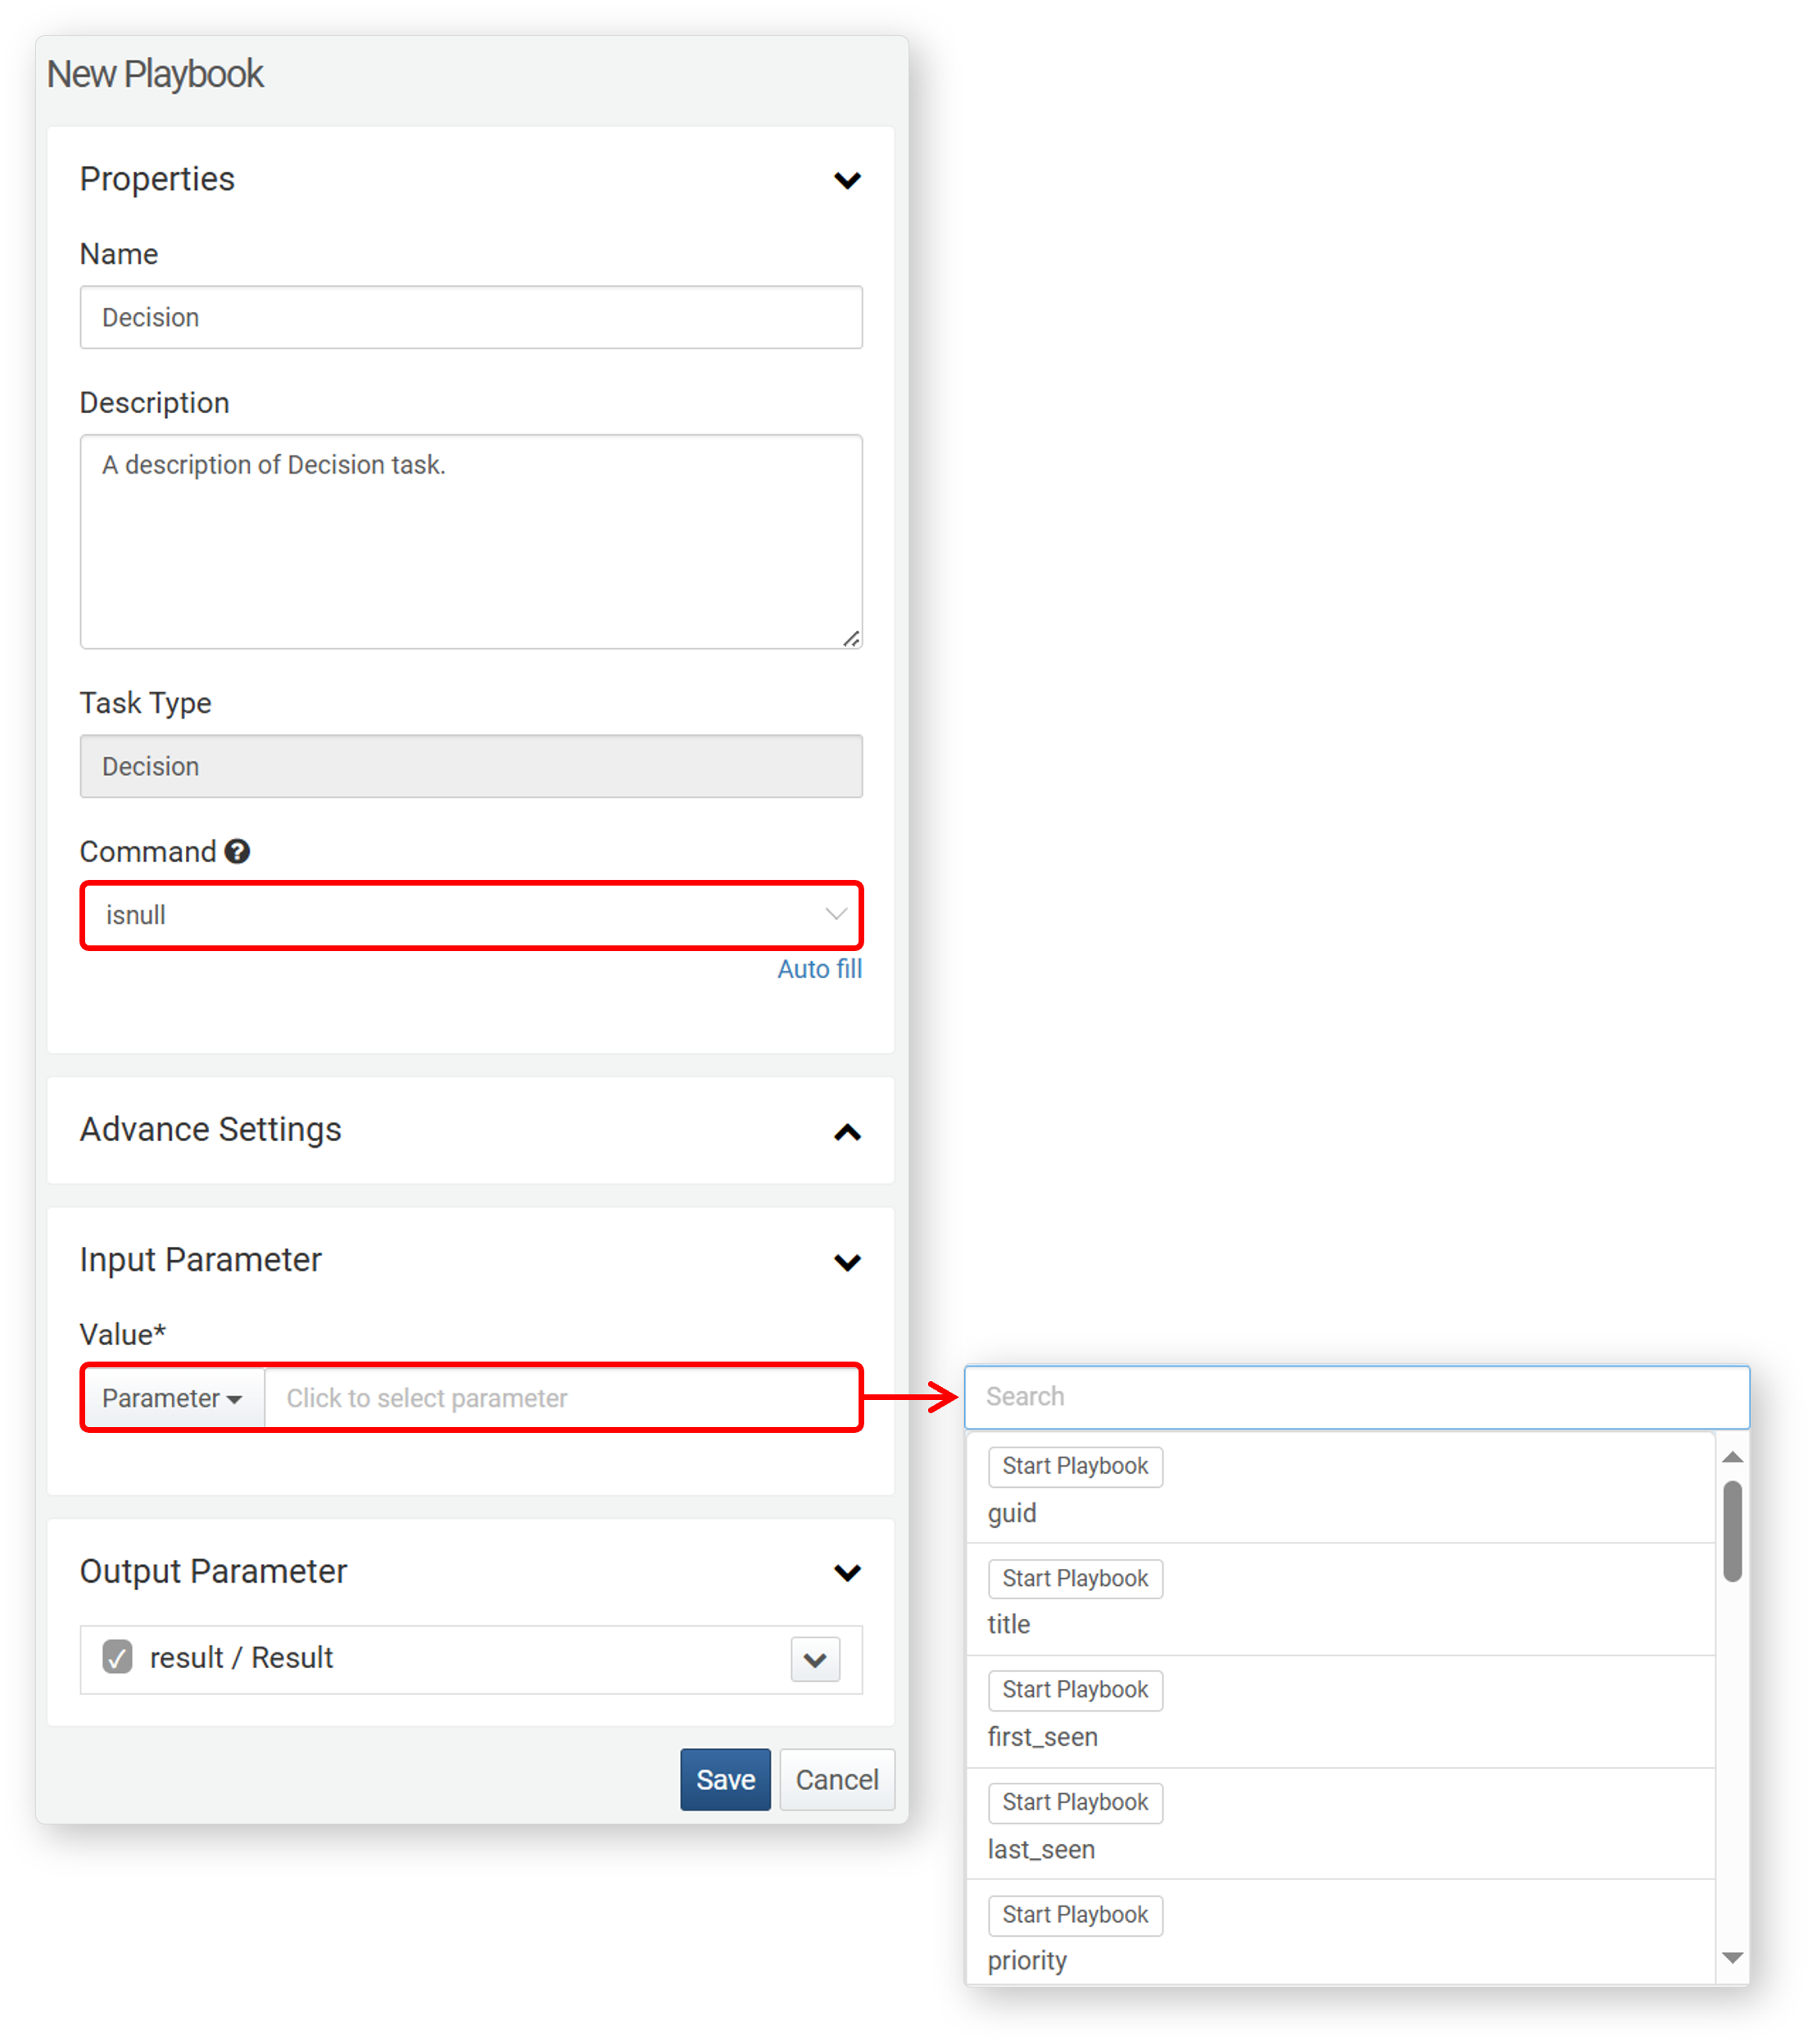
Command:
| Command | Description |
|---|---|
| isnull() | Returns true if the value is null. |
| isnotnull() | Returns true if the value is not null. |
Input Parameter
| Input Parameter | Description |
|---|---|
| Value* | The parameter whose value will be evaluated. |
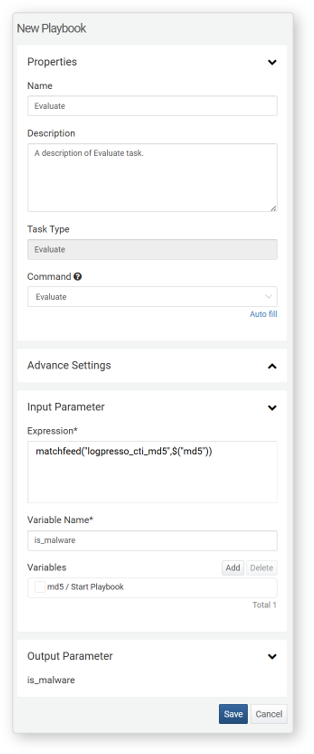
Expression
Evaluates a logical expression and determines the task flow based on whether the result is true or false.
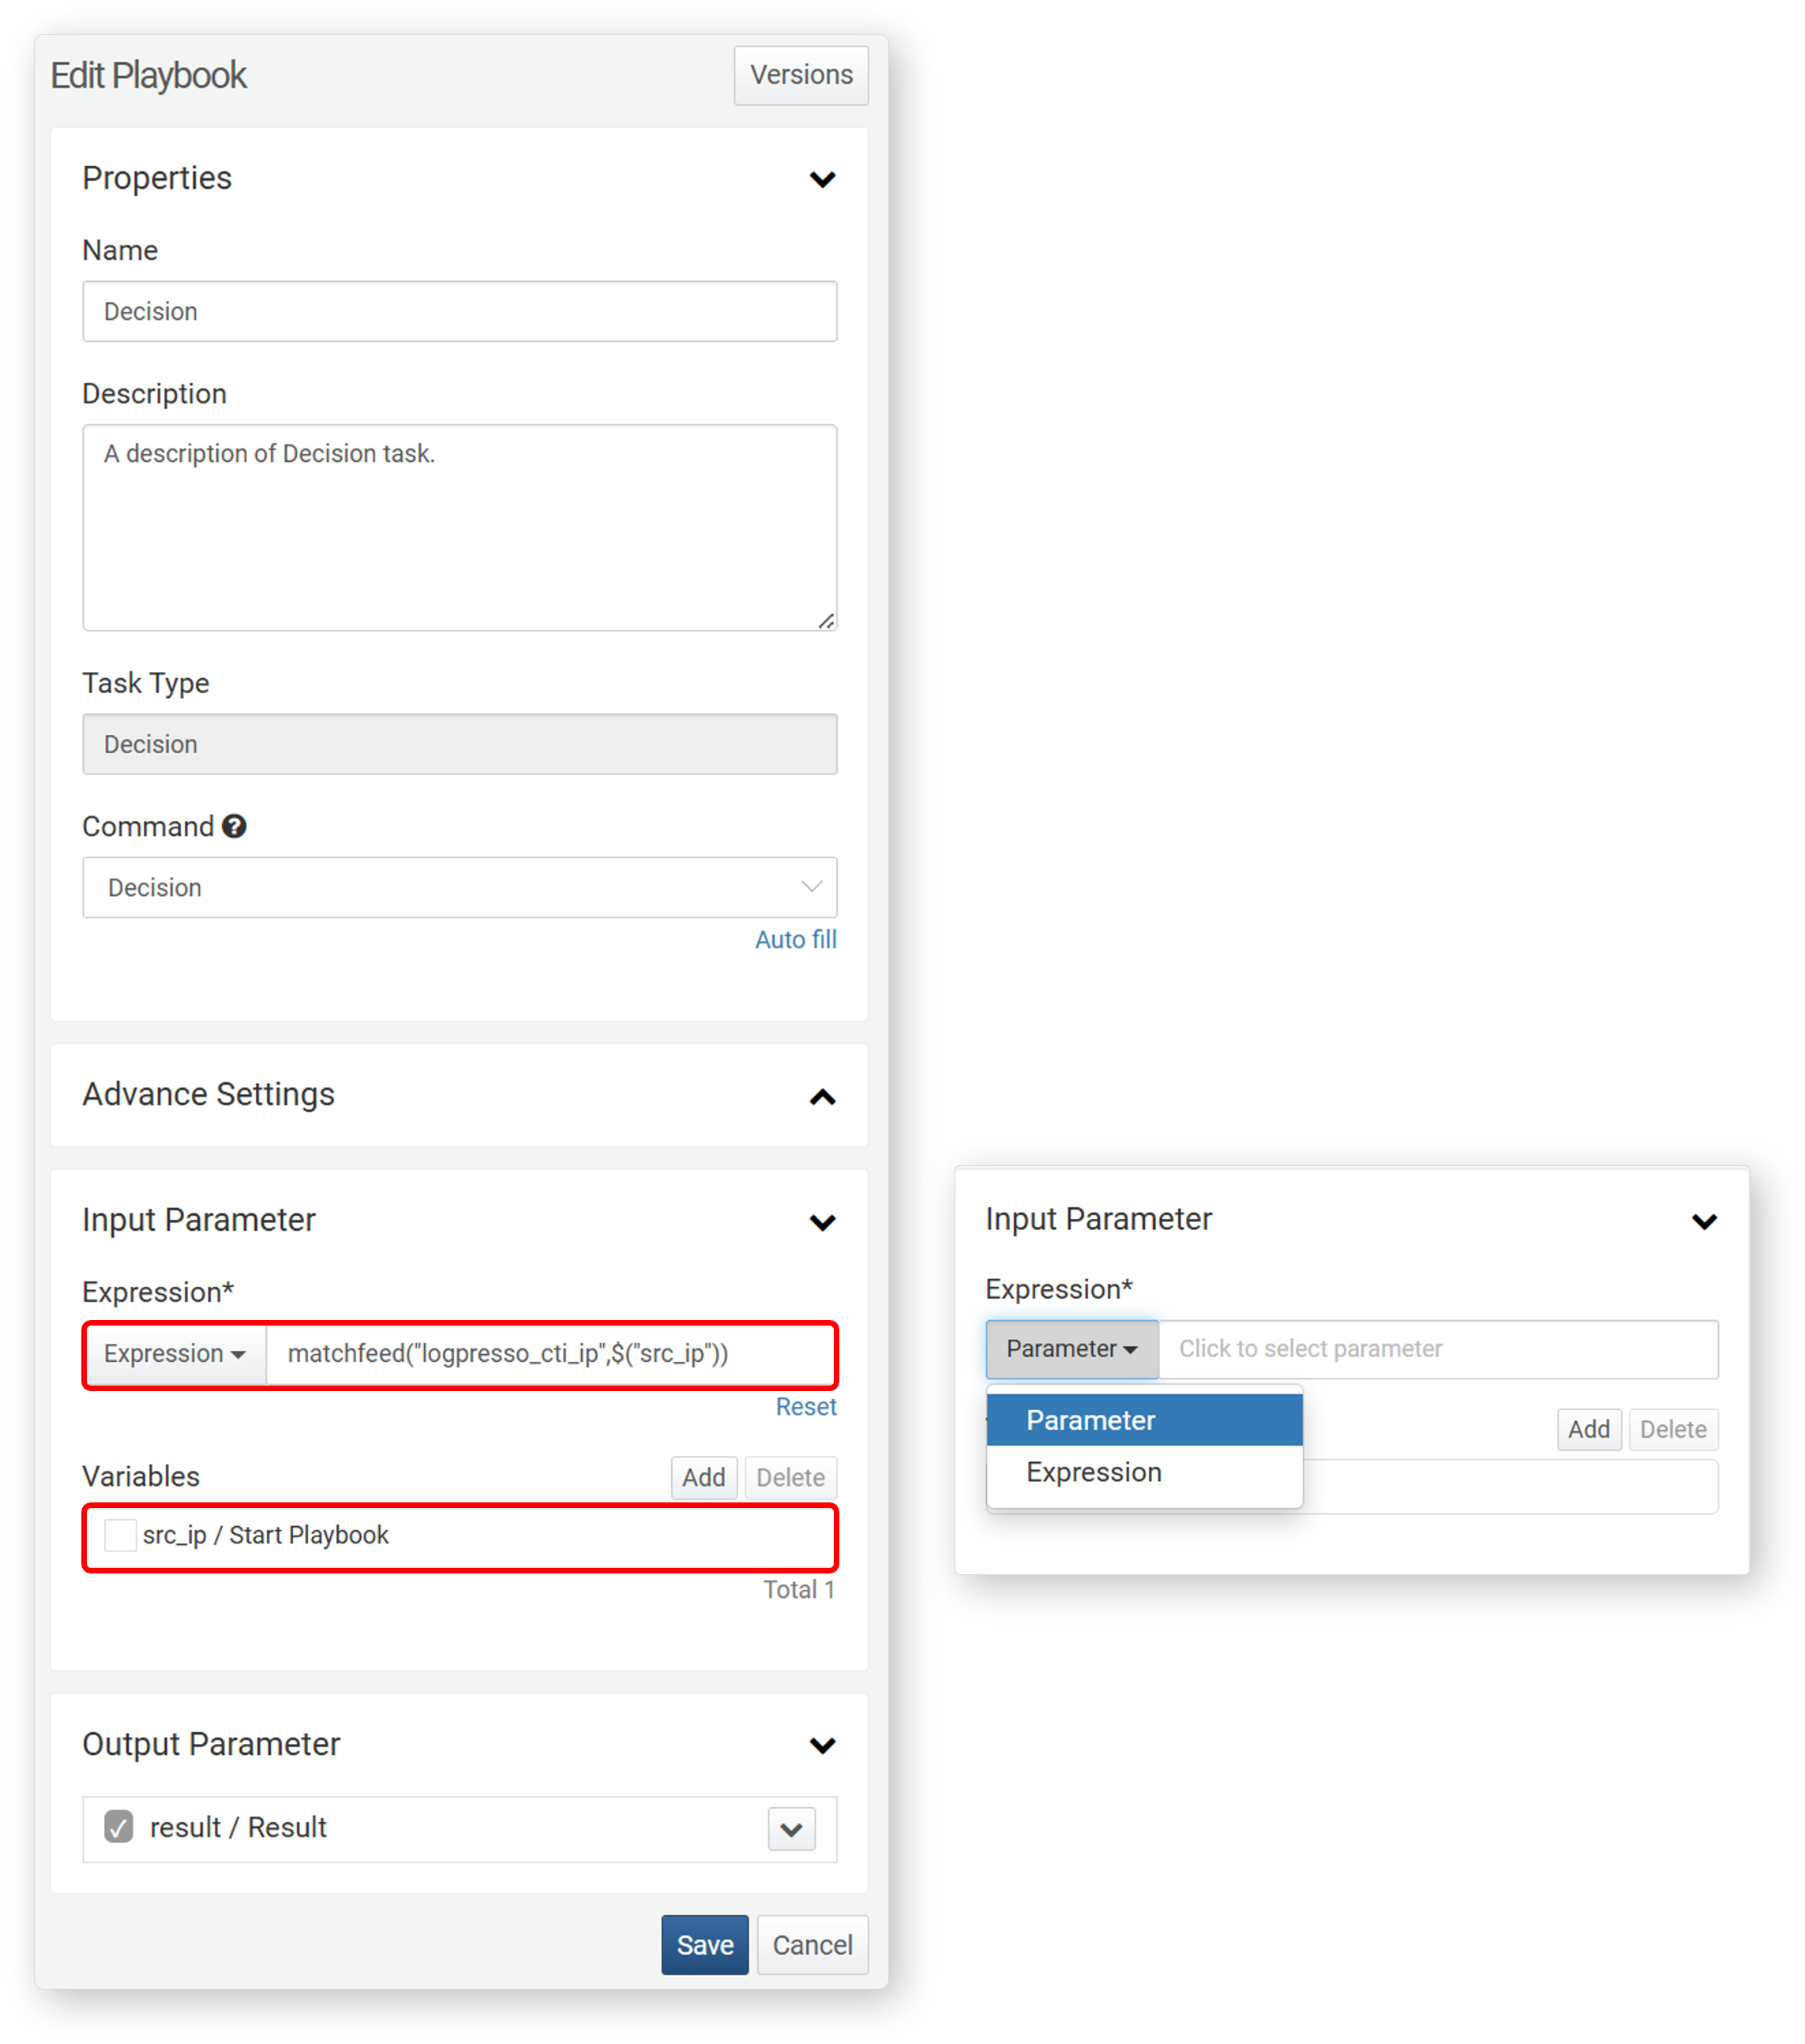
Command: Expression
- Input Parameters
- Input parameters will be used in the expression. To use parameters from previous tasks, add them to the parameter list.
-
Expression*
- Enter the logical expression to evaluate. To use a parameter from the Variable in the expression, enter it in the format $("variable").
- The expression can include complex logical operations or function calls.
- You can also specify parameters in the expression. In this case, the parameter value must be a boolean (
true/false).
-
Variable:
- Click Add and select parameters from the list. The list includes parameters passed from previous tasks or input parameters of the playbook.
- To delete a variable from the list, select the checkbox next to the variable and click Delete.
decision Task Example
A decision task splits the workflow into T when the result is true and F when the result is false.
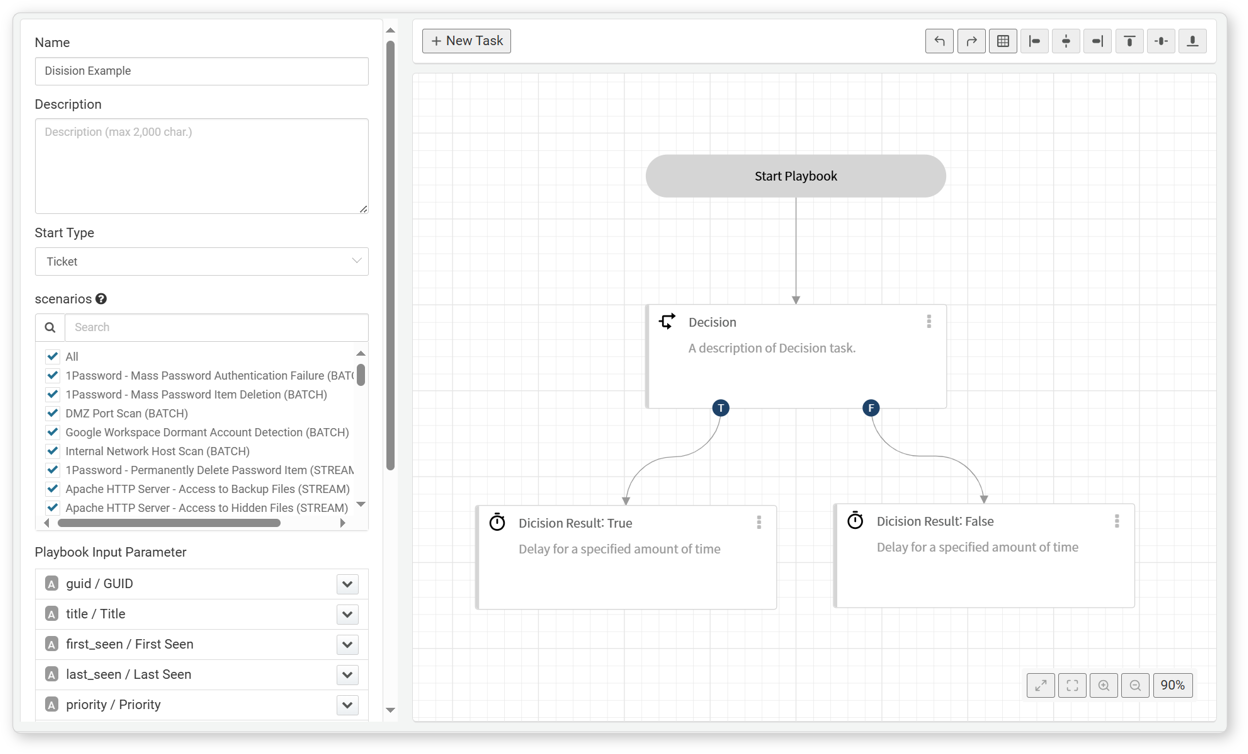
Following example shows branching when the comparison operation or expression evaluation returns true.
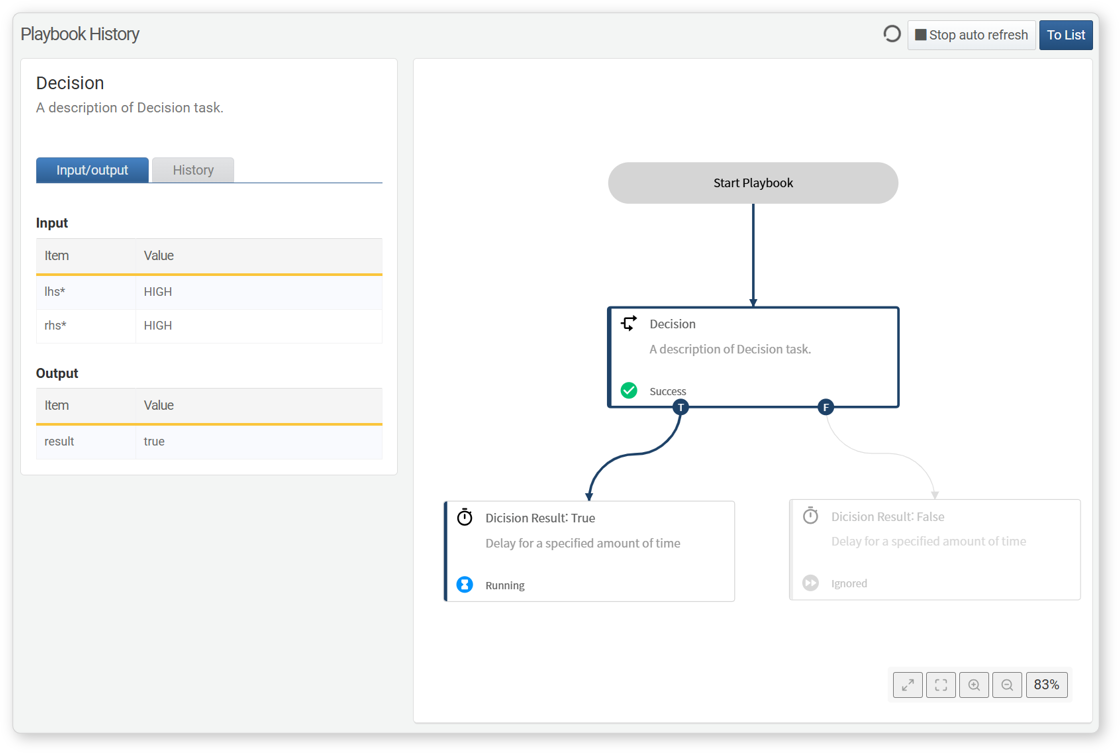
Following example shows branching when the comparison operation or expression evaluation returns false.
Evaluate
This task assigns the result of an expression to defined output parameters.
Command: Evaluate
- Input Parameters
- The Evaluate task takes Expression and the name of the Output Parameter as input parameters. To use parameters from previous tasks in the expression, add them to the Variable list.
-
Expression*: Enter the expression. Various query functions can be used within the expression. To use a parameter from the Variable in the expression, enter it in the format $("variable").
-
Output Parameters*: Enter the name of the output parameter to store the result of the expression.
-
Variable: Click Add and select parameter from the parameter list to use in the expression. The list includes parameters passed from previous tasks or input parameters of the playbook. To delete a variable from the list, select the checkbox next to the variable and click Delete.
Example of Evaluate Task
An Evaluate task assigns the result of an expression to an output parameter, which can then be used as an input parameter for the next task. For example, to use the variable a in an expression, enter $("a") in the expression field and add a to the variable list.
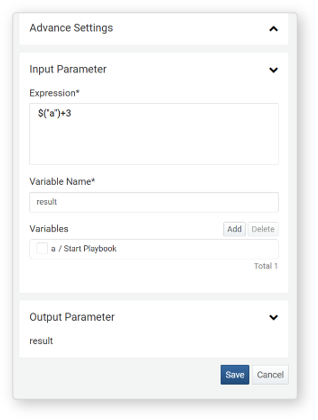
When the playbook is executed and a is set to 5, the expression $("a")+3 evaluates to 5+3, and 8 is assigned to the output parameter result.
User Input
This task processes user input. It waits until the user enters the required data and then returns the input as the output parameter input.
A task awaiting user input can be checked under Response > Approval Requests. Clicking an item with the User Input type in the list displays the request details as follows:
The result of processing user input can be checked under Response > Approval Logs. Clicking an item with the User Input type in the list displays the request details as follows:

User input tasks can be categorized based on the selected Command:
The type of the data stored in the output parameter input depends on the selected command.
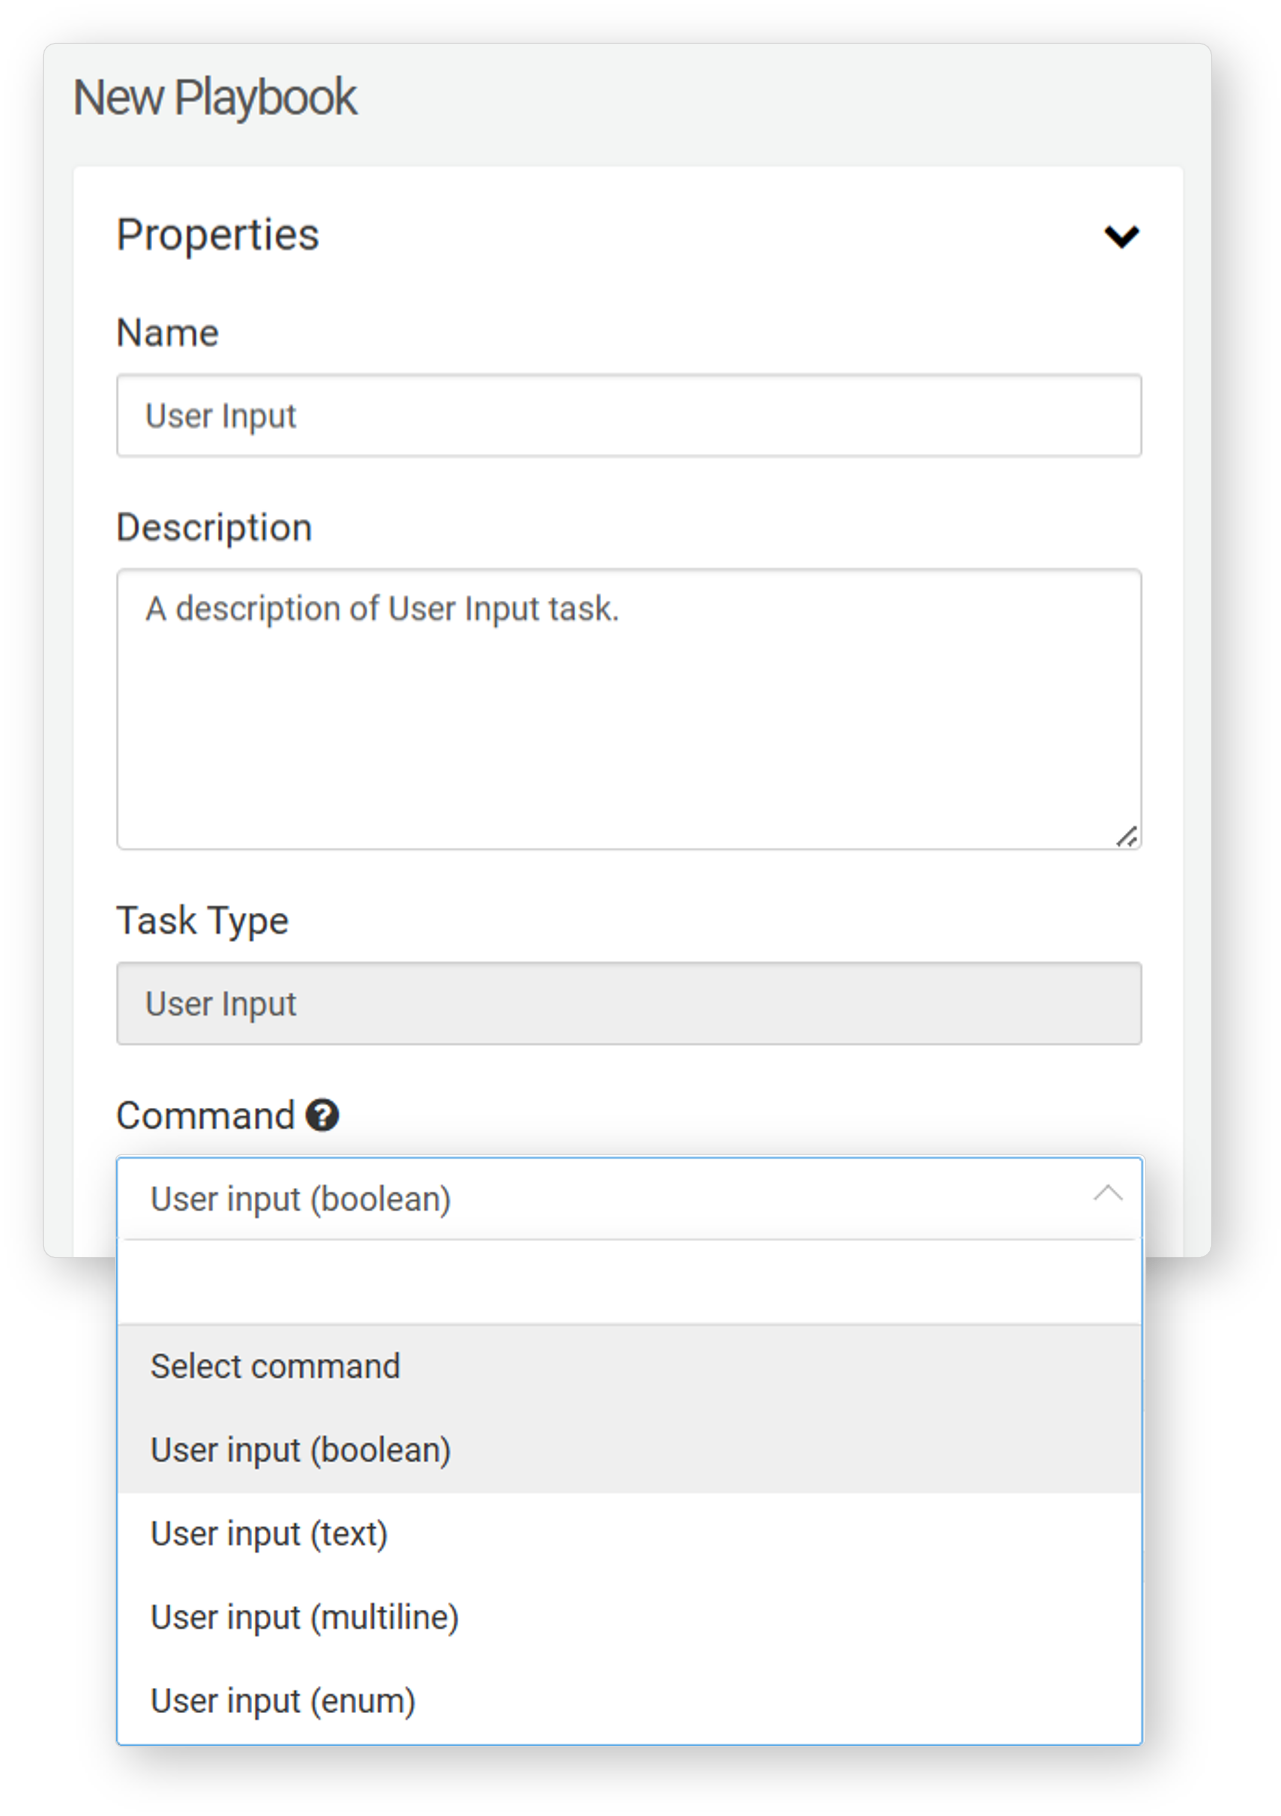
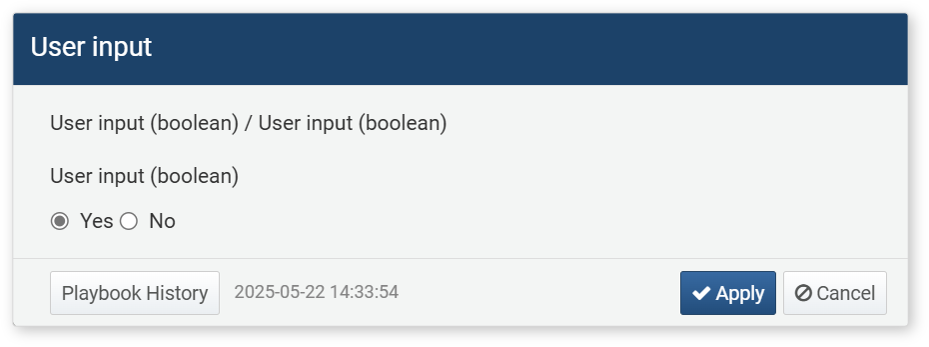
Boolean
When the command is User Input (Boolean), the task generates a request where the user can respond with Yes or No. If the response is Yes, the task returns true; if No, it returns false as the output parameter input.
This task is often used with Decision - Expression task to control task flow based on user responses.

Command: User Input (Boolean)
- Input Parameters
- Enter the Title and Content for the user input request. If needed, select variables from the Variable list.
-
Title*: Enter the title of the user input request.
-
Content*: Enter the message for the user input request.
-
Variables: Click Add and select a variable to use in the Title or Content. Both Title and Content are strings. To substitute a variable value within a string, use the
${variable}format.Note$("variable") is used in Logpresso queries to reference variable values and cannot be used within a string.
String
When the command is User Input (String), the task generates a request for the user to enter a string. The entered string is returned as the output parameter input.
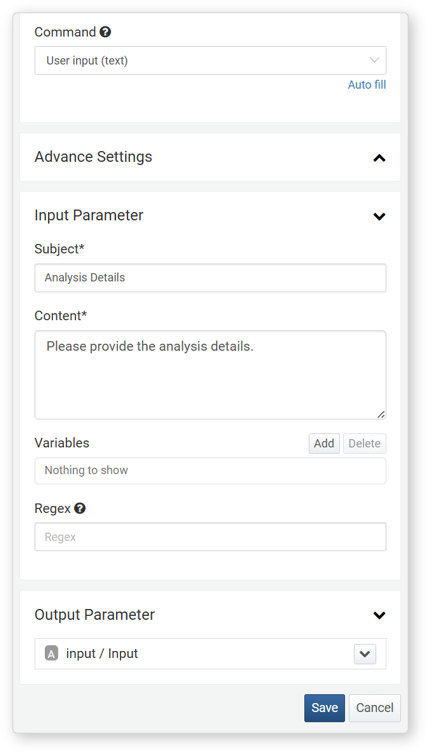
Command: User Input (String)
- Input Parameters
- Enter the Title and Content for the user input request. If needed, select variables from the Variable list. To validate the format of the entered value, use a regular expression.
-
Title*: Enter the title of the user input request.
-
Content*: Enter the message for the user input request.
-
Variables: Click Add and select a variable to use in the Title or Content. Both Title and Content are strings. To substitute a variable value within a string, use the
${variable}format. - Note$("variable") is used in Logpresso queries to reference variable values and cannot be used within a string.
-
Regular Expression: Use a regular expression to restrict the format of the entered string.
multiline
When the command is User Input (multiline), the task generates a request for the user to enter multiple lines of text. This is suitable for handling long text data. The entered text is returned as the output parameter input.

- Command
- User Input (multiline)
- Input Parameters
- Enter the Title and Content for the user input request. If needed, select variables from the Variable List.
-
Title*: Enter the title of the user input request.
-
Content*: Enter the message for the user input request.
-
Variables: Click Add and select a variable to use in the Title or Content. Both Title and Content are strings. To substitute a variable value within a string, use the
${variable}format.Note$("variable") is used in Logpresso queries to reference variable values and cannot be used within a string.
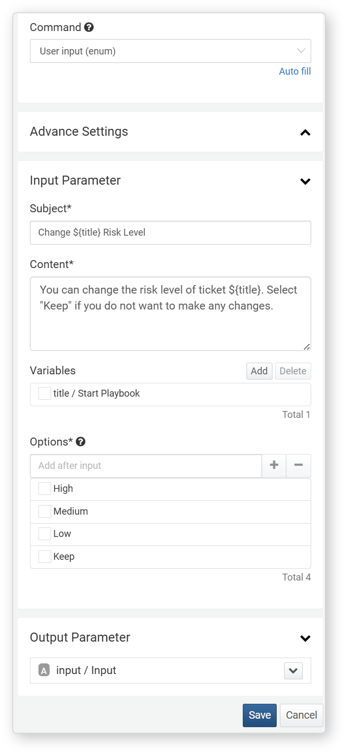
Enumeration
When the command is User Input (Enum), the task generates a request where the user selects one option from multiple choices. The selected option is returned as the output parameter input in string format.
- Command
- User Input (Enum)
- Input Parameters
- Enter the Title and Content for the user input request. If needed, select variables from the Variable List.
-
Title*: Enter the title of the user input request.
-
Content*: Enter the message for the user input request.
-
Variables: Click Add and select a variable to use in the Title or Content. Both Title and Content are strings. To substitute a variable value within a string, use the
${variable}format.Note$("variable") is used in Logpresso queries to reference variable values and cannot be used within a string.
-
Options*: Enter the choices to be presented to the user. After entering an option, press Enter or click + to add it.
Example - User Input
- User Input (Boolean)
- Allows task branching based on specific conditions. For example, asking "Do you want to process this ticket immediately?" If the user selects
Yes, the task proceeds with immediate processing; ifNo, the ticket remains in a pending state. - User Input (String)
- Enables tasks based on user-provided text. For instance, prompting "Enter the GUID of the ticket to process." The entered GUID can then be used to retrieve or update the ticket’s details.
- User Input (Multiline)
- Allows users to input multi-line text, such as by asking "Enter the details of the issue." The provided information can be added to the ticket's notes or Description field.
- User Input (Enum)
- Presents predefined options for selection. For example, asking "Select the priority level for processing." Based on the selected priority, the ticket's priority can be set, and corresponding actions can be executed.
Approval
This task presents information to the user and requests approval. Based on the user’s response (Approve or Reject), different tasks are executed. If the response is Approve, the workflow follows the Y branch; if Reject, it follows the N branch.
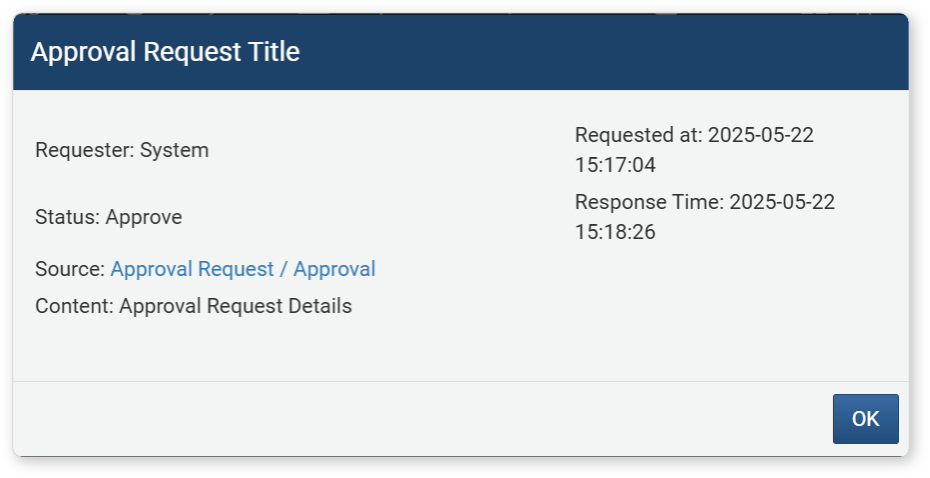
Pending approval tasks can be viewed under Response > Approval Requests. Clicking an item with the Type set to Approval displays the request details, as shown below:
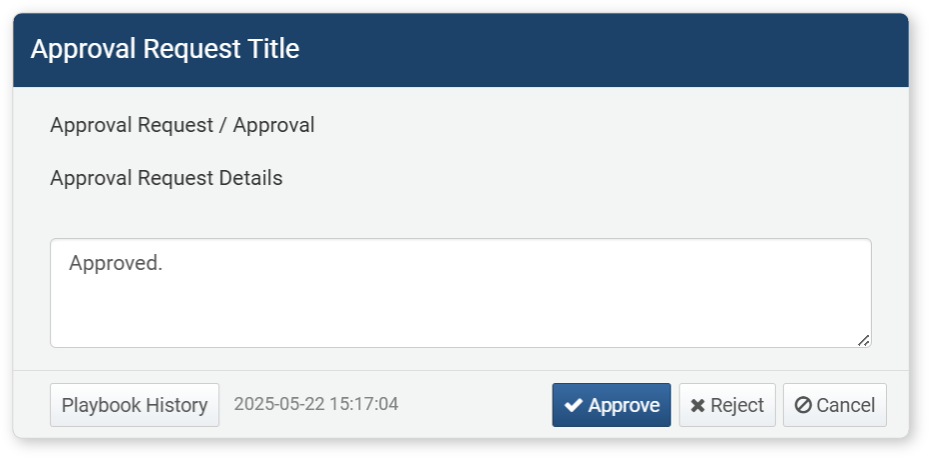
User approval is processed by clicking either Approve or Reject, and any input from the user is returned as the comment output parameter.
The properties of the approval task are as follows:
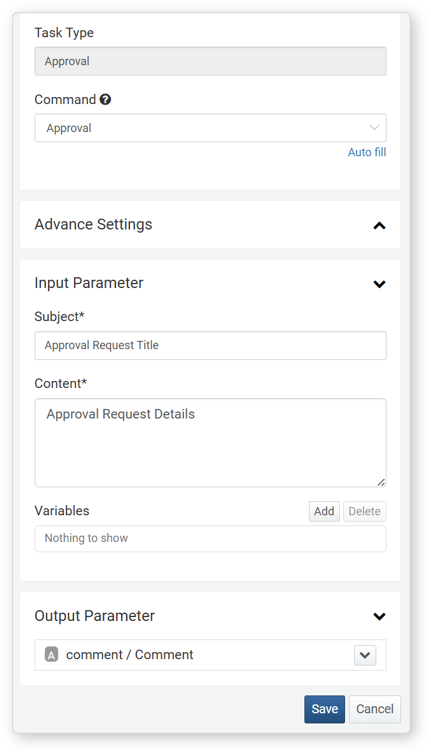
Command: Approval
- Input Parameters
- Enter the Title and Content for the user input request. If needed, select variables from the Variable list**.
-
Title*: Enter the title of the user input request.
-
Content*: Enter the message for the user input request.
-
Variables: Click Add and select a variable to use in the Title or Content. Both Title and Content are strings. To substitute a variable value within a string, use the
${variable}format.Note$("variable") is used in Logpresso queries to reference variable values and cannot be used within a string.
Pause
This task delays execution for a specified period. It is useful when multiple workflows run in parallel, when dependencies exist between workflows, or when a task needs to wait for another workflow to complete.
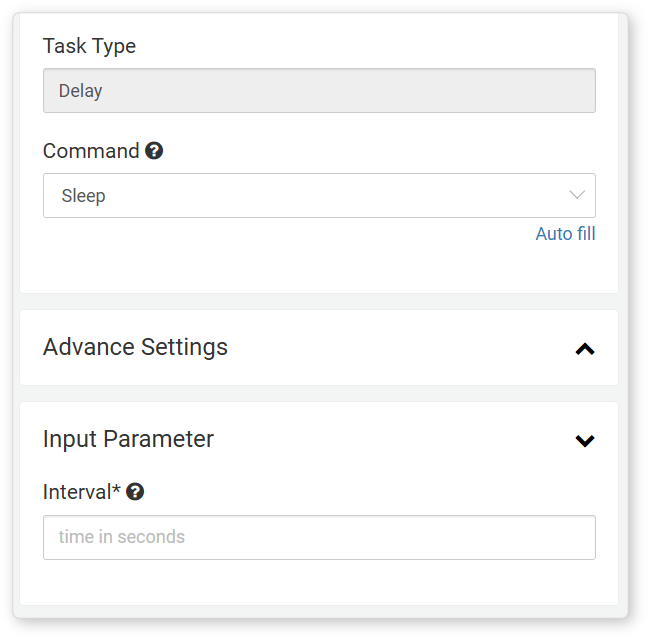
Command: Pause
Input Parameter
- Time*: Enter the waiting time in seconds.
This task sends an email based on a specified format.

Command: Send Email
Input Parameters
-
Mail To*: Enter the recipient's email address. You can either select from parameters or input the address as a string.
-
Email Subject*: Enter the subject of the email.
-
Format*: Choose the format for the body of the email (range: plain, markdown, html).
-
Content*: Enter the body content of the email.
-
Variables: Click Add and select a variable to use in the Title or Content. Both Title and Content are strings. To substitute a variable value within a string, use the
${variable}format.Note$("variable") is a function used to refer to variable values in Logpresso queries and cannot be used within strings.
NoteTo execute the email task, you must first configure the mail server settings in "Settings > Mail Server."
Call Playbook
This task calls and executes another playbook. The playbook being called is referred to as a sub-playbook. If a loop variable is specified by the input parameters, the sub-playbook will be executed repeatedly repeatedly for the given number of iterations.
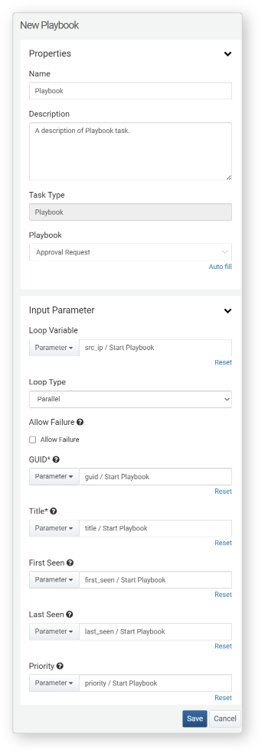
- Playbook*
- This is a unique property of the Call Playbook task. Select the playbook (sub-playbook) to be executed from the list of available playbooks.
Input Parameters
-
Loop Variable: Select the input parameter to limit repeated execution of the sub-playbook. Typically, this is a parameter that matches a specific field in the dataset, similar to playbook input parameters. The sub-playbook will be executed as many times as the number of values in the loop variable. If a *String type variable is used, it contains only a single value, so the playbook will be executed only once.
-
Loop Type: Choose between Parallel or Sequential execution (default: Parallel). This setting is available only if a Loop Variable is specified.
- Parallel: Executes the sub-playbook in parallel for each value in the loop variable.
- Sequential: Executes the sub-playbook one at a time, following the order of values in the loop variable.
-
Allow Failure: Select this option to allow the sub-playbook to continue execution even if an error occurs (default: unchecked).
- Checked: Continues executing the sub-playbook loop even if an error occurs.
- Unchecked: Stops executing the sub-playbook loop if an error occurs.
-
Sub-playbook Input Parameters: Lists all input parameters required for the sub-playbook. Specify the necessary input parameters to execute the sub-playbook.
Use Cases for Calling a Playbook
Calling a playbook can be useful in the following scenarios:
- Handling Multiple Alerts : When multiple security alerts occur, the same response procedure is repeated for each alert.
- Example: Blocking suspicious IPs.
- Regular Inspections : When conducting periodic inspections across multiple systems, the same inspection process is repeated for each device.
- Example: Analyzing server logs.
- Incident Response : When a security incident occurs, actions are taken simultaneously across multiple systems or users.
- Example: Resetting passwords for compromised accounts.
- Data Collection and Analysis : When gathering and analyzing information from multiple data sources, the same process is repeated for each source.
- Example: Searching for specific patterns in log files.
*Example of Calling a Playbook
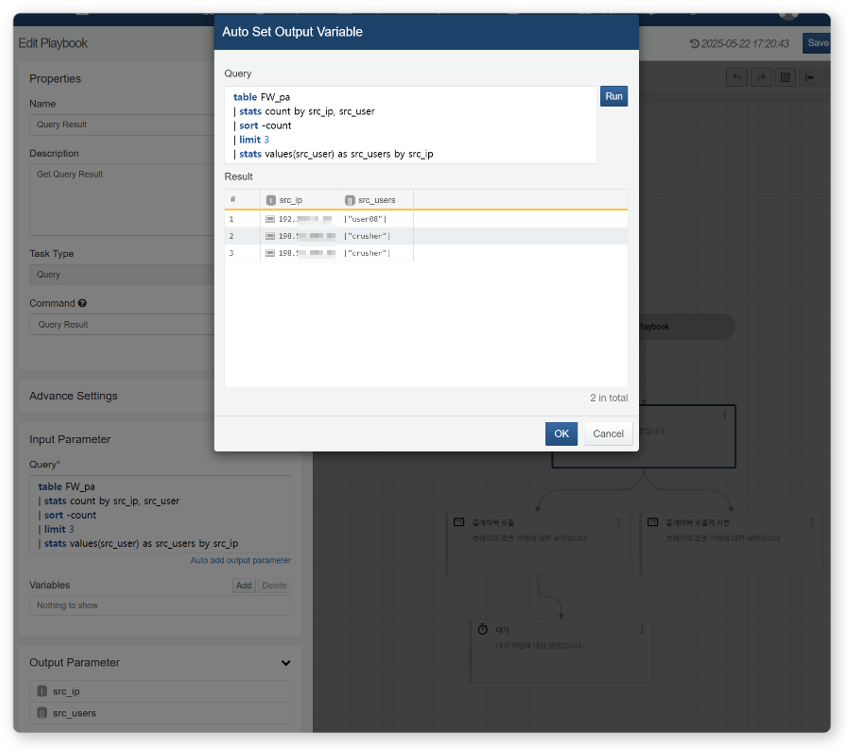
The Call Playbook task can invoke a sub-playbook within the current playbook and execute repeated calls (loop execution) based on its configuration. Below is an example where multiple IPs are extracted, and a sub-playbook is repeatedly called to add those IPs to an address group.
-
Add a query task to retrieve multiple IP addresses in the playbook.
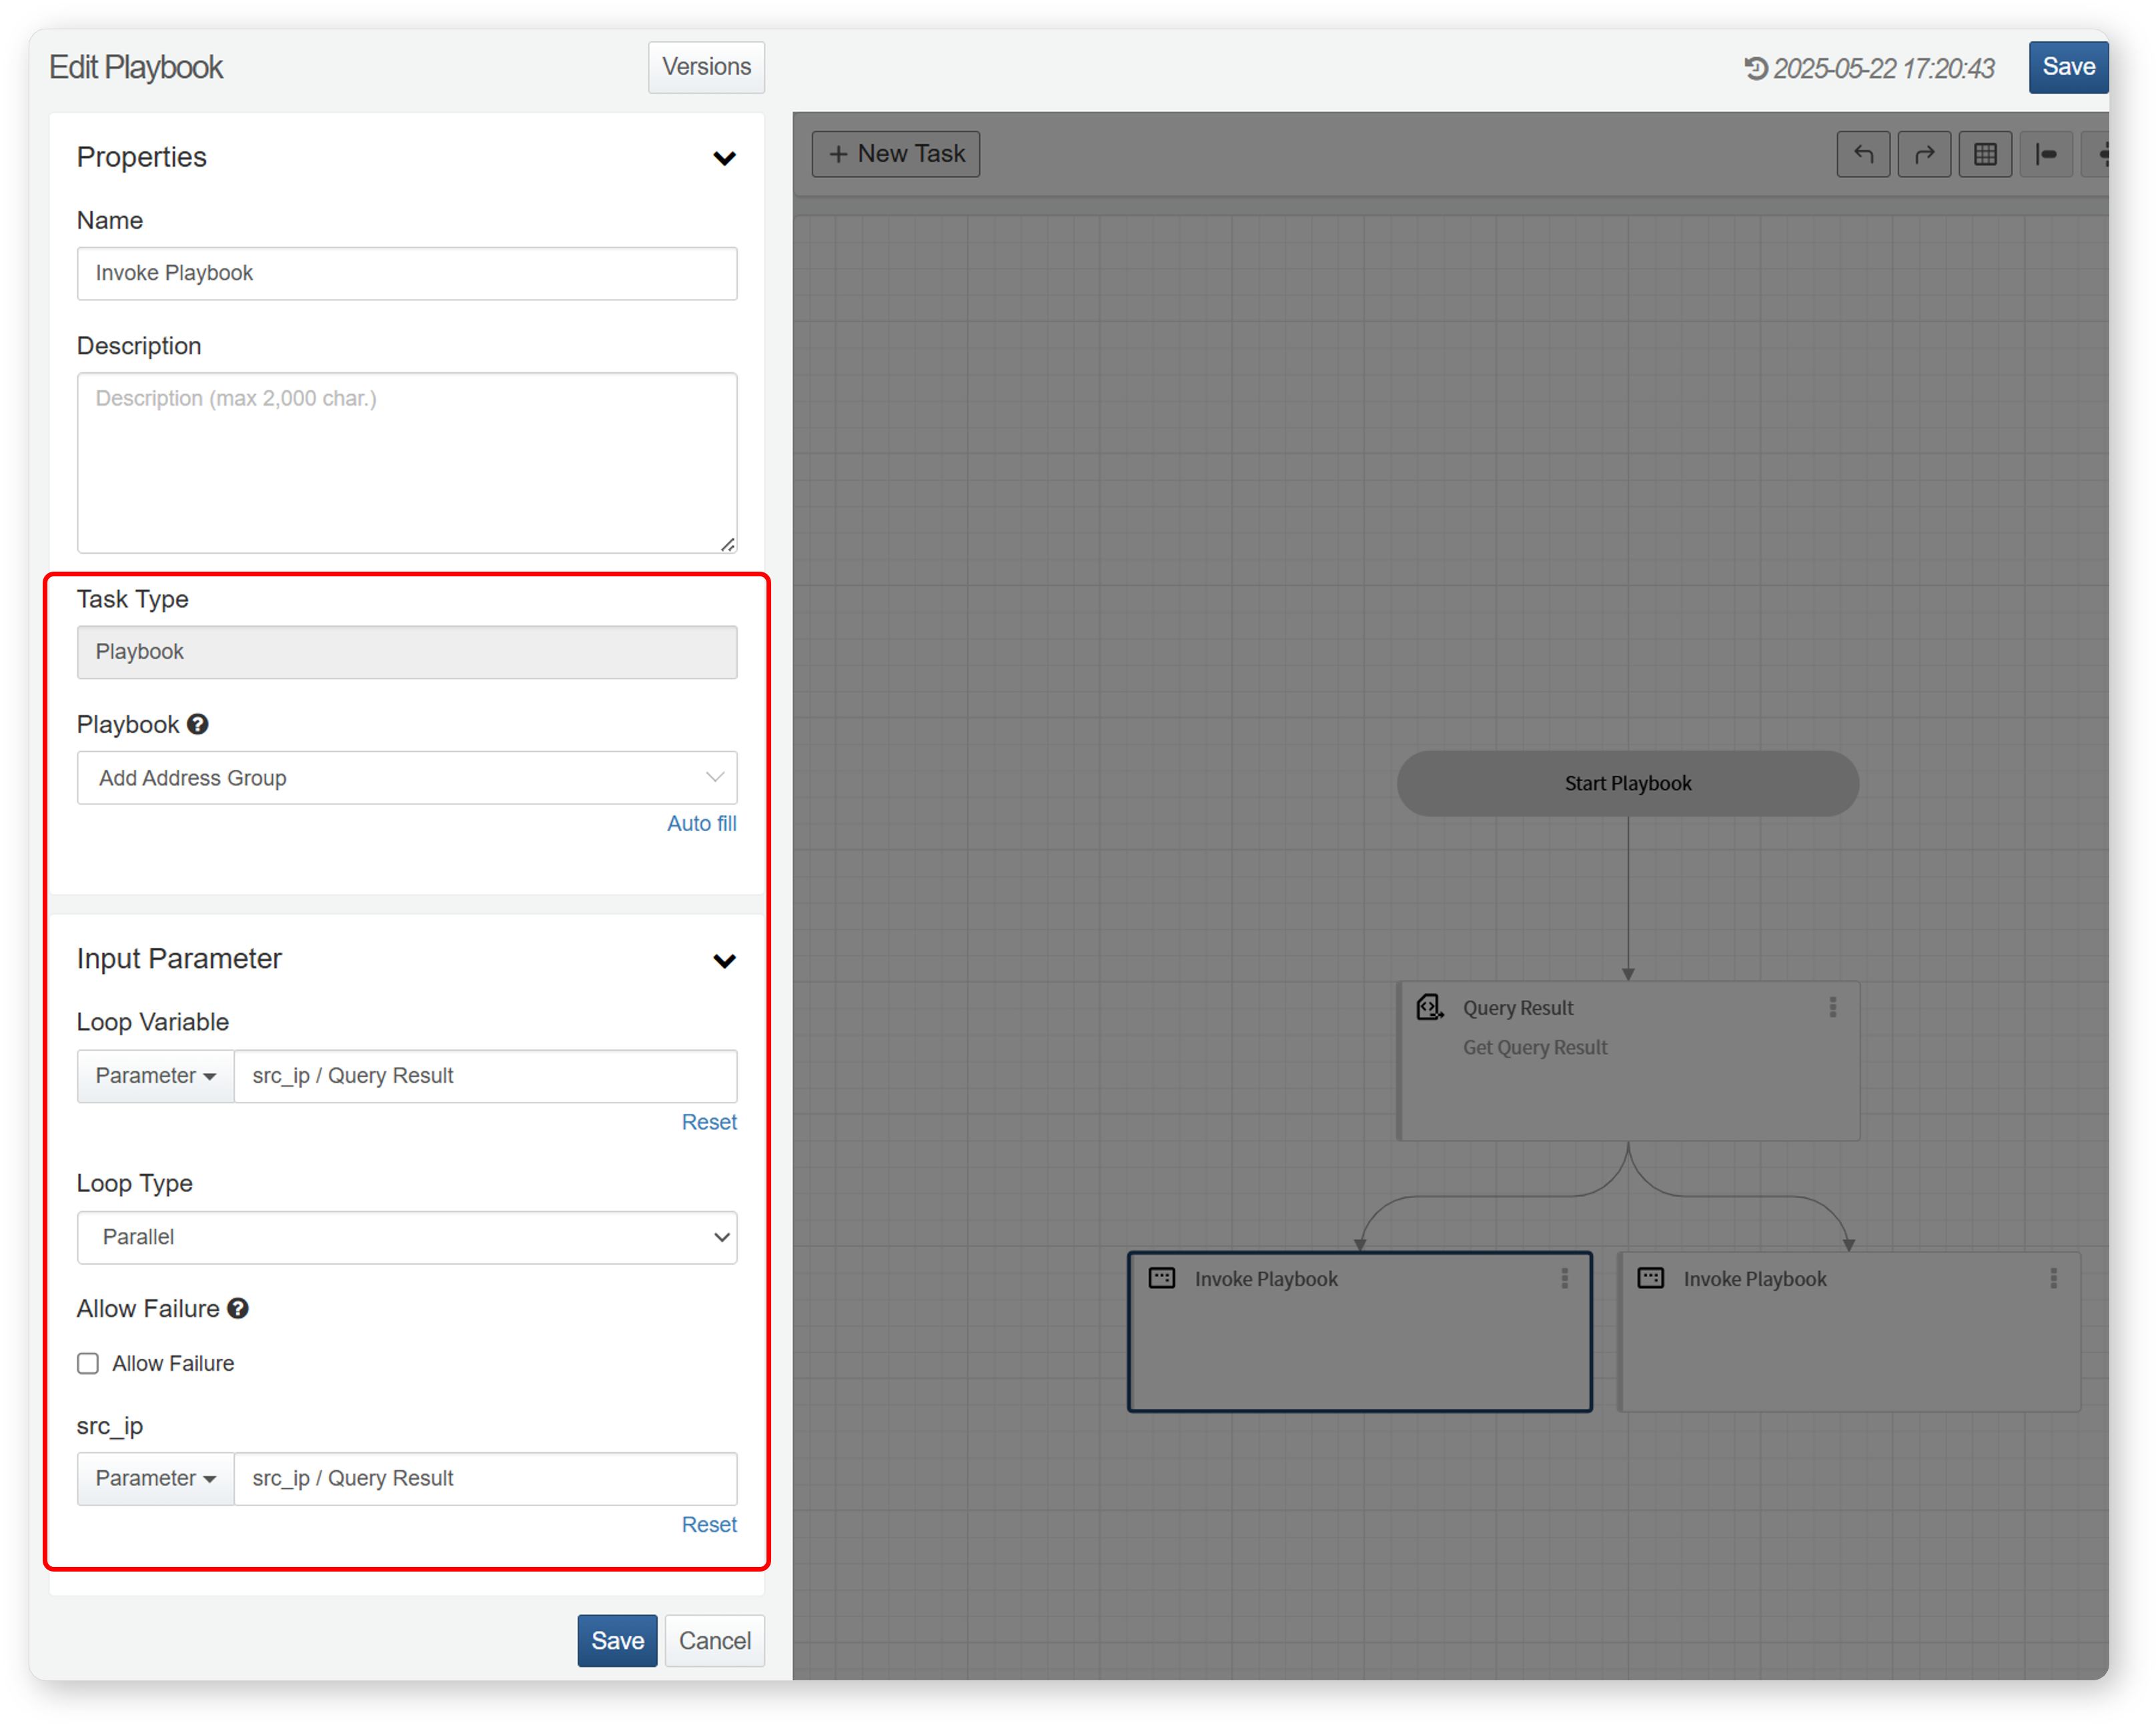
-
Add a Call Playbook task that uses the extracted source IP addresses as input parameters. Ensure that the Loop Variable in the Call Playbook task matches the input parameter of the called sub-playbook.
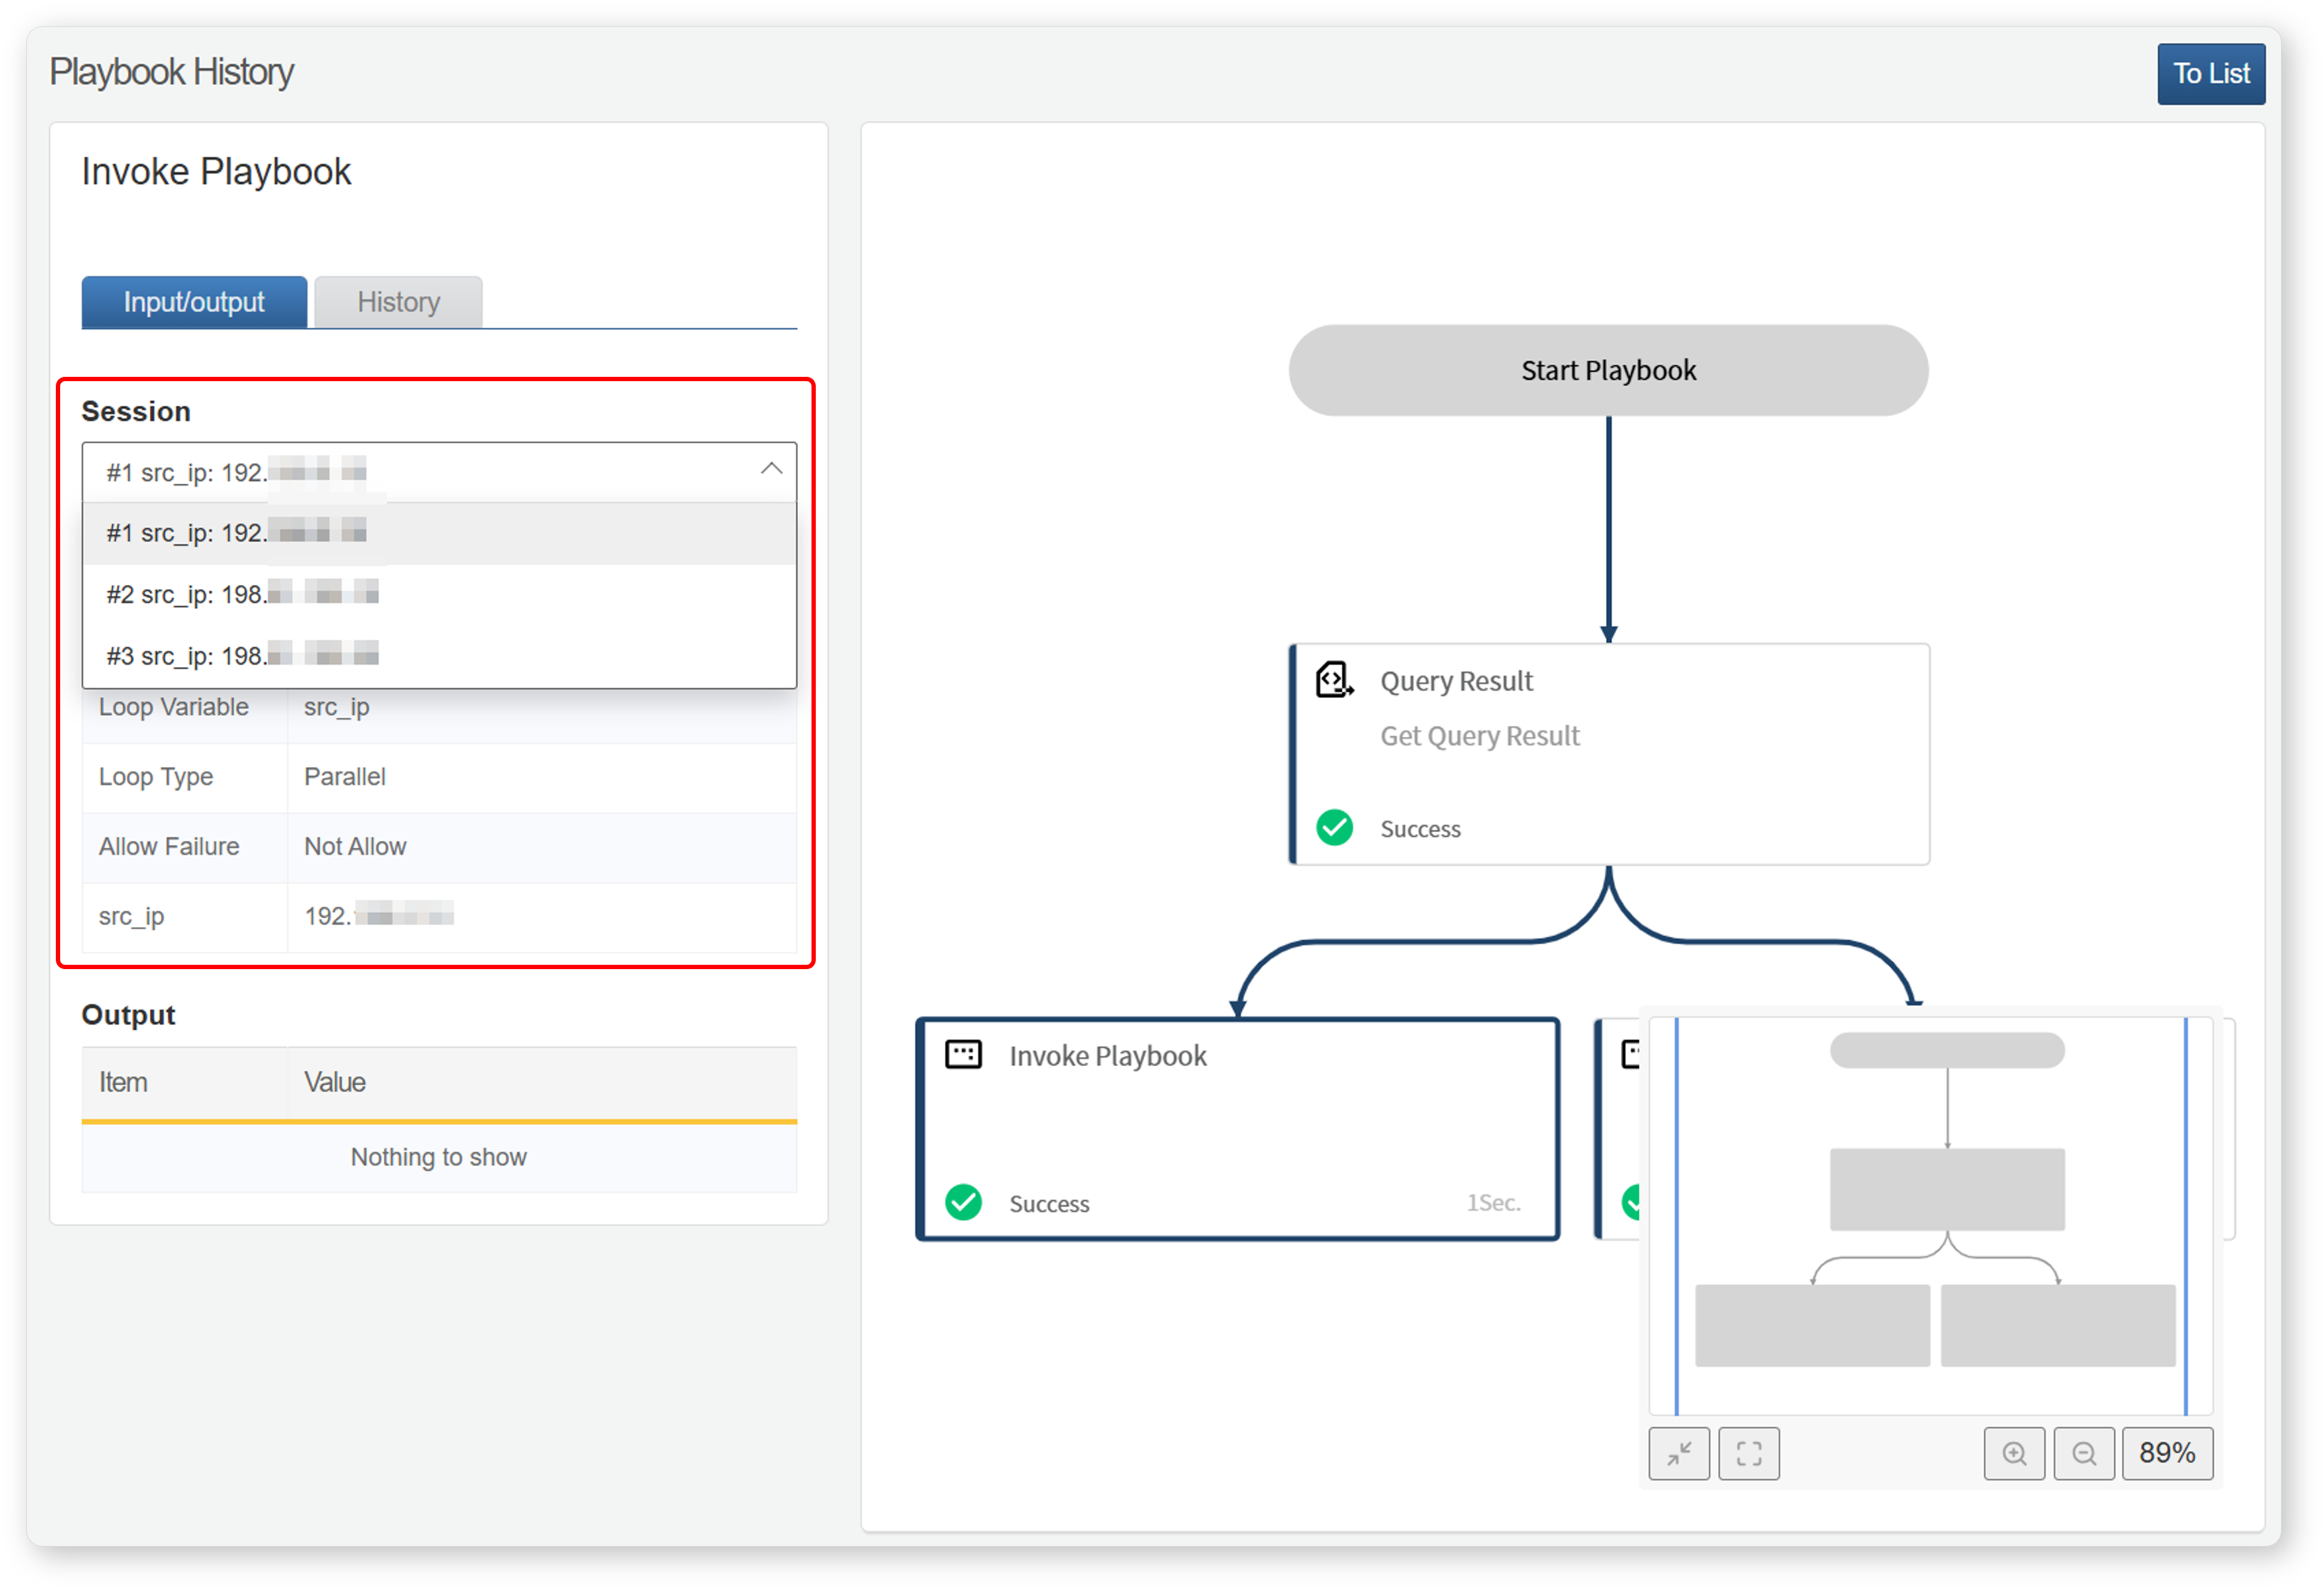
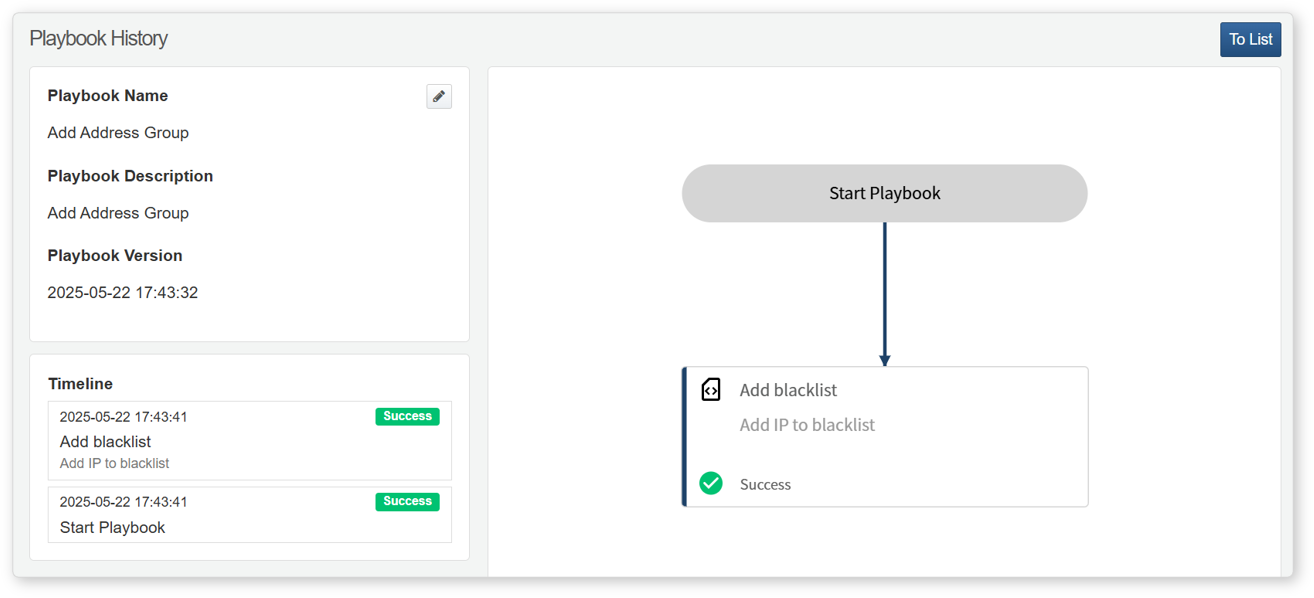
-
The playbook will be called repeatedly based on the number of IP addresses, adding each IP to the address group. You can verify input and output parameters as well as execution details for each iteration.
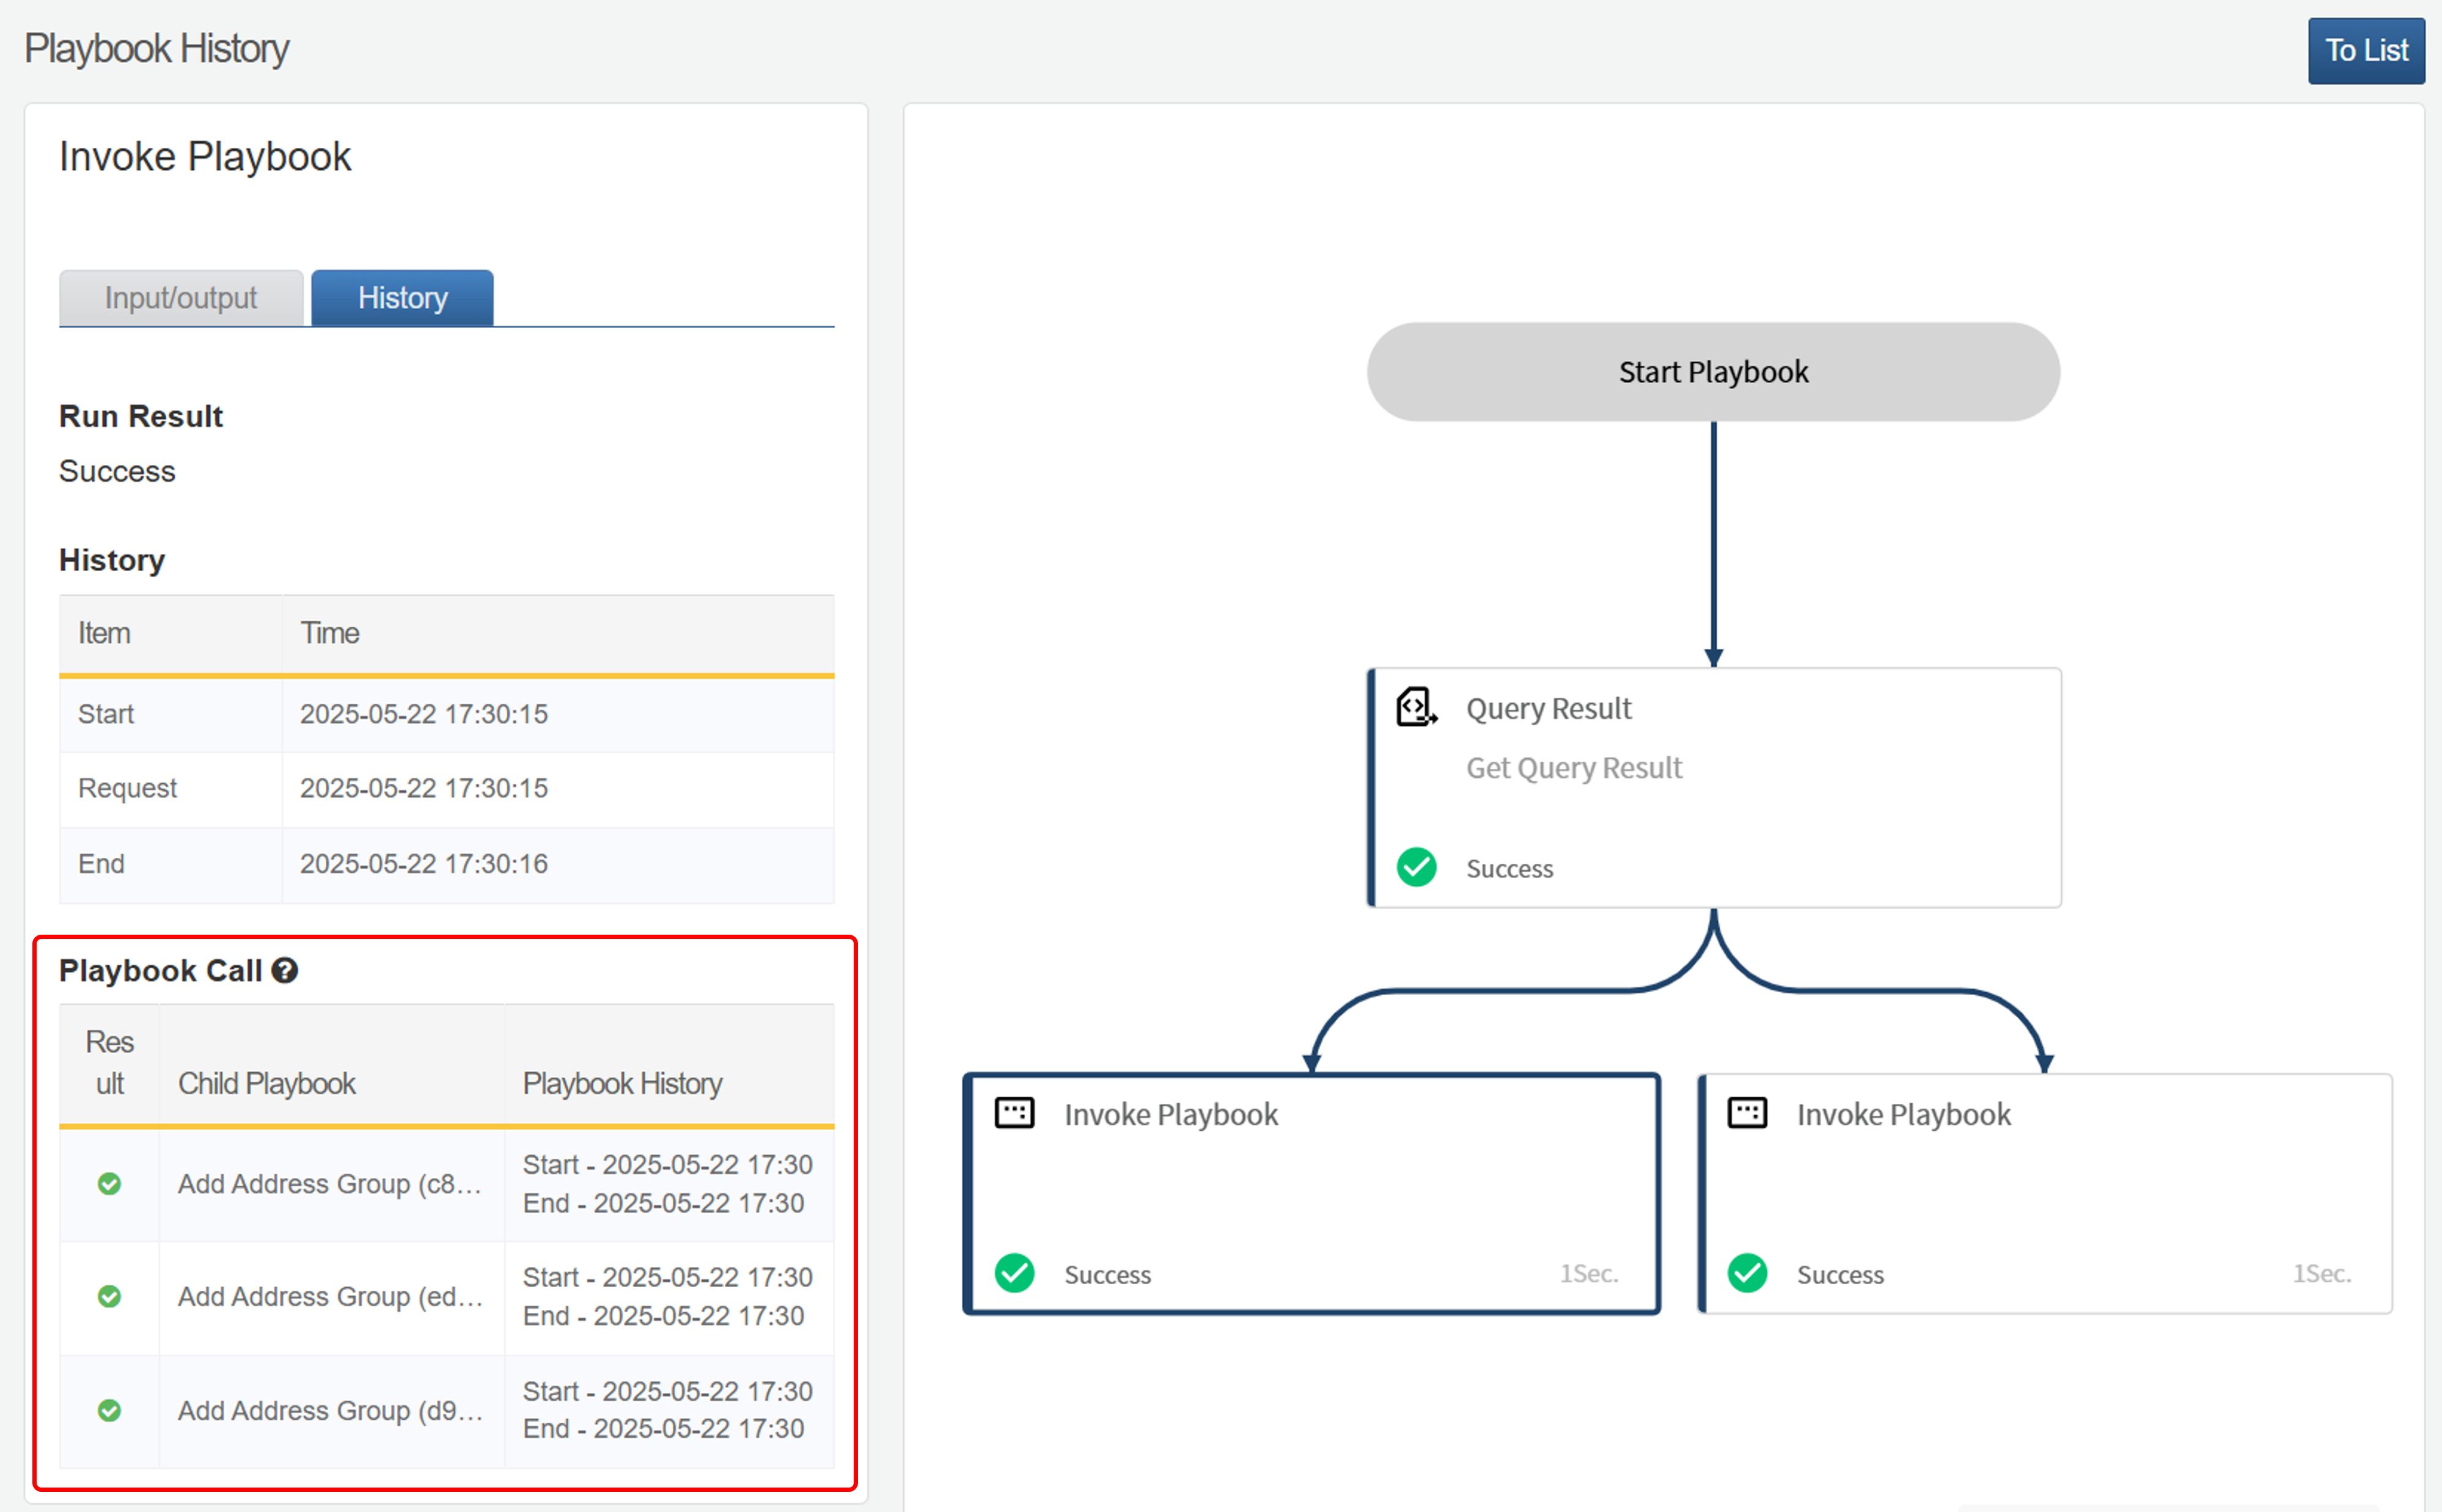
-
Click the name of the sub-playbook in the execution history to check the automated response details within that playbook.
Query
The Query task executes a query and returns the result as an output parameter. It can be used to detect anomalies in specific events or logs, retrieve logs for security incident analysis, or perform regular system monitoring.
The query task can be categorized based on the selected command:
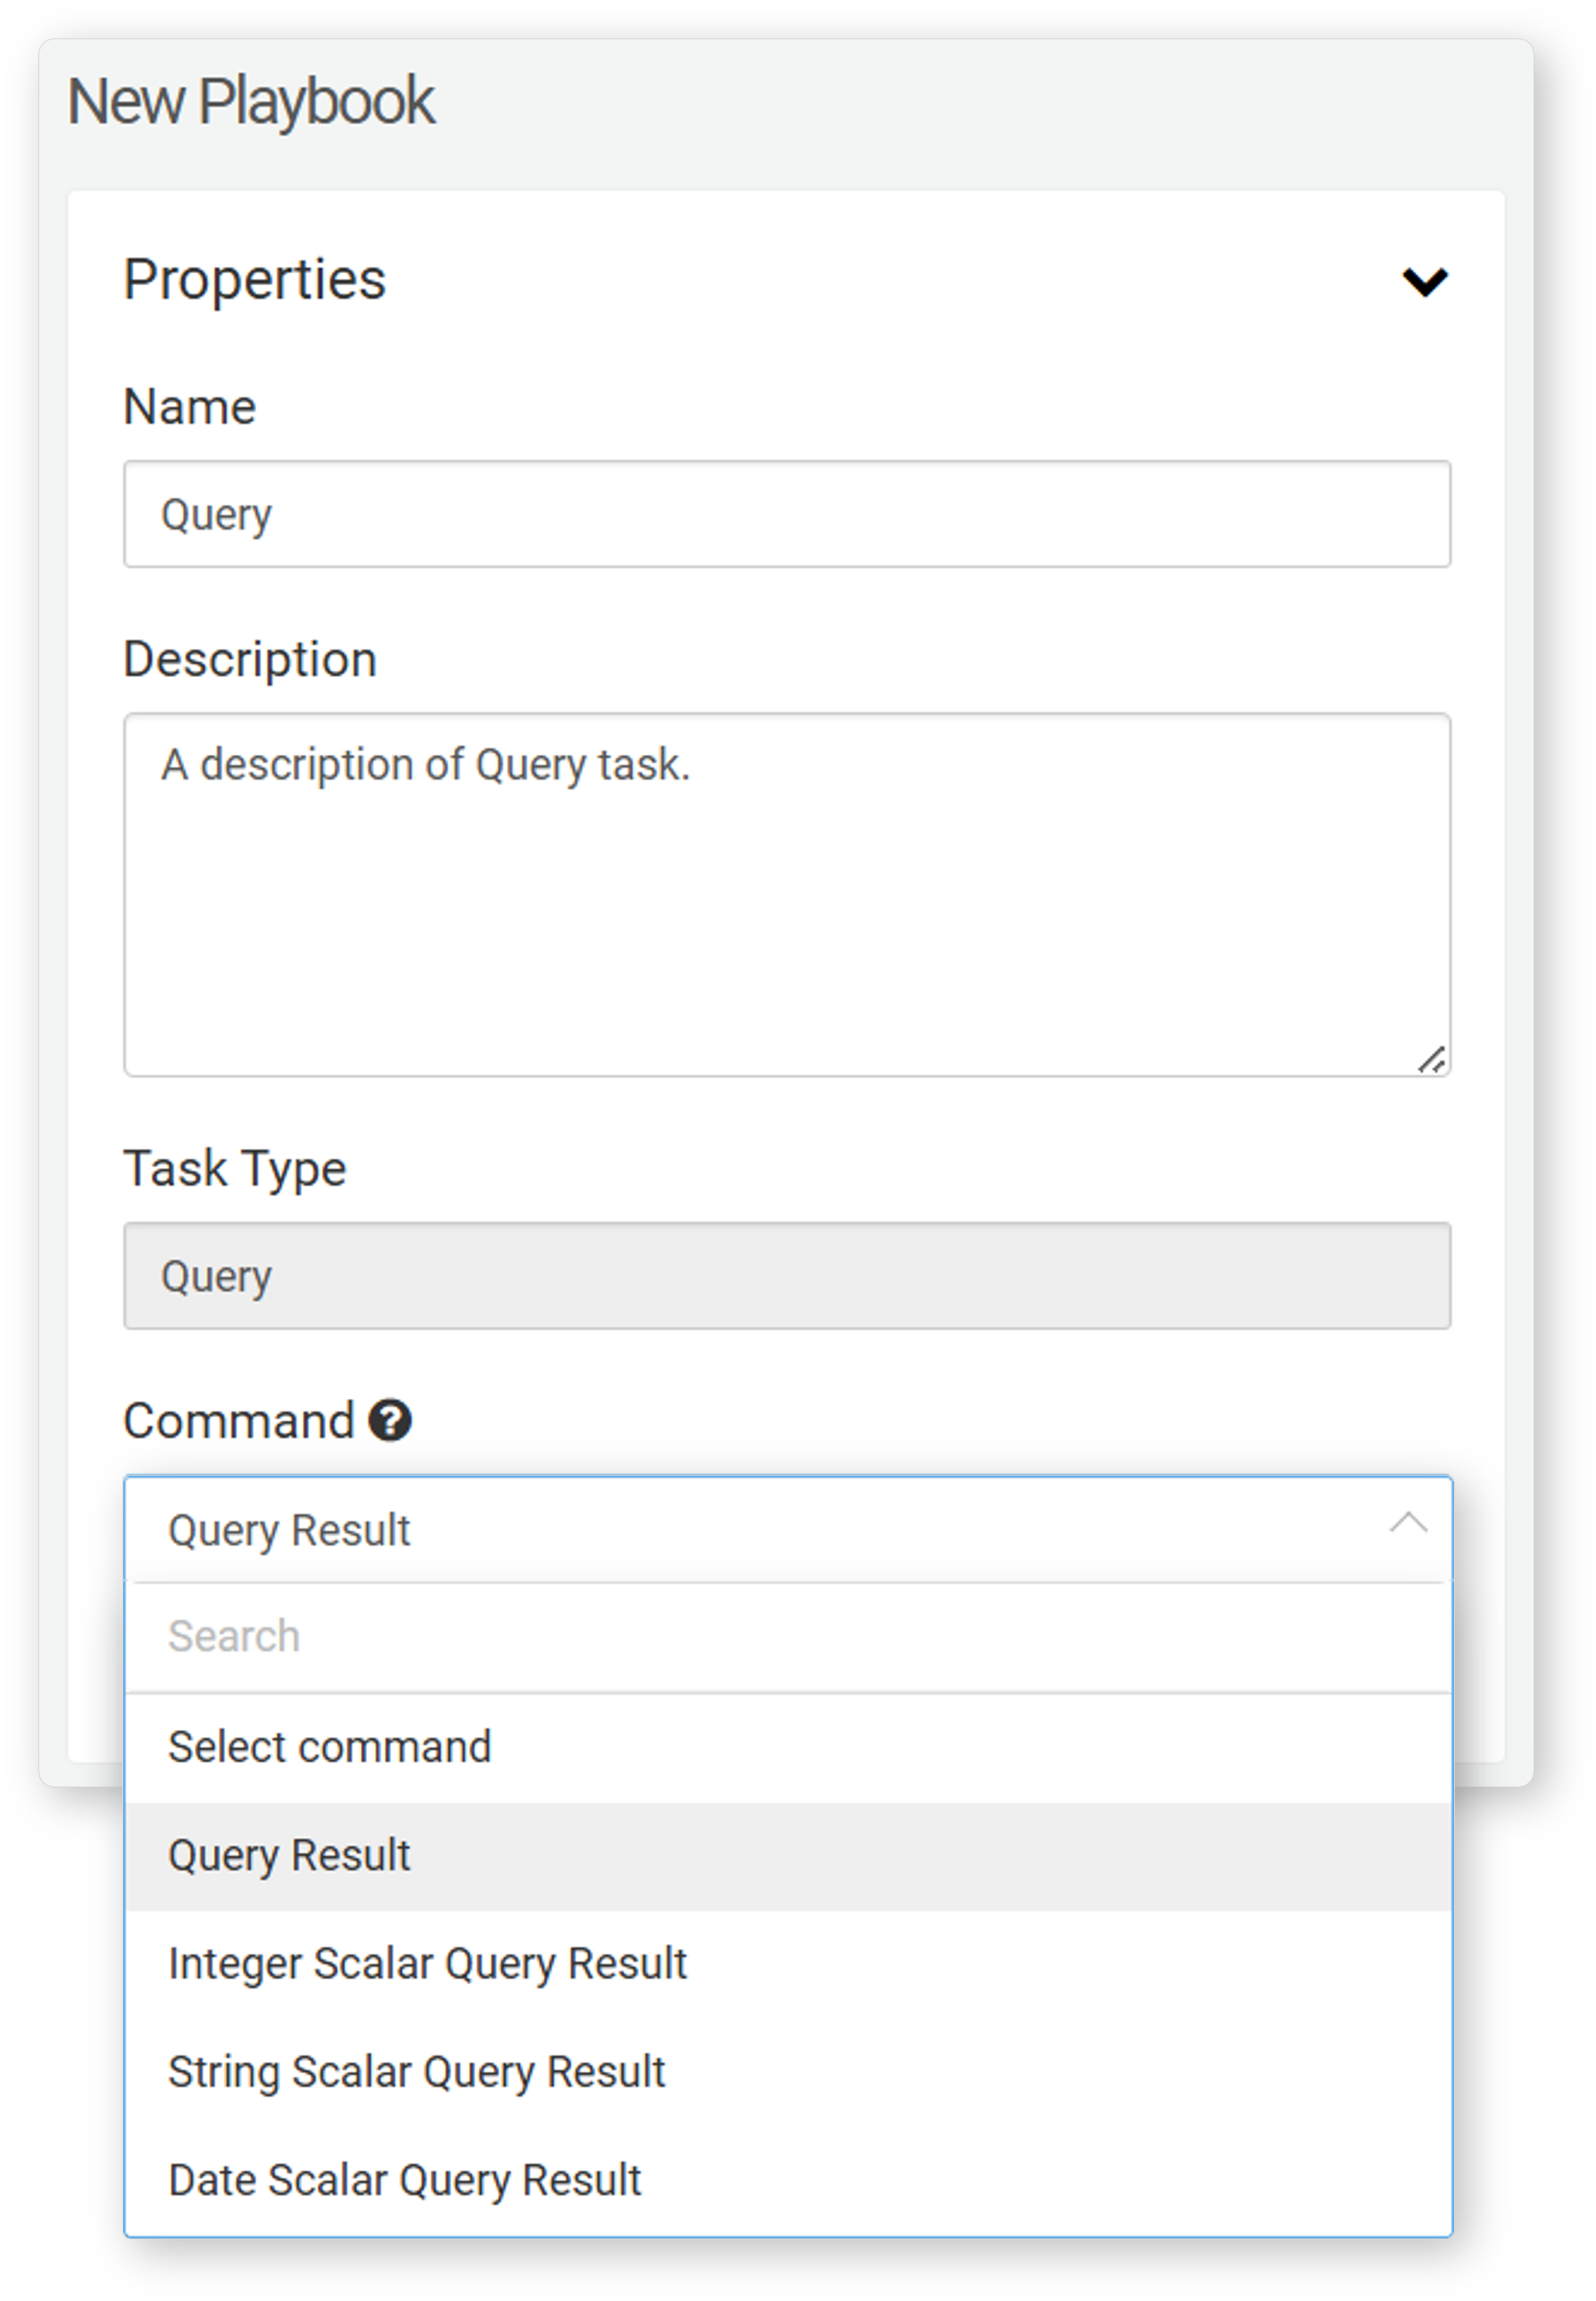
Get Query Result
Executes a query and assigns the result to output parameters.
Command: Get Query Result
Input Parameters
-
Query*: Enter the query statement to execute. To use variables from the Variables, enter them in the format $("variable").
- auto add output paramter: Click to automatically add query output fields as output parameters.
-
Variables: Click Add to select variables from the list to use in the query expression. To delete a variable, check the box next to the it and click *Delete.
Get Scalar Query Result (Integer)
Executes a query that returns an integer. The result is assigned to the result output parameter.
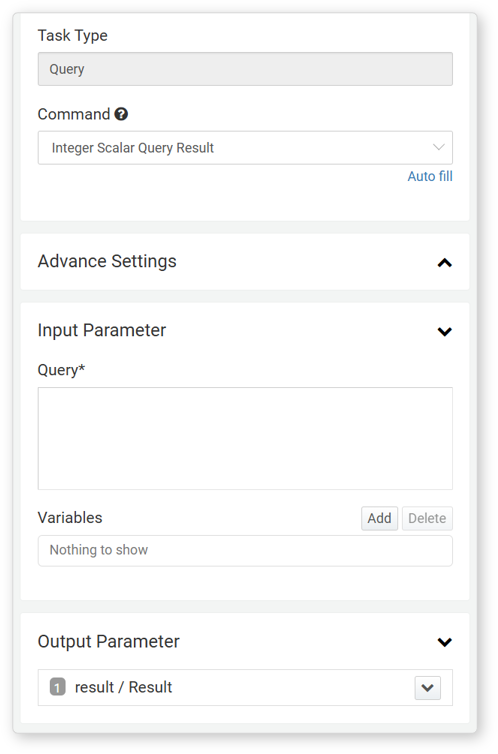
Command: Get Scalar Query Result (Integer)
Input Parameters
-
Query*: Enter the query statement to execute. To use variables from the Variables, enter them in the format $("variable").
- auto add output paramter: Click to automatically add query output fields as output parameters.
-
Variables: Click Add to select variables from the list to use in the query expression. To delete a variable, check the box next to the it and click *Delete.
Get Scalar Query Result (String)
Executes a query that returns a string. The result is assigned to the result output parameter.
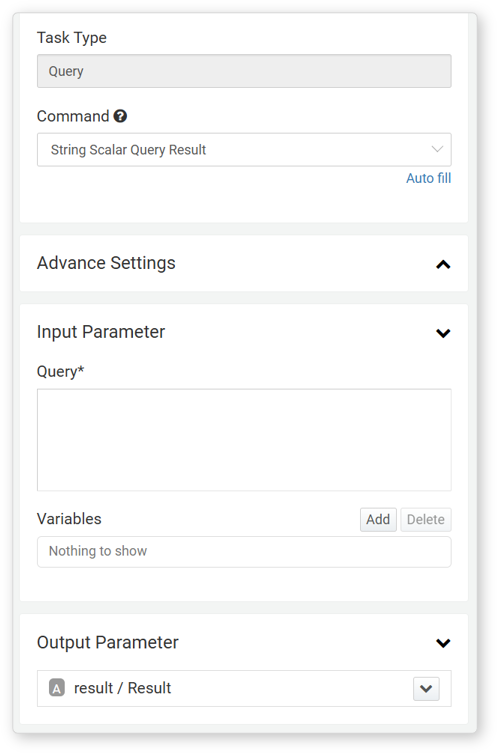
Command: Get Scalar Query Result (String)
Input Parameters
-
Query*: Enter the query statement to execute. To use variables from the Variables, enter them in the format $("variable").
- auto add output paramter: Click to automatically add query output fields as output parameters.
-
Variables: Click Add to select variables from the list to use in the query expression. To delete a variable, check the box next to the it and click *Delete.
Get Scalar Query Result (Date)
Executes a query that returns date values.
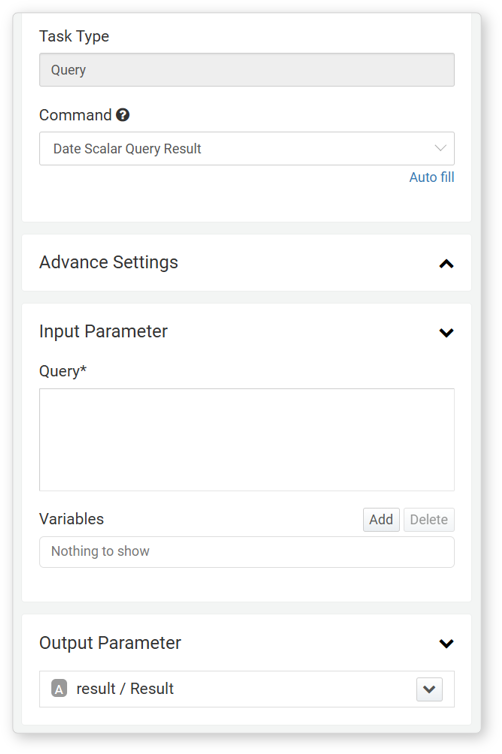
Command: Get Scalar Query Result (Date)
Input Parameters
-
Query*: Enter the query statement to execute. To use variables from the Variables, enter them in the format $("variable").
- auto add output paramter: Click to automatically add query output fields as output parameters.
-
Variables: Click Add to select variables from the list to use in the query expression. To delete a variable, check the box next to the it and click *Delete.
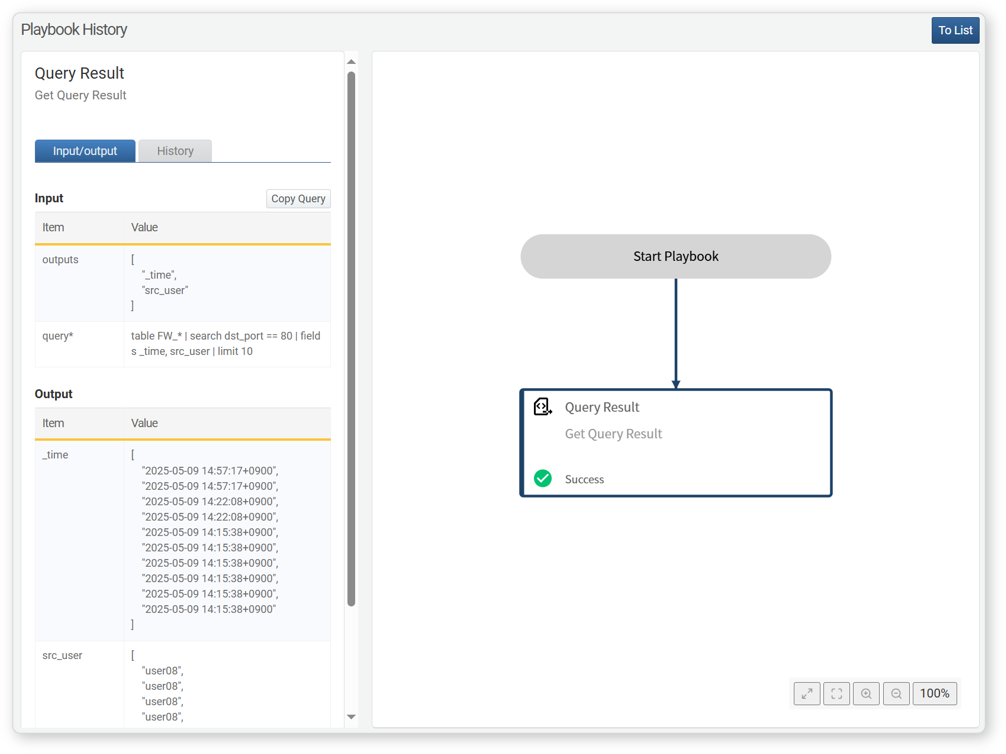
Example of Query Task
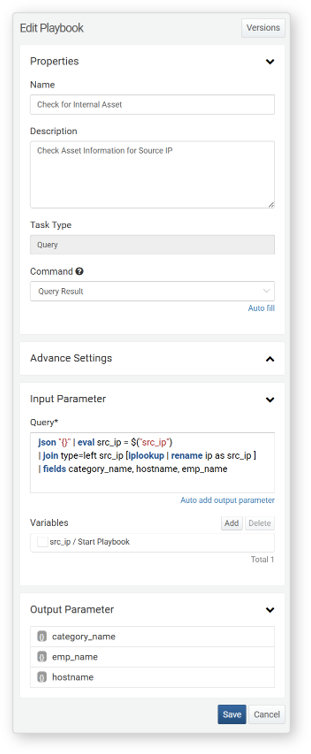
The query task retrieves data using a query statement and returns the result as an output parameter. Below is an example of Get Query Result.
- Configure a Query type task with the Get Query Result command.
-
Click auto add output paramter to generate a list of output paramters.
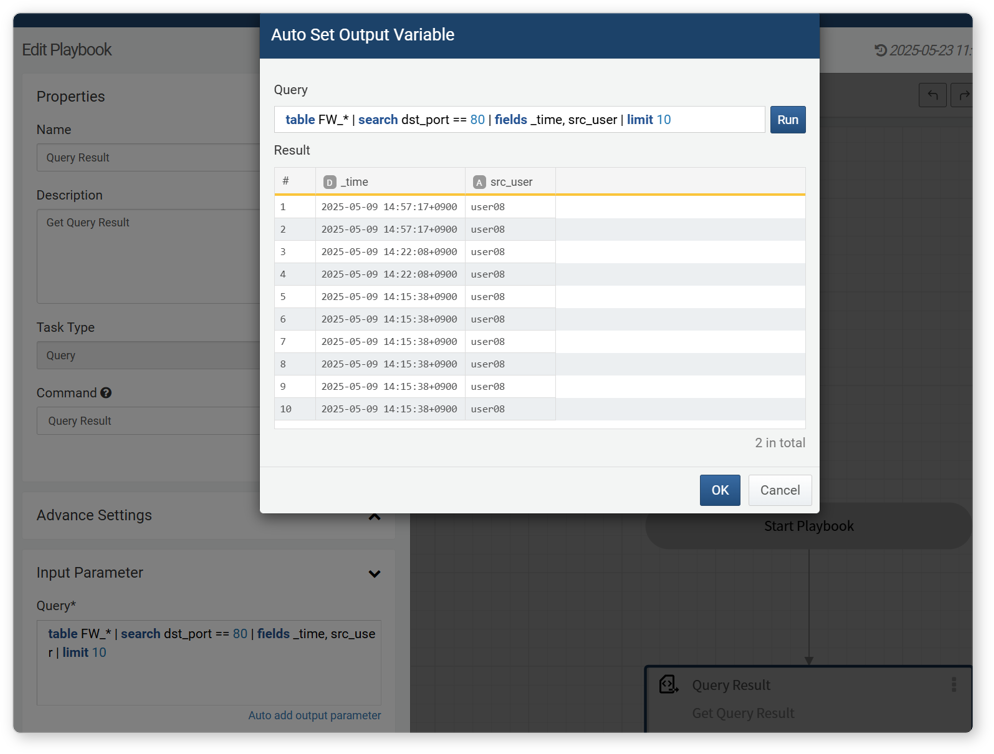
-
Click OK in the auto add output paramter popup to set the output parameters automatically.
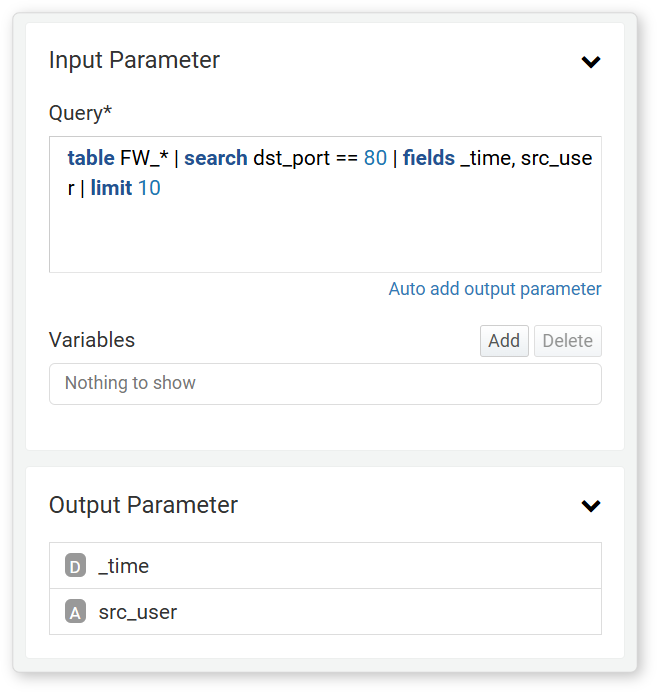
-
Run the playbook and verify that the query results are returned as output parameters.
Investigate
This task executes a query and adds the results as investigation data to the ticket. It is useful when investigating security incidents or anomalies, allowing you to add relevant logs or data to document and analyze the progression of the event. For example, you can add logs related to suspicious activities from a specific IP address.
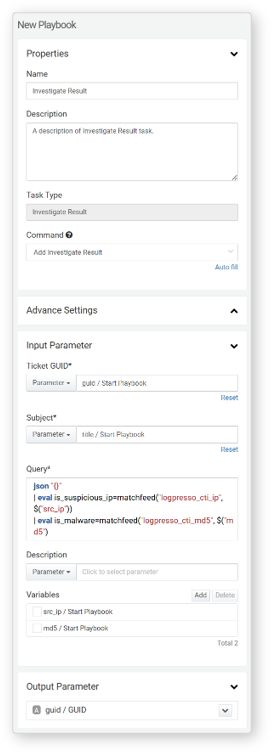
- Command
- The only available command is Add Investigation Result.
Input Parameters
- Ticket GUID*: Choose or enter the GUID value of the ticket to which investigation data will be added.
- Title*: Select String and specify the title for the investigation data, or choose from the available parameters for the title.
- Query*: Enter the query that will return the investigation data to be added. To use parameters from the variable, enter them in the format $("variable").
- Description: Select String and provide a description of the investigation data, or select a parameter from the Variable that includes a description string.
- Variables: Click Add to select variables from the list that will be used in the expression. The Variables shows parameters from previous tasks or playbook. To use variables from the Variables in Query, enter them in the format $("variable"). To delete a variable from the variable list, select the checkbox of the variable you want to delete, then click Delete.