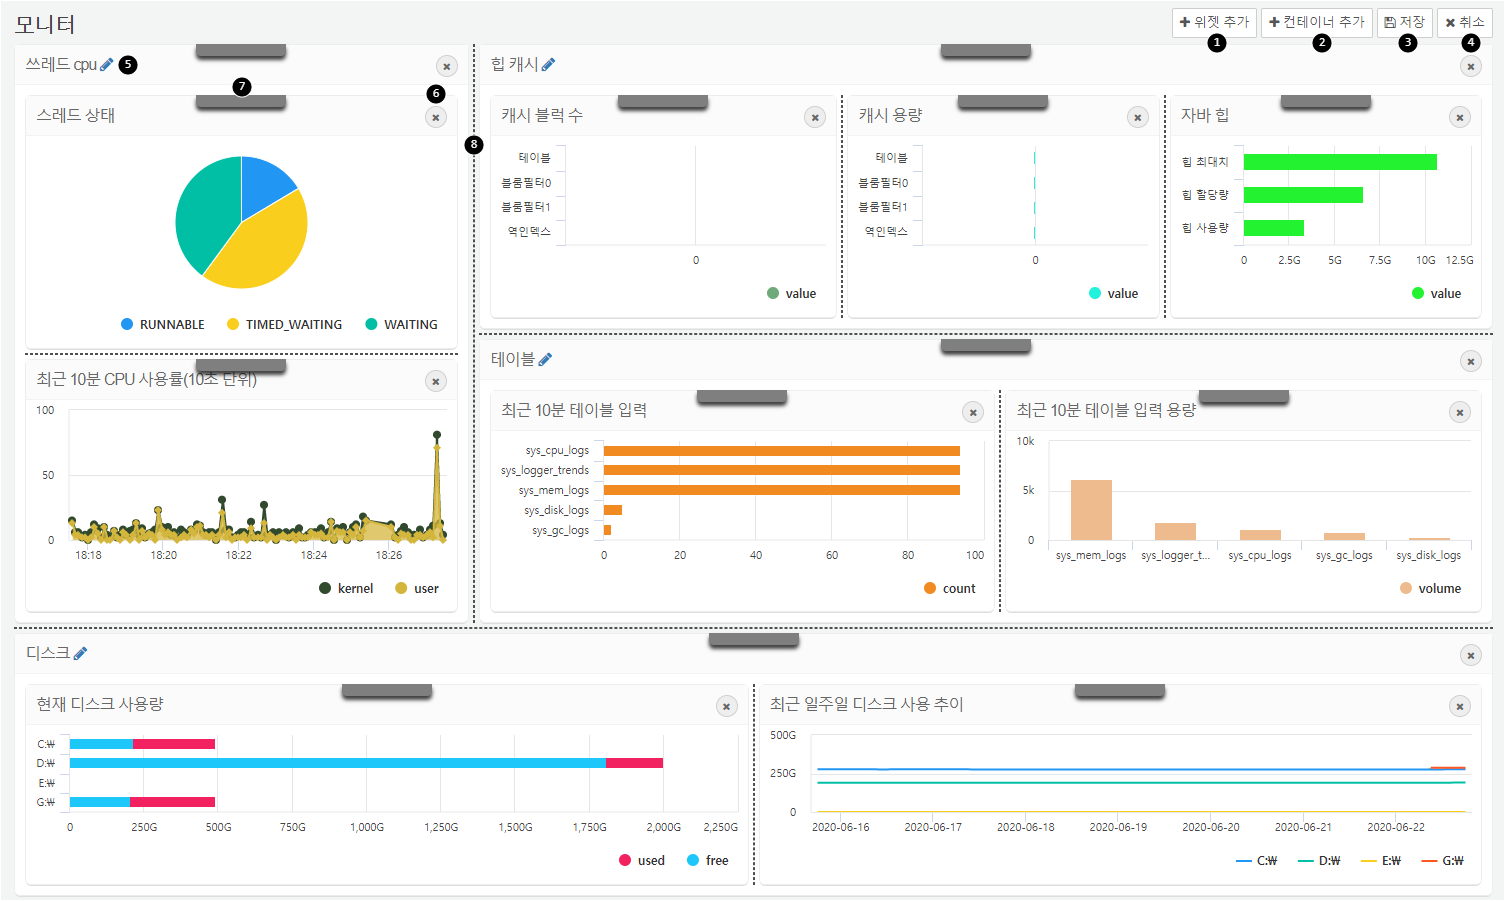
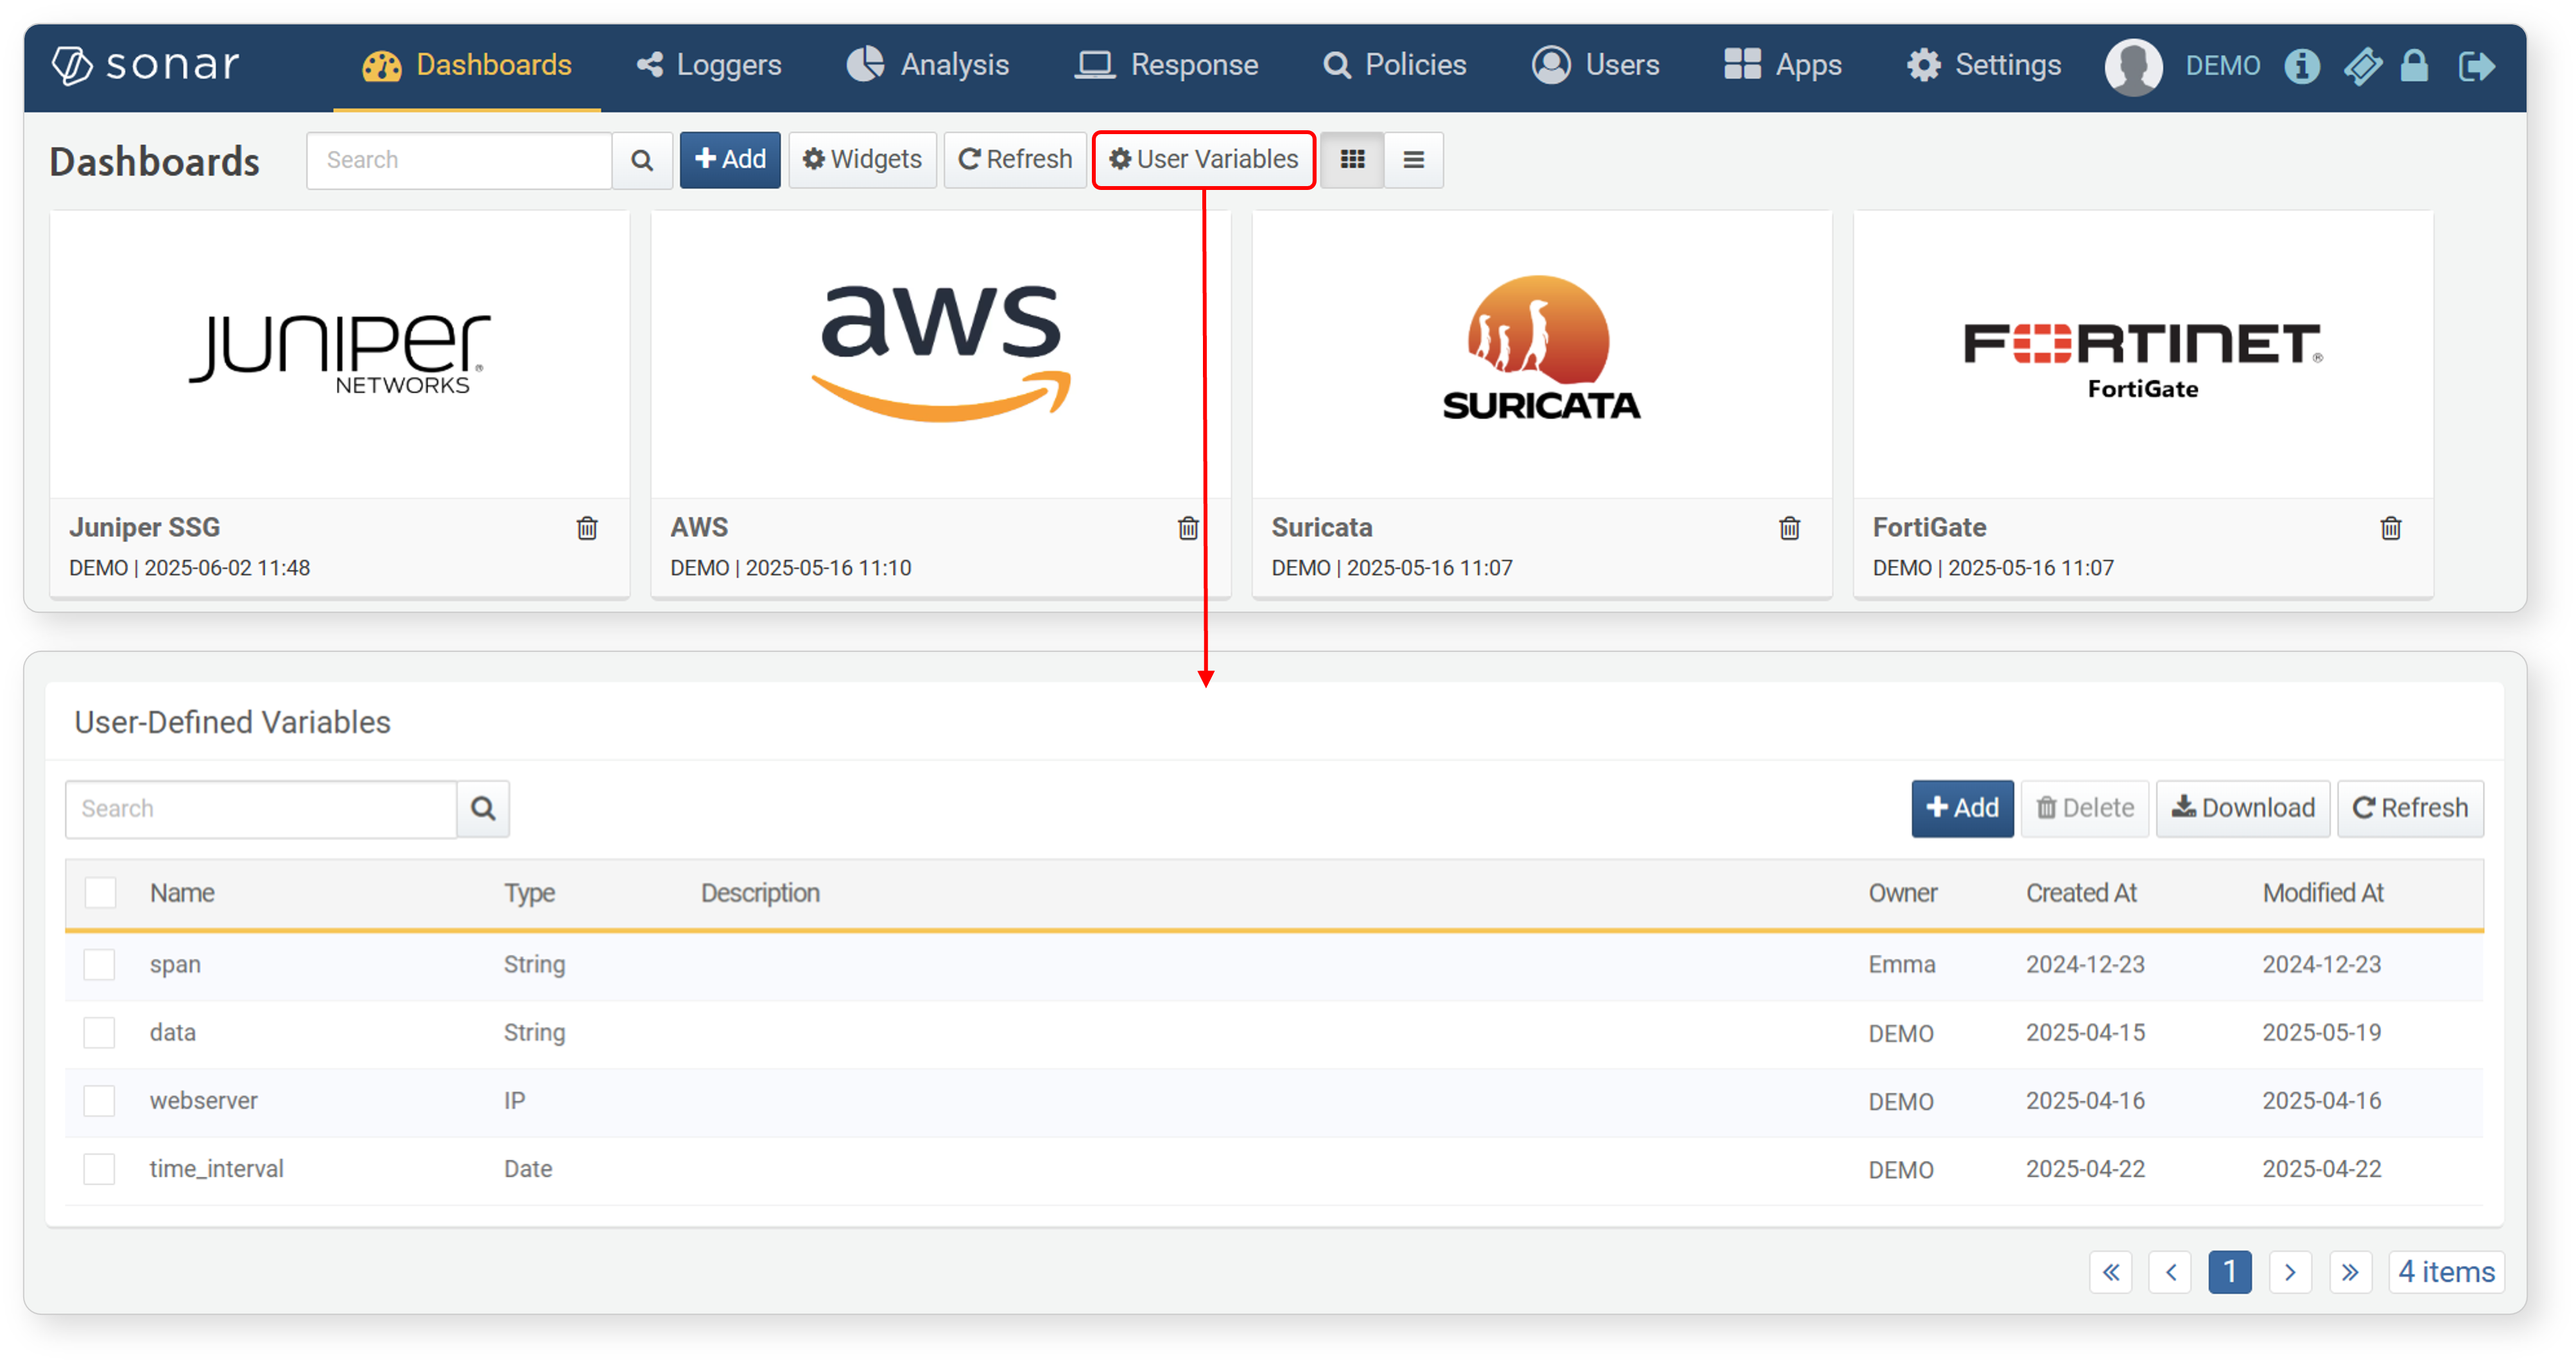
Dashboards
Overview
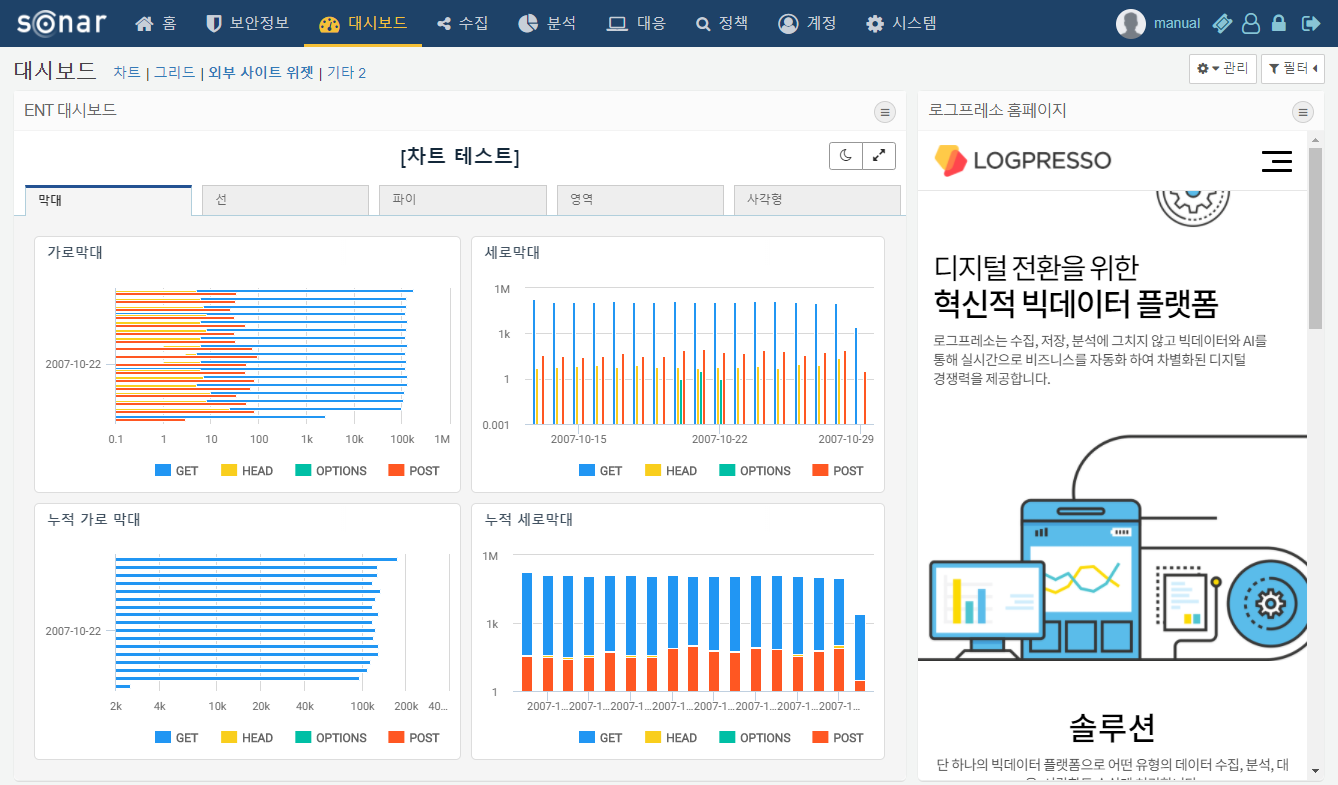
The dashboard feature allows real-time monitoring by visualizing custom user analysis results. You can configure widgets based on your desired topics in the Dashboard menu to create customized dashboard views.
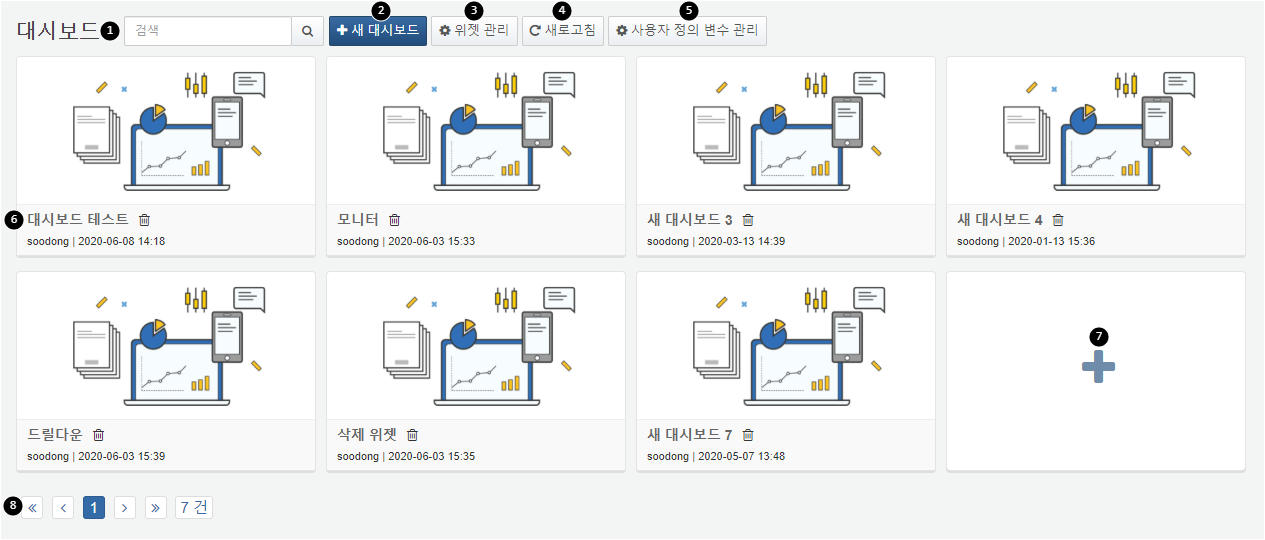
- Search: Search for a dashboard by name.
- Add: Create a new dashboard.
- Widgets: Manage the widgets used in dashboards. You can create new widgets or modify existing ones. Any changes made to a widget will be reflected across all dashboards that use that widget.
- Refresh: Refresh the dashboard data.
- User Variables: Open the user-defined variable management popup.
- View/Delete Dashboard: Click on a dashboard name to view it. Click the trash icon to delete the corresponding dashboard.
Components
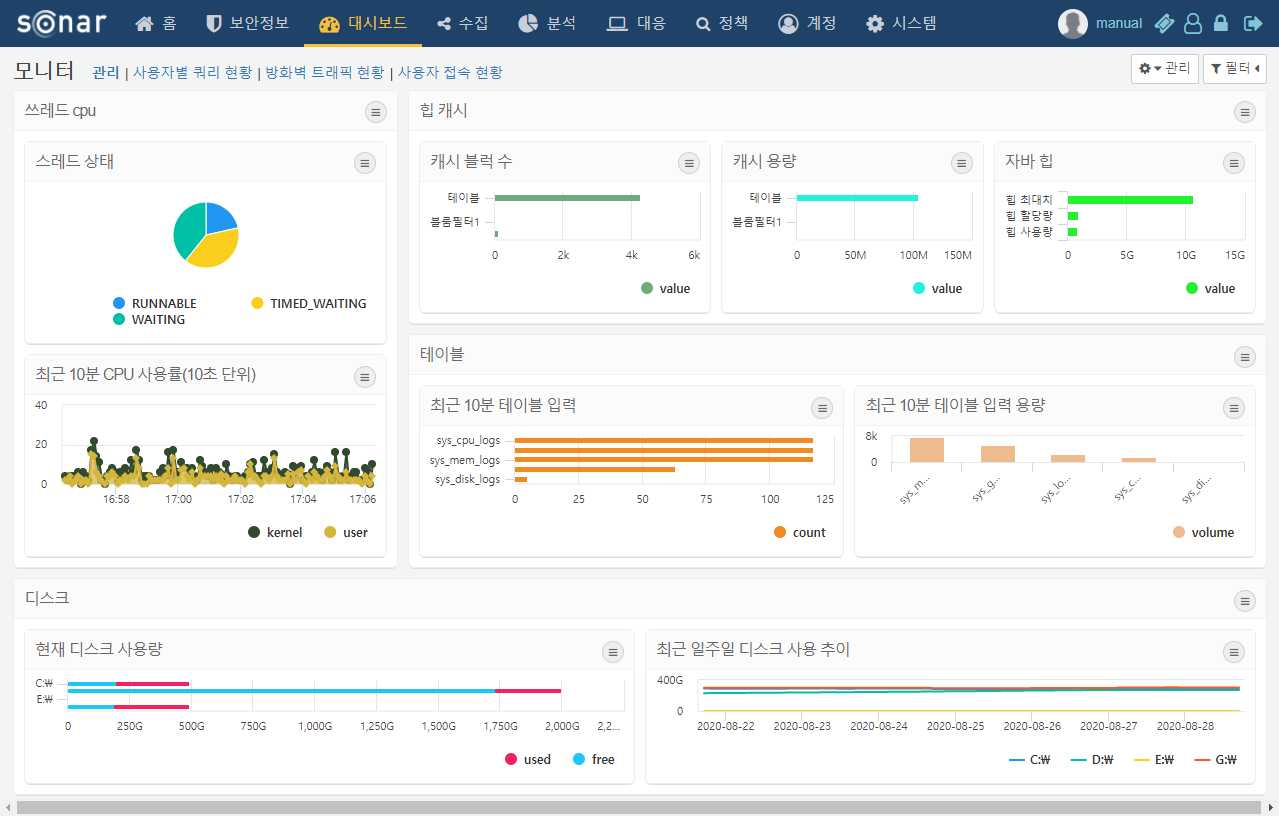
A single dashboard is composed of multiple tabs and widgets, and it offers a docking layout feature that allows widgets to be placed at desired locations with arbitrary sizes. Once a widget is created, it can be reused multiple times, and any changes made to the widget properties will be uniformly applied across all dashboards.

- Tab Switching: Click on the tab title to switch to the corresponding tab.
- Dashboard Management: Clicking the button will display options for managing the dashboard. You can select edit mode to change the layout of the dashboard, manage widgets, manage tabs, change themes, enter fullscreen mode, and adjust widget display options. For detailed explanations, refer to Dashboard Tabs.
- Filters: Clicking the button will open a panel where you can specify filters for the global dashboard or for widgets using the same dataset. For detailed explanations, refer to Filters.
- Widget Settings: Clicking the button will display options for widget information, refreshing, pausing, viewing query results, and enlarging the widget.
Dashboard Tabs
Tabs consist of widgets and containers. When using multiple widgets that contain various pieces of information on a single dashboard, you can group similar widgets together to form a single tab.
Click the Manage button in the upper right corner to display the context menu. By clicking each menu item, you can add or remove widgets or containers in the current tab, as well as add or manage new tabs. Additionally, you can change the theme of the dashboard and the display options for the widgets.
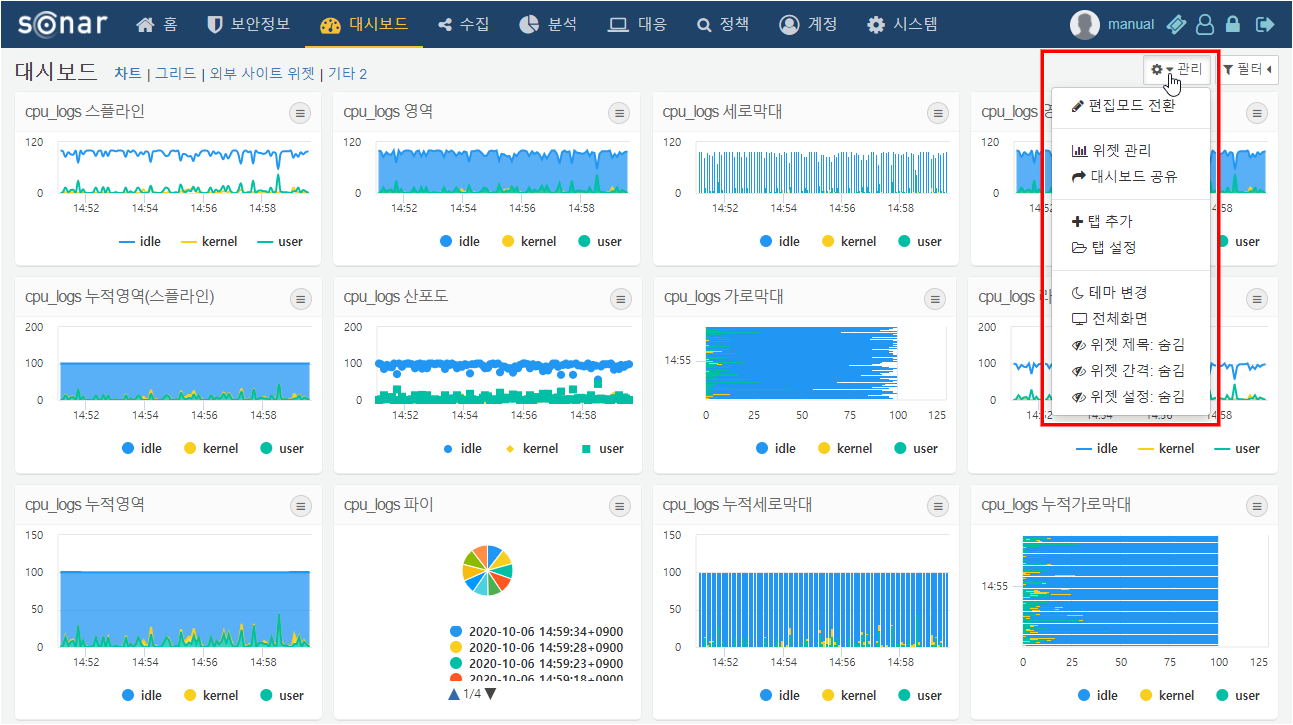
- Switching to Edit Mode
-
Switch to a mode where you can add or remove widgets on the dashboard, as well as change the size and position of the widgets. For more details, please refer to Dashboard Editing.
- Widget Management
-
Navigate to the management screen where you can create, edit, and delete widgets. For more information, please refer to Widget Management.
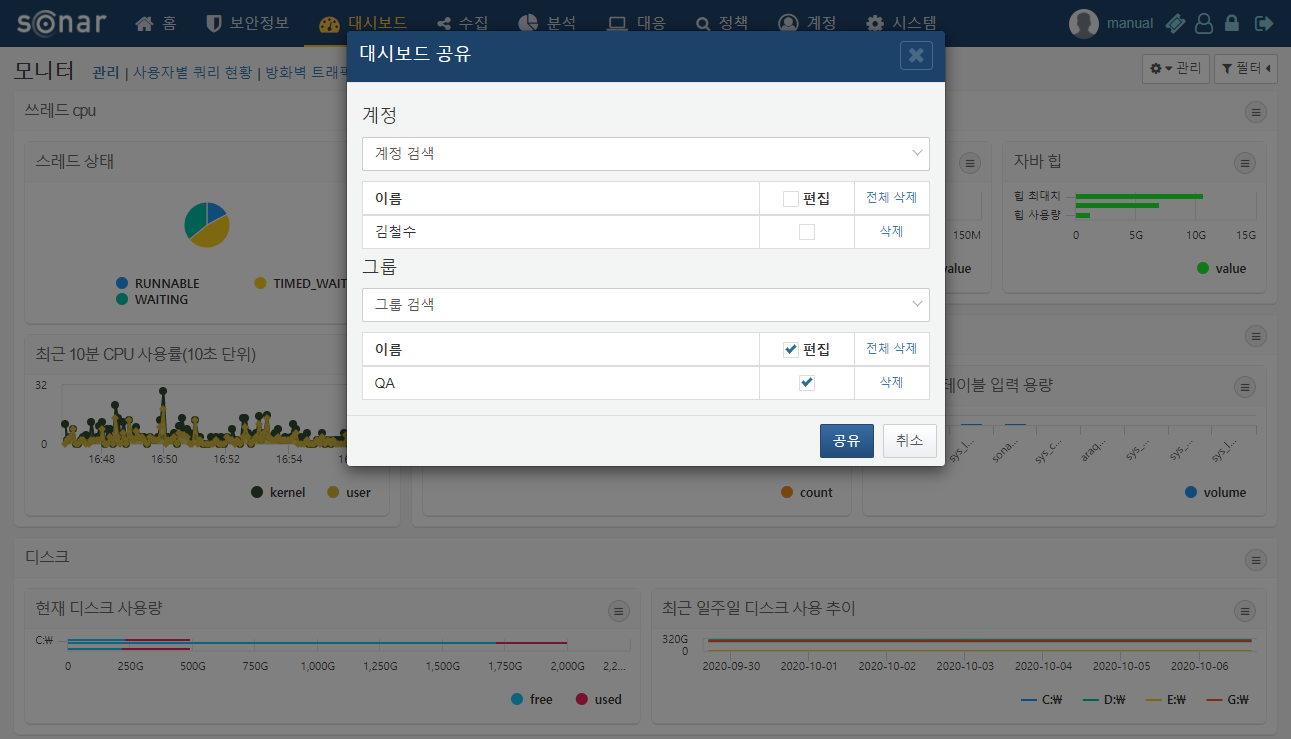
- Dashboard Sharing
-
Select accounts and groups to share the dashboard with all accounts within the selected group. If you grant edit permissions to shared accounts, they will be able to edit or delete the shared dashboard.
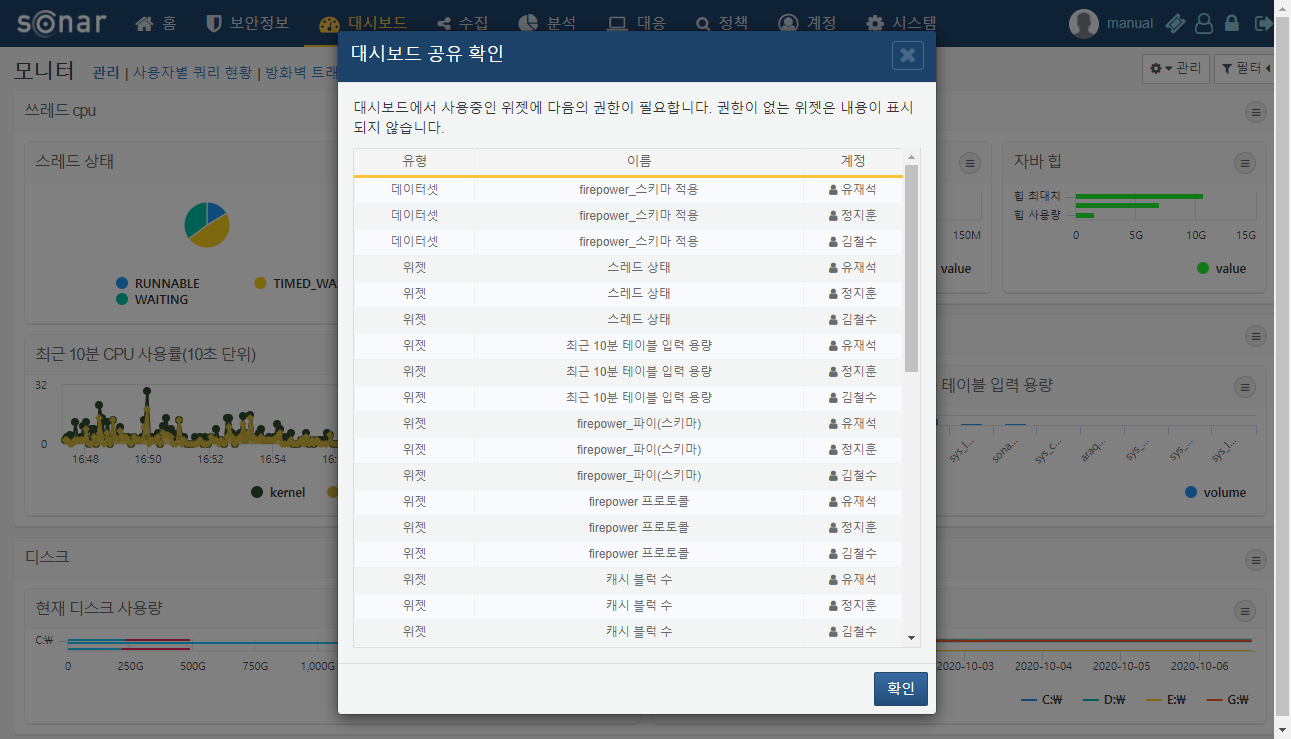
-
After selecting shared accounts and saving, the system checks the sharing status of the widgets and data sources used in the dashboard. If an account has access to the dashboard but lacks permissions for the widgets or data sources, those widgets will not display correctly. A list of items for which the shared accounts do not have permissions for the widgets and data sources will be provided.
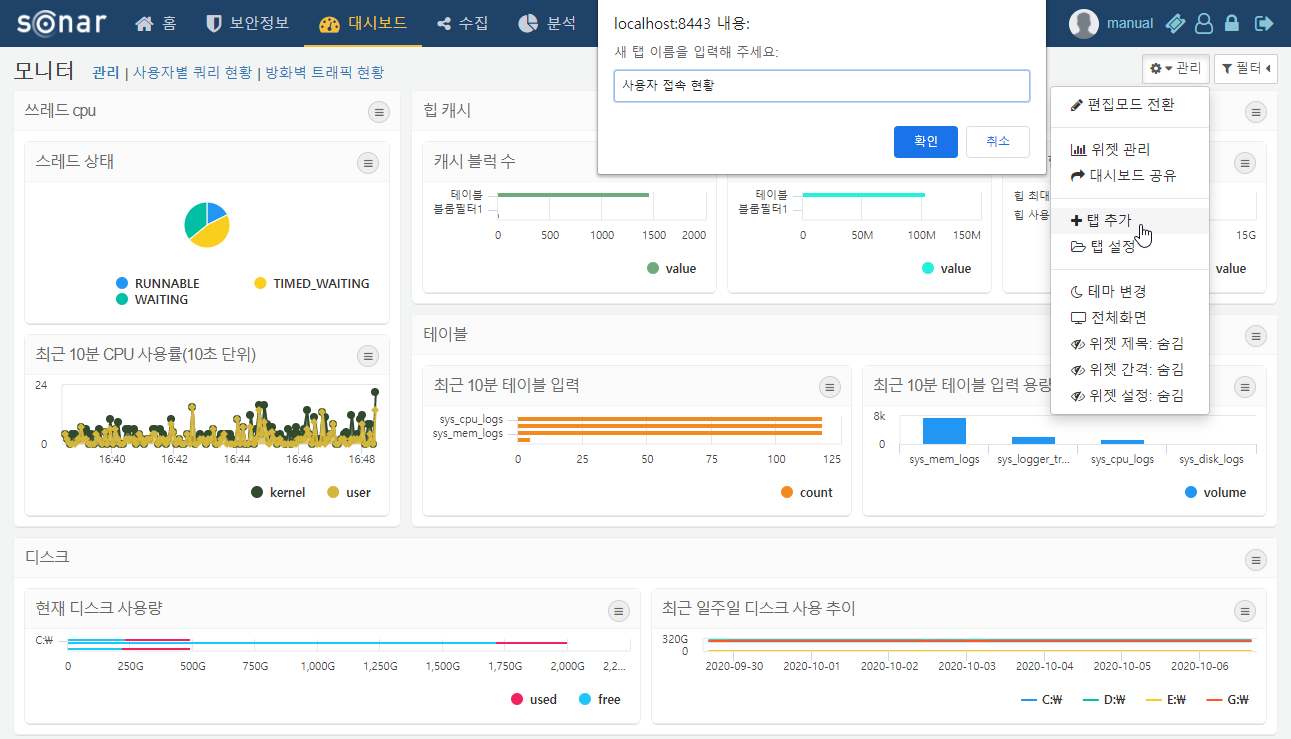
- Adding Tabs
- Add a tab to the dashboard. When you click "Add Tab," a popup window will appear where you can specify the name of the tab.
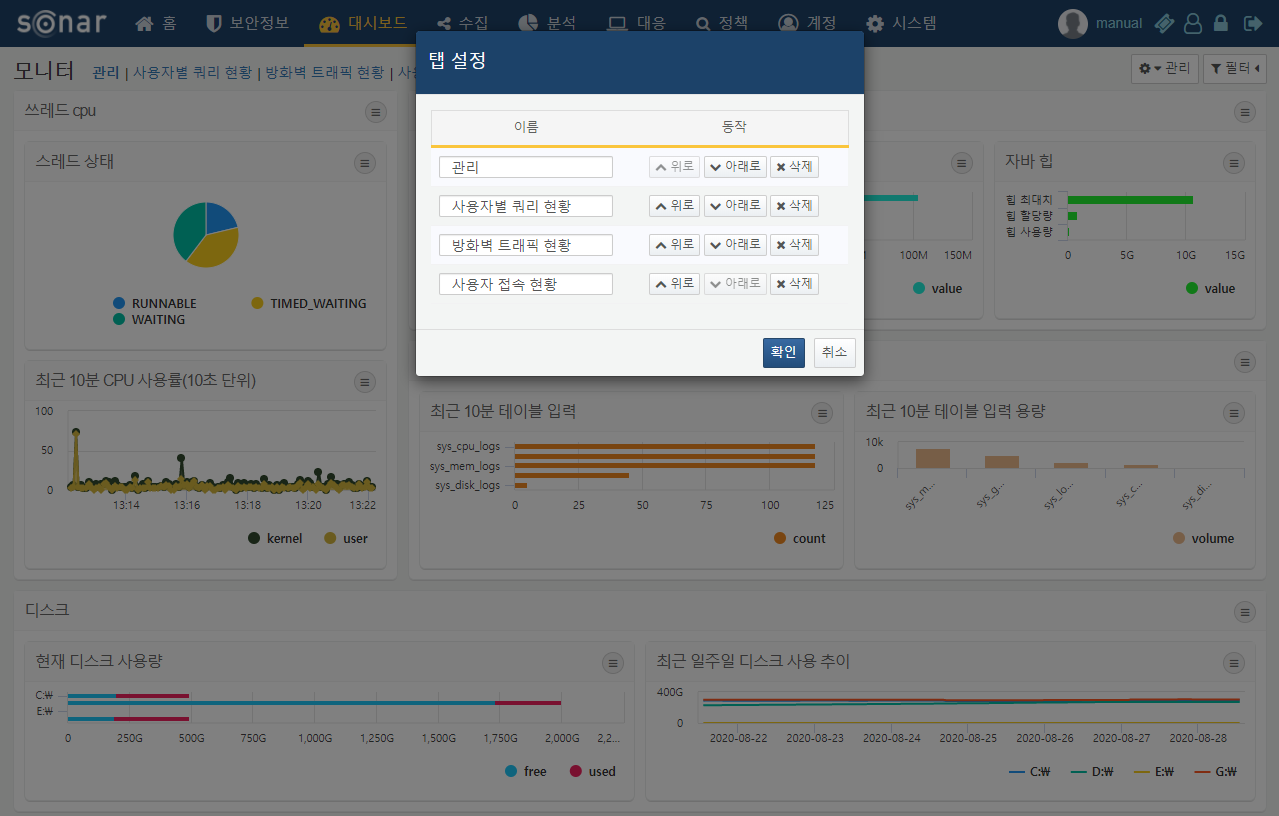
- Tab Settings
- Change the names and order of the dashboard tabs or delete tabs. After making modifications, click the confirm button to save the changes.
- Changing Themes
- Change the theme of the dashboard. There are options for a default theme and a dark theme. In the dark theme, the spacing between widgets does not appear regardless of the options selected.
- Full Screen
- Remove the top menu of Sonar to display the dashboard in full screen within the browser.
- Widget Title
- Set whether to display the title of the widget. For widget containers, the title is always displayed regardless of the option selected.
- Widget Spacing
- Set whether to display the spacing between widgets. For widget containers, the spacing is always displayed regardless of the option selected.
- Widget Settings
- Set whether to display the widget settings button. For widget containers, the settings button is always displayed regardless of the option selected.
Edit Dashboard
By clicking on the Edit Mode in the management section, you will enter a state where you can add or delete widgets and containers, as well as change the size and position of widgets on the dashboard.
- Add Widget: Add a widget to the dashboard.
- Add Container: Add a widget container that allows you to group different widgets together to function as a single widget.
- Save: Complete your edits and click the save button to save your changes.
- Cancel: If you do not wish to save your edits, click the cancel button to discard your changes.
- Edit Widget Container Name: Edit the name of the widget container. If you wish to edit the name of a widget, navigate to the widget management screen to make changes.
- Delete Widget/Container: Click the
xbutton to delete a widget or widget container. - Rearrange Widget: Drag and drop the gray handle to move the widget or its position within the dashboard, either vertically or horizontally, or within the container.
- Adjust Splitter: Drag the dotted line to resize the widget.
Widgets & Containers
Widgets and containers are the elements that make up the tabs of the dashboard. The types of widgets include query widgets, external site widgets, and input control widgets. The widget container allows different widgets to be grouped together and used as a single widget.
Query Widgets
The Query Widget processes data collected by Logpresso Sonar and visualizes it in the form of charts such as bars and lines, or in grid format. For details on creating a Query Widget, please refer to the section on creating Query Widgets.
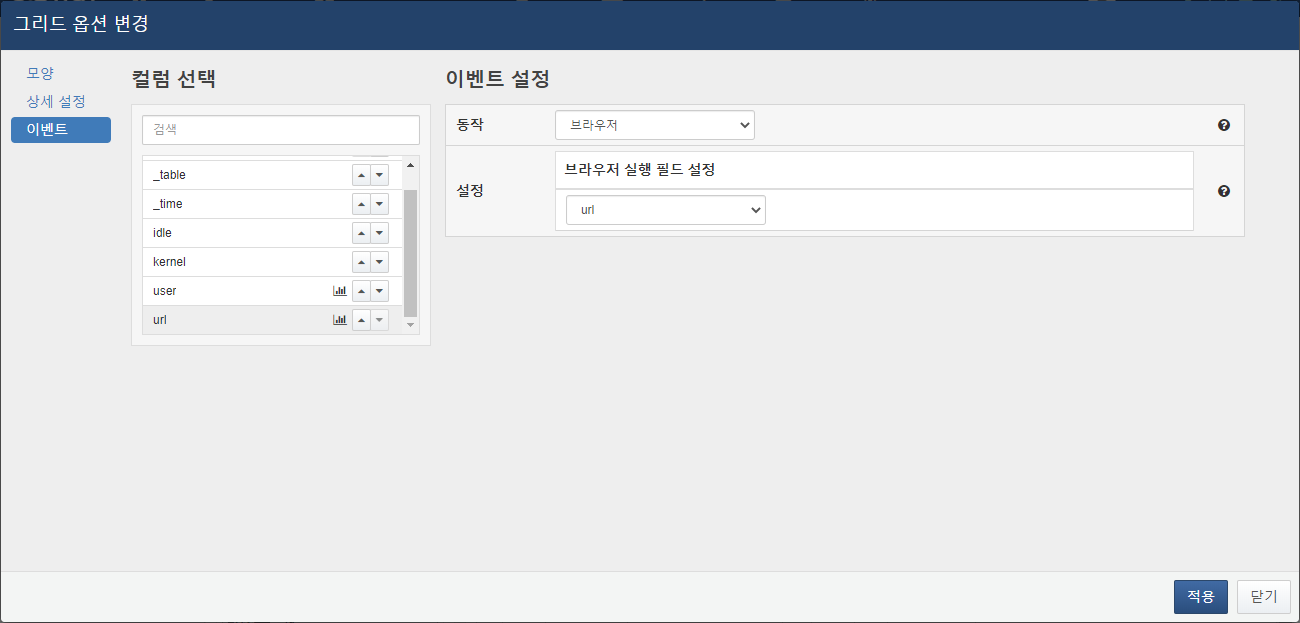
Widget Events
The Query Widget can execute actions such as applying filters, executing queries, and opening browsers when clicked or dragged. These actions can be configured in the event section added to the widget creation/editing screen.
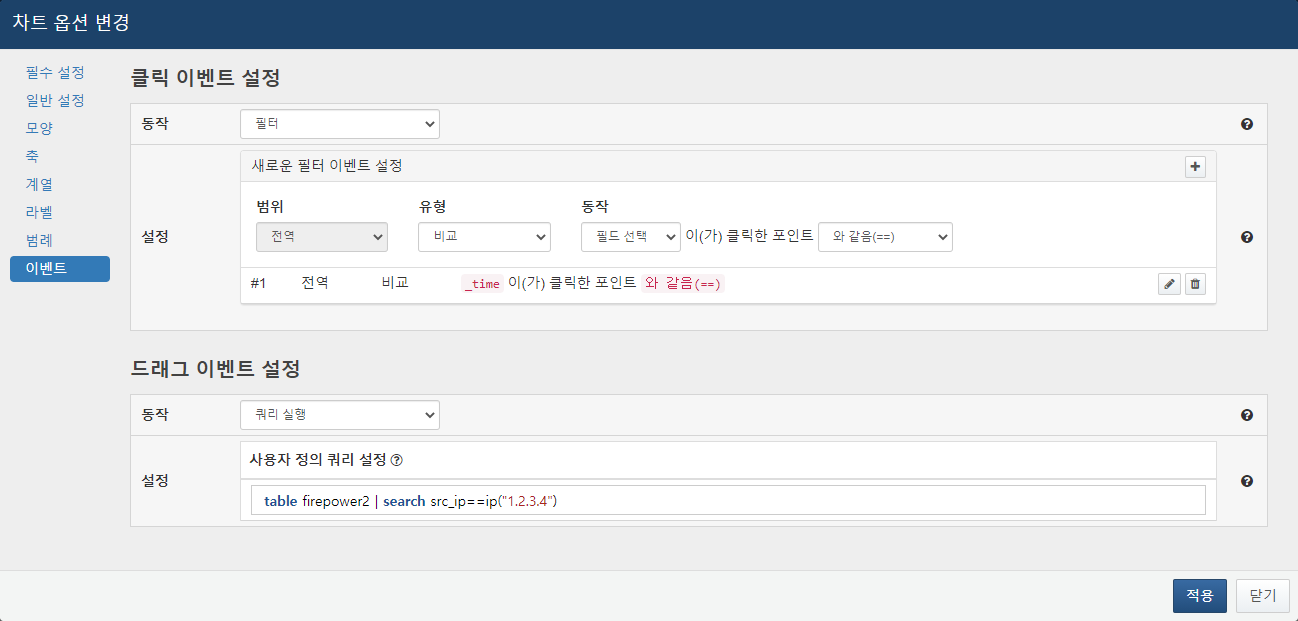
- Event Types
- Events occur when a user clicks or drags specific items in the widget.
- Click: An event that performs an action when the widget is clicked.
- Drag: An event that performs an action when the widget is dragged. The drag event is applicable only when the independent variable of the chart widget is of time type.
- Event Actions
- Users can apply specified filters, execute queries, or open browsers.
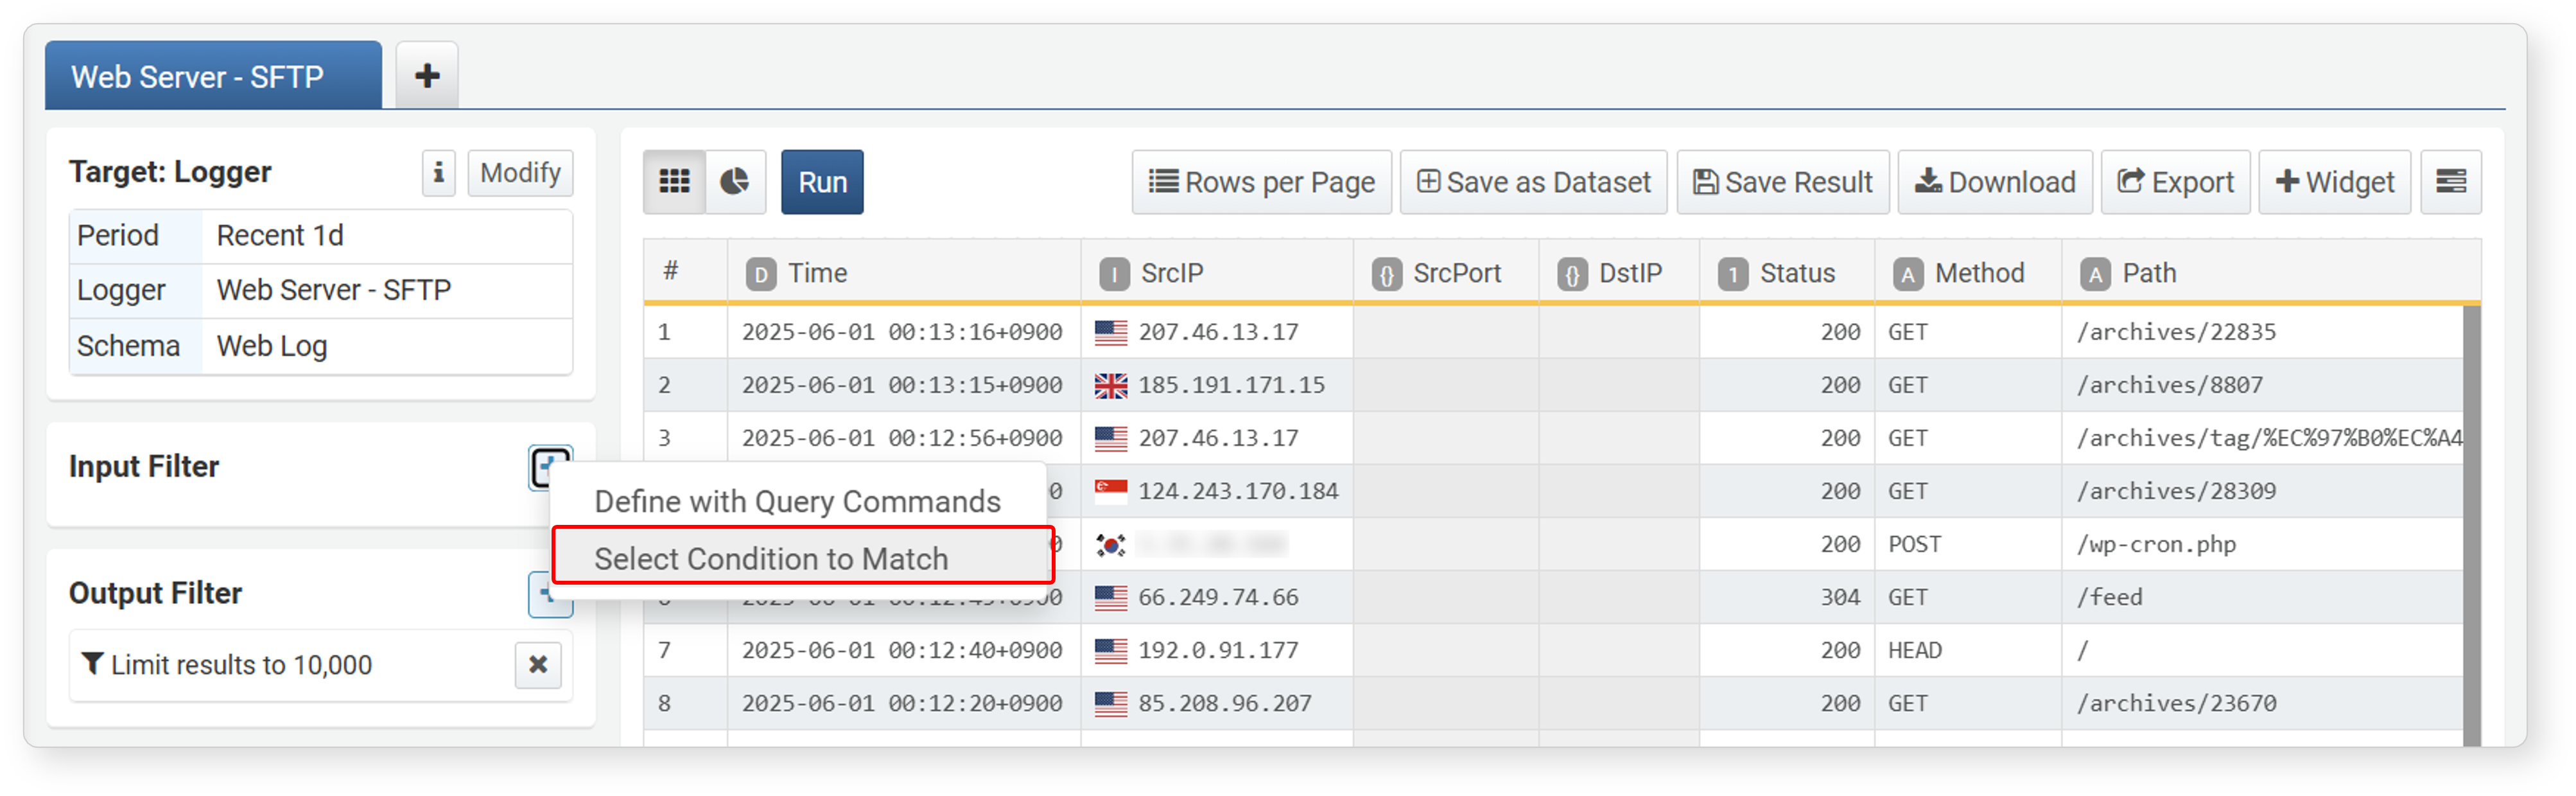
- Filter
- When a click or drag event occurs, the specified filter by the user is applied. When configuring filter actions, select the filter range, type, and action, and press
+to add the filter. Filters of the same action cannot be added multiple times, but multiple filters can be added to a single event.
-
Range: Global filters apply to all widgets within the dashboard, while dataset filters apply to widgets using the same dataset as the current widget.
-
Type: If you select Filter as Type, it will only show values that match the target field. Currently, only fields specified as independent variables can be entered.
-
Target Field/Query Statement: When the type is Filter, the field specified as the independent variable is automatically populated. When the type is query, you can write a query using macros. Use $x$ to pass the value of a field in the chart, or use $xfield$ to pass the field name itself.
- Query Execution
-
When a click or drag event occurs, a new window opens in the web browser to execute the user-specified query. The following reserved words can be used in the query statement:
-
Reserved Words for Click Events
- $series$: The name of the field
- $fieldname$: The value displayed in the field specified by the name
: Reserved Words for Drag Events
-
$xfield$: The name of the time field
-
$from$: The starting time value of the drag
-
$to$: The ending time value of the drag
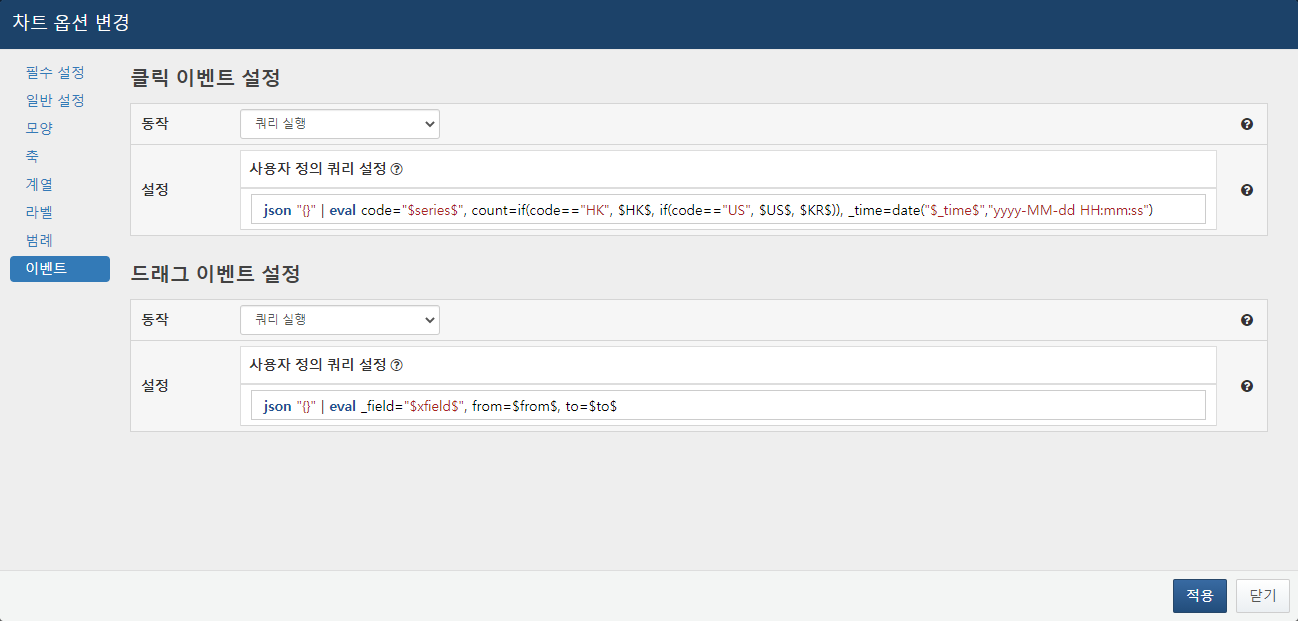
: When the query execution action is specified, the designated query will be executed in a new window upon the occurrence of the event.
- Browser Execution
- When a click or drag event occurs, a new window opens in the web browser to access the URL specified in the user-defined field.
External Site Widgets
The External Site Widget is a widget that displays external web pages using a URL. For a description of how to create an External Site Widget, please refer to the External Site Widget Creation Guide.
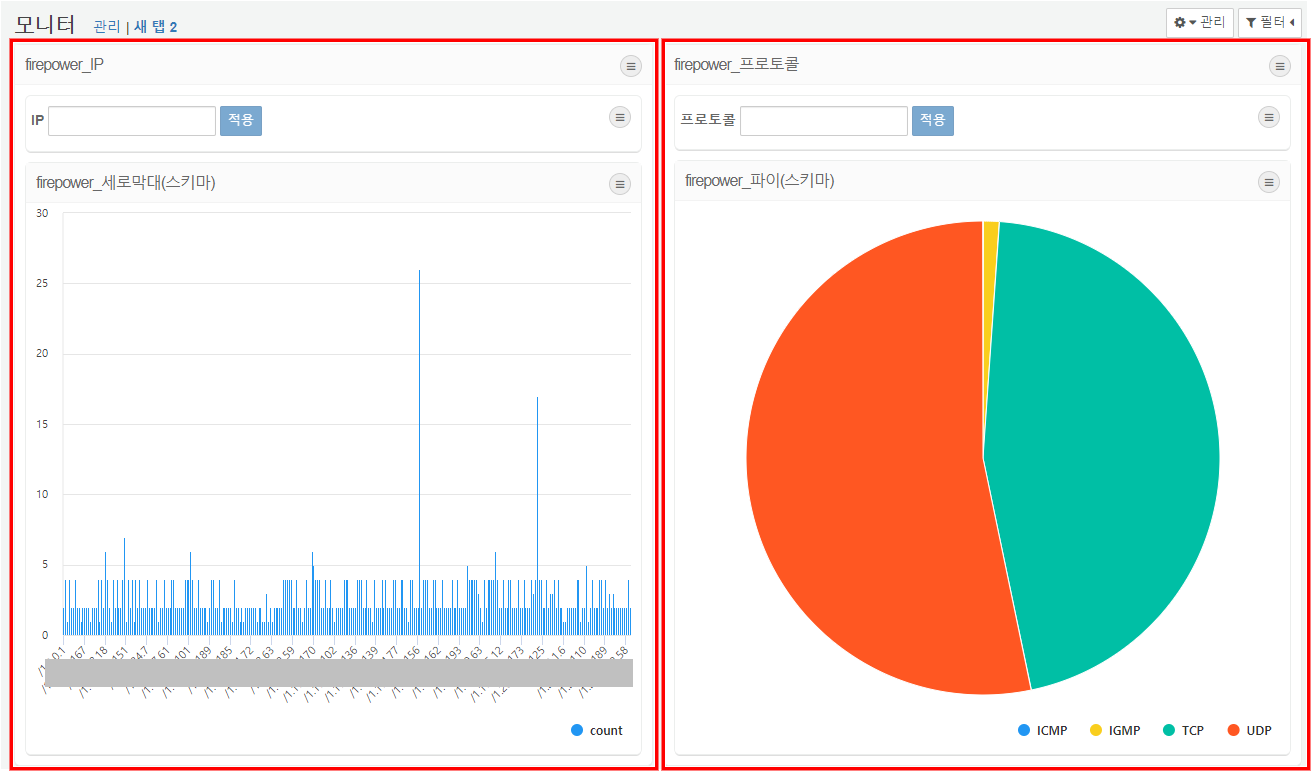
Control Widgets
The Input Control Widget is designed to accept user input and apply dynamic filters. Depending on the input method, it can be configured as a date, list, or text input control widget. For instructions on creating the Input Control Widget, refer to the section on creating Input Control Widgets, and for details on applying dynamic filters, see the section on dynamic filters.
Widget Containers
The widget container is a feature that enables different widgets to be used as a single widget. In dashboard edit mode, you can add a container and position your desired widgets within it. By manipulating just one container, you can easily manage the movement, resizing, expansion, and deletion of multiple widgets.
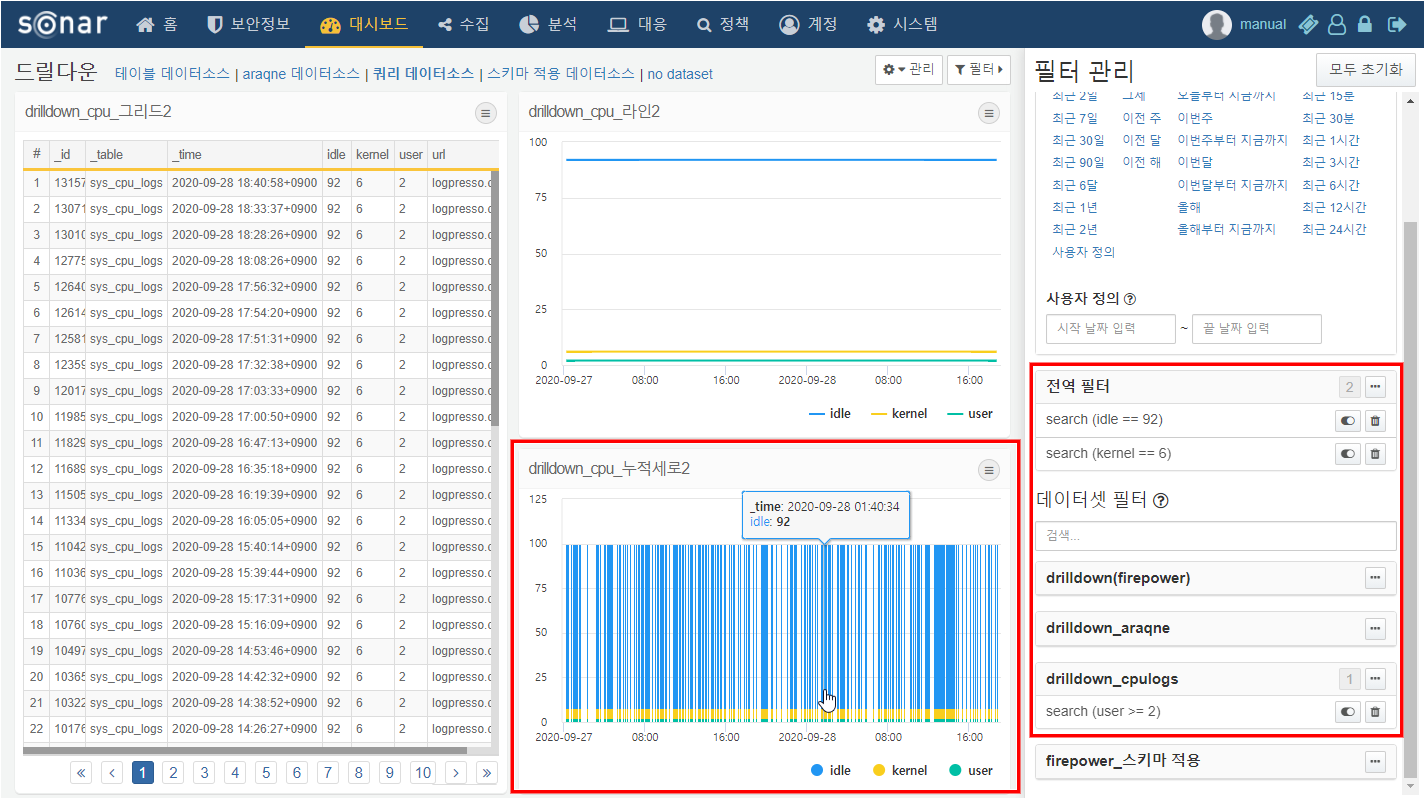
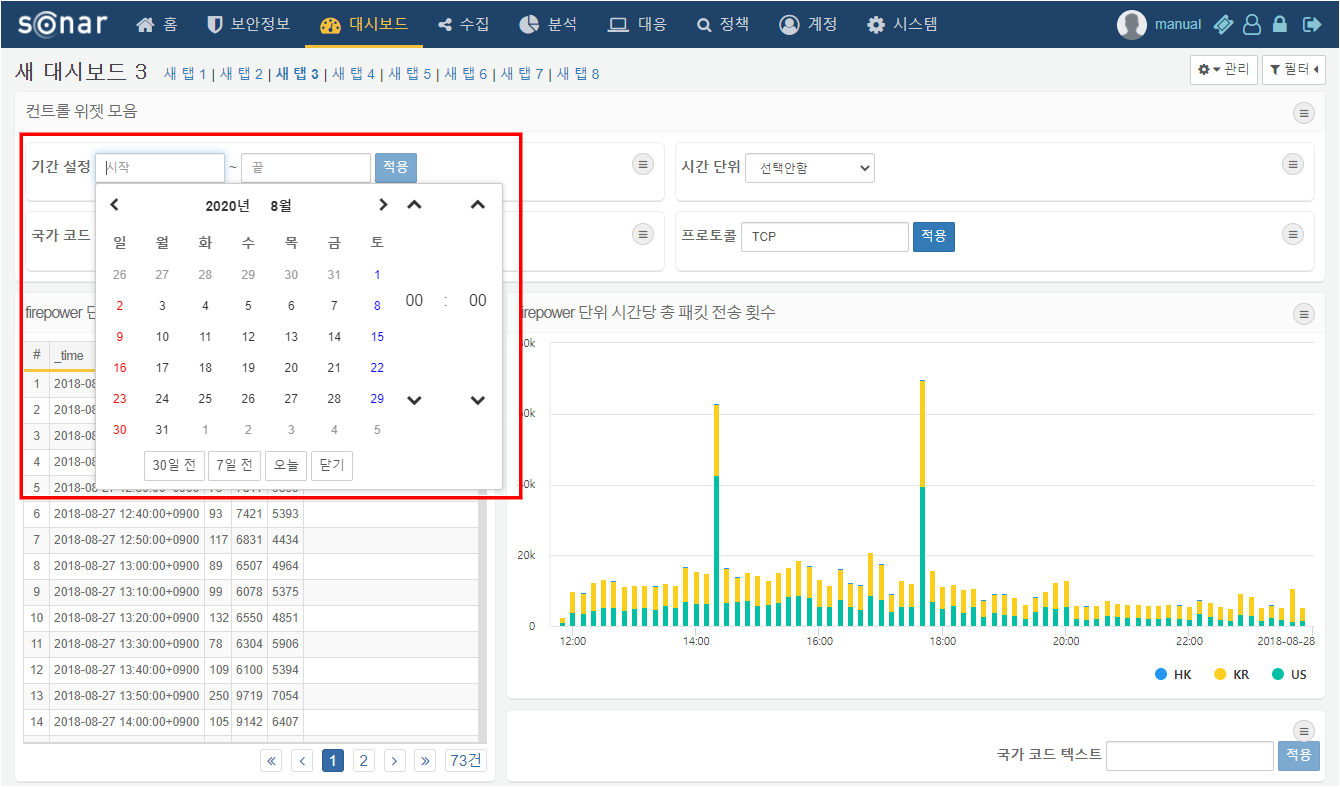
Filters
Specify filters on the dashboard according to your desired conditions. Once a filter is set, the widgets will display data that satisfies those conditions. There are two types of filters: global dashboard filters that can be applied across the entire dashboard, and dataset filters that can be applied to widgets based on the same dataset.
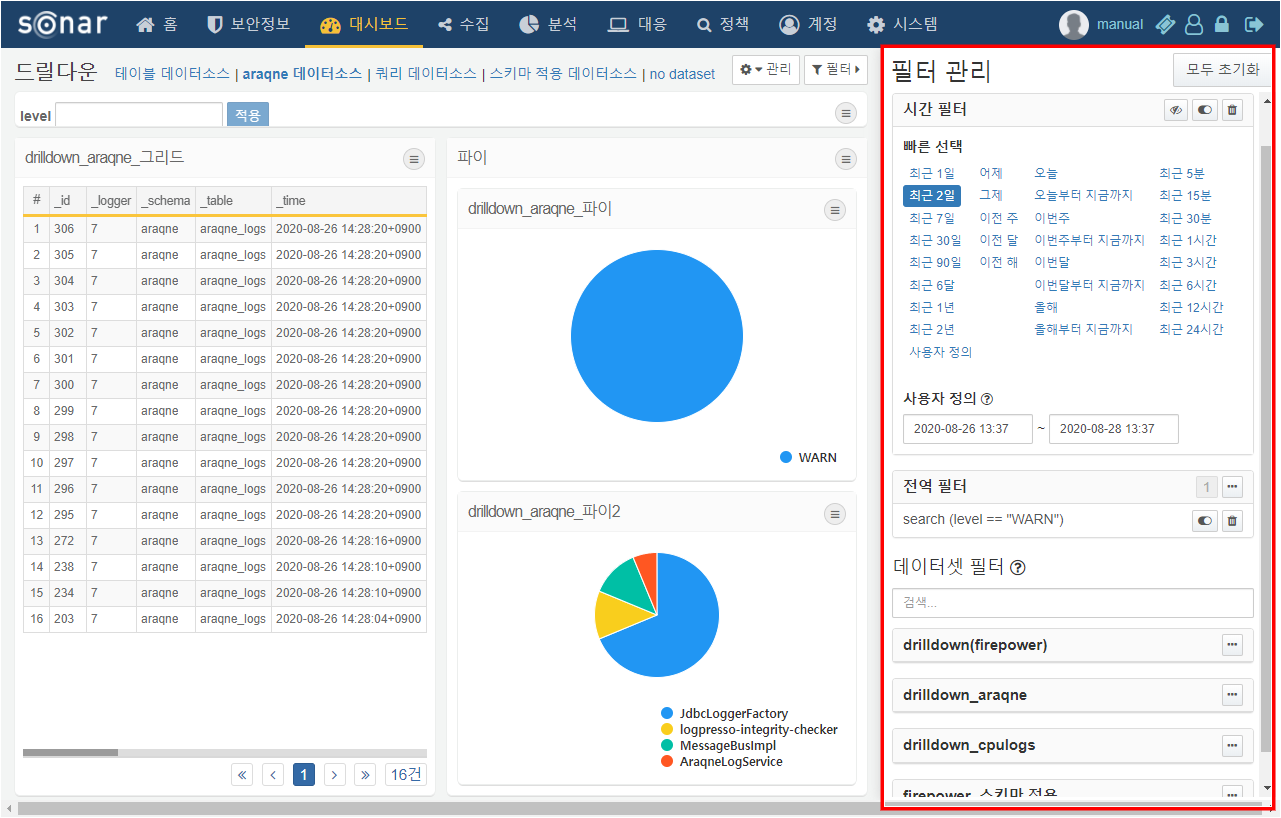
Dashboard Filters
Dashboard filters include time filters and global filters that specify conditions for all widgets on the dashboard, and dataset filters that specify conditions only for widgets created from related datasets. Click Filter in the top right corner of the dashboard to display a panel where you can add, delete, and control filter applications. Dashboard filters can be applied either through widget events or by directly adding filters in the filter management panel.
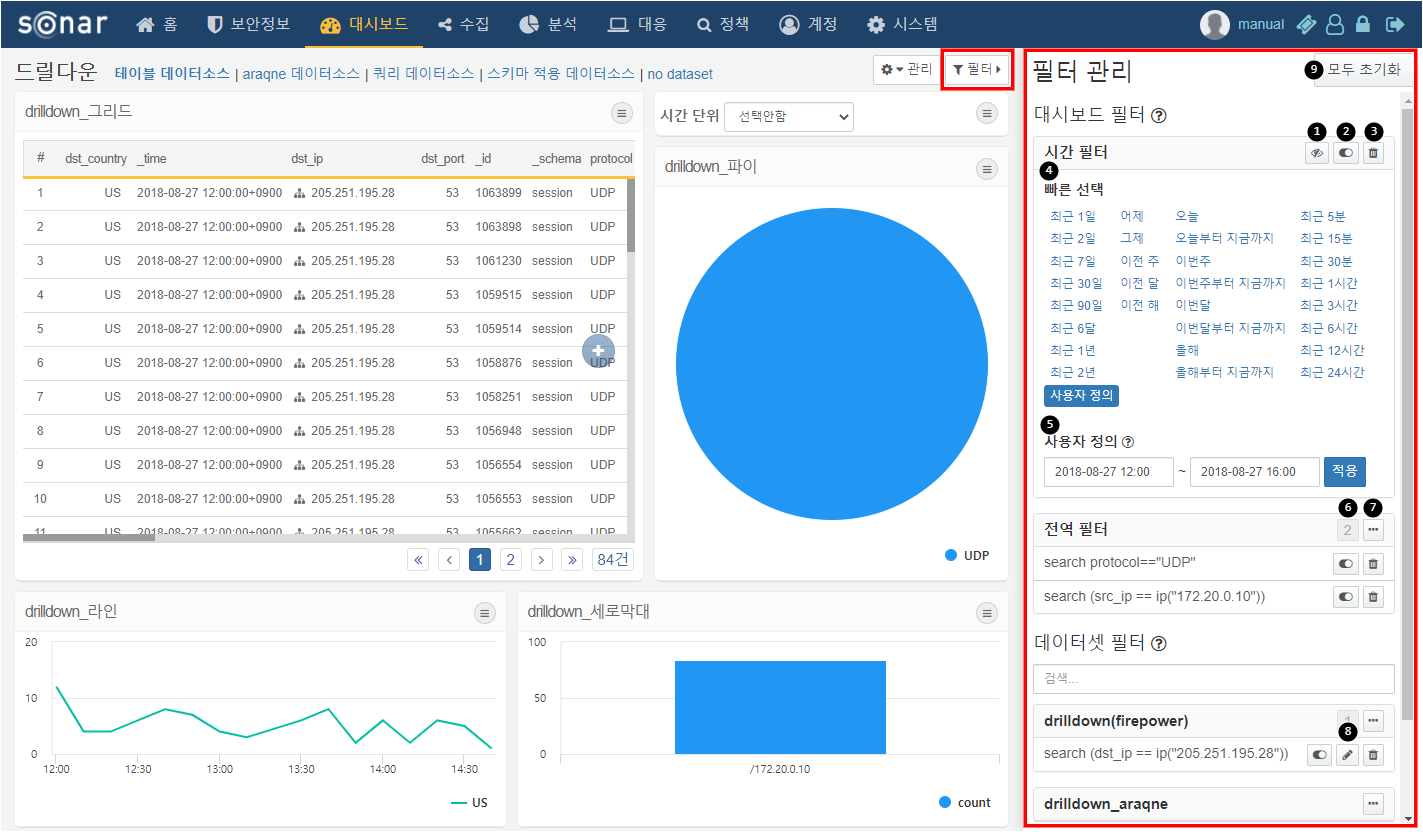
The following explains the items in the filter management panel:
- Show/Hide Time Range Filters: Show or hide time range filters.
- Filter Enable/Disable Button: Activates or deactivates the filter.
- Delete Filter: Removes the added filter.
- Quick Select Time Filter: Allows for quick application of frequently used time range filters.
- Custom Time Filter: Users can input a custom time range to apply. This option is available by selecting "Custom" from the quick select.
- Number of Filters: Displays the number of filters added to the global or dashboard filters.
- Global Filter Menu: Displays a menu for hiding the filter list, adding filters, bulk deleting filters, and bulk enabling/disabling filters.
- Edit Filter: Edits the filter conditions. Editing is only possible for filters added directly by the user; filters added through widget events cannot be edited.
- Reset All: Deletes all added filters.
Method 1: Widget Event Actions
When an event such as click or drag occurs on a widget with filter options configured in its event actions, the filter is applied with the specified condition. For more information about widget event filters, refer to Event Settings.

Method 2: Direct Addition
You can directly add filters to dashboards and datasets in the filter management panel. Click ··· to open the filter menu and click Add Filter to add a filter.
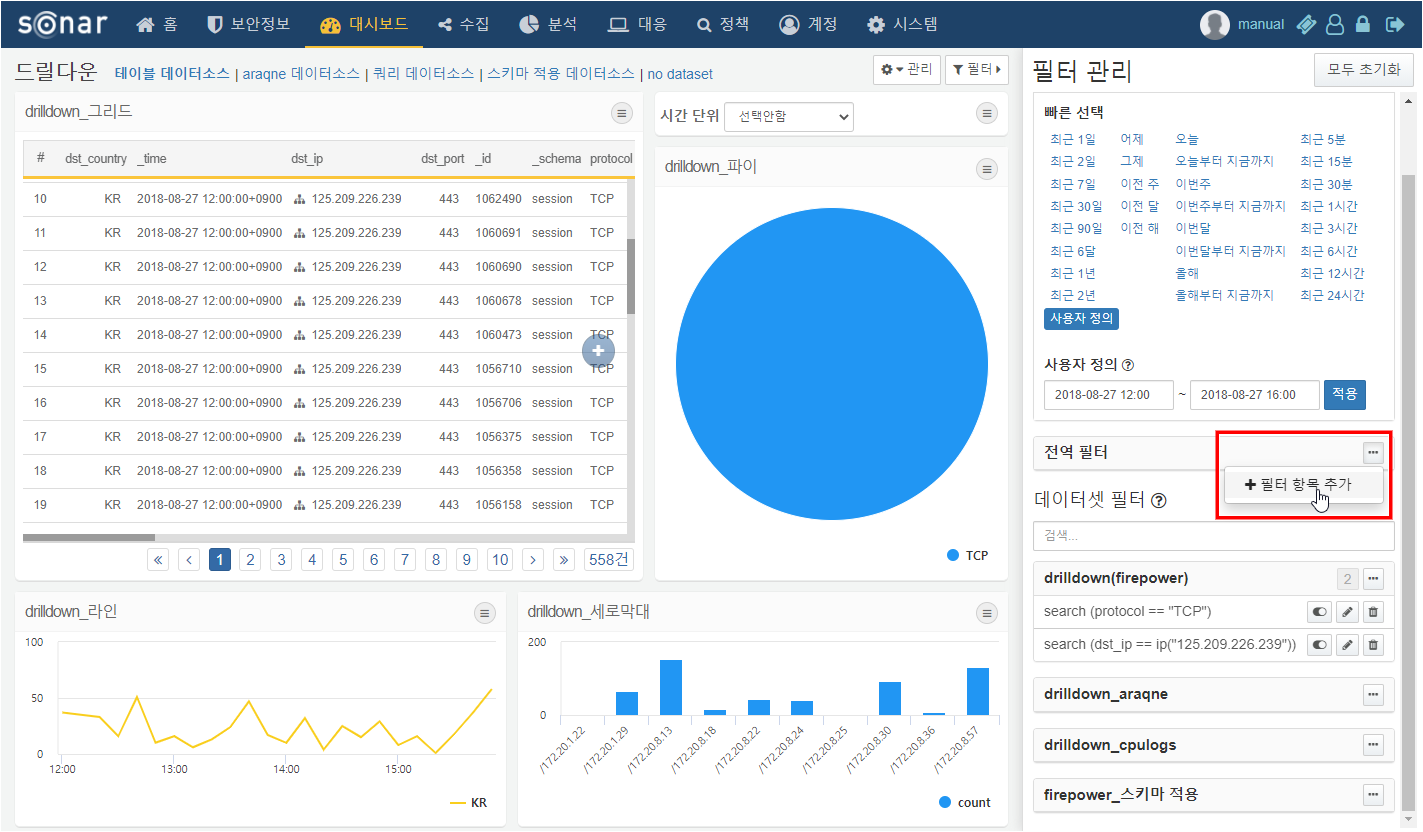
The following types of filters can be added:
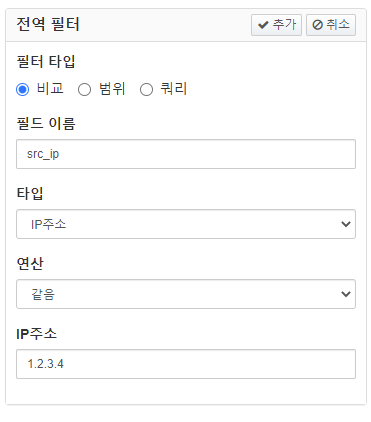
- Single Value: Creates a filter condition using the operations and values entered for a specific field.
- Range: Creates a filter condition based on a range of values entered for a specific field.
- Query: Applies a filter using a user-defined Logpresso query statement.
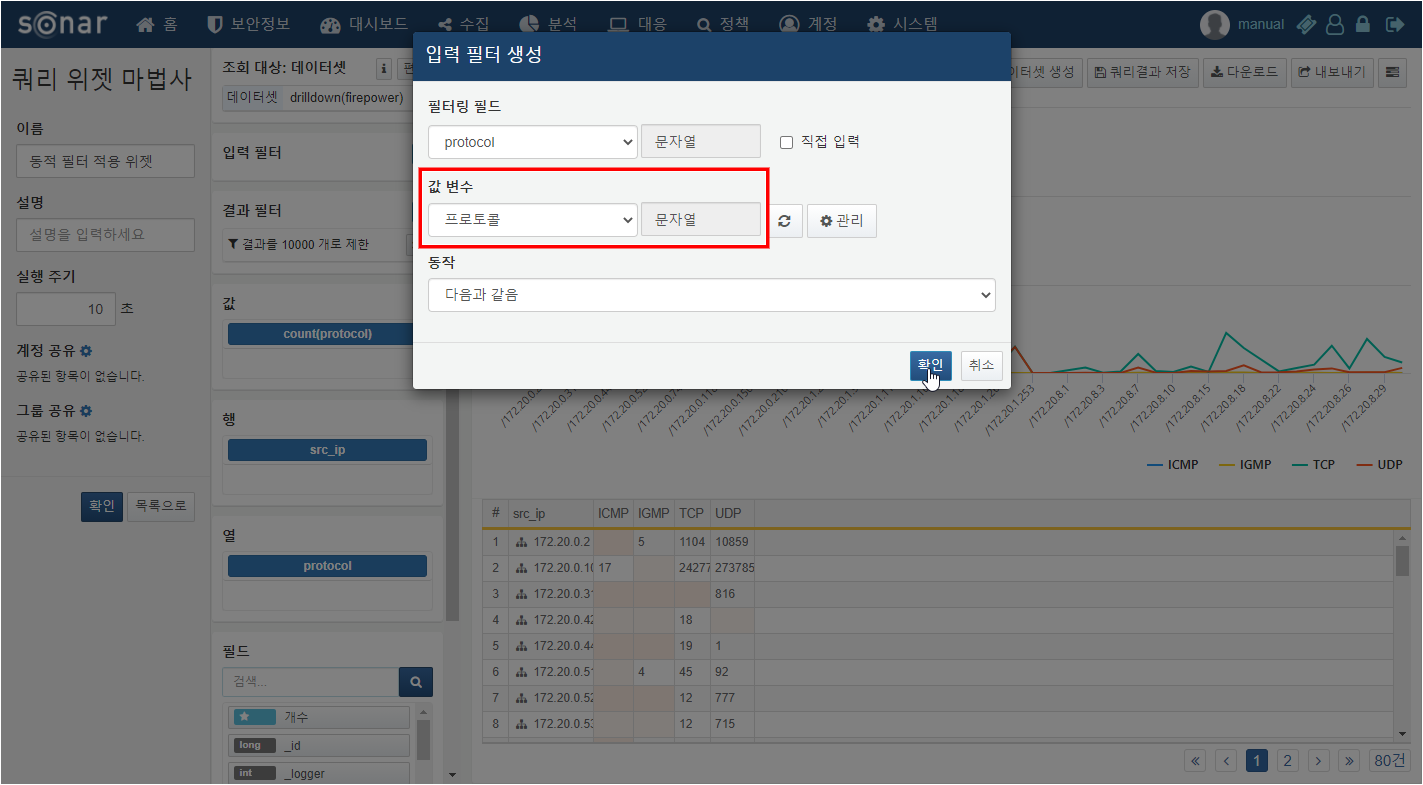
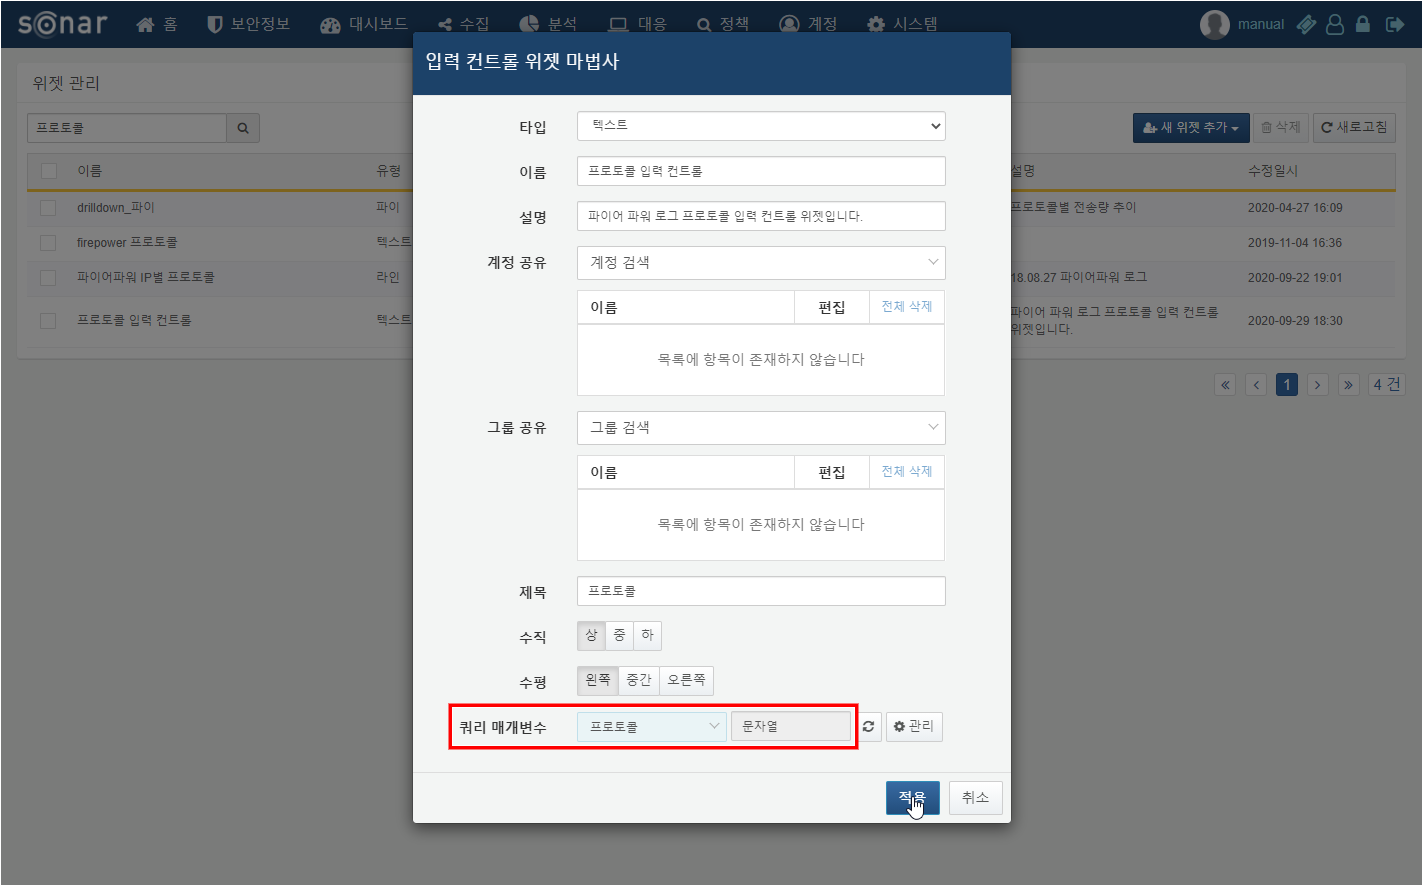
Dynamic Filters
When creating/editing a widget, add a dynamic filter in the input filter and use an input control widget to assign values to user-defined variables to apply the filter.
Filter Application Method
-
Create a user-defined variable by referring to Adding Variables.
-
Add a dynamic filter by specifying the created user-defined variable as the value variable.
-
Create an input control widget by specifying the value variable entered when adding the dynamic filter as a query parameter.
-
Add the widget with the created dynamic filter and the input control widget to the dashboard.

-
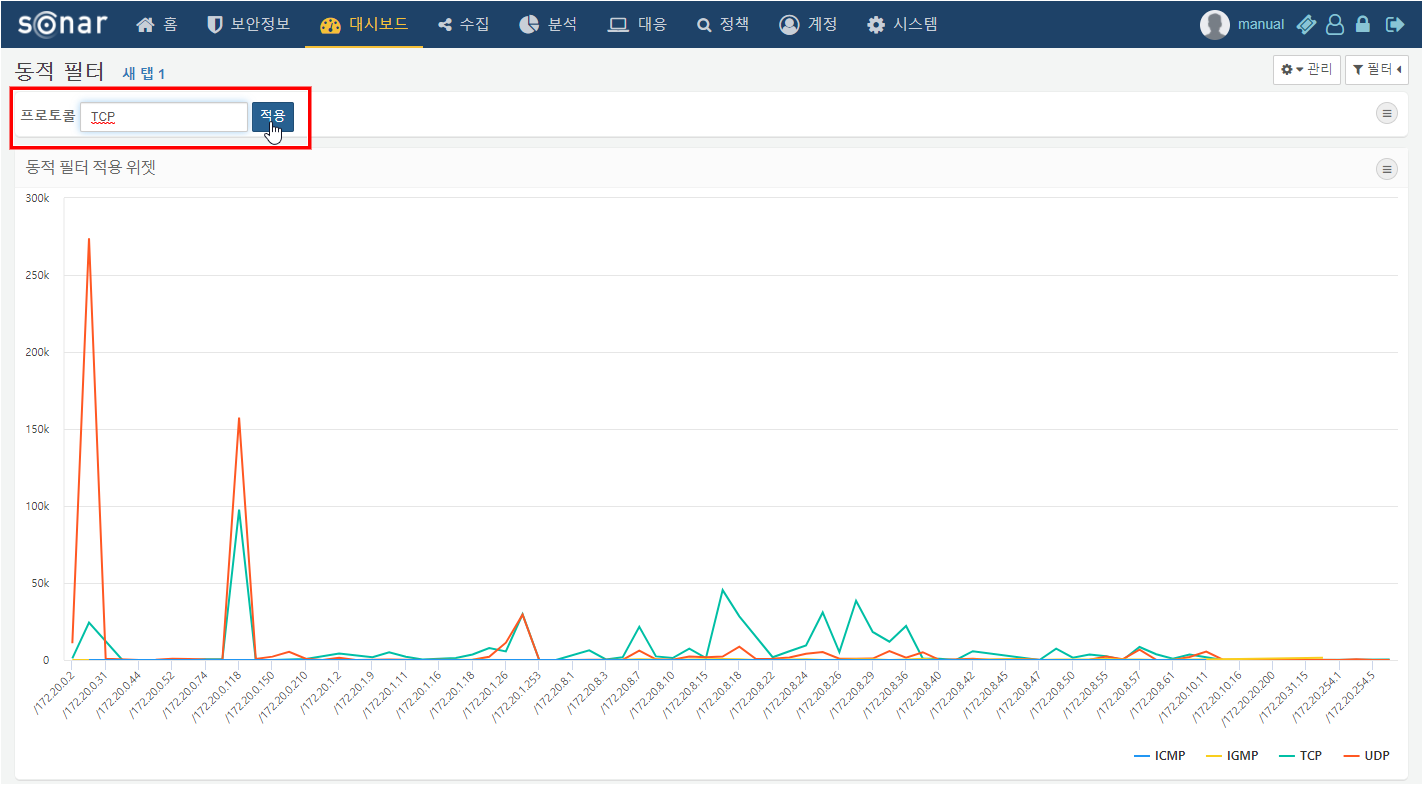
Enter a value or values and click Apply in the input control widget.
User-Defined Variables
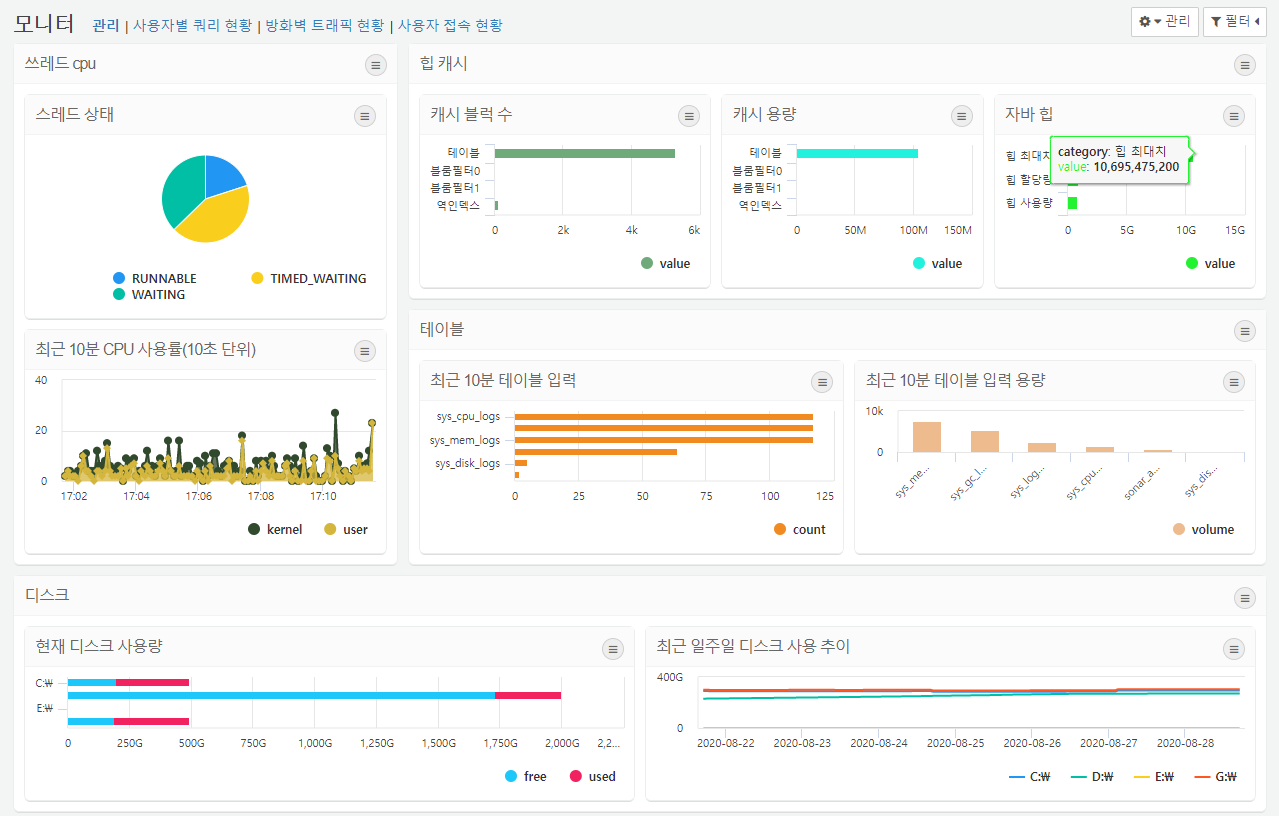
User-defined variables are used to control the information displayed by query widgets based on values (such as specific dates and times, specific IP addresses, etc.) entered by users in input control widgets on the dashboard.
Viewing/Searching Variable List
To view user-defined variables:
- View from Dashboard Screen
-
Click User-Defined Variables in the Dashboard to view the user-defined variable list in a new window.
- View from Pivot Screen
-
Click the
 button when setting dynamic filters or time unit truncation formulas to view the user-defined variable list in a new window.

To find a specific user-defined variable in the list, use the search tool in the toolbar. The search tool finds and displays user-defined variables whose names contain the search term. The user-defined variable search tool is case-sensitive.
Adding Variables
To add a user-defined variable:
-
Click Add in the Variable List View screen.
-
Enter/select the properties of the user-defined variable in the Add User-Defined Variable screen, then click OK.
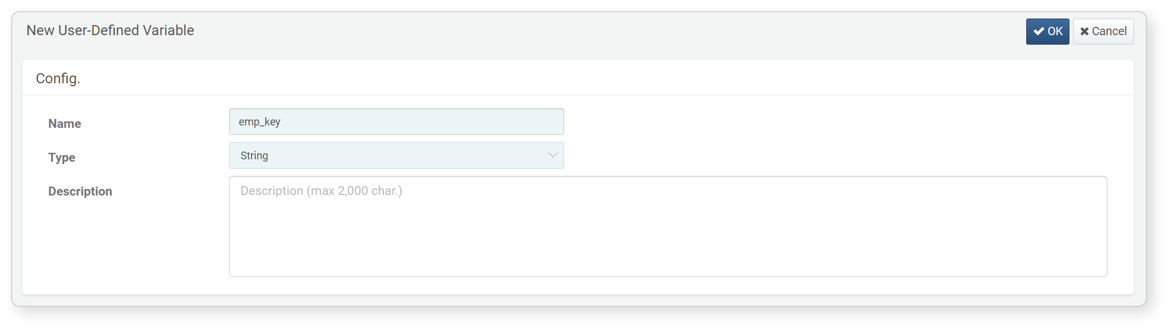
- Name: Unique name of the user-defined variable (maximum 50 characters)
- Type: Type of the user-defined variable (default: string). This item specifies the type of value to be input by the user.
- Description: Detailed description of the user-defined variable (maximum 2,000 characters)
Modifying Variables
To modify a user-defined variable:
- Click the name of the user-defined variable to modify in the Variable List View screen.
- Modify the information in the User-Defined Variable modification screen, then click OK. The Name cannot be modified.
Deleting Variables
To delete a user-defined variable:
- Select the checkbox in the row of the user-defined variable to delete in the Variable List View screen.
- Click Delete in the toolbar.
- Check the list of user-defined variables to delete in the Delete User-Defined Variable dialog, then click Delete. Click Cancel if you don't want to delete.