Stream Rules
Overview
Stream rules evaluate normalized logs during ingestion to immediately detect anomalies or threat activity. Security operators manage rules in Policies > Stream Rules, and detection results can flow into follow-up features such as Event Summary, Tickets, Explanations, and Playbooks.
For example, stream rules can immediately detect events that match specific patterns in IPS, EDR, or firewall logs, or apply multi-step conditions based on normalized field values to quickly identify data exfiltration, C&C communication, or abnormal behavior. Administrators can add, edit, and delete rules and change their enabled state, and operators can review detection policies based on the rule list and status. In Sonar 5, you can link rules to MITRE ATT&CK techniques and tactics to manage detection objectives in a more structured way.
The following diagram shows how a stream rule operates. Stream rules apply to data that has been normalized during the ingestion phase. When you need to enter a field name while writing a stream rule, use the field names normalized by the log schema.
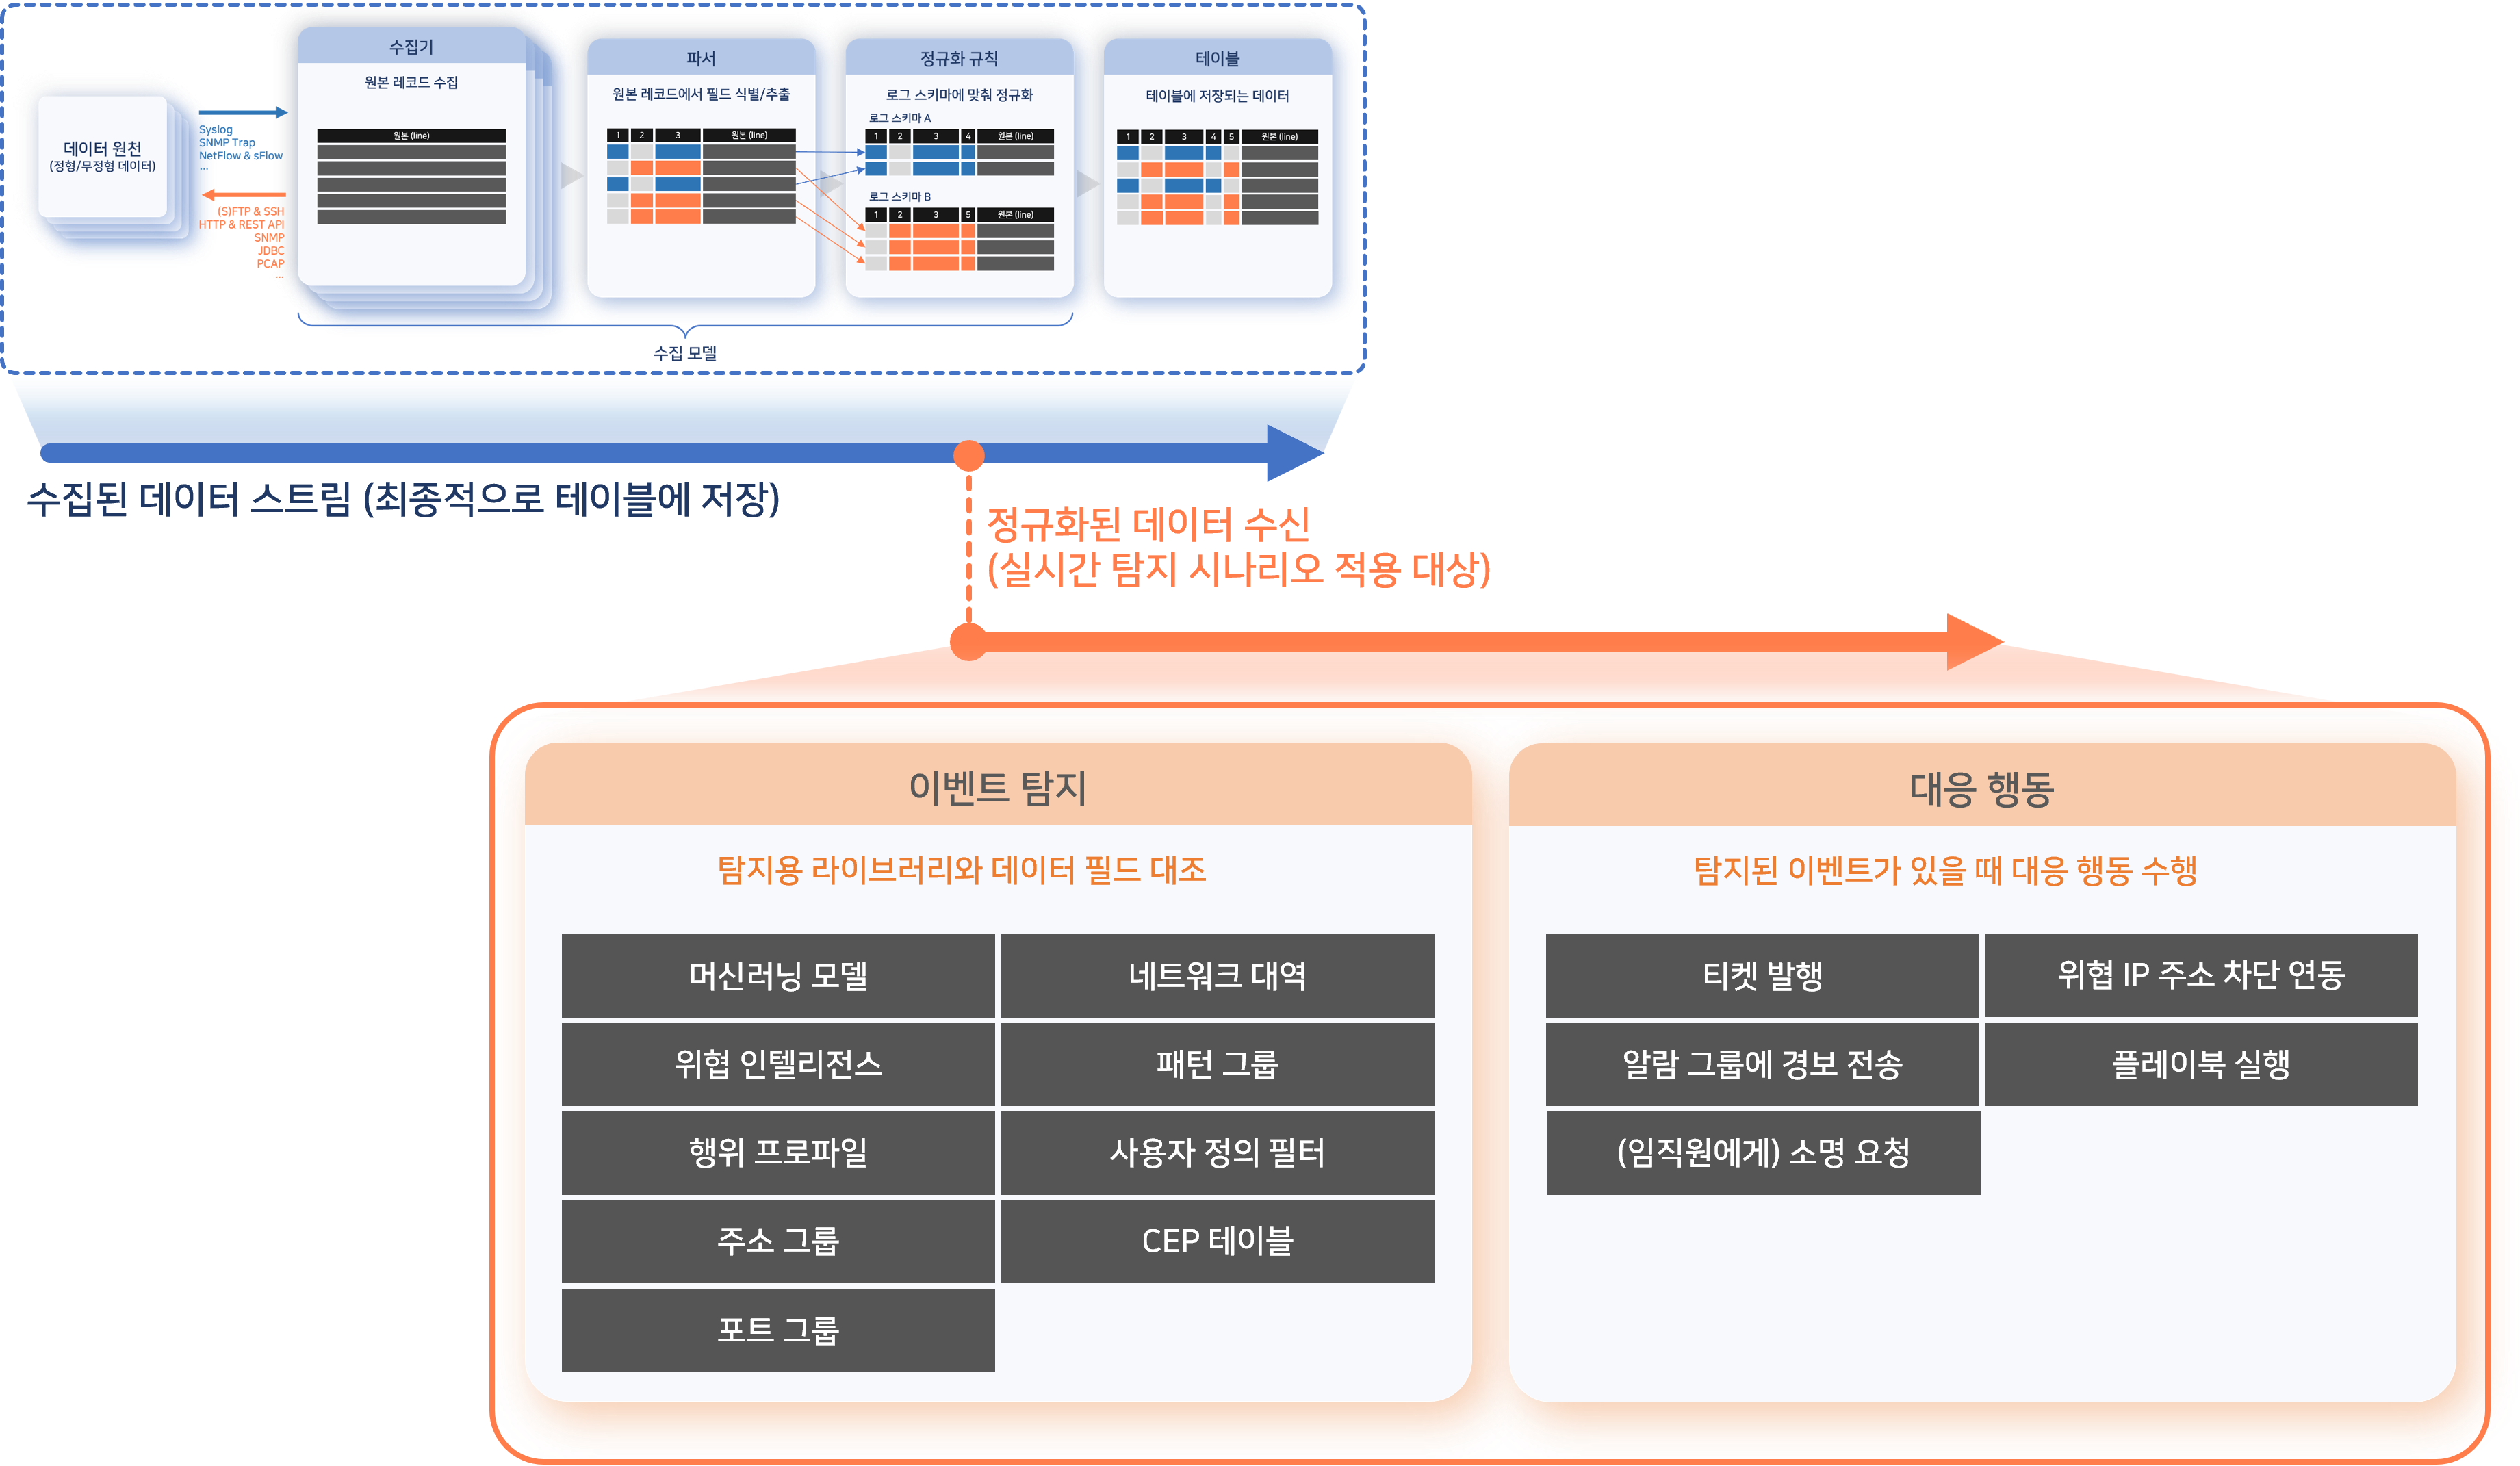
A stream rule performs the following key actions:
- Event detection: Match the detection library against normalized field values.
- Response actions:
- Issue tickets and send alerts for detected events.
- Request an explanation if the actor is an employee.
- Register the IP address associated with the event in an address group.
- If necessary, send a command to the connected device to block the related traffic.
- Trigger playbook execution.
In most cases, stream rules issue tickets on event detection or request an explanation from the actor. Excessive ticket creation increases the workload of malware analysts and security operators, so you should minimize duplicate tickets. Logpresso Sonar consolidates events with the same content into a single ticket based on the alert message, ticket subject, or specified duplicate-detection fields.
Search stream rules
You can view or search the list of stream rules in Policies > Stream Rules.
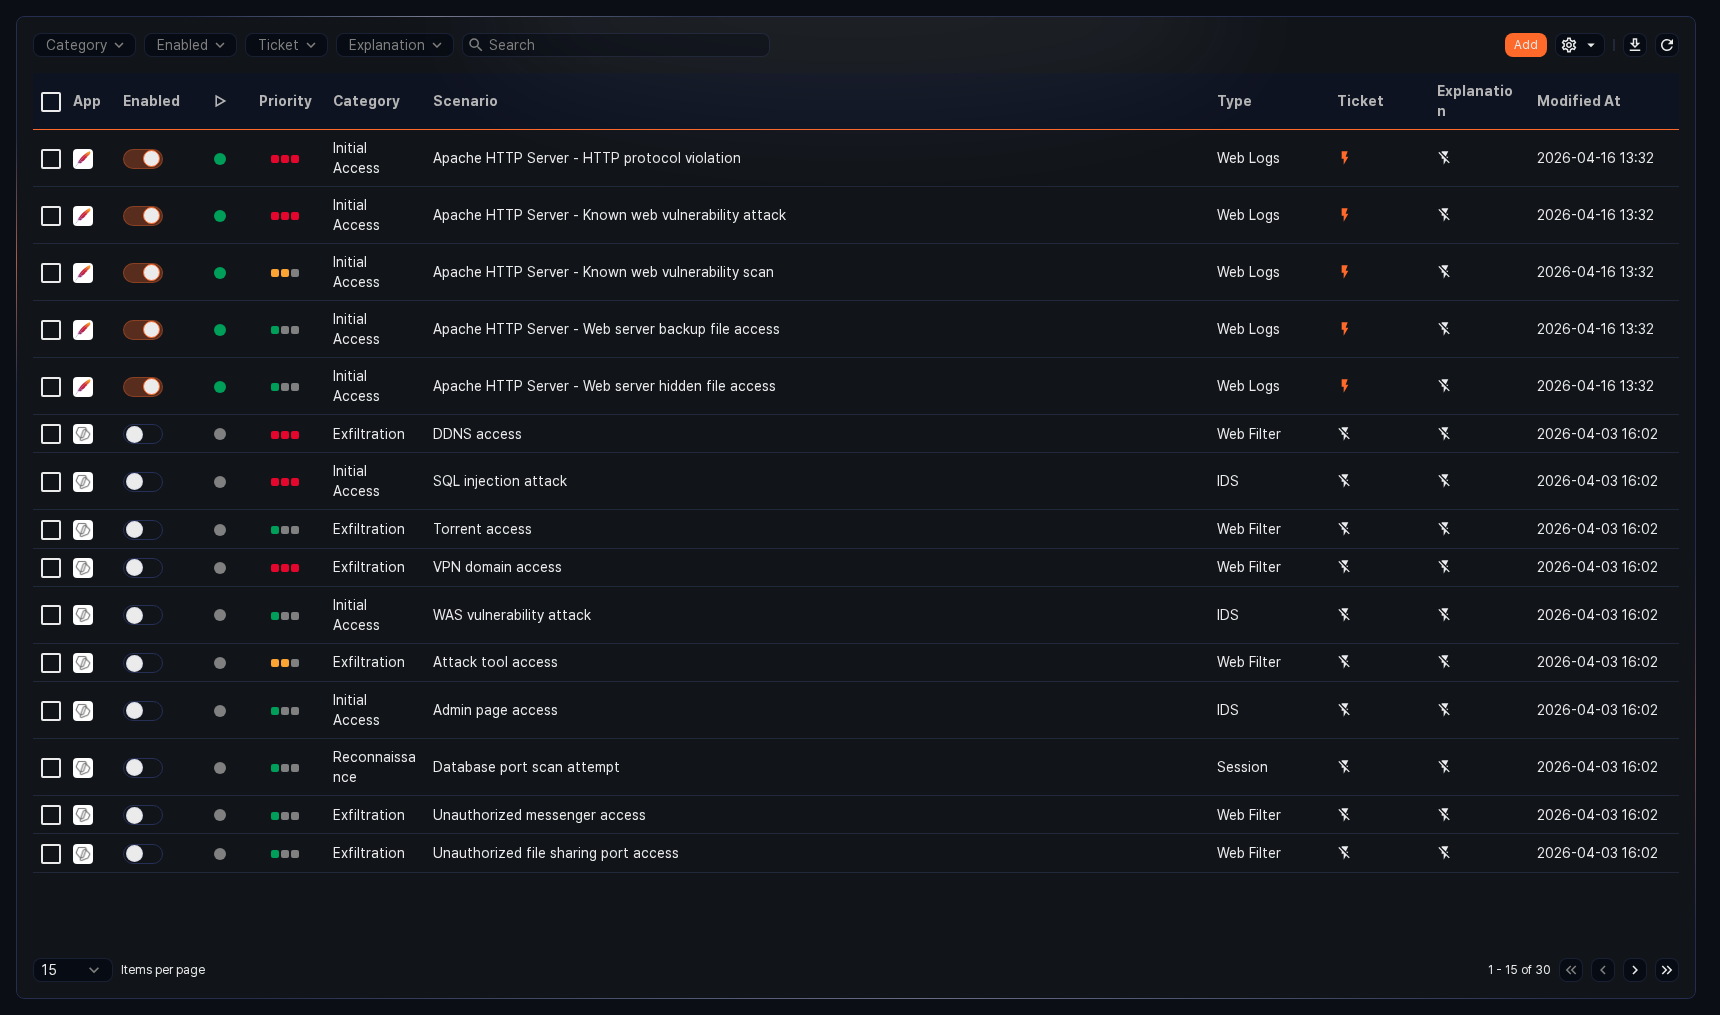
- App: Icon indicating the app associated with the rule. Default rules and user-added rules show the Logpresso icon, and rules installed from apps show the app icon.
- Enabled: Toggle button to enable/disable the rule (
 : enabled,
  : disabled)
 - Status: Column that shows the rule's current application status.
- Priority: Rule priority (high, medium, low)
- Category: Category assigned to the rule
- Scenario: Name of the stream rule
- Type: Log schema configured for the rule
- Ticket: Whether ticket issuance is configured
- Explanation: Whether explanation request is configured
- Modified At: Date the rule was last modified (or created)
To find a specific stream rule in the list, use the search tool in the toolbar. Enter a keyword to filter the list.
Use the Category, Enabled, Ticket, and Explanation filters in the toolbar to quickly narrow down the rules you need.
Enable/disable a rule
To enable or disable a stream rule, click the toggle button in the Enabled column of the rule (: enabled, : disabled).
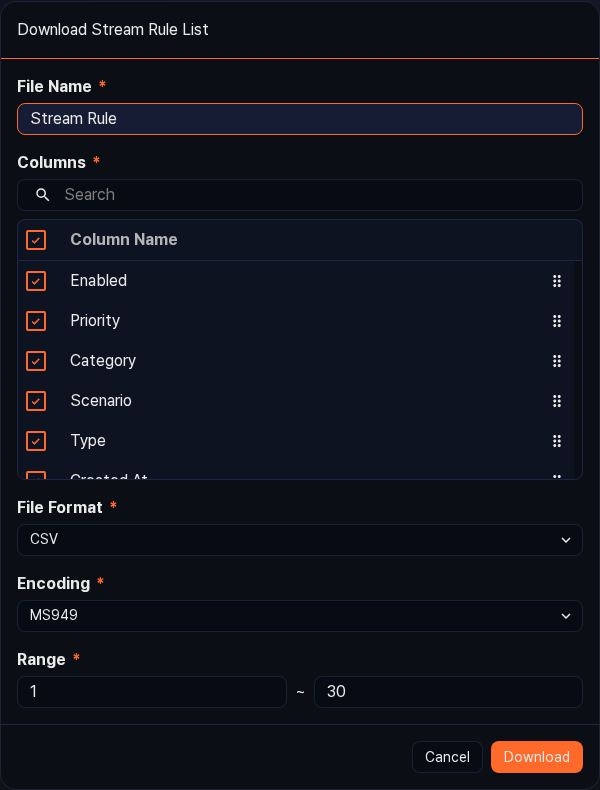
Download the list
To save the stream rule list to your local PC, click ![]() in the toolbar, then select the file format you want.
in the toolbar, then select the file format you want.
Refresh the list
To refresh the stream rule list with the latest data, click ![]() in the toolbar.
in the toolbar.
Set acceptable risk
In environments where the XDR license is activated, you can set an acceptable risk score for a stream rule to estimate the expected number of tickets.
To set acceptable risk:
-
Select the checkbox of the rule you want to configure in the stream rule list.
-
Click
 in the toolbar, then click Set Acceptable Risk from the menu that appears.
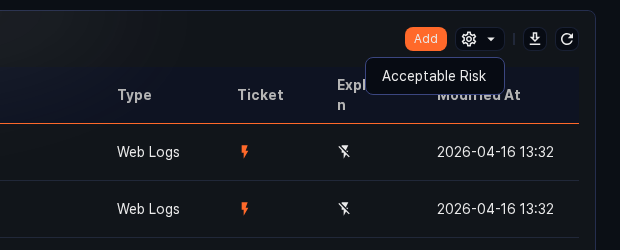
-
In the Set Acceptable Risk dialog, enter the Acceptable Risk Score (1–100) and click Estimate Ticket Count to see the estimated daily ticket count. Click Save to apply, or Cancel to discard.

Add a stream rule
To add a stream rule:
-
In Policies > Stream Rules, click Add in the toolbar.
-
On the Add Stream Rule screen, configure the basic settings.
-
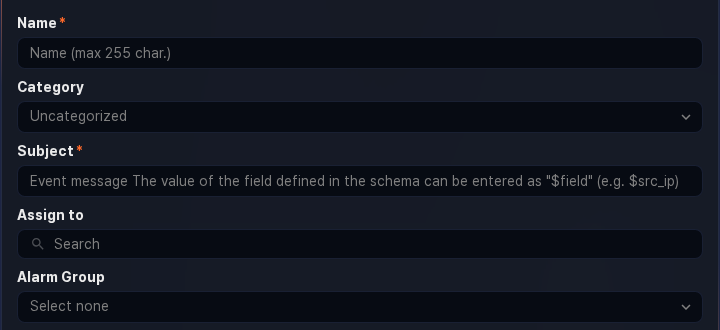
Name: A unique name for the rule (up to 255 characters). Duplicate names are not allowed.
-
Category: The category for the rule. Categories appear in the Category column on the Analysis > Event Summary screen. You can pre-add categories in Rule Categories.
-
Message: The subject assigned to tickets when an event is detected.
- Enter a field name defined in the log schema as
$fieldnameor$fieldname$to pull the field value from the log that triggered detection (e.g.,$src_ip). If the field name contains non-ASCII characters, use the$fieldname$format. - If no Duplicate Key Field is set under Advanced Settings, duplicate tickets are suppressed based on whether the generated message (up to 2,000 characters) is identical.
- Enter a field name defined in the log schema as
-
Assignee: The user account to assign issued tickets to. You can select one or more accounts. If none is specified, tickets are created without an assignee.
-
Alarm Group: The alarm group to notify when an event is detected.
NoteConfigure how alarms are received in the alarm group settings.
-
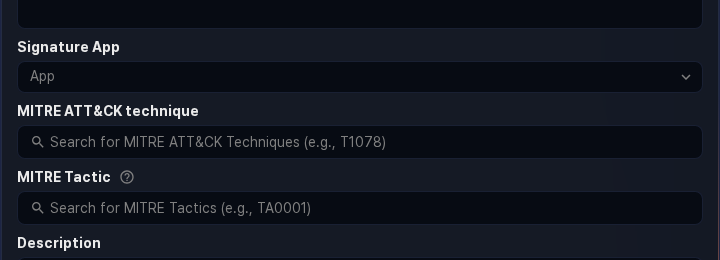
Signature App: Select the app associated with this rule. Selecting an app makes it easier to identify the source and context of the rule.
-
MITRE Technique: Search for and select one or more MITRE ATT&CK techniques that this rule is designed to detect. You can search by technique ID (e.g.,
T1078) or technique name. Selected items appear as tags. -
MITRE Tactic: Search for and select the MITRE ATT&CK tactic this rule addresses. You can search by tactic ID (e.g.,
TA0001) or tactic name. -
Description: A detailed description of the rule (up to 2,000 characters).
-
-
To separately manage the attacker's IP address or the abnormal actor's IP address upon event detection, or to pass address group information to a firewall or IPS, configure the following settings:
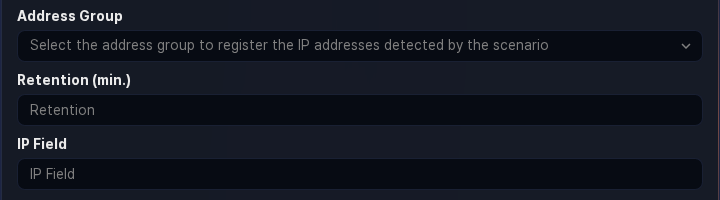
- Address Group: The address group to which the value (IP address) of the IP Block Field is added.
- Block Duration: How long (in minutes) to keep the IP address in the Address Group. The IP address is automatically removed from the address group after the block duration expires. If not specified, the IP address is retained indefinitely (range: 1–100,000,000).
- IP Block Field: The IP address field to add to the address group when an event is detected. Enter the IP address-related field name defined in the log schema (e.g.,
src_ip,dst_ip) (up to 50 characters).- For block integration settings with third-party security systems, refer to Response Targets.
-
Set the priority of detected events and select the logger model or logger to apply the stream rule to.

- Priority: Priority of detected events (high, medium, low)
- Log Schema: Select the log schema to apply to the rule. The schema determines which options are available in the scenario builder.
- Detection Target: Select the data logger model or logger from the list to apply the rule to. You cannot select both a logger model and a logger at the same time — choose one or the other. The list shows only logger models and loggers that reference the selected Log Schema.
NoteIf a logger model has only "raw" normalization rules, it does not reference any log schema and will not appear in the detection target list. Make sure to define normalization rules that reference a log schema when configuring the logger model.
-
Write the threat detection rule. You can write the rule using the Scenario Builder or by entering a query directly in the Query field. For details on the scenario builder, refer to Rules and parameters by field type.
A rule consists of at least one condition, applied in order from top to bottom. When data arrives through the Detection Target selected in step 4, conditions are evaluated in order. A subsequent condition is only evaluated if the preceding one is satisfied. The execution order can affect system performance. Set simple, fast conditions at the top to filter out irrelevant logs as much as possible.
If you enter an invalid or non-executable query (e.g., referencing a nonexistent address group or pattern group), the rule cannot be added.
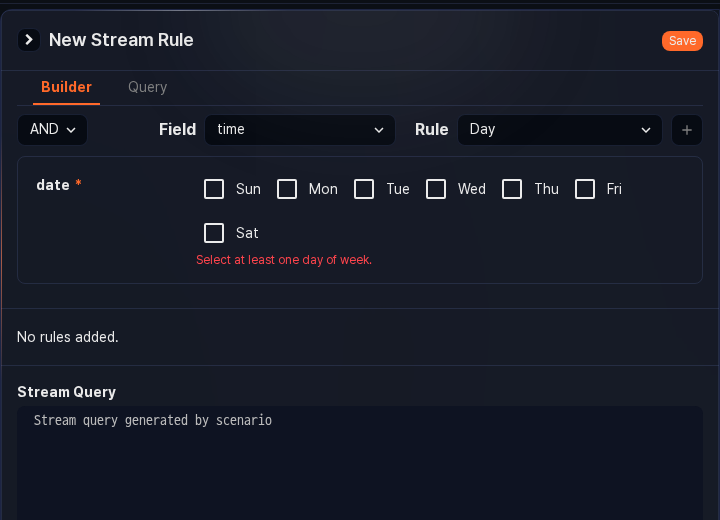
- Scenario Builder: A detection rule editor composed of Condition, Field, and Rule. After selecting all options, click Add to add the rule to the list. You can add one or more rules.
- Condition: The condition for applying the rule (AND, NOT; default: AND). The next rule is applied when the comparison between the data and this rule evaluates to true.
- AND: True when matched (
true) - NOT: True when not matched (
true)
- AND: True when matched (
- Field: The field defined in the log schema to compare against the Rule.
- Rule: The rule to apply to the Field. Shows a list of applicable rules based on the Field data type.
- Condition: The condition for applying the rule (AND, NOT; default: AND). The next rule is applied when the comparison between the data and this rule evaluates to true.
- Query: Enter a query to add filter rules directly (up to 10,000 characters).
- Stream Query: Displays the filter rule entered in the Scenario Builder or Query as a stream query.
- Scenario Builder: A detection rule editor composed of Condition, Field, and Rule. After selecting all options, click Add to add the rule to the list. You can add one or more rules.
-
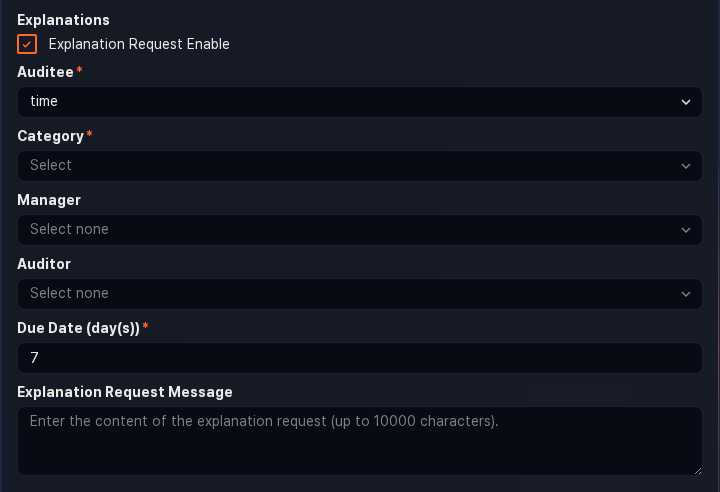
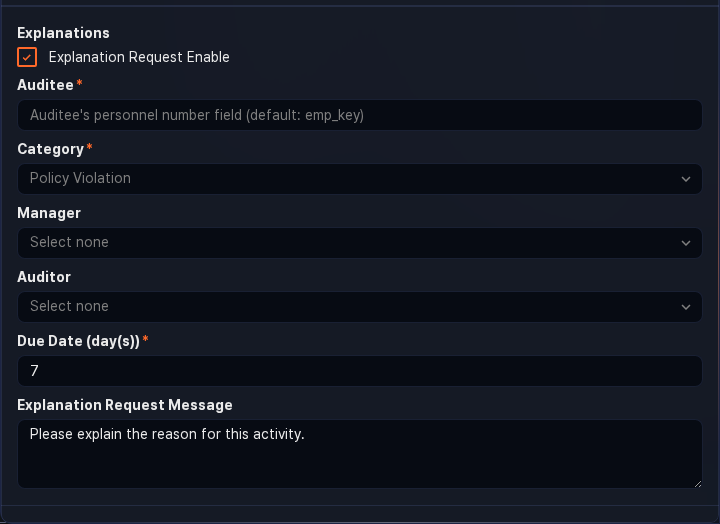
If detected events are related to an employee in the organization, you can request an explanation from that employee.
-
Request Explanation: Whether to send an explanation request (default: disabled).
-
Explanation Target Field: The field containing the employee ID of the employee to explain.
When a threat is detected, an explanation request email is automatically sent to the employee mapped to that ID. The employee information (ID, account, email) must be configured in advance under Users > Employees.
-
Category: Category of the explanation. If needed, click Manage Explanation Categories in Response > Explanations to add categories.
-
First Reviewer, Second Reviewer: The first and second reviewer of the explanation (defaults to department head if not set). Refer to Explanations for details on reviewers.
-
Deadline: Deadline for submitting the explanation (default: 7 days). After the deadline, the explanation target can no longer submit a response.
-
Note: Content to add to the explanation request email. The entered content is inserted where the text macro
$user_noteappears in the email/SMS template body. If you enter a field name defined in the schema as a macro (e.g.,$fieldname), it is replaced with the field value. You can view the note in the explanation detail under Response > Explanations (up to 10,000 characters).
NoteExplanation requests require a field named `emp_key`. If that field does not exist, click **Query** in step 5 and write a query that creates the `emp_key` field and maps it to a user account or IP address.
-
-
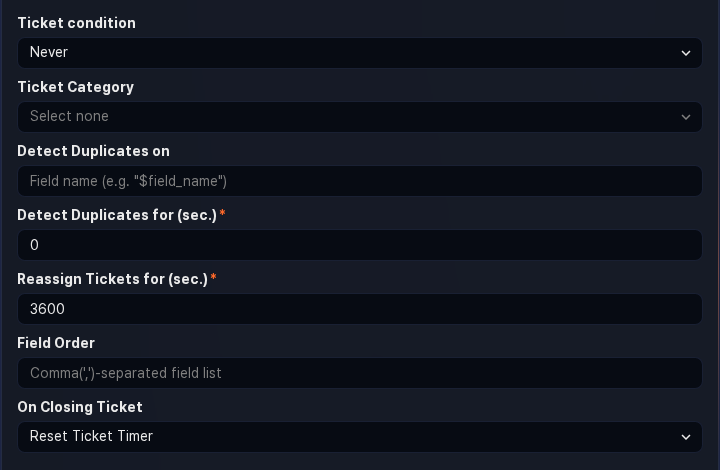
To issue tickets when events are detected, configure the Advanced Settings.
-
Ticket Repository: The ticket repository used to categorize tickets during security operations (default: none selected).
NoteYou must specify a ticket repository to automatically create a ticket when an event is detected. You can also control ticket creation in a playbook triggered by an event. Do not use this setting if you want the playbook to control ticket creation.
-
Duplicate Key Field: Enter the field names to use as the duplicate-detection key, separated by commas (
,), in macro format ($fieldname), up to 2,000 characters. If not set, the Message string is used as the basis.NoteFor example, if the message is set to "C&C server connection: $src_ip -> $dst_ip" but you want to avoid generating excessive tickets for events from the same host connecting to different C&C servers, set the duplicate key to `$src_ip`.
-
Deduplicate Events: When the same event occurs consecutively after a ticket is issued, the duration to ignore duplicate events (default: 0; range: 0–86,400 seconds).
- When
0: Behavior follows the Deduplicate Tickets setting. - When not
0: Ignores the same event for the specified duration, and does not use it as supporting evidence for the existing ticket.
- When
-
Deduplicate Tickets: When the same event occurs after a ticket is issued, the duration during which no new ticket is created but only supporting evidence and occurrence count are added to the existing ticket (default: 3,600; range: 0–86,400 seconds).
- When
0: A new ticket with the same subject is created each time an event occurs. - When not
0: Only the supporting evidence and occurrence count are recorded in the existing ticket for the specified duration.
- When
-
Output Field Order: The order of log data fields to display in the ticket's supporting evidence. Enter field names in display order, separated by commas (
,) (up to 2,000 characters; excludes special characters and pipe symbols). -
Closed Ticket Handling: How to handle a ticket with Deduplicate Tickets set after it is closed (default: Reset deduplication timer).
- Retain deduplication timer: Even after the ticket is closed, if the same threat event occurs before the deduplication period expires, the evidence and occurrence count are added to the closed ticket.
- Reset deduplication timer: When the ticket is closed, the deduplication period is treated as expired, and a new ticket is created when the same threat event occurs again.
-
-
Click Confirm to finish adding the stream rule. The rule is activated immediately upon creation.
Rules and parameters by field type
The scenario builder allows you to configure rules for each field type defined in the log schema. The available rules and parameters for each field data type are as follows.
STRING
| Rule | Parameter | Input range | Load | Description |
|---|---|---|---|---|
| Match target string | Comparison string | Up to 255 characters | Low | Filter field values by comparison string |
| Contains target string | Substring | Up to 255 characters | Low | Filter field values containing the substring |
| Detect signature pattern | Comparison signature group | Select signature group | Medium | Filter field values by signature |
BOOL
| Rule | Parameter | Input range | Load | Description |
|---|---|---|---|---|
| True or false | Comparison | Select true or false | Low | Filter field values that are true/false |
SHORT/INT/LONG/DOUBLE
| Rule | Parameter | Input range | Load | Description |
|---|---|---|---|---|
| Match target value | Comparison value | -9007199254740991 to 9007199254740991 | Low | Filter fields with matching value |
| Target value range | Start, end | -9007199254740991 to 9007199254740991 | Low | Filter field values within the range |
| Greater than target value | Comparison value | -9007199254740991 to 9007199254740991 | Low | Filter field values greater than the value |
| Greater than or equal to target value | Comparison value | -9007199254740991 to 9007199254740991 | Low | Filter field values greater than or equal to the value |
| Less than target value | Comparison value | -9007199254740991 to 9007199254740991 | Low | Filter field values less than the value |
| Less than or equal to target value | Comparison value | -9007199254740991 to 9007199254740991 | Low | Filter field values less than or equal to the value |
DATE
| Rule | Parameter | Input range | Load | Description |
|---|---|---|---|---|
| Day of week match | Select day | Multiple selection: Sun/Mon/Tue/Wed/Thu/Fri/Sat | Low | Filter data created on the specified day of the week |
| Weekend match | - | - | Low | Filter data created on weekends |
| Weekday match | - | - | Low | Filter data created on weekdays |
| Time range | Start time, end time | 0–23 | Low | Filter data that occurred in the specified time range |
COUNTRY
| Rule | Parameter | Input range | Load | Description |
|---|---|---|---|---|
| Country code match | Comparison country code | Select country | Low | Filter field values with matching country code |
PORT
| Rule | Parameter | Input range | Load | Description |
|---|---|---|---|---|
| Port number match | Comparison port | 0–65535 | Low | Filter field values matching the port number |
| In port group | Comparison port group | Select port group | Low | Filter field values included in the port group |
IP
| Rule | Parameter | Input range | Load | Description |
|---|---|---|---|---|
| IP address match | Comparison IP | IPv4 format | Low | Filter field values matching the comparison IP |
| IP address in subnet group | Comparison subnet group | Select subnet group | Low | Filter field values included in the subnet group |
| IP address in address group | Comparison address group | Select address group | Low | Filter field values included in the address group |
| IP address in specific reputation DB | Reputation DB | Select threat intelligence | Medium | Filter field values included in the specified reputation DB |
| Wait for event correlation by IP address | Event name, timeout | Up to 255 characters, 0–86400 (mon/h/m/s) | High | Create an event context by event name and hold the IP address for the timeout duration |
| Detect event correlation by IP address | Event name | Up to 255 characters | High | Filter IP addresses included in the specified event context |
| IP address exceeds event threshold | Event name, threshold | Up to 255 characters, threshold 0–9007199254740991 | High | Filter IP addresses exceeding the occurrence threshold in the specified event context |
| IP address in reputation DB | - | - | Medium | Filter field values included in any threat intelligence at least once |
MD5/SHA1/SHA256
| Rule | Parameter | Input range | Load | Description |
|---|---|---|---|---|
| Match target hash value | Hash | Up to 255 characters | Low | Filter field values with matching hash value |
| In reputation DB | - | - | Medium | Filter field values included in any threat intelligence at least once |
| In specific reputation DB | Reputation DB | Select threat intelligence | Medium | Filter field values included in the specified reputation DB |
URL
| Rule | Parameter | Input range | Load | Description |
|---|---|---|---|---|
| URL in reputation DB | - | - | Medium | Filter field values included in the reputation DB |
| URL in specific reputation DB | Reputation DB | Select threat intelligence | Medium | Filter field values included in the specified reputation DB |
DOMAIN
| Rule | Parameter | Input range | Load | Description |
|---|---|---|---|---|
| DOMAIN | Match target string | Up to 255 characters | Low | Filter field values matching the comparison string |
| DOMAIN in reputation DB | - | - | Medium | Filter field values included in the reputation DB |
| DOMAIN in specific reputation DB | Reputation DB | Select threat intelligence | Medium | Filter field values included in the specified reputation DB |
Other — BLOB, etc.
| Rule | Parameter | Input range | Load | Description |
|---|---|---|---|---|
| Other | Behavior profile detection | Select behavior profile | Low | Filter field values matching the key field of the behavior profile |
Notes on configuring explanation requests
To configure explanation requests, you need a data field that can be mapped to the explanation target. For example, the employee ID, account, or source IP address is required. Most log schemas do not include fields related to explanation targets, so additional configuration is needed.
There are multiple ways to map explanation target information. The following is one representative approach.
-
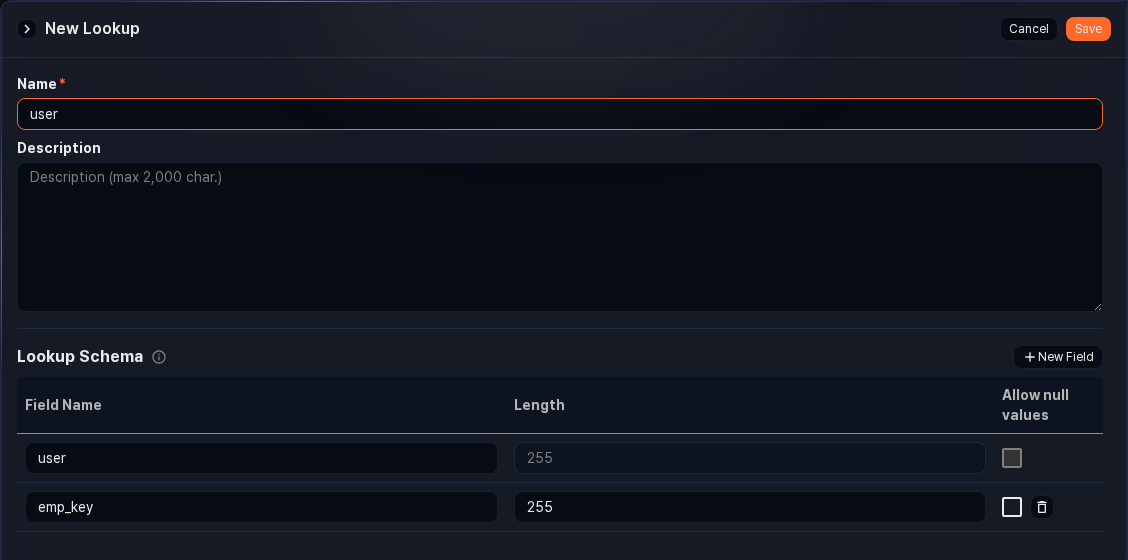
Configure a lookup table for matching employee accounts and IDs
-
To extract employee IDs by matching account information from collected logs, configure an employee ID table as a lookup table in Analysis > Lookup. The table must contain account (
user) and employee ID (emp_key) mapping data. For detailed instructions on adding a lookup table, refer to Analysis > Lookup. -
When configuring the lookup table, the account field name in the collection table and the account field name in the lookup table must match for the lookup to work correctly.
-
-
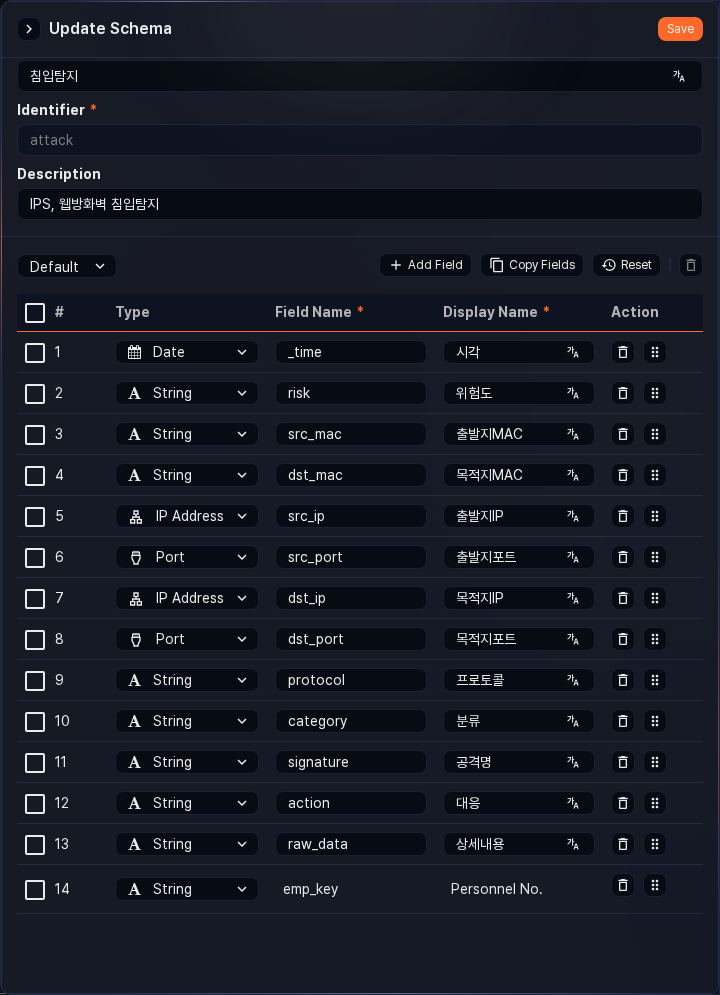
Configure a log schema for normalizing employee ID information
-
To add the extracted employee ID as a field and normalize it, edit or add a log schema in Loggers > Log Schemas.
-
In this example, the intrusion detection log schema is used, and the employee ID field is added to that schema.
-
-
Configure a stream query to add the employee ID field by matching against the lookup table
-
To add and store the employee ID field by matching against the lookup table while collecting logs in real time, configure a stream query in Loggers > Logger Models.
-
Add a normalization rule for the employee ID field and configure the stream query for that rule. Example:
lookup 'lookup table name' 'account field name' output 'employee ID field name to add'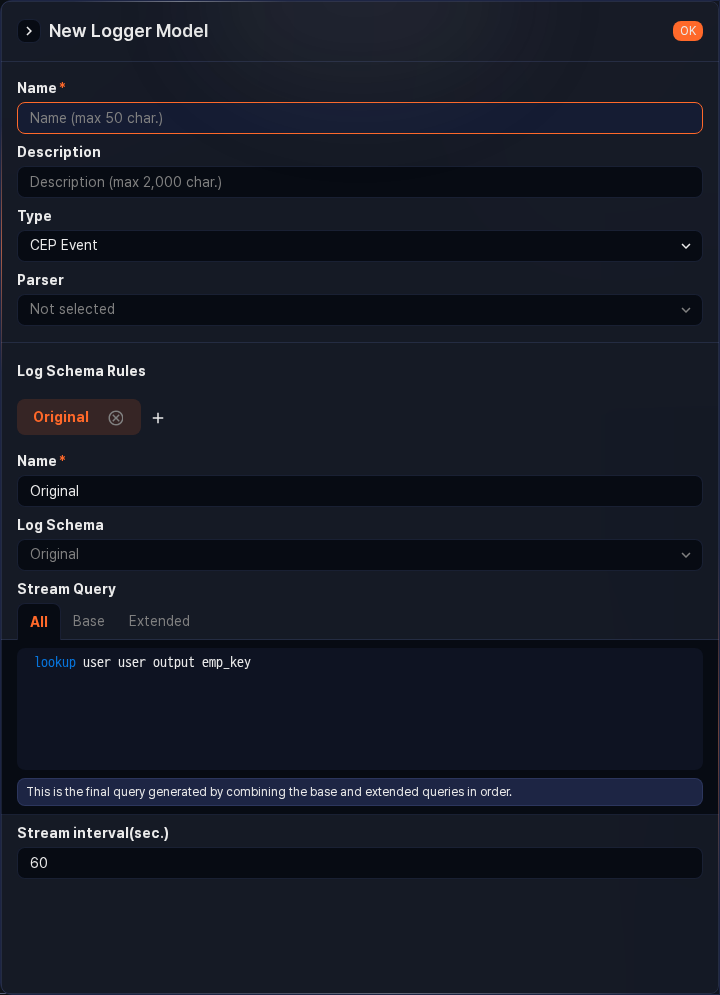
-
If no logger using this logger model has been added, add one.
-
-
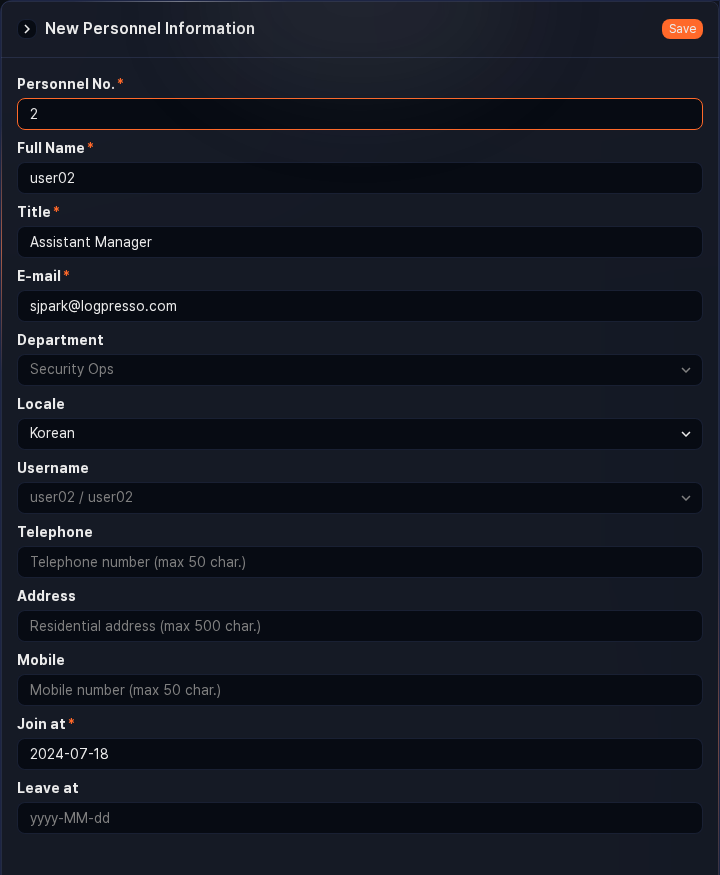
Configure employee information including ID and account
-
To send explanation request emails to employees, configure employee information in Users > Employees.

-
When configuring employees, if there is a user account corresponding to an employee, enter the account information in the Login Name field. Also configure the department head to enable completion of threat review through first and second review. For detailed configuration, refer to Users > Employees.
NoteYou can import employee information from a database. For details, contact our technical support team.
-
-
Configure explanation request settings in the detection rule policy
-
To request an explanation from the employee who is the subject of a threat detected by the stream rule, configure the explanation request option.
-
Duplicate a stream rule
To duplicate an existing stream rule:
- Select the checkbox of the stream rule you want to duplicate in the list.
- An action menu appears in the toolbar. Click Duplicate in the action menu.
- In the Duplicate Stream Rule dialog, review the list of rules to duplicate, then click Duplicate. Click Cancel to abort.
- A new rule named 'original rule name copy' is added in a disabled state.
Edit a stream rule
To edit a stream rule:
- Click the name of the stream rule you want to edit in the list.
- On the Edit Stream Rule screen, update the information and click Confirm. For descriptions of each field, refer to Add a stream rule.
View stream rule version history
A new version is automatically created each time you add or edit a stream rule. On the Version History tab of the edit screen, you can review past versions and restore a specific version or duplicate it as a separate rule.
- In the stream rule list, click the name of the rule whose version history you want to review.
- Click the Version History tab at the top of the edit screen. Cards are listed from the most recent version in reverse chronological order.
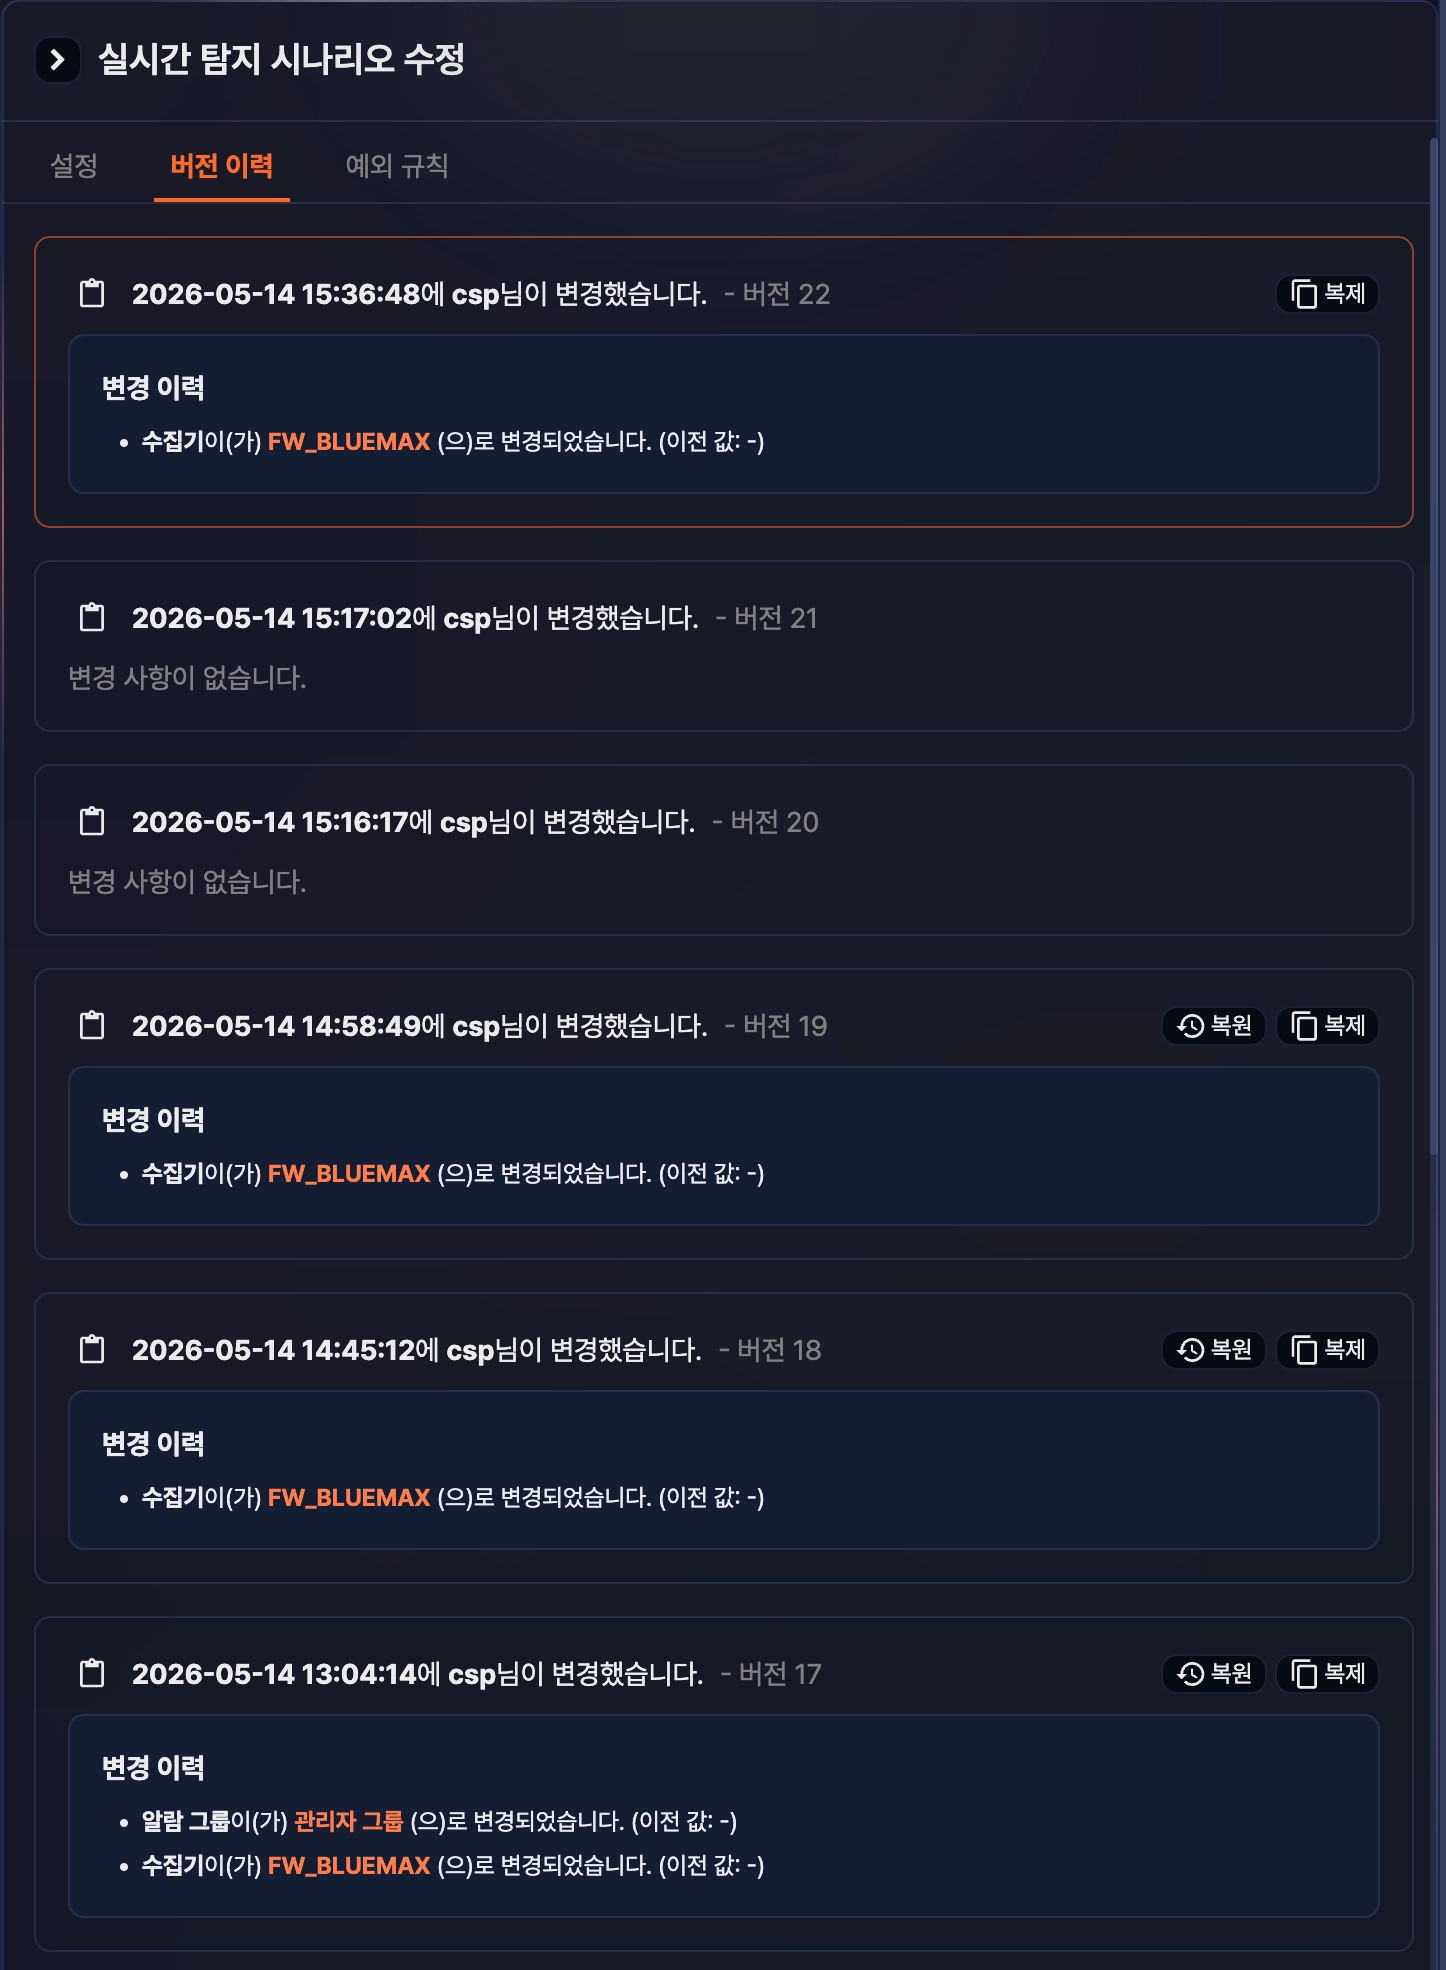
Each version card shows the following information:
- The time the version was changed, the account that made the change, and the version number (e.g.,
csp changed it on 2026-05-14 15:36:48. - Version 22) - The stream query body at that version
- Change history: Shows the items changed compared to the previous version, in the format
Field changed to NewValue. (Previous value: ...). When more than three items changed, click the Show N more button to expand the full list, then click Collapse to fold it again. If nothing changed, it showsNo changes. - If the version was created by a restore, the base version number (e.g.,
Restored from version 5)
Restore a previous version
To roll a rule back to a previous version's settings:
- On the Version History tab, locate the card for the version you want to restore. The card for the version currently in use, and any version with no changes, does not show a Restore button.
- Click Restore on the card.
- In the confirmation dialog, review the version to restore and proceed with the restore.
- On success, the restored settings are created as a new version, and you return to the Settings tab. If validation fails, a dialog with the failure reason is displayed; click Manual Editing to load the settings you tried to restore into the Settings tab and edit them directly.
Restoring a rule requires Administrator privileges or higher.
Duplicate a previous version as a new rule
To create a separate rule based on a previous version's settings:
- On the Version History tab, click Duplicate on the card for the version you want to duplicate.
- In the Duplicate dialog, enter a name for the new rule and proceed with the duplication. The default name is
Rule name Version N (copy). - The new rule is added to the list in a disabled state with the name you entered.
Duplicating a rule requires Administrator privileges or higher.
Delete stream rules
To delete stream rules:
- Select the checkboxes of the rules you want to delete in the stream rule list.
- An action menu appears in the toolbar. Click Delete in the action menu.
- In the Delete Stream Rule dialog, review the list of rules to delete, then click Delete. Click Cancel to abort.