Tickets
Overview
You can configure the system to generate tickets when a security threat event is suspected on the monitored system. When setting up Stream Rules or Batch Rules, if you specify a Ticket Assignee, a ticket is automatically created when the corresponding event occurs.
Once a ticket is generated, it may already have an assignee, or a Sonar administrator can assign the responsible person directly. The assignee performs response actions based on the ticket content and evidence, records the response history, and submits an approval request. The approver reviews the ticket content and response history and either approves or rejects the request. If the ticket is rejected, the assignee must perform additional work and resubmit the approval request.
The process is illustrated below.
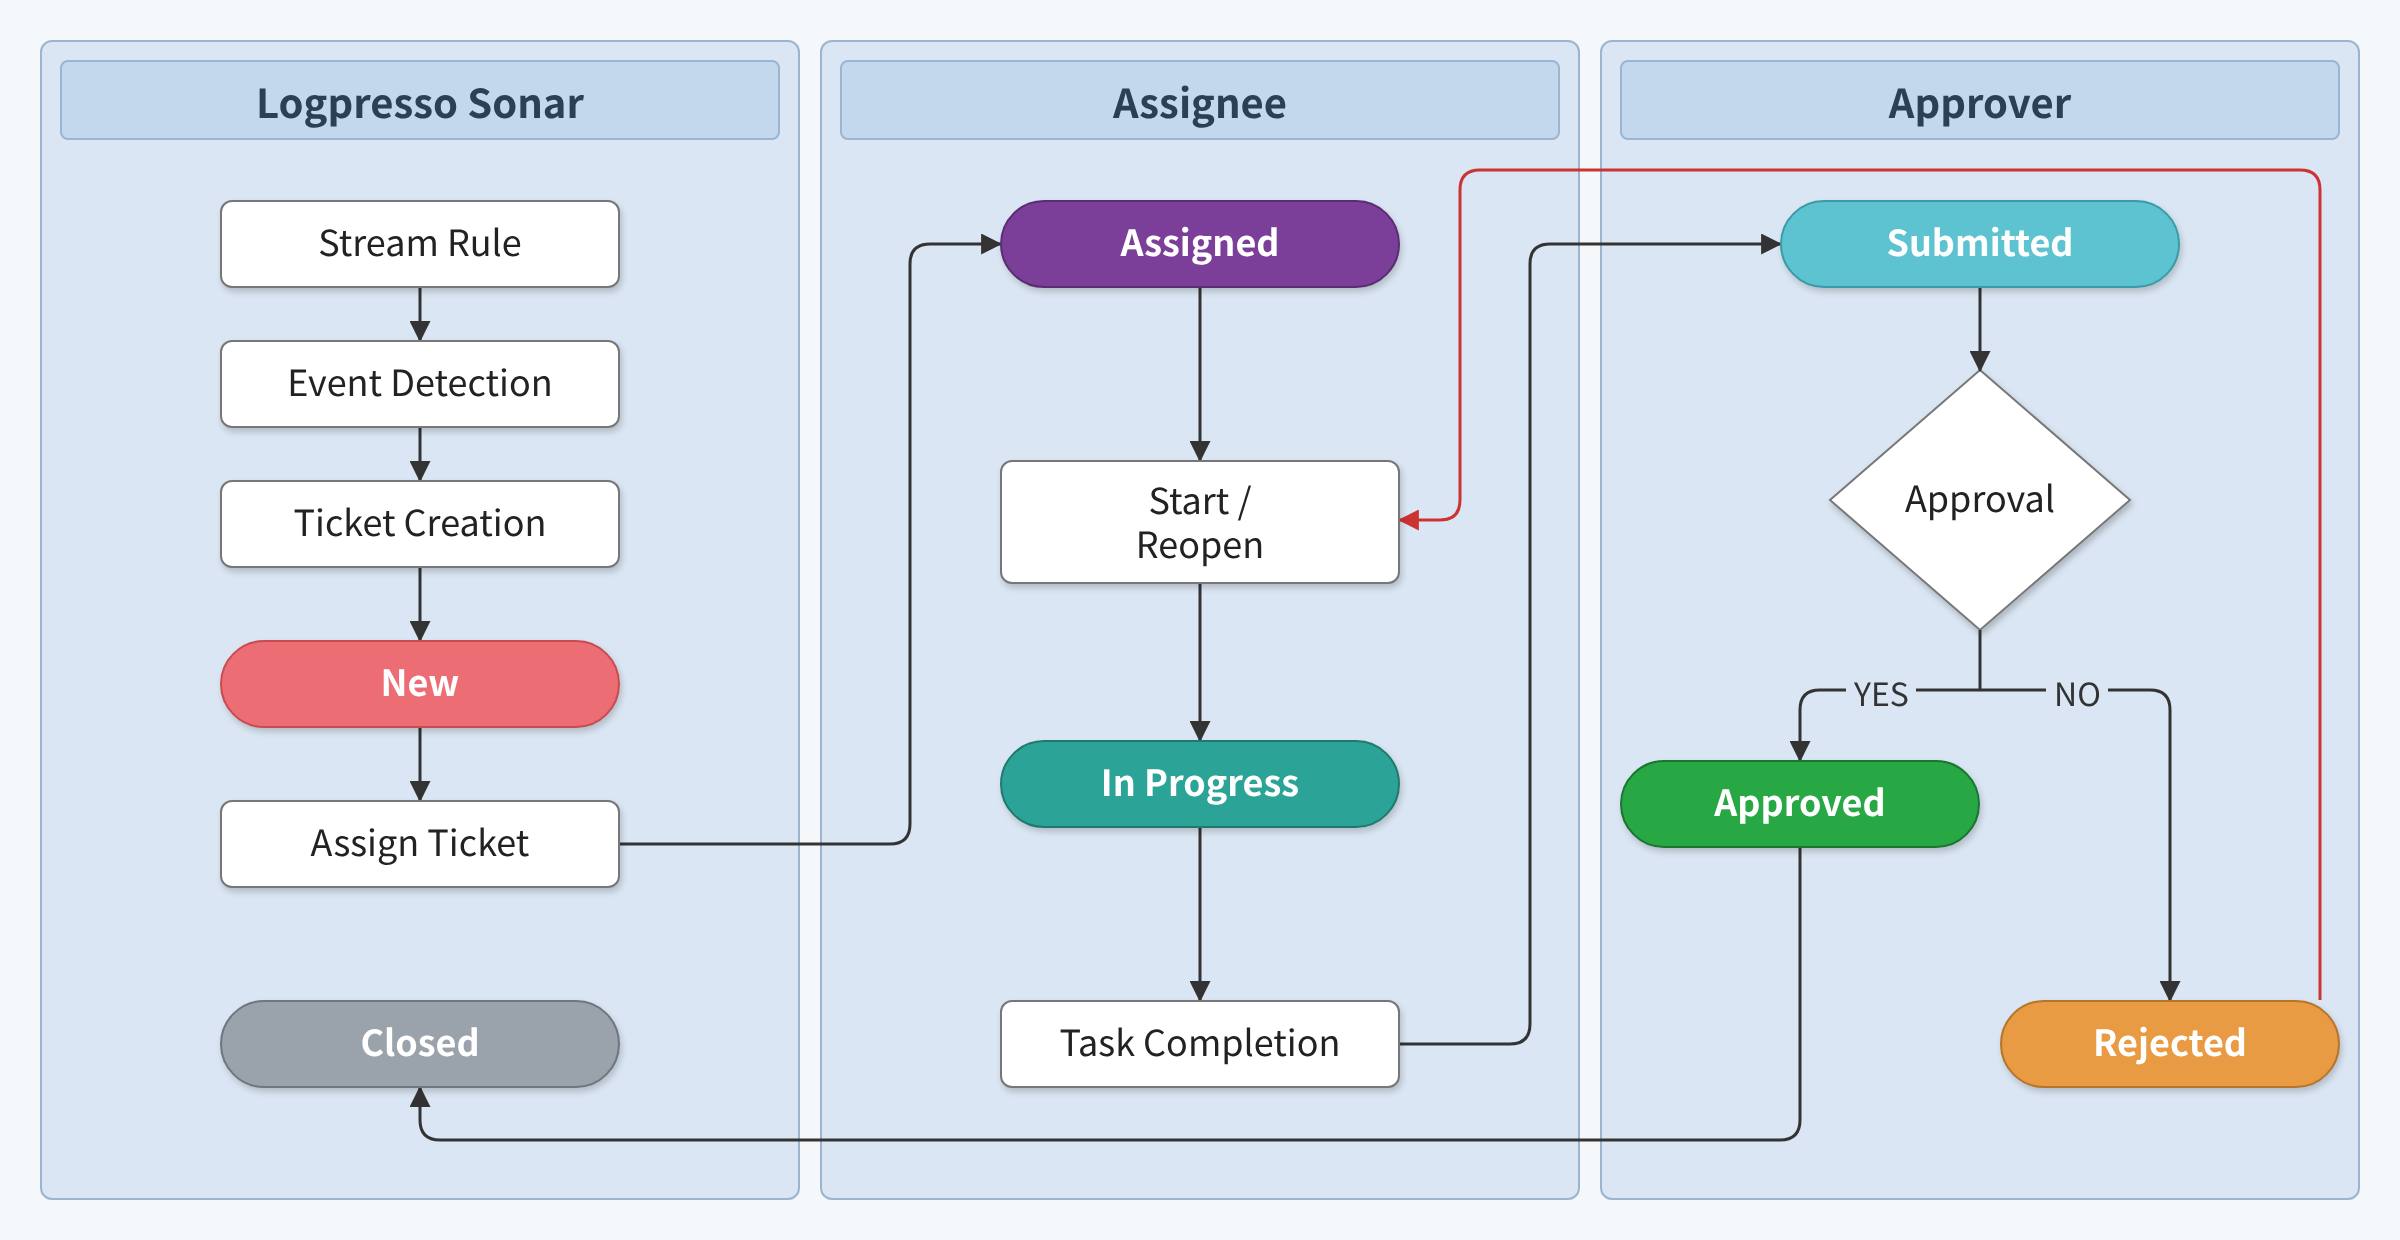
Ticket statuses are categorized as follows:
- New
- The ticket has been created but is not assigned to anyone.
- Assigned
- A ticket assignee has been designated.
- In Progress
- The ticket assignee is currently working on the task.
- Submitted
- The ticket assignee has completed the work and submitted an approval request.
- Approved
- The approver has approved the ticket.
- Rejected
- The approver has rejected the ticket. The assignee must perform additional work.
- Closed
- The ticket has been finalized.
Although the ticket workflow suggests that a ticket can only be closed after the approver approves the assignee's work, in practice a ticket can be set to Closed from any state, including New, Assigned, or In Progress. Tickets that are duplicates or have already been handled elsewhere—tickets that do not need to go through the Logpresso Sonar ticket workflow—can be closed immediately. Conversely, a closed ticket can be reopened for further work if necessary. When reopened, the ticket reverts from Closed back to New or Assigned.
Administrator accounts and accounts with the Ticket View permission can view the ticket list. Adding, editing, or deleting tickets requires an administrator account or an account with the Ticket Edit permission.
Ticket list
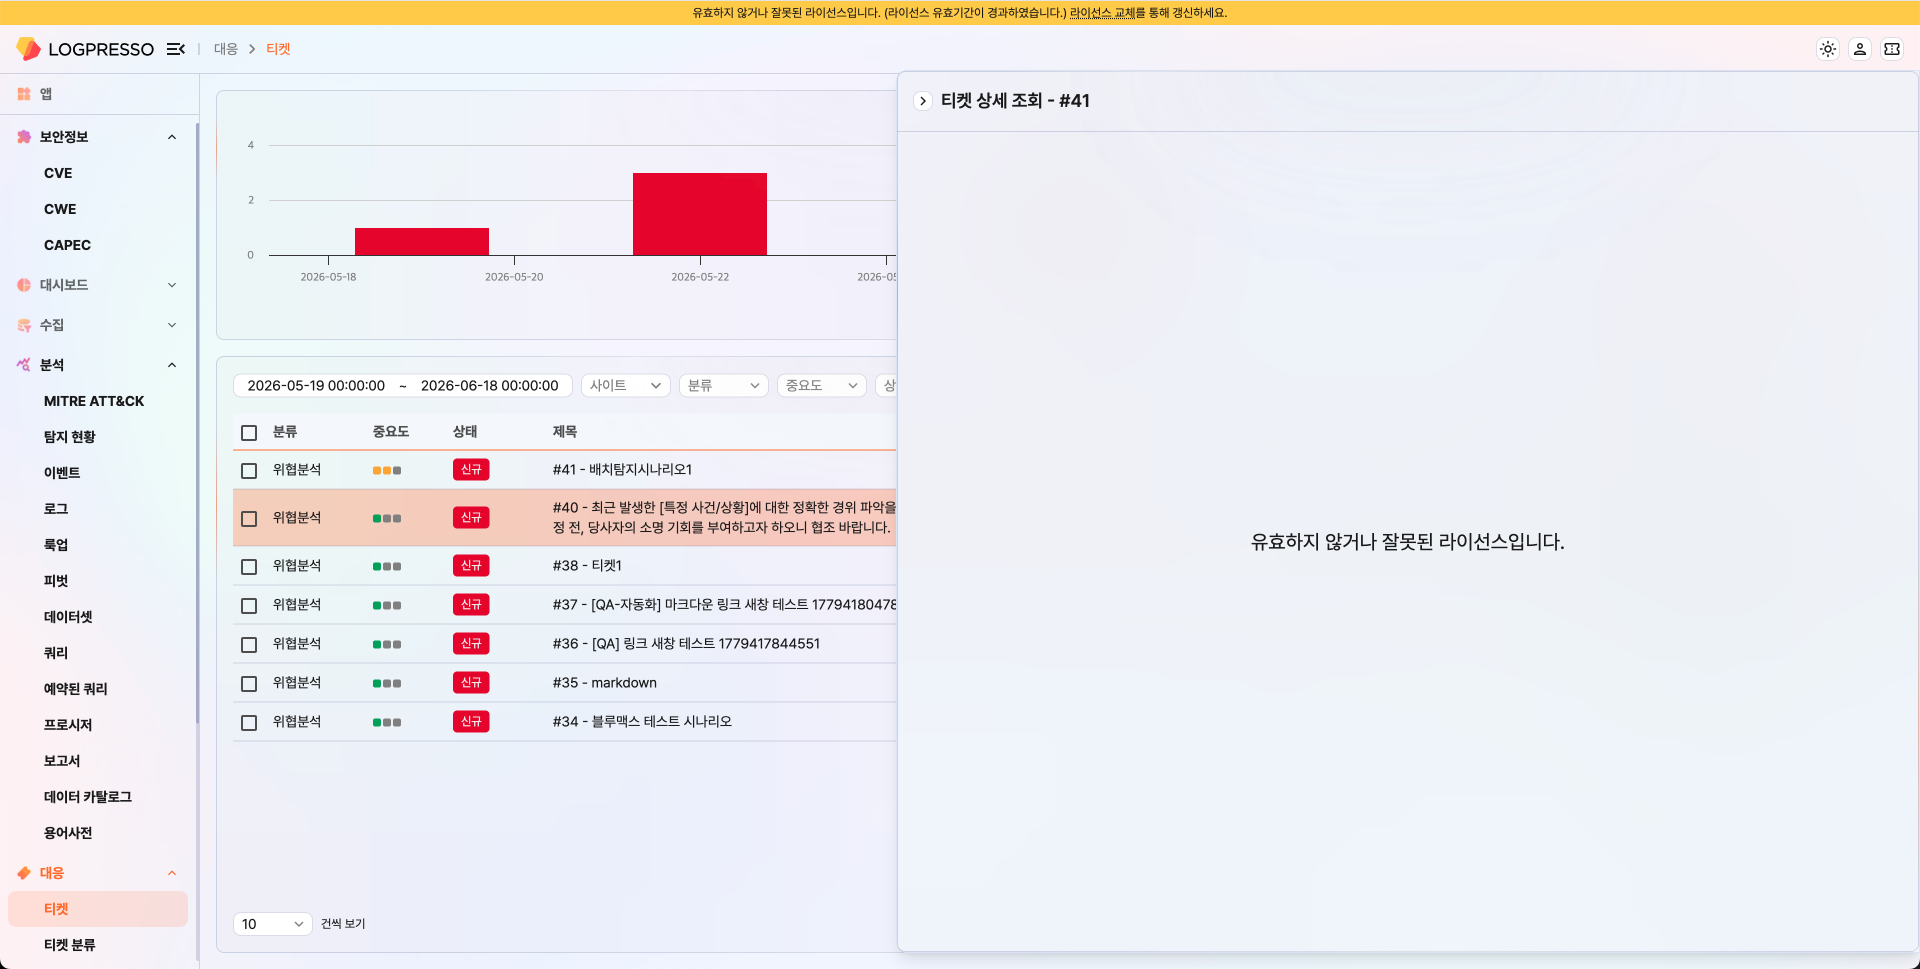
You can view and manage the ticket list from Response > Tickets.
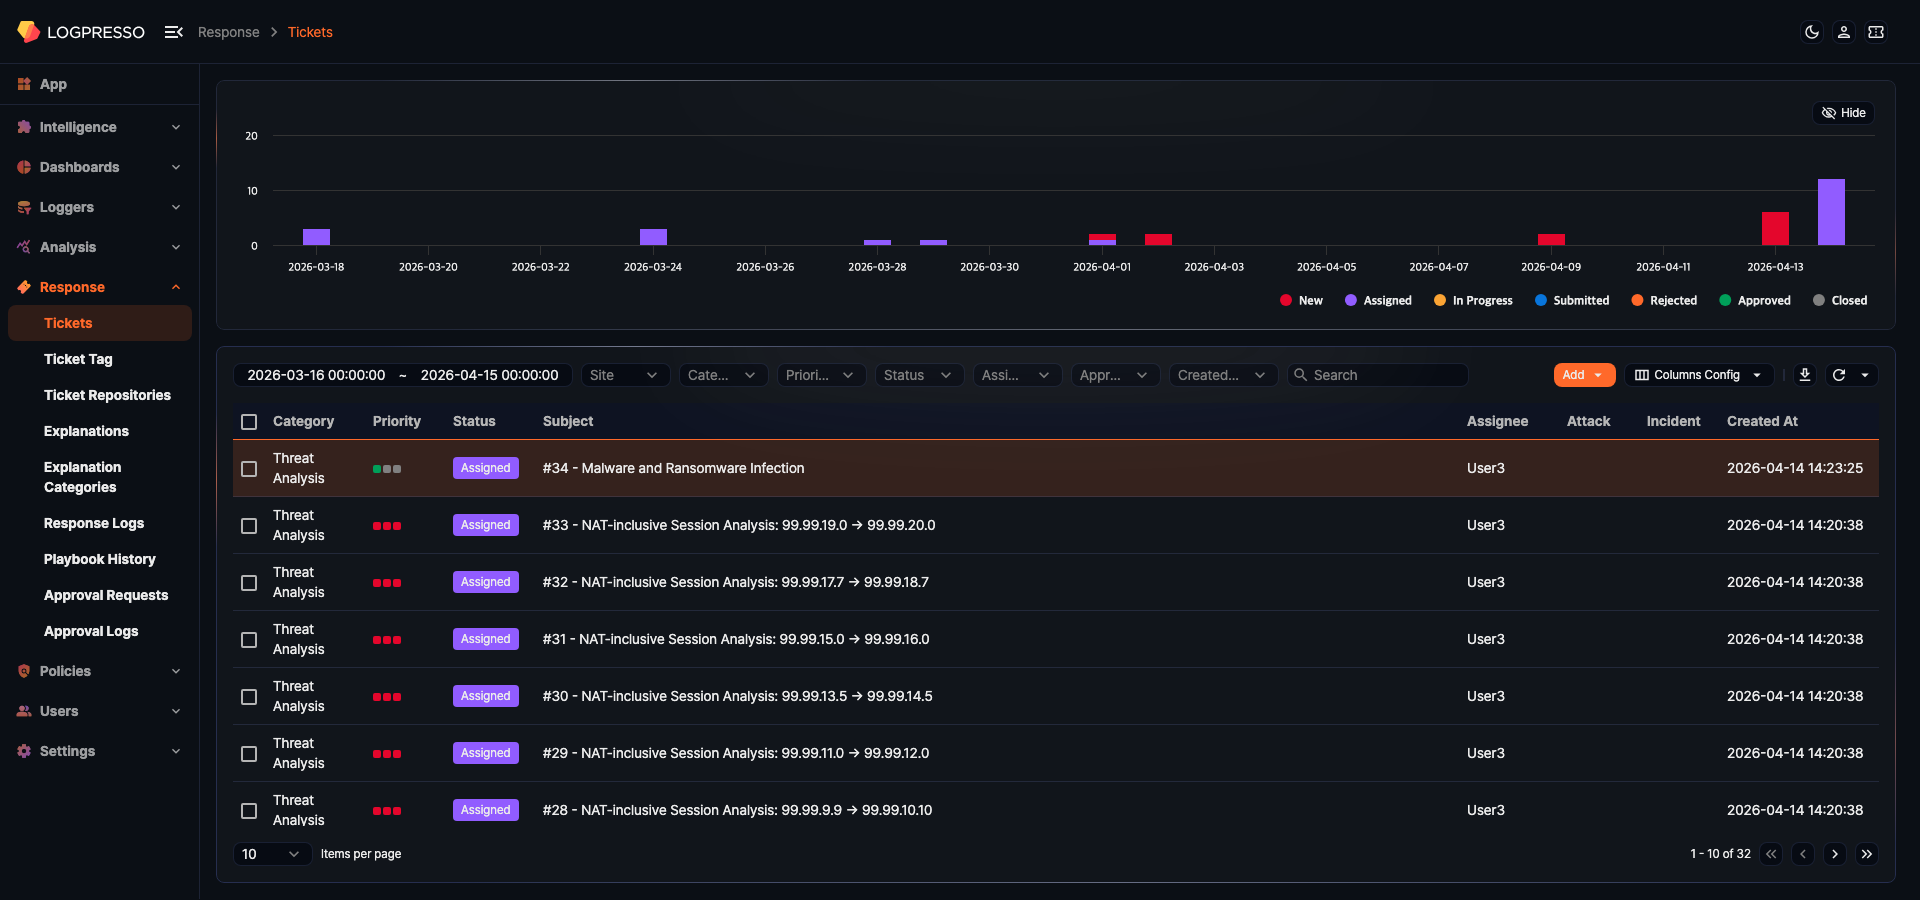
The upper area displays a trend graph of daily ticket processing by status, and the lower area provides filter tools and the ticket list.
Ticket trend graph
The ticket trend graph shows the change in ticket count by status for the specified period as a daily stacked bar chart. Each bar is divided into the following statuses: New, Assigned, In Progress, Submitted, Rejected, Approved, and Closed.

Click a legend label at the bottom of the graph to show or hide the corresponding status series.
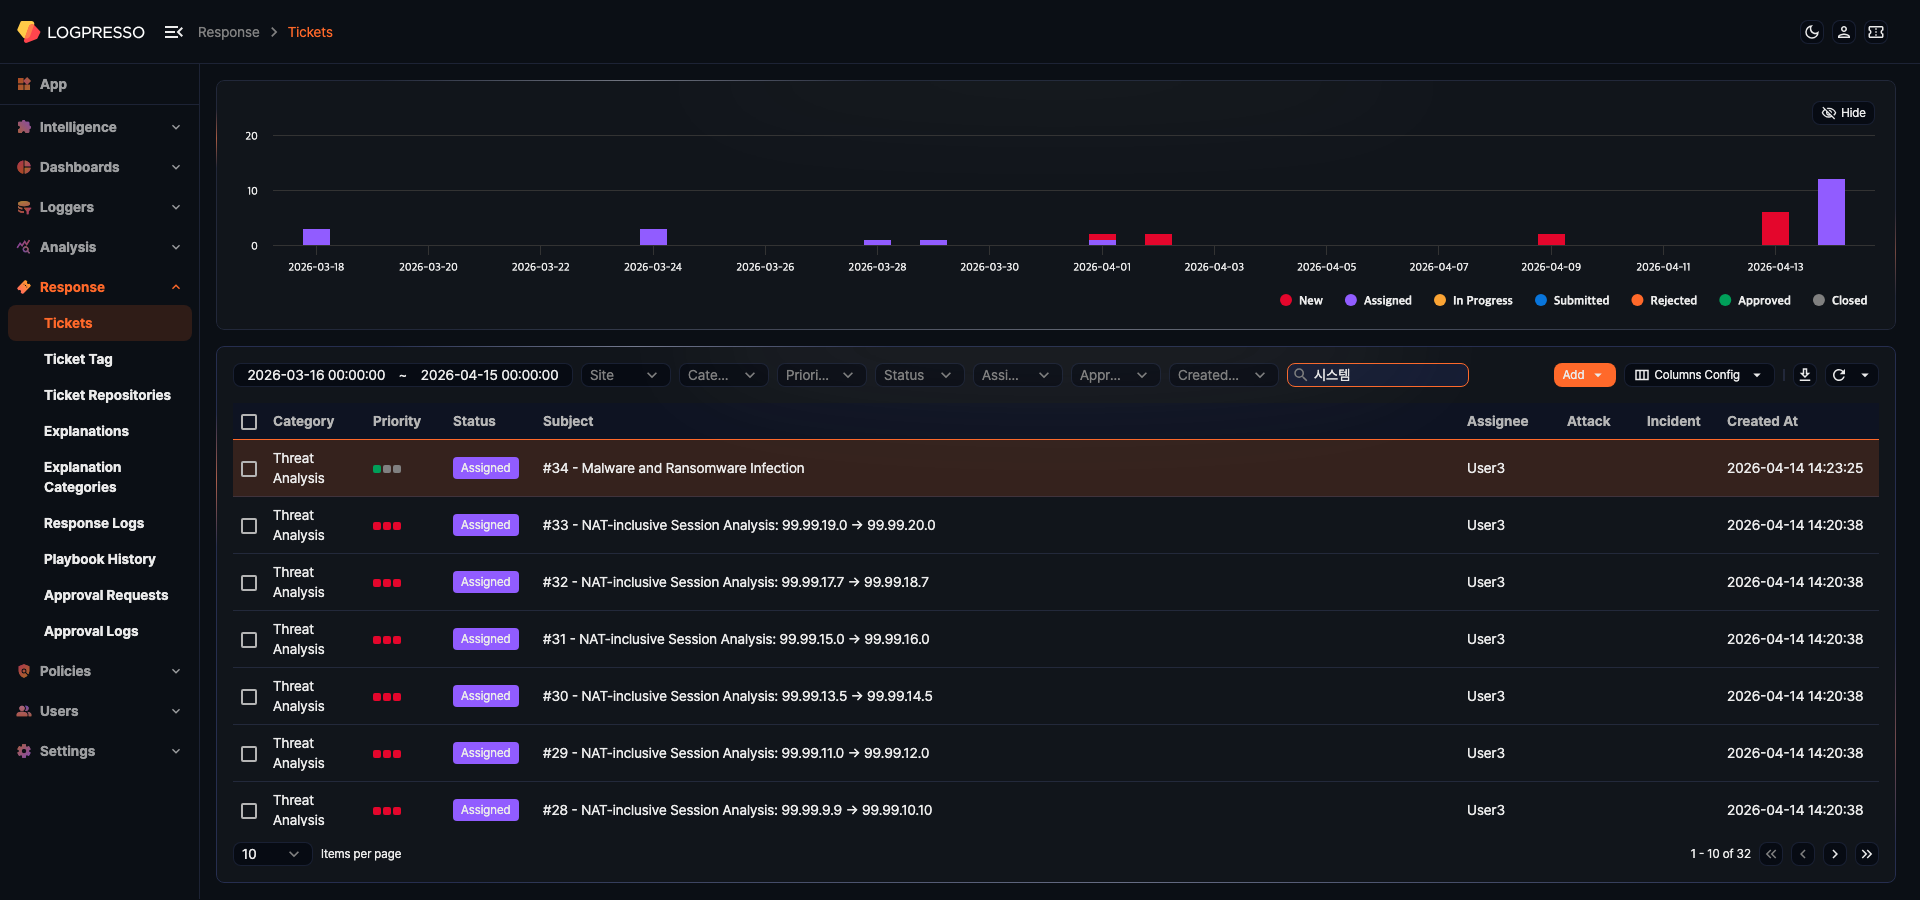
Searching tickets
Use the filters at the top of the list to search for tickets. Search results are also reflected in the trend graph.
The available filters are as follows.
- Period: Search by ticket creation period. Enter or select the start and end date and time.
- Site: Display only tickets belonging to a specific site.
- Category: Display only tickets belonging to a specific ticket category (ticket repository).
- Priority: Display only tickets with the selected priority (High/Medium/Low).
- Status: Display only tickets with the selected status (New/Assigned/In Progress/Submitted/Rejected/Approved/Closed).
- Assignee: Display only tickets assigned to a specific assignee.
- Approver: Display only tickets with a specific approver designated.
- Created by: Filter tickets by how they were created.
- System: Tickets automatically created by stream rules or batch rules
- User: Tickets manually created by a user
Enter a keyword in the search box to display only tickets whose text fields (such as the title) contain the keyword.
Ticket list columns
The default columns displayed in the ticket list are as follows.
- Category: The name of the ticket category (repository) the ticket belongs to
- Priority: The ticket priority (High/Medium/Low) displayed as a color indicator
- Status: The current ticket status (New/Assigned/In Progress/Submitted/Rejected/Approved/Closed) displayed as a badge
- Title: The ticket number (
#ID) and title. If the ticket has tags, they appear as colored badges next to the title; click a tag badge to search for tickets with that tag. - Assignees: Assignee account names (comma-separated if multiple)
- Attack: Whether the ticket is a true positive or false positive
- Incident: Whether it is a security incident
- Created: Ticket creation timestamp (yyyy-MM-dd HH:mm:ss format)
- Explanation status: The current status of the explanation request (New/Submitted/Returned/Closed/Awaiting/Audit-returned/Audit-completed)
In addition to the default columns, you can display the following columns.
- Site: The name of the site the ticket belongs to
- Approvers: Approver account names (comma-separated if multiple)
- Registered by: The account name of the user who created the ticket
- Duplicate attack count: The number of times the same attack pattern has occurred
- Format: The ticket body format (Text/JSON/Markdown)
- Closed: Ticket completion timestamp (yyyy-MM-dd HH:mm:ss format)
- Modified: Ticket last modified timestamp (yyyy-MM-dd HH:mm:ss format)
Column settings
Click the Column Settings button to select which columns to display in the list and adjust their order.
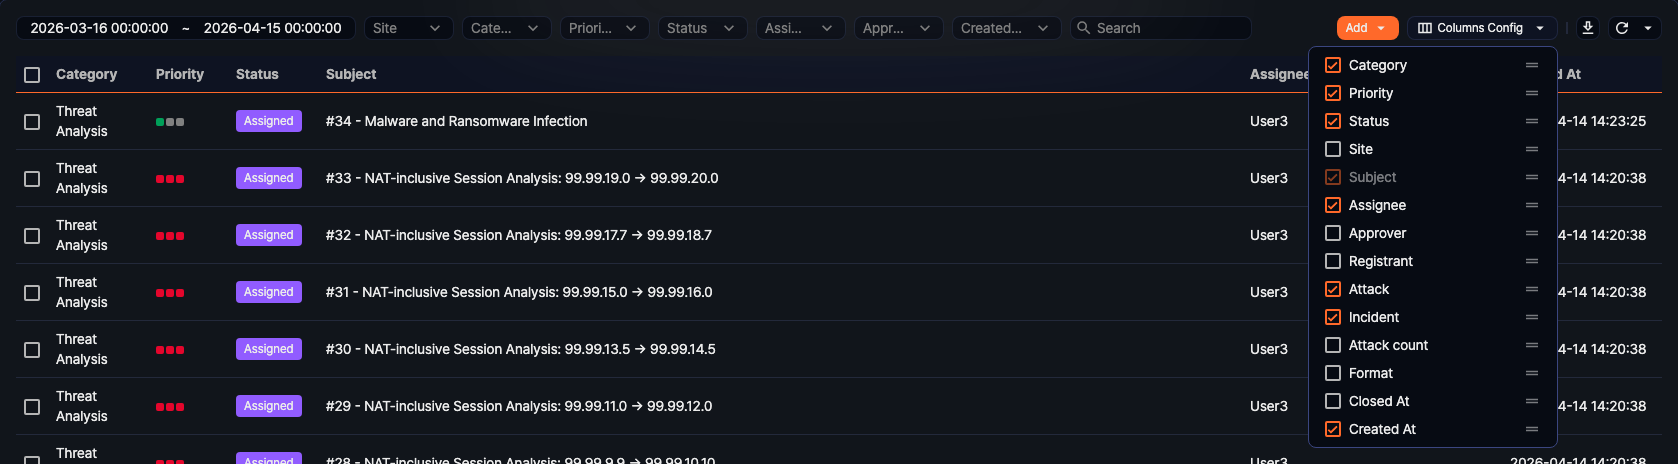
- Use the checkboxes to toggle the visibility of each column.
- Drag and drop to reorder columns.
- Click Reset to restore the default column configuration.
Column settings are saved per account.
Auto-refresh
You can set the auto-refresh interval from the dropdown next to the refresh icon in the list toolbar.

Available intervals are 1 second, 10 seconds, 30 seconds, and 1 minute. Select Stop to disable auto-refresh.
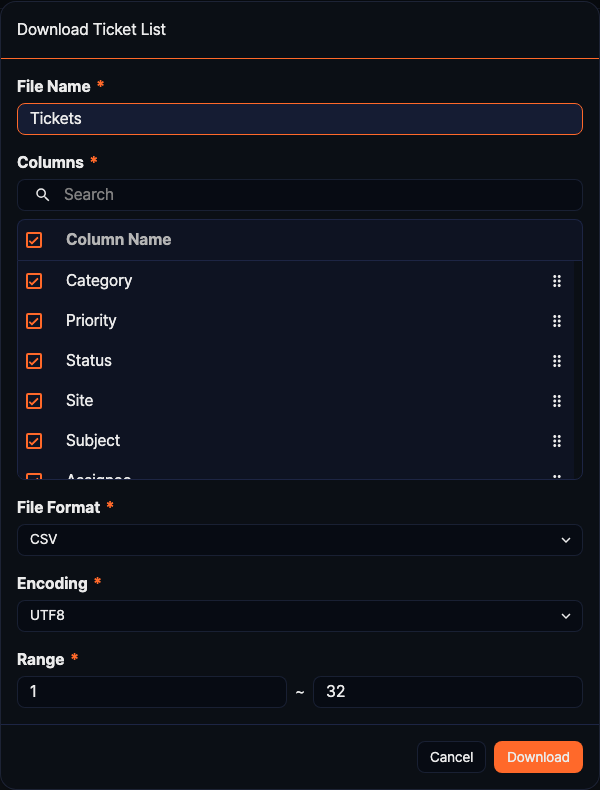
Download ticket list
You can download the ticket list matching the current filter conditions as a file.
- Click
 .
. - In the Download Ticket List dialog, configure the following options.
- File name: Enter the file name to save.
- Column search: Search for a column name in the list of columns to save.
- Column list: Select the columns to include in the file.
- File type: Select the file format (CSV, Excel XML, MS Word, HTML, JSON).
- File encoding: Select the file encoding.
- Range: Select the range of tickets to save. The first ticket on page 1 is number 1.
- Click Confirm.
Bulk actions
When you select one or more tickets using the checkboxes on the left side of the list, bulk action buttons appear in the toolbar.

The available bulk actions are as follows.
- Change Assignee
- Changes the assignee for the selected tickets in bulk. Click Change Assignee and select an assignee in the user search dialog.
- Change Approver
- Changes the approver for the selected tickets in bulk. Click Change Approver and select an approver in the user search dialog.
- Change Status
- Changes the status of the selected tickets in bulk.
- Restart: Changes the ticket status to New.
- Close: Changes the ticket status to Closed.
- Apply Tag
- Applies tags to the selected tickets in bulk. Click Apply Tag and select the tags to apply. If you confirm without selecting any tags, all existing tags are removed.
- Change Attack
- Changes the true/false positive status of the selected tickets in bulk.
- True positive: Marks as a true positive.
- False positive: Marks as a false positive.
- Change Incident
- Changes the security incident status of the selected tickets in bulk.
- Incident: Classifies as a security incident.
- Normal: Classifies as normal.
- Run Playbook
- Runs a playbook for the selected tickets. Click Run Playbook and select the playbook to execute.
- Clear selection
- Deselects all selected tickets.
Register ticket
To register a ticket manually, go to Response > Tickets and click the Add button at the top right of the list to select the ticket type to create.
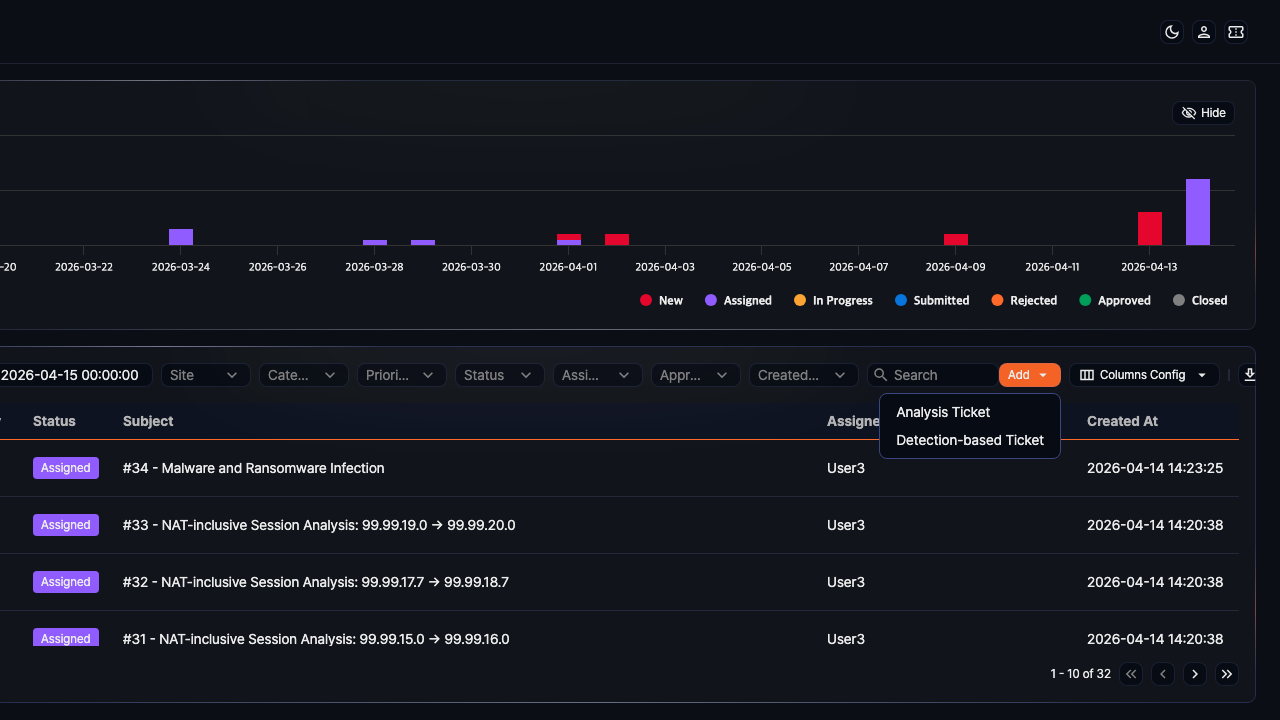
Clicking Add lets you choose between the following two ticket types.
- Analysis Ticket
- A general-purpose ticket where you write the body content freely. Content can be written in Markdown or plain text format.
- Detection-based Ticket
- A ticket where you enter structured fields based on a detection scenario (site, first/last detection time, source/destination IP, port, protocol, and more). Useful for accurately recording standardized information when analyzing security events.
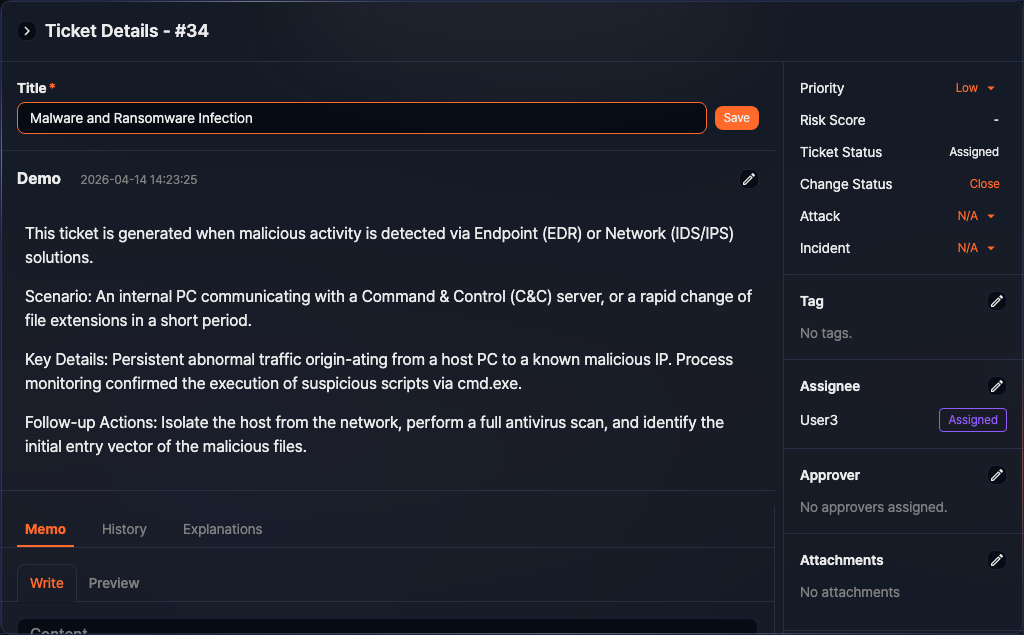
Add analysis ticket
-
Click Add > Analysis Ticket.
-
In the Create Analysis Ticket panel that opens on the right, fill in the fields.
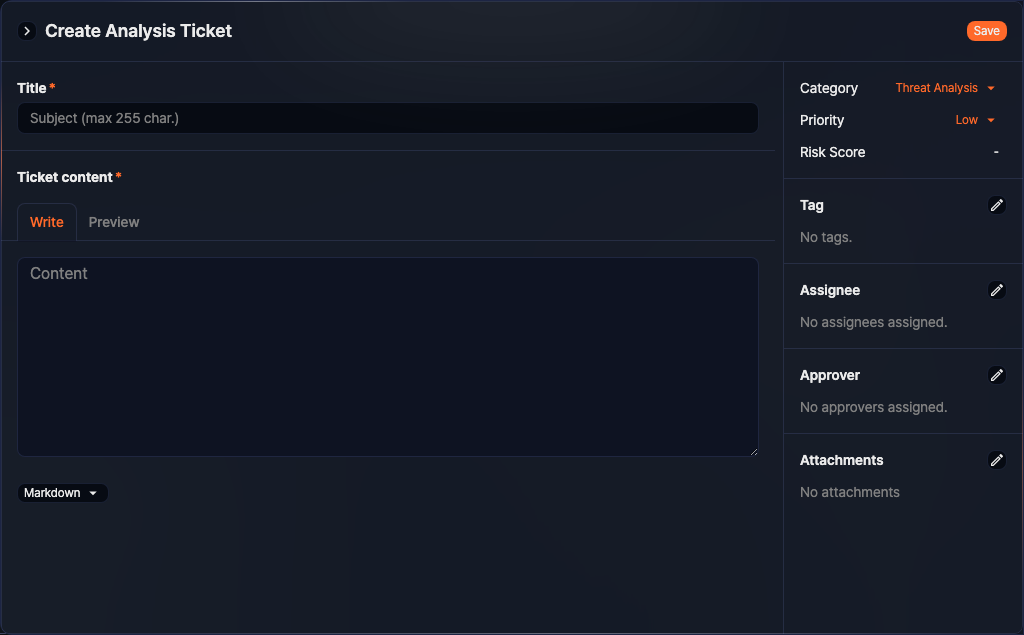
- Title: The ticket title displayed in the ticket list (required, up to 255 characters).
- Ticket content: The ticket body. Write in Markdown or plain text format (required). You can draft content in the Write tab and check the rendered output in the Preview tab.
-
Configure the ticket properties in the right sidebar.
- Category: Select the repository the ticket belongs to.
- Priority: The ticket priority (default: Low; range: High/Medium/Low).
- Attack: Whether the detected event is a true positive or false positive (range: True, False).
- Incident: Whether this constitutes an actual security incident (range: True, False).
- Assignee: Select the account responsible for responding to the ticket.
- Approver: Select the account that will review and approve or reject the assignee's work.
- Attachments: Upload files to attach to the ticket body or download later.
-
Click Save to register the ticket.
Add detection-based ticket
-
Click Add > Detection-based Ticket.
-
In the Create Detection-based Ticket panel that opens on the right, fill in the fields.
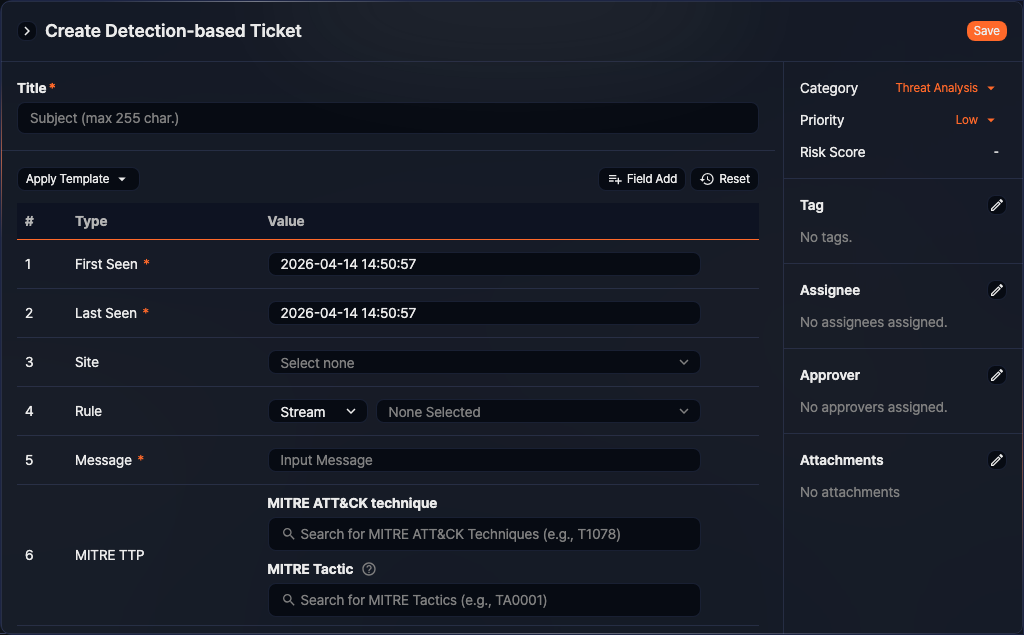
- Title: The ticket title displayed in the ticket list (required, up to 255 characters).
- Ticket content: Enter the security event details in a structured format (required). Click Apply Template to use a Network, Endpoint, or Email template. Click Add Field to add custom fields.
-
Configure the ticket properties in the right sidebar. The settings are the same as for Analysis Ticket.
-
Click Save to register the ticket.
View ticket
In the Response > Tickets menu, click a ticket title to open the ticket detail side panel on the right.
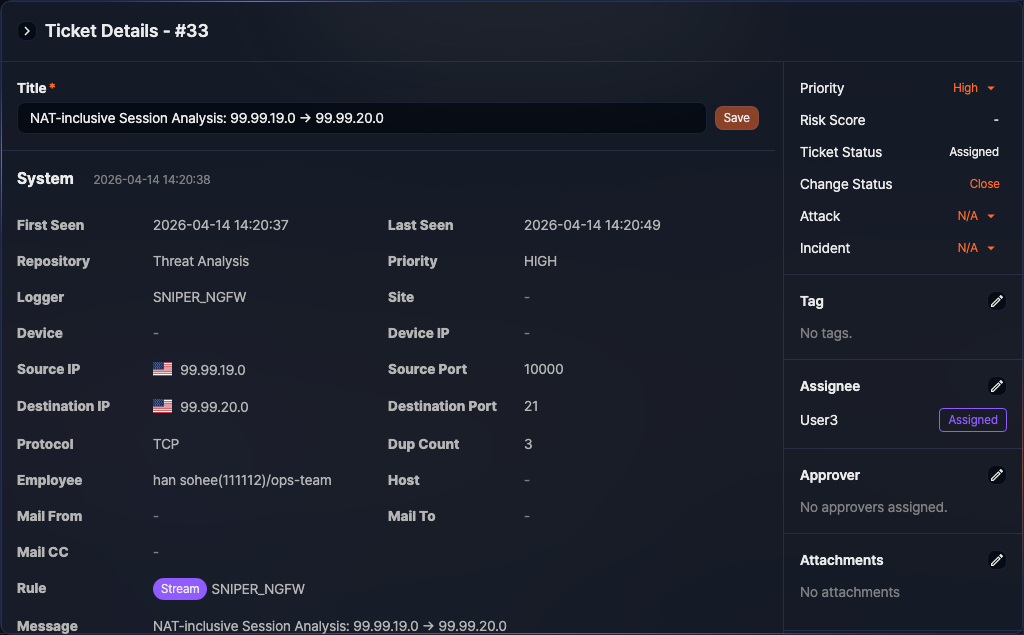
The left area of the panel shows the ticket body and tabs below it. The right sidebar displays properties such as ticket status, priority, assignees, approvers, and attachments.
When you view a ticket, the system also checks the license expiration status. If the license has expired or is invalid, the ticket detail panel shows the message Invalid or incorrect license. and you cannot view the ticket content. Because limitations or notification messages that occur during ticket processing may be related to the license status, check and renew the License in this case.
Tabs
The following tabs appear below the ticket body.
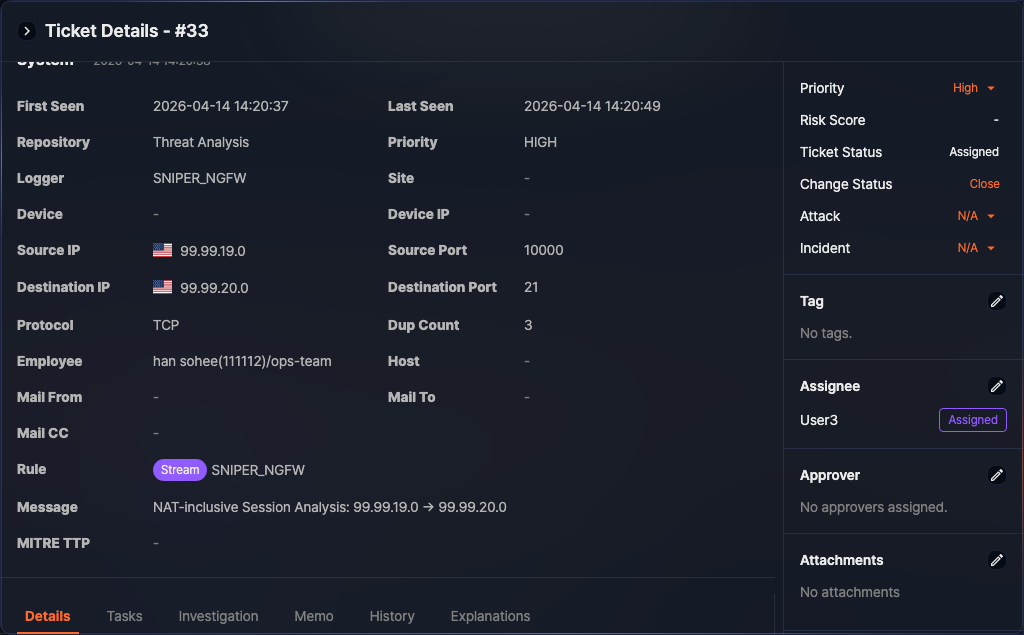
- Details: Shown only for tickets generated by detection scenarios. Review the raw logs or related data that triggered the detection event. If the data is difficult to read in the panel, click Open query window to review the data in the query screen.
- Tasks: Shown only for detection-based tickets when the Maestro license is active. View playbook tasks linked to the ticket.
- Investigation: Shown only for detection-based tickets when the Maestro license is active.
- Memo: Record response actions or analysis results in Markdown or plain text format. File attachments are supported.
- History: View a chronological list of all changes made to the ticket.
- Explanations: View the list of explanation requests linked to this ticket.
Right sidebar
The right sidebar of the ticket detail panel shows the following information.
- Category: The repository the ticket belongs to
- Priority: The ticket priority (High/Medium/Low)
- Risk Score: Shown when the XDR license is active
- Ticket Status: The current ticket status (New/Assigned/In Progress/Submitted/Rejected/Approved/Closed)
- Change Status: Switch the ticket status using Close or Reopen
- Attack: Whether the detected event is a true positive or false positive
- Incident: Whether this constitutes an actual security incident
Analyzing evidence
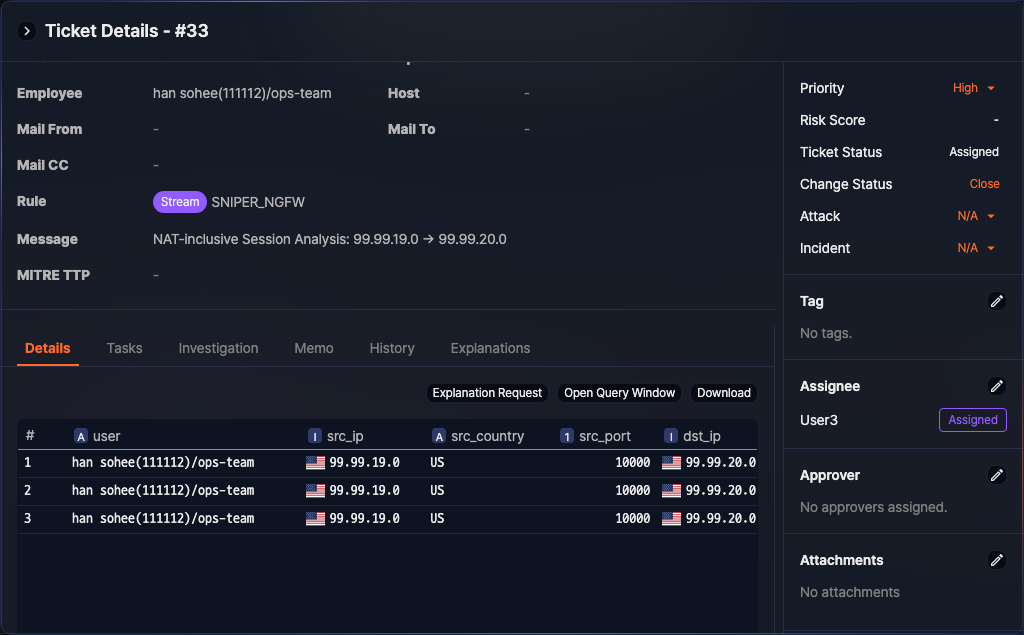
For tickets generated by detection scenarios, the Details tab shows the raw data that triggered the event. For example, if a host scan was detected, the tab displays information such as the source/destination IP addresses and ports used in the scan.
You can also search for previous tickets related to the source IP, destination IP, or host, and check the reputation in VirusTotal.
Analysts start by reviewing the evidence to determine whether there is a genuine threat or anomaly, record their response in the Memo tab, then update the ticket status to complete the process.
Edit ticket
Click a ticket in the ticket list to open the ticket detail side panel on the right. You can edit the ticket title and body in this panel. Tickets automatically generated by detection scenarios cannot be edited.
Edit title
Edit the title directly in the title input field at the top of the ticket detail panel, then click Save.
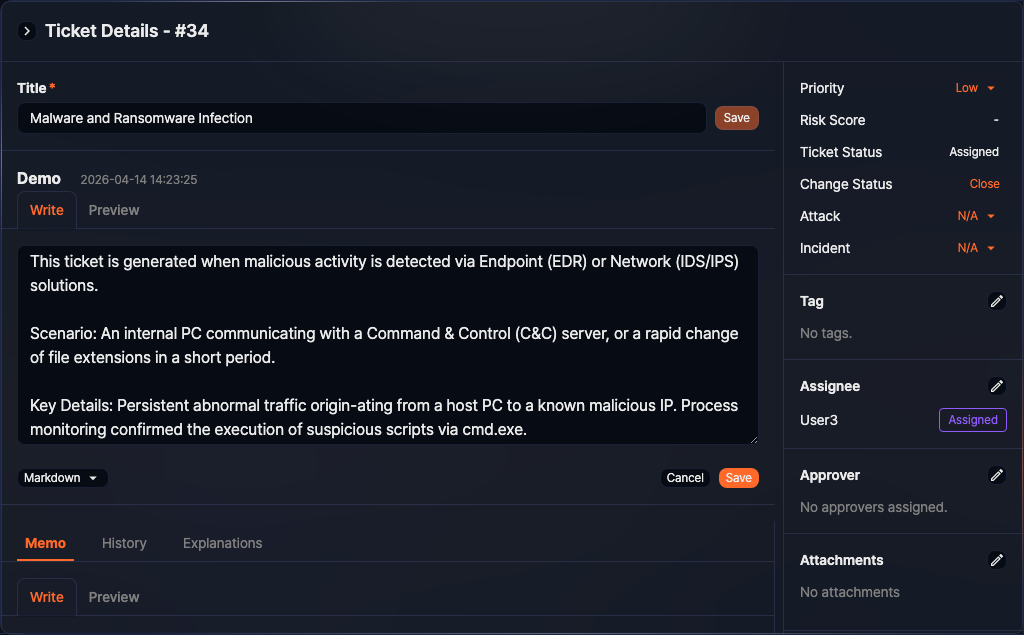
Edit body
-
Click
 at the top right of the ticket body area in the ticket detail panel.
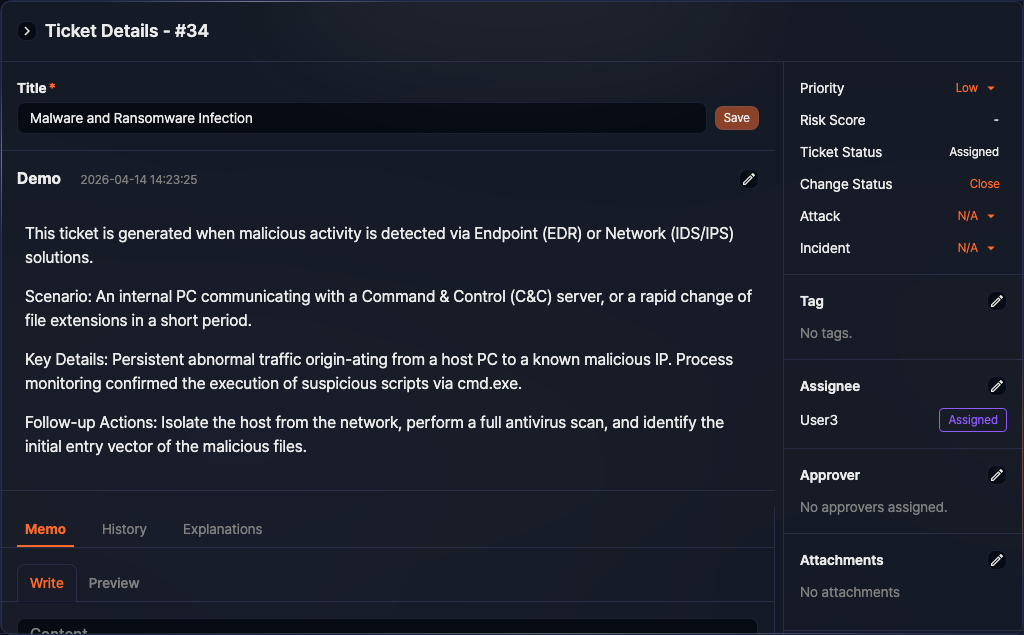
-
When edit mode is activated, modify the content.
- Analysis Ticket: Edit the body in Markdown or plain text format.
- Detection-based Ticket: Modify field values in the structured field list.
-
Click Save to apply the changes, or click Cancel to discard.
Ticket operations
Assignees perform response actions on the monitored system, record their work in the ticket, and update the status as their work progresses.
Assign assignees and approvers
If assignees and approvers have not yet been set, a Sonar administrator can click ![]() in the Assignee or Approver section of the right sidebar to assign them.
in the Assignee or Approver section of the right sidebar to assign them.

Record response actions
Record response actions in the Memo tab at the bottom of the ticket detail panel. You can write in Markdown format and attach files, just as you can in the ticket body. Recorded memos are visible in the ticket detail view.
Change ticket status
Change the ticket status from the Change Status item in the right sidebar. The buttons displayed vary depending on the logged-in user's role (assignee, approver, or administrator) and the current ticket status.

Regardless of the current status, any ticket can be set to closed immediately. If the ticket does not need to go through the response and approval process, click Close under Change Status to switch the ticket to closed immediately. Conversely, a closed ticket can be switched back to Assigned by clicking Reopen.
Submit for approval
When the assignee has finished the response work, click the Submit Approval button in the Approval section to request the approver's review. This button is shown only when the logged-in user is the assignee and an approver has been set.
Change assigned task status
Assignees can change their task progress status using the dropdown in the Assigned Task section. This section is shown only to users designated as the assignee of the ticket.
Change approval status
Approvers can approve or reject using the dropdown in the Approval Status section. This section is shown only to users designated as the approver of the ticket.
For the status transition flow, refer to the ticket process diagram in the Overview section at the top of this document.
Ticket explanation request
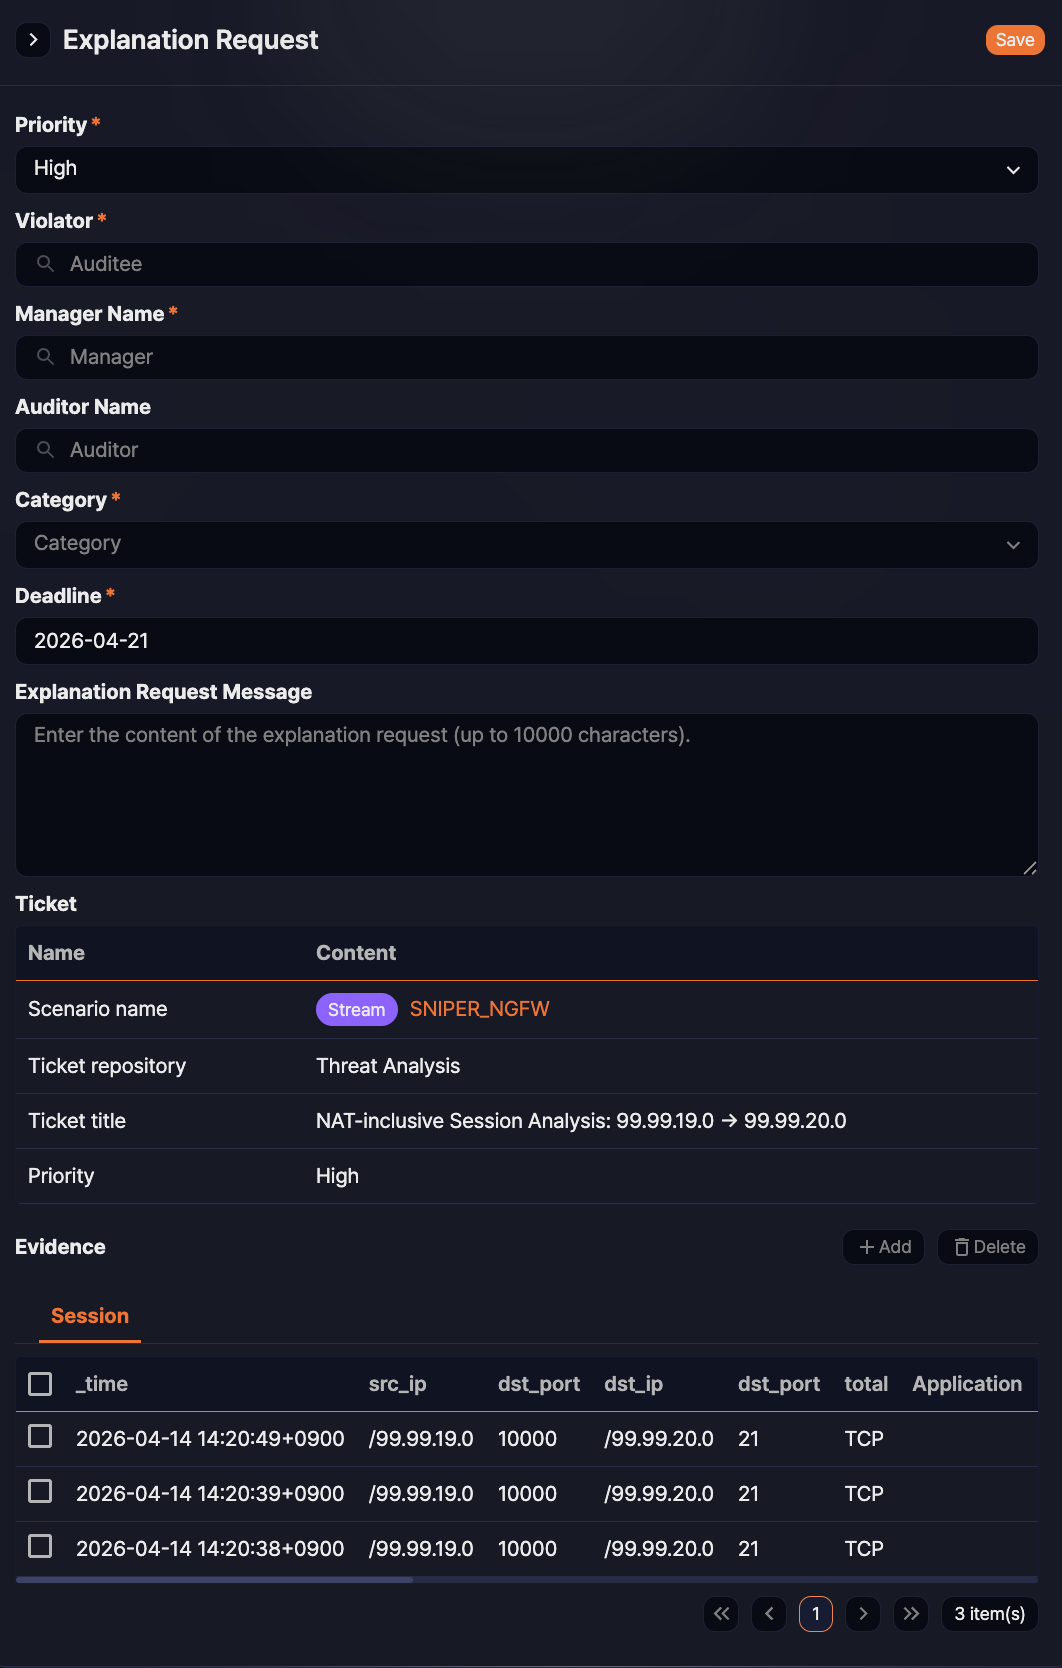
System tickets automatically generated by detection scenarios display a Details tab. When you need to request an explanation from a violator regarding the ticket content, click the Explanation Request button in this tab to open the explanation request form.
In the explanation request form, the ticket's evidence is automatically loaded. When you select a violator, the violator's department manager is automatically assigned as the primary reviewer. Fill in the following fields, then click Save to submit the explanation request.
| Field | Description |
|---|---|
| Priority | Select the priority of the explanation request. |
| Violator | Specify the employee from whom the explanation is requested. |
| Manager Name | The violator's department manager is automatically assigned. You can change this if needed. |
| Auditor Name | Optional. Assign a secondary reviewer if required. |
| Category | Select the explanation category. |
| Deadline | Set the deadline for submitting the explanation. |
| Explanation Request Message | Enter a message to convey to the violator. |
| Evidence | The ticket's evidence is automatically loaded. You can add or remove records. |
For detailed instructions on creating an explanation request, see Add explanation request.
Ticket propagation
Use the Propagation feature to quickly share ticket information with other users. In the ticket detail side panel, click ![]() in the Propagation section of the right sidebar to open the propagation dialog.
in the Propagation section of the right sidebar to open the propagation dialog.
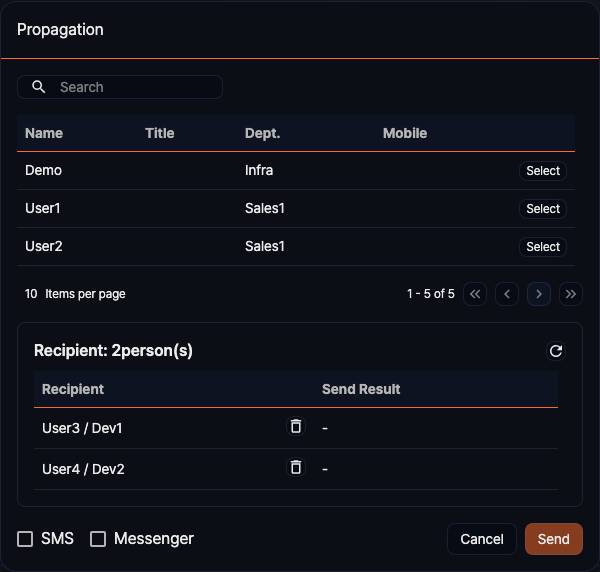
- Select recipients: Search for and add users to receive the notification.
- Select delivery method: At the bottom of the dialog, select SMS, Messenger, or both.
- Click Send.
When the transmission is complete, the send result is displayed next to each recipient in the list. Review the results and close the dialog.