Subnet Groups
Overview
Subnet Groups let you manage multiple IP address ranges as named groups. Security operators can organize networks with similar characteristics — such as internal networks, external partner networks, or exception ranges — into a single group in Policies > Subnet Groups.
Registered subnet groups can be used with Stream Rules, Batch Rules, the matchnet command, and the matchnet() function. All users can view subnet groups and their subnet lists, but only administrators can add, edit, or delete subnet groups and the subnets within them.
Search subnet groups
You can view or search the list of subnet groups in Policies > Subnet Groups.
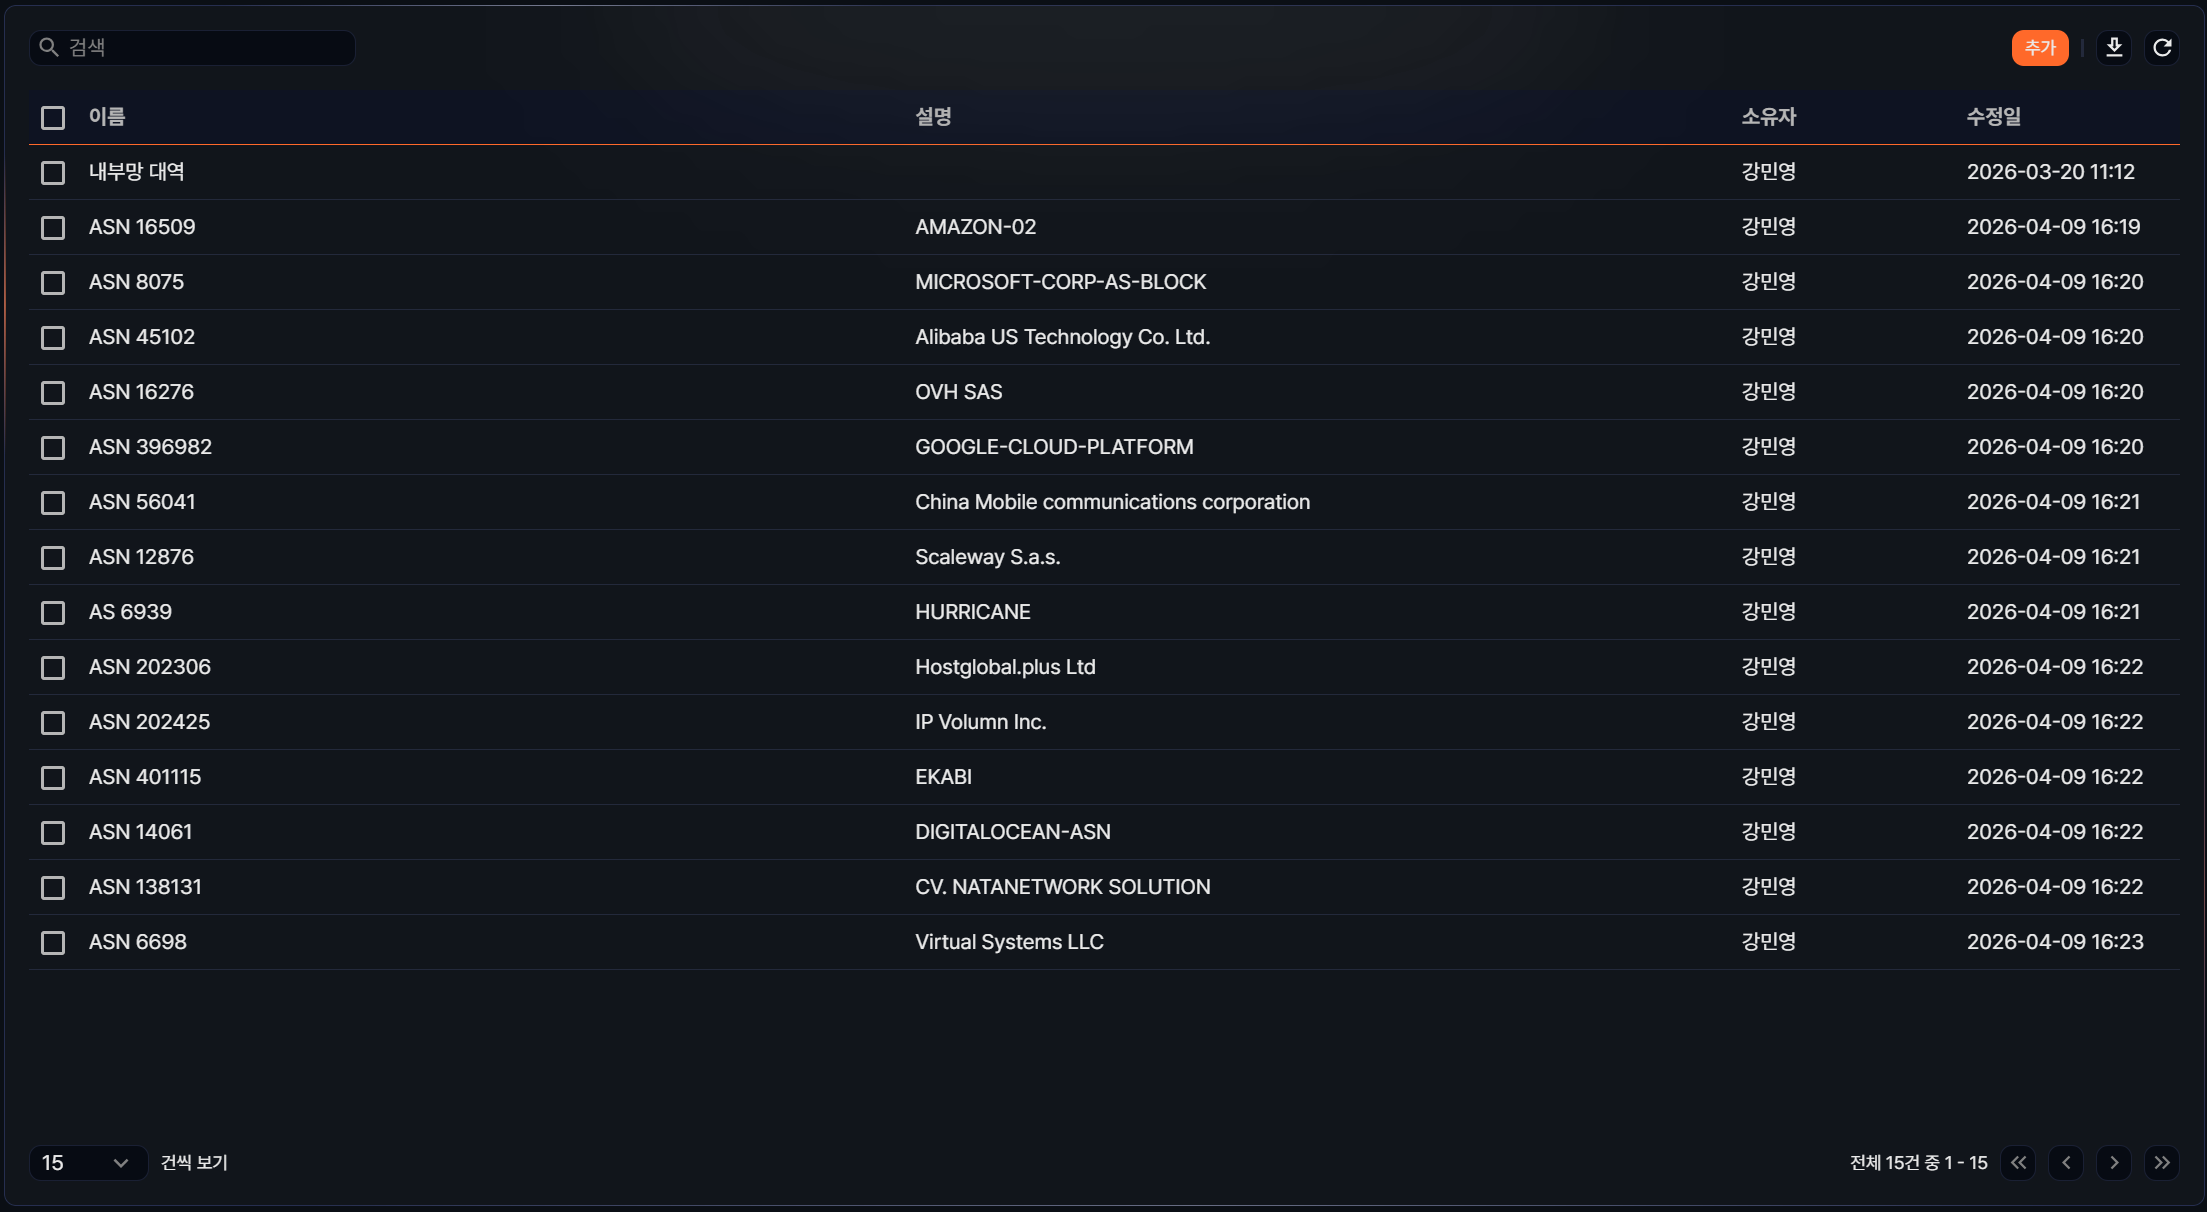
- Name: The name of the subnet group.
- Description: A description of the subnet group.
- Owner: The user account that created the subnet group.
- Modified At: The date and time the subnet group was last modified.
To find a specific subnet group in the list, use the search tool in the toolbar. You can search by IP address and general keywords at the same time.
- Entering only an IP address finds subnet groups that include that IP address.
- Entering only a keyword finds subnet groups whose Name or Description contains the keyword.
- Entering both an IP address and a keyword finds subnet groups that include the IP address and whose Name or Description contains all the keywords.
Download the list
To save the subnet group list to your local PC, click ![]() in the toolbar.
in the toolbar.
Refresh the list
To refresh the subnet group list with the latest data, click ![]() in the toolbar.
in the toolbar.
Add a subnet group
To create a new subnet group for reuse in detection policies or queries, follow these steps.
-
In Policies > Subnet Groups, click Add in the toolbar.
-
On the Add Subnet Group screen, enter the group information.
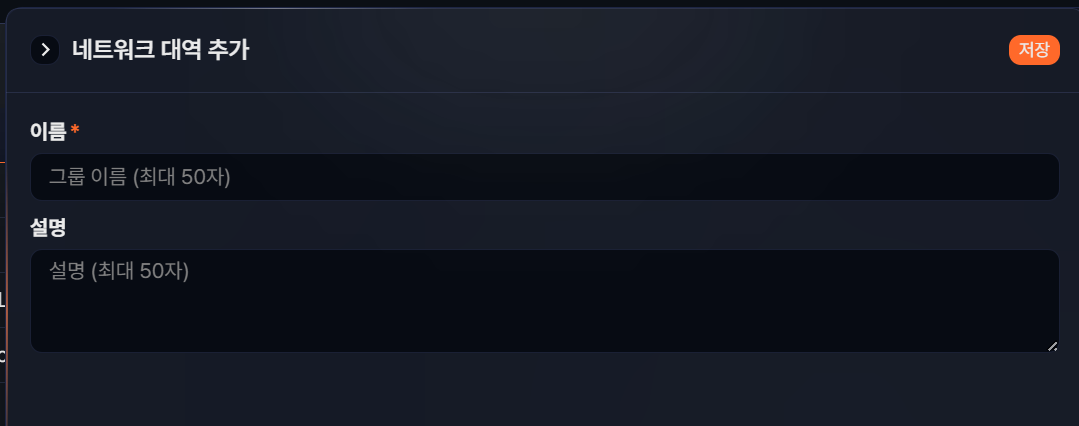
- Name: The name of the subnet group (required, up to 50 characters).
- Description: A description of the subnet group (up to 50 characters).
-
Review the information you entered, then click Save.
Edit a subnet group
To rename or update the description of an existing subnet group, follow these steps.
- Click the subnet group row you want to edit in the subnet group list.
- On the Edit Subnet Group screen, update the information and click Save.
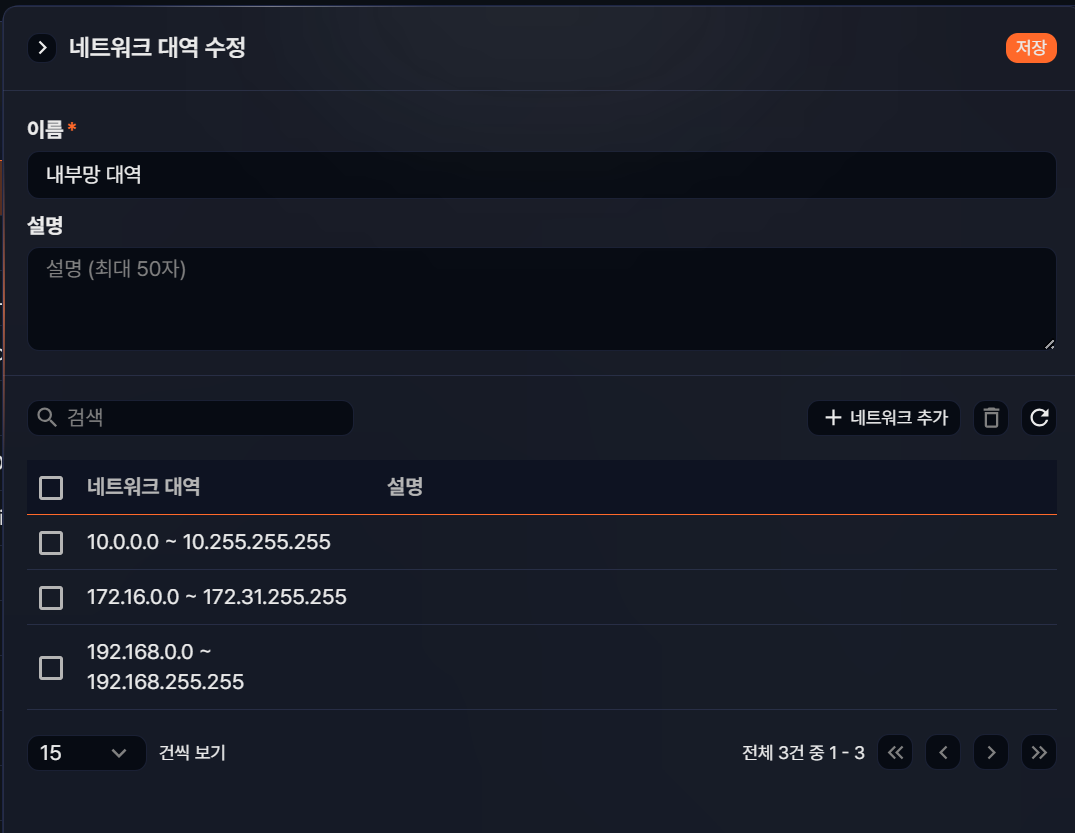
Search subnets
To review or organize the subnets registered in a group, check the subnet list at the bottom of the edit screen.
- Subnet: The registered network information, displayed in single IP address, IP address range, or CIDR format.
- Description: A description of the subnet.
You can also use the search tool in the subnet list. The search behaves as follows:
- Entering only an IP address finds subnets that include that IP address.
- Entering only a keyword finds subnets whose Description contains the keyword.
- Entering both an IP address and a keyword finds subnets that include the IP address and whose Description contains all the keywords.
Add a subnet
To register a subnet entry within a subnet group, follow these steps.
-
Click the subnet group row you want to edit in the subnet group list.
-
Click Add Subnet in the subnet list toolbar on the edit screen.
-
In the Add Subnet dialog, enter the type and value.
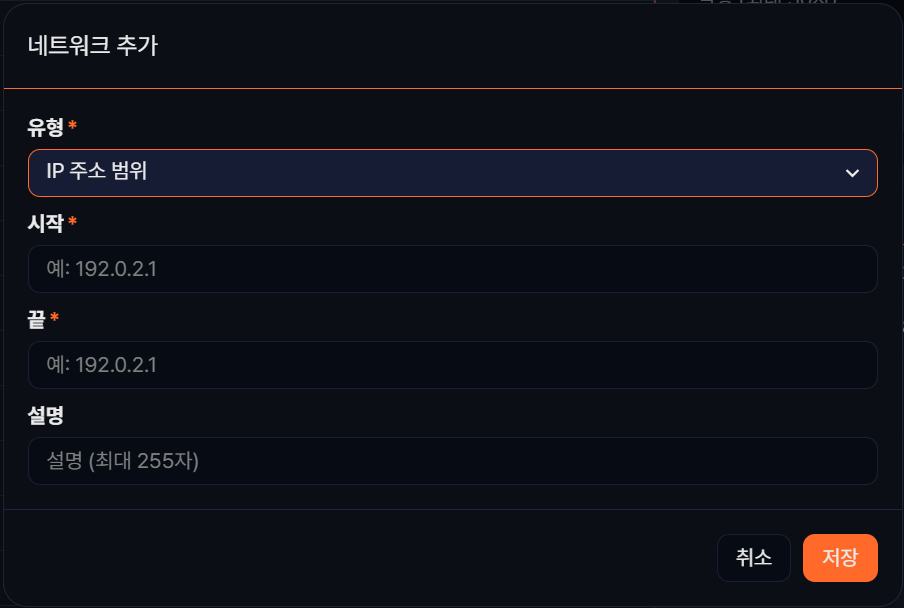
- Type: The format of the subnet to register (options:
IP Address Range,Single IP Address,CIDR). - When IP Address Range:
- Start: The starting IPv4 address of the range (required).
- End: The ending IPv4 address of the range (required). Must be greater than the start IP.
- When Single IP Address:
- IP Address: The IPv4 address to register (required).
- When CIDR:
- Network Address: The base IPv4 address for the CIDR (required).
- Bits: The CIDR prefix length (required, range: 1–32).
- Description: A description of the subnet (up to 255 characters).
- Type: The format of the subnet to register (options:
-
Review the information you entered, then click Save.
Edit a subnet
To edit a registered subnet entry, follow these steps.
- Click the subnet group row you want to edit in the subnet group list.
- Click the subnet row you want to edit in the subnet list on the edit screen.
- In the Edit Subnet dialog, update the information and click Save.
Delete subnets
To remove subnets you no longer want to manage in the group, follow these steps.
- Click the subnet group row you want to edit in the subnet group list.
- Select the items to delete in the subnet list on the edit screen.
- Click the delete icon in the toolbar.
- In the Delete Subnet dialog, review the items to delete and click Delete.
Use subnet groups
You can use registered subnet groups in the following ways.
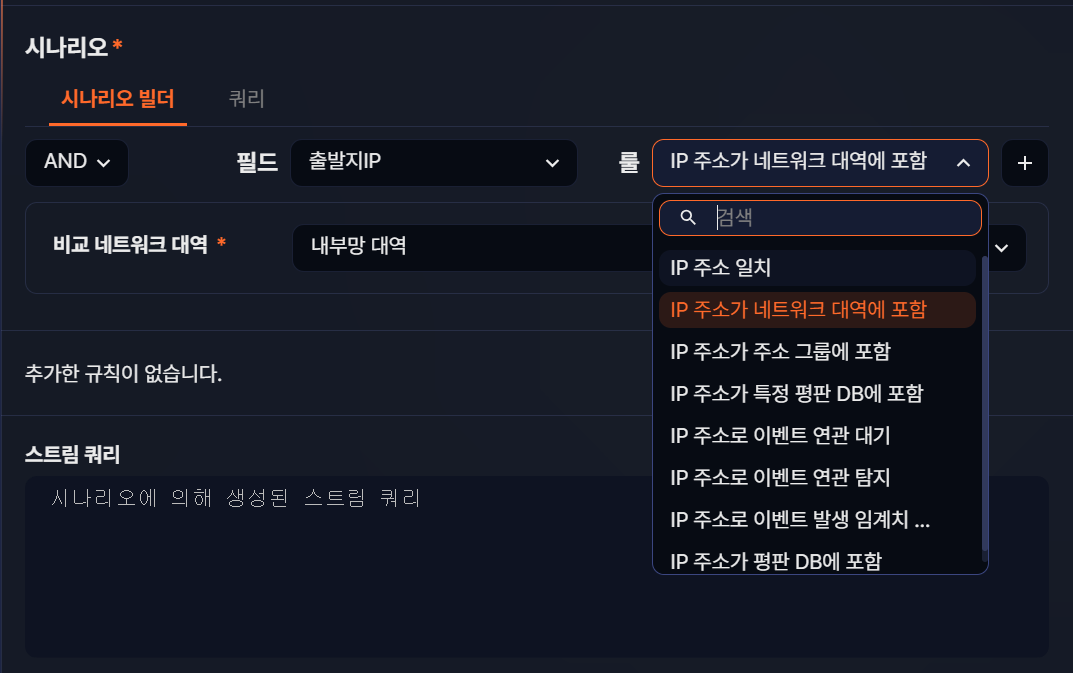
Scenario builder
In the scenario builder in Stream Rules, you can add a condition that checks whether an IP address in a given field falls within a specific subnet group. This lets you classify events based on predefined ranges such as internal networks, DMZ, or specific partner networks.
Queries
In queries, use the matchnet command and matchnet() function to determine whether an IP address in a given field is included in a specific subnet group. You can use the same approach in queries within stream rules or batch rules.
Delete subnet groups
To delete subnet groups you no longer use, follow these steps.
- Select the checkboxes of the subnet groups you want to delete in the list.
- Click Delete in the toolbar.
- In the Delete Subnet Group dialog, review the items to delete, then click Delete.