Scheduled Queries
Overview
In Analysis > Scheduled Queries, you can register and manage queries that need to run repeatedly. This page is useful when a query should be executed on a fixed interval or when one query should start only after another scheduled query finishes.
For example, if you want to review allowed firewall traffic regularly, you can save a scheduled query and keep tracking its recent run status from the same page.
View and Search the Scheduled Query List
Open Analysis > Scheduled Queries to see the list page.
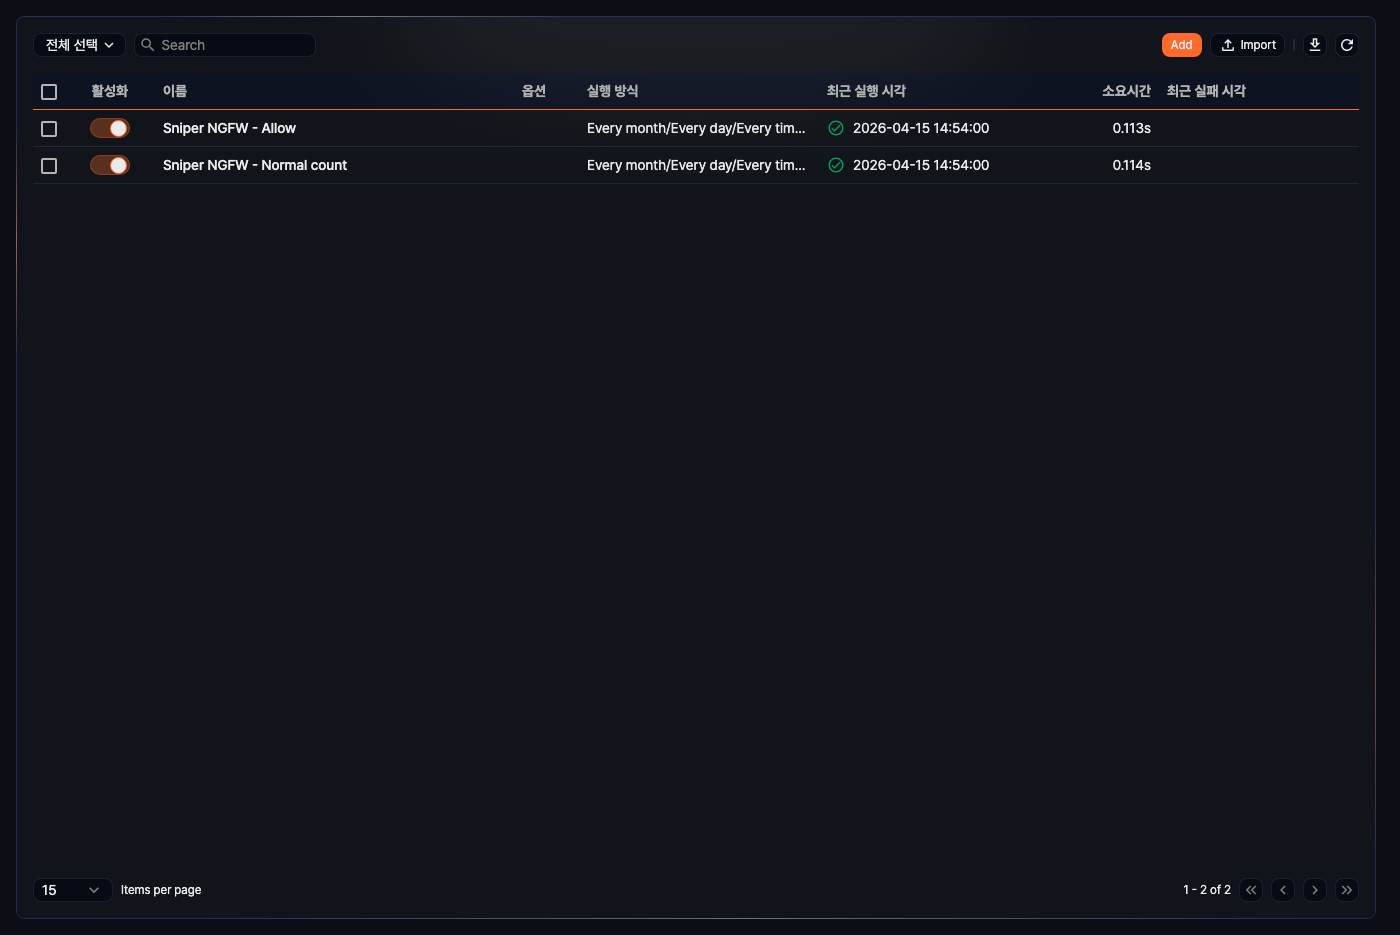
- Enabled: Shows whether the scheduled query is active. You can toggle it directly from the list.
- Name: The scheduled query name. Click it to open the detail panel on the right.
- Options: A share icon appears when result handoff is enabled.
- Execution Rule: For scheduled runs, the CRON value is shown in readable text. For workflow runs, the preceding query name and condition are shown together.
- Last Run: Shows the latest run time with a state icon.
- Elapsed: Shows the elapsed time of the latest run in seconds.
- Last Failure: Shows the latest failure time. If a failure reason exists, you can inspect it from the tooltip.
The upper area lets you narrow the list with these controls:
- Search keyword: Finds scheduled queries by name.
- Status filter: Choose All, Activated, Deactivated, Succeeded, or Failed.
Enable or Disable Scheduled Queries
To change one item, click the Enabled toggle in the list.
To change multiple items at once:
- Select the scheduled queries in the list.
- Click Activate in the selected-action area, then choose Activate or Deactivate.
- Confirm the target names in the confirmation dialog.
Run or Stop Scheduled Queries
Users can manually run or stop scheduled queries regardless of the configured execution rule.
-
Select the scheduled queries to run or stop.
-
Click Run in the selected-action area, then choose Run or Stop.
-
If one of the selected queries is already running, a run-policy dialog appears.
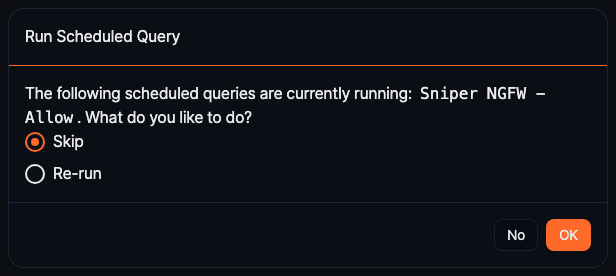
- Skip running queries: Runs only the queries that are not already in progress.
- Re-run: Stops the running query and starts it again.
Download the List
Click the download icon on the toolbar to export the current filtered list.
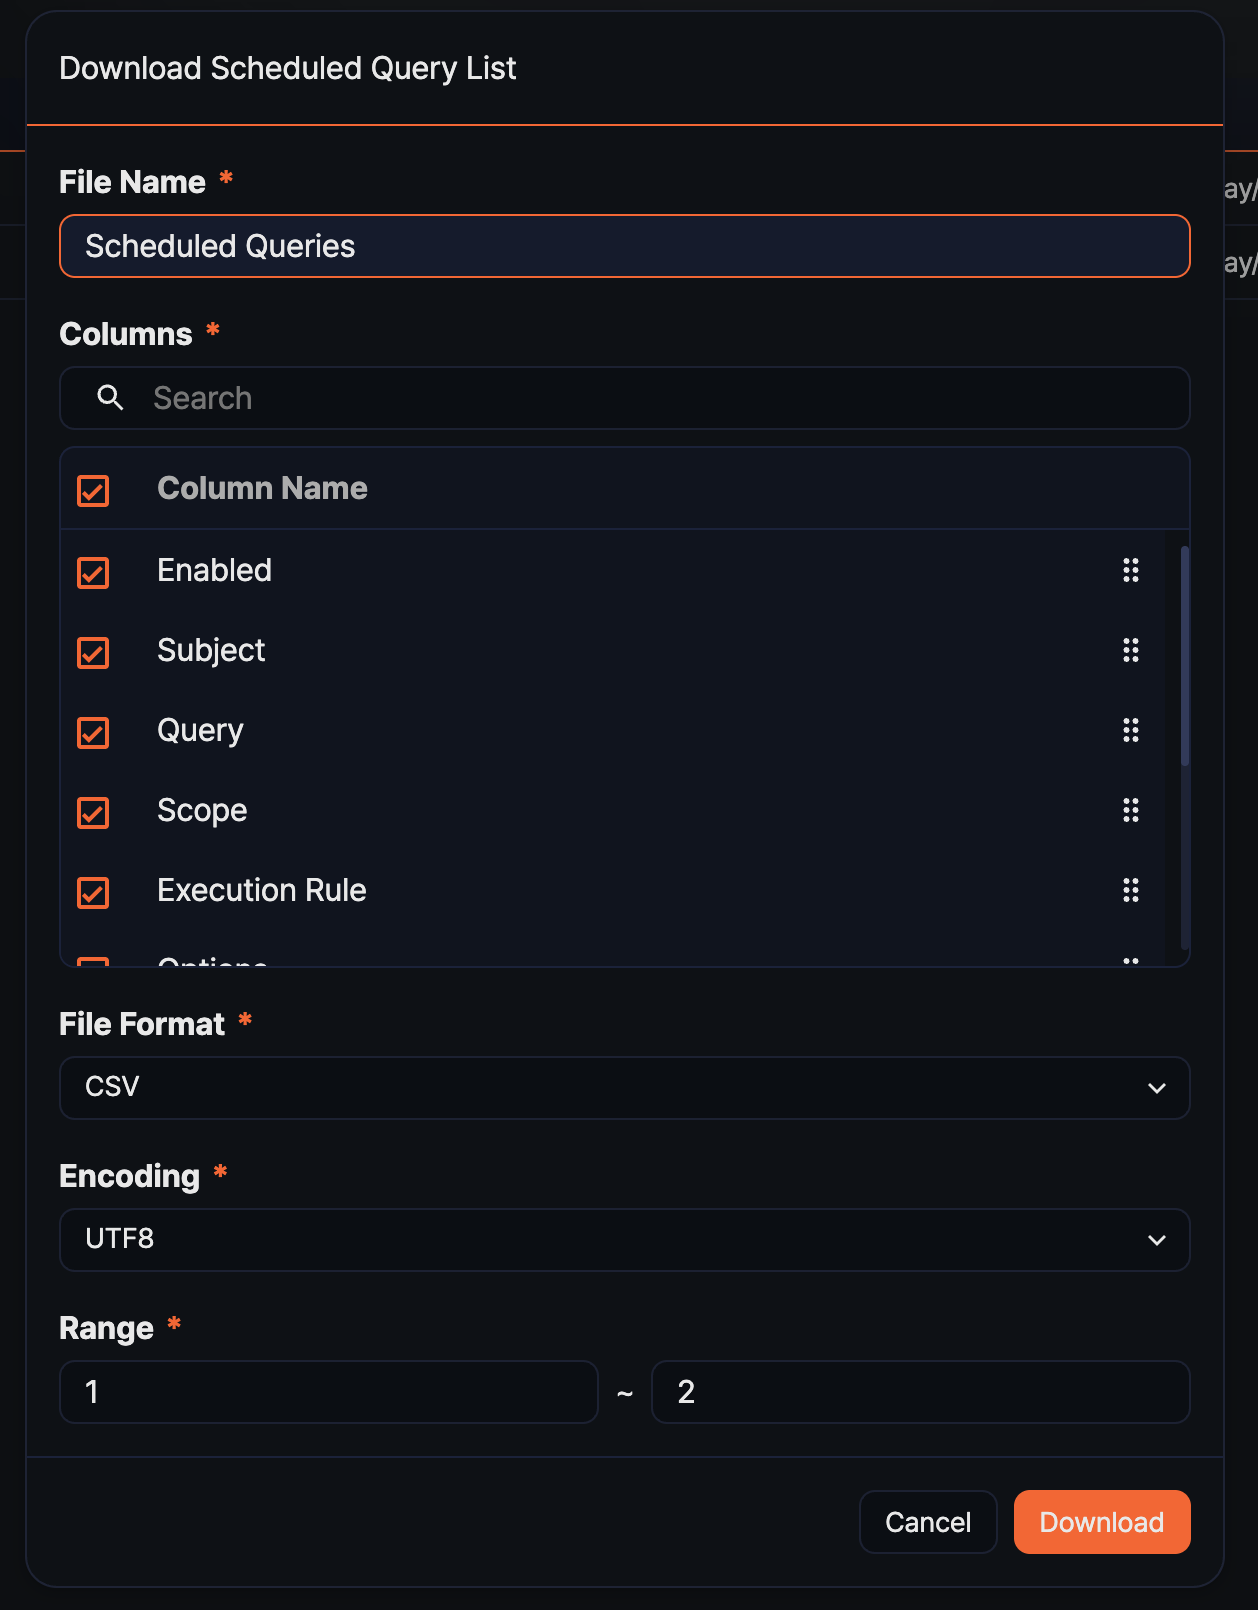
- File Name: Name of the exported file.
- Columns: Columns to include in the export.
- File Format: Choose CSV, JSON, HTML, Excel XML, or Microsoft Word.
- Encoding: Character encoding for the file.
- Range: Export the full list or a selected range.
Refresh the List
Click the refresh icon on the toolbar to reload the list while keeping the current keyword and status filter.
Add a Scheduled Query
To register a repeated inspection query, configure it in the right-side panel.
-
Click Add on the toolbar.
-
Fill in the fields in the Add Scheduled Query side panel.
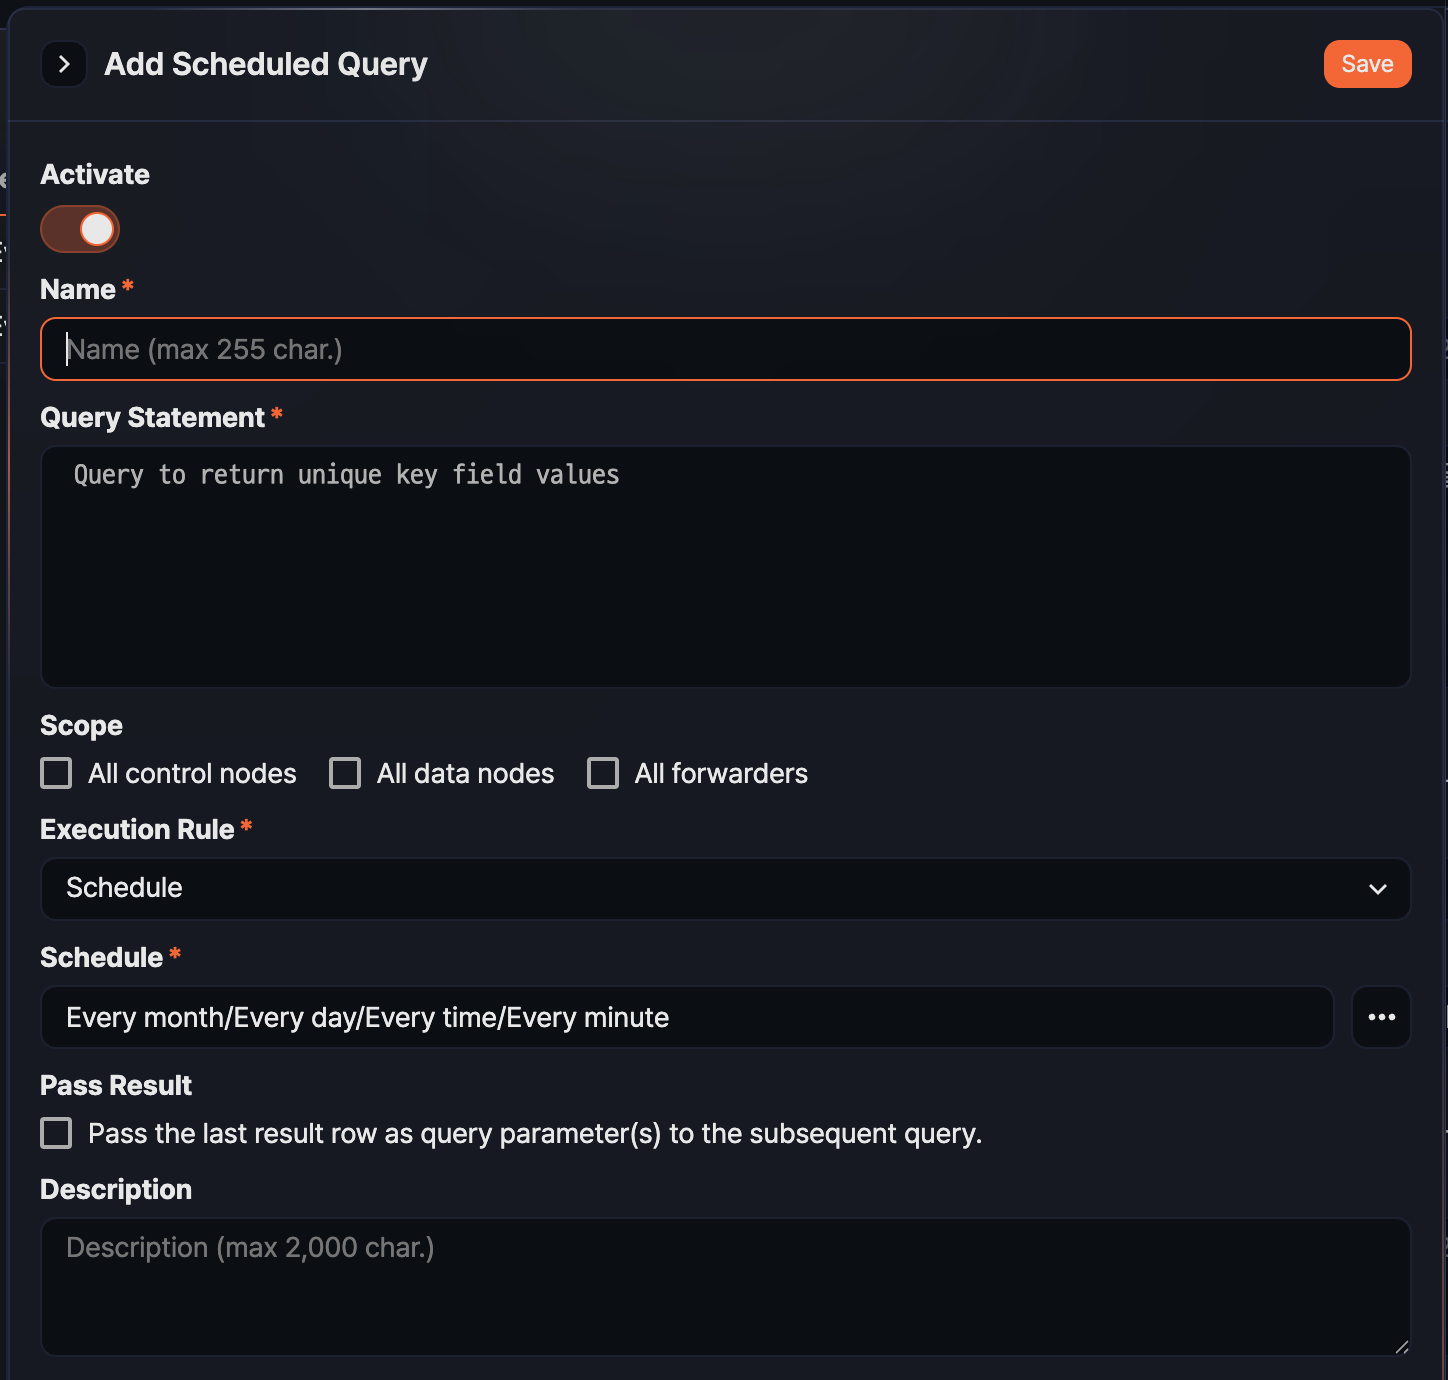
- Enabled: Decides whether the query is active immediately after saving.
- Name: Scheduled query name (required, up to 255 characters). It cannot be blank-only and must be unique.
- Query Statement: Logpresso query to run (required, up to 10,000 characters). The screen validates the query before saving.
- Target: Node scope where the query runs. You can combine All control nodes, All data nodes, and All forwarders. If nothing is selected, the query runs on the active control node.
- Execution Rule: Selects how the query starts (required).
- Schedule: Runs according to a CRON schedule.
- Run by another query result: Runs after a preceding scheduled query finishes with a matching condition.
- Interval: Appears when Schedule is selected (required). Set the CRON expression with the built-in input.
- Execution Condition: Appears when the workflow option is selected (required).
- After finished: Runs when the preceding query finishes, regardless of success or failure.
- After succeeded: Runs only when the preceding query succeeds.
- After failed: Runs only when the preceding query fails.
- Preceding query selector: Pick a preceding scheduled query from the searchable list. Self-reference and circular reference are not allowed.
- Output Parameter: Passes the result of this query to a downstream scheduled query.
- Description: Free-text description for the scheduled query (up to 2,000 characters).
-
Click Save in the upper-right corner of the panel.
Edit a Scheduled Query
To update an existing item, open its detail panel first and then switch to edit mode.
- Click the scheduled query name in the list.
- Click Edit in the right-side detail panel.
- Update the fields and click Save.
Export Scheduled Queries
Use export when you want to archive selected scheduled queries or move them to another system.
- Select the scheduled queries in the list.
- Click Export in the selected-action area.
- Verify the downloaded ZIP file in the browser.
Import Scheduled Queries
Use the import modal to register scheduled queries from an exported ZIP file.
-
Click Import on the toolbar.
-
Choose a ZIP file in the file field.
-
Click OK to upload it.

Delete Scheduled Queries
Delete scheduled queries from the list when they are no longer needed.
-
Select the scheduled queries to remove.
-
Click Delete on the toolbar.
-
Review the names in the confirmation dialog.
-
If any selected query is running, choose how to handle it before completing the deletion.
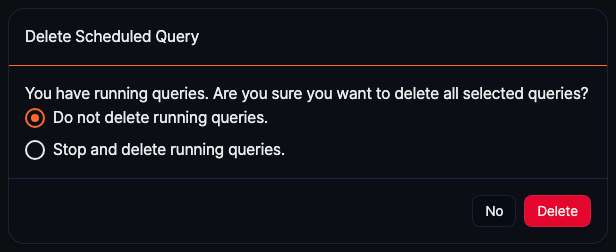
- Do not delete running queries: Leaves running queries in place and deletes only the rest.
- Stop and delete running queries: Stops the running queries and deletes them together.