Batch Rules
Overview
Batch rules run Logpresso queries or datasets on a schedule to analyze logs and table data accumulated over a period of time. Security operators manage rules under Policies > Batch Rules, and detection results can flow into follow-up features such as Event Summary, Tickets, Explanations, and Playbooks.
While stream rules are a good fit for detections that must react immediately, batch rules are well suited to finding low-frequency attacks, anomalous behavior that spans long periods, and patterns that need to be evaluated across many logs. For example, you can use batch rules to find port scans, repeated failures, or signs of lateral movement from accumulated access or firewall logs over a given period. In Sonar 5, you can link rules to MITRE ATT&CK techniques and tactics to manage detection objectives in a more structured way.
Because batch rules use Logpresso query commands and functions, you can write scenarios flexibly. For example, you can analyze the activities of specific users to predict related potential threats and detect suspicious behavior.
In most cases, batch rules issue tickets on event detection or request an explanation from the actor. Excessive ticket creation increases the workload of malware analysts and security operators, so you should minimize duplicate tickets. Logpresso Sonar consolidates events with the same content into a single ticket based on the alert message and ticket subject, or based on a specified duplicate-detection field.
Search Batch Rules
You can view or search the list of batch rules in Policies > Batch Rules.
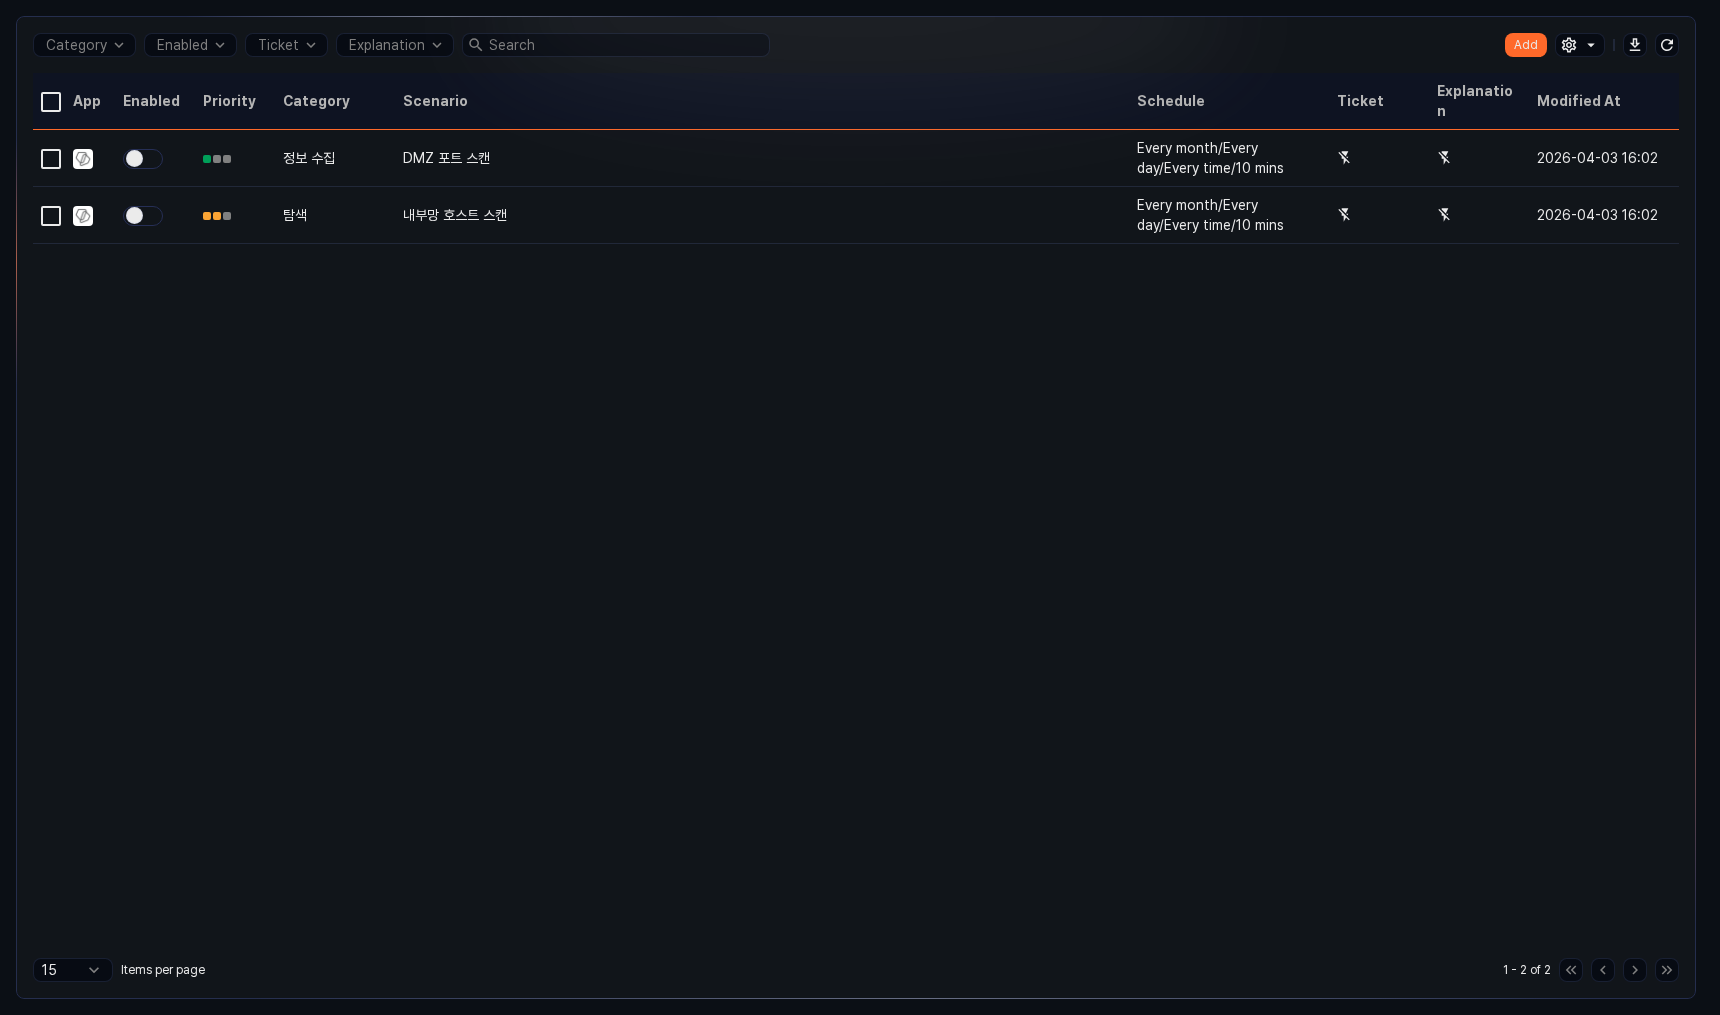
- App: Icon indicating the app associated with the rule. Default rules and user-added rules show the Logpresso icon, and rules installed from apps show the app icon.
- Enabled: Toggle button to enable/disable the rule (
 : enabled,
  : disabled)
 - Priority: Rule priority (high, medium, low)
- Category: Category assigned to the rule
- Scenario: Name of the batch rule
- Schedule: Execution interval of the rule
- Ticket: Whether ticket issuance is configured
- Explanation: Whether explanation request is configured
- Modified At: Date the rule was last modified (or created)
To find a specific batch rule in the list, use the search tool in the toolbar. Enter a keyword to filter the list.
Use the Category, Enabled, Ticket, and Explanation filters in the toolbar to narrow the list to just the rules you need.
Enable and Disable Batch Rule
To enable or disable a batch rule, click the toggle button in the Enabled column of the rule (: enabled, : disabled).
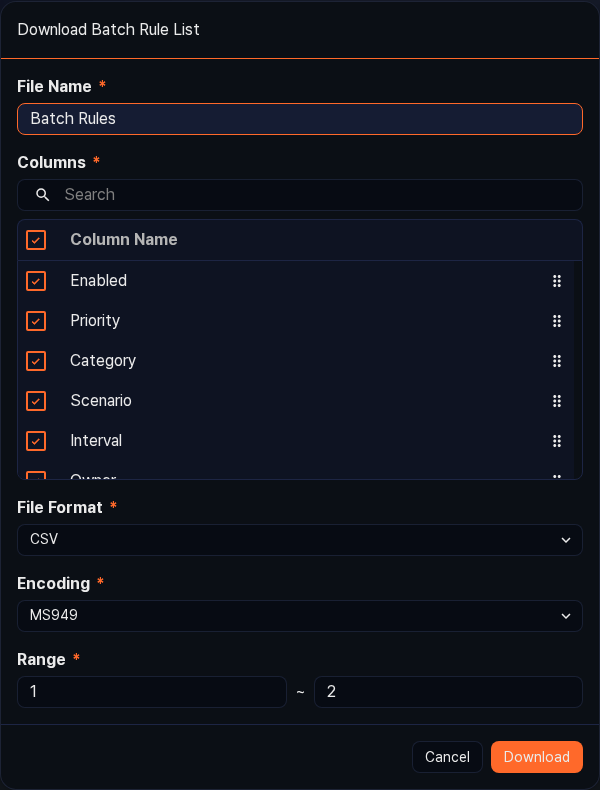
Download Batch Rule List
To save the list of batch rules to your local PC, click ![]() in the toolbar.
in the toolbar.
Refresh Batch Rule List
To refresh the list with the latest information, click ![]() in the toolbar.
in the toolbar.
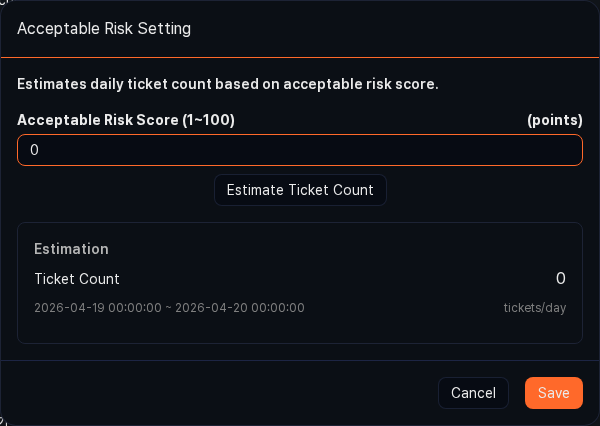
Acceptable Risk Setting
In environments where an XDR license is active, you can set an acceptable risk score on a batch rule to estimate the expected number of tickets.
To set an acceptable risk:
-
In the batch rule list, select the checkbox for the rule you want to configure.
-
Click
 in the toolbar, and then click Acceptable Risk in the menu that appears.
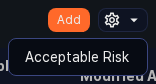
-
In the Acceptable Risk Setting dialog, enter the Acceptable Risk Score (1–100) and click Estimate Ticket Count to check the estimated daily ticket count. Click Save to apply, or Cancel to discard.
Add Batch Rule
To add a batch rule:
-
Go to Policies > Batch Rules and click Add in the toolbar.
-
On the New Batch Rule screen, configure the common settings.
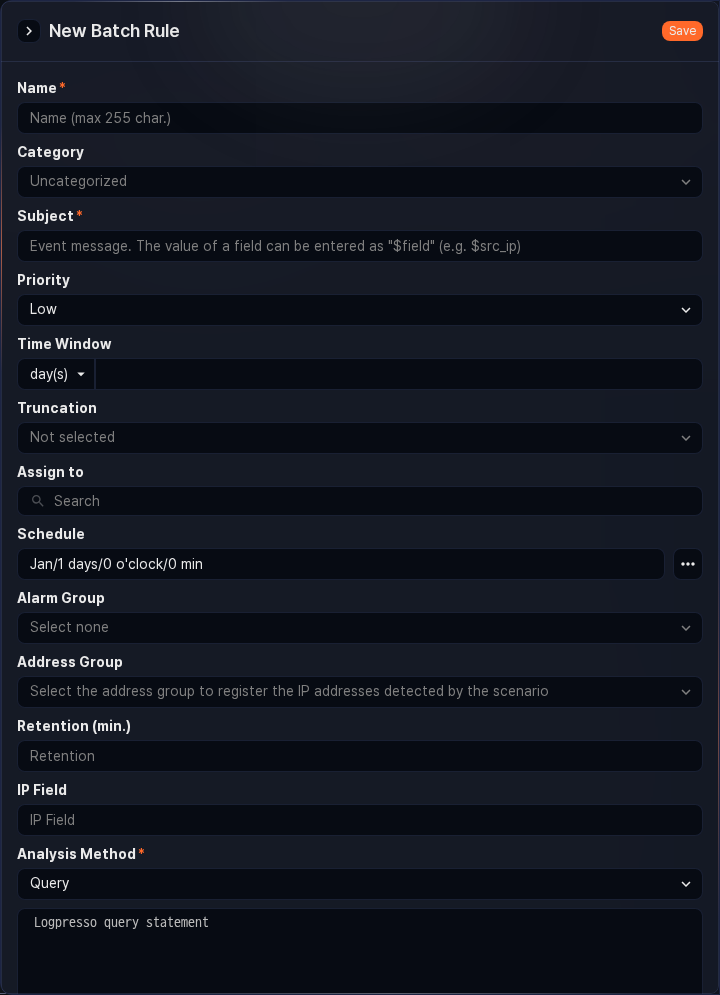
-
Name: Rule name (up to 255 characters). Duplicate names are not allowed.
-
Category: Rule category. The category appears under Category in the detection list under Analysis > Event Summary. You can pre-register the categories you need in Rule Categories.
-
Subject: Title assigned to the ticket on event detection.
- If you enter a field name defined in the log schema in the
$fieldNameor$fieldName$format, the message is generated by fetching the field value from the log that was the basis for the event detection (for example,$src_ip). If the field name contains Korean characters, always use the$fieldName$format. - If Detect Duplicates on in Advanced is not configured, duplicate tickets are prevented based on whether the generated message (up to 2,000 characters) is the same.
- If you enter a field name defined in the log schema in the
-
Priority: Priority of detected events (high, medium, low).
-
Time Window: Applies when Analysis Method is Query. Defines the target period for data analysis by calculating the
fromandtoparameters. Enter a numeric value with a time unit (seconds, minutes, hours, days) (default: not set). To use this feature, the data-fetching command in the query (for example,table) must include thefrom=$("from") to=$("to")option.For example, if you set Time Window to 30 days, each time the query runs (for example, a query that starts with
table from=$("from") to=$("to") FW_*), it fetches data from tables whose names start withFW_for the 30 days preceding the execution time (range: 1 – 3,153,600,000). -
Truncation: Time precision to apply to the fetched data. Select a time unit (default: none; options: none, seconds, minutes, hours, days). Selecting a unit aligns the data's timestamp precision to that unit.
For example, if Time Window is 5 minutes and Truncation is seconds, milliseconds are discarded from the analyzed data's timestamps and the values are rounded to the nearest second.
-
Assign to: User account to assign the issued ticket to. You can select one or more accounts. If not specified, the ticket is created without an assignee.
-
Schedule: Execution schedule of the rule. Click the ... button to configure the schedule in CRON syntax.
-
Alarm Group: Alarm group to receive alarms when an event is detected.
NoteConfigure how alarms are received in the alarm group.
-
Analysis Method: Data analysis method to run on the schedule (default: Query; options: Dataset, Query).
- Dataset: Select a dataset to run from the Dataset list.
- Query: Enter a query directly (up to 10,000 characters).
-
Description: Detailed description of the rule (up to 2,000 characters).
-
-
To link a batch rule to a specific app and MITRE ATT&CK TTPs for management purposes, configure the following settings:
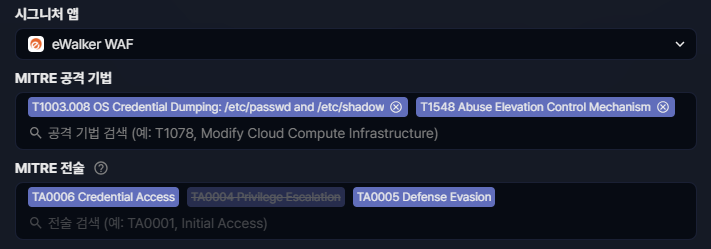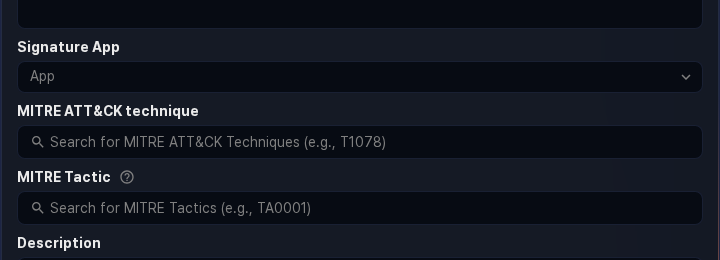
- Signature App: Select the app associated with the rule. Selecting an app makes it easier to identify the origin and application context of the rule.
- MITRE ATT&CK technique: Search for one or more MITRE ATT&CK techniques the rule is intended to detect. You can search by technique ID (for example,
T1078) or by name; selected items appear as tags. - MITRE Tactic: Search for the MITRE ATT&CK tactics the rule responds to. You can also search by tactic ID (for example,
TA0001) or by name.
-
To separately manage the attacker's IP address or anomalous actor's IP address, or to forward address group information to firewalls or IPS devices, configure the following settings:
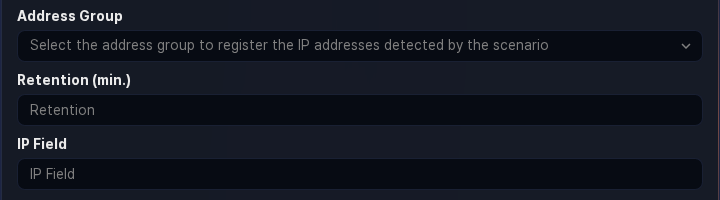
- Address Group: Address group to which the IP address of the field specified as IP Field is added when an event is detected. Add new address groups as needed in Policies > Address Groups.
- Retention: Duration (in minutes) to retain the IP address in the address group after it is added as a suspected threat IP. When the specified period elapses, the IP address is automatically removed from the address group. If not specified, the IP address remains permanently (range: 1–100,000,000).
- IP Field: Name of the IP address field to add to the address group on event detection. Enter the name of the IP-related field defined in the log schema (for example,
src_ip,dst_ip) (up to 50 characters).
NoteFor block integration with third-party security systems, see [Response Targets](section-response-target).
-
If a detected event is related to an employee in your organization, you can request an explanation from that employee.
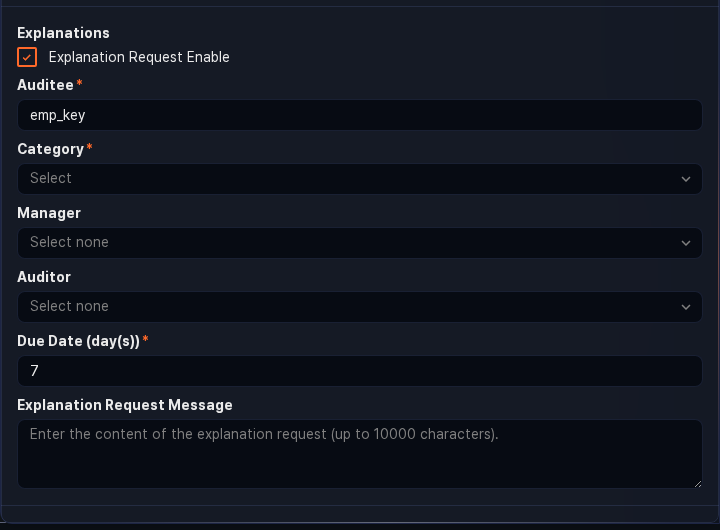
-
Explanation Request: Whether to enable explanation requests (default: disabled).
-
Auditee: Field containing the employee ID of the explanation target.
When a threat is detected, an explanation request email is automatically sent to the employee mapped to the specified employee ID. In this case, employee information (employee ID, login name, email) must first be configured in Users > Employees.
-
Category: Category of the explanation. If necessary, click Manage Categories under Response > Explanations to add more.
-
Manager: Primary reviewer of the explanation. You can assign an account directly if needed.
-
Auditor: Secondary reviewer of the explanation. For details on primary and secondary reviewers, see Explanations.
-
Due Date (days): Deadline for submitting the explanation (default: 7 days). After the deadline, the auditee can no longer submit an explanation.
-
Explanation Request Message: Message sent with the explanation request. You can include field macros such as
$src_ipor$dst_ipto convey detection context.
NoteTo request an explanation, a field named `emp_key` is required. If this field does not exist, write a query in step 2 that creates the `emp_key` field by mapping user accounts or IP addresses to employee IDs.
-
-
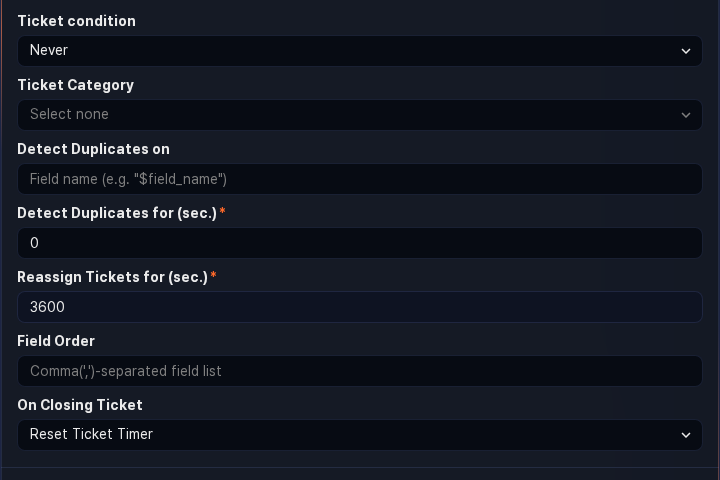
To issue a ticket on event detection, configure the Advanced settings.
-
Ticket condition: Specifies when a ticket is issued based on the batch detection result.
- Always: A ticket is always issued on detection.
- Occur when acceptable risk score is exceeded: A ticket is issued only when the acceptable risk score is exceeded (available with an XDR license).
- Never: No ticket is issued.
-
Ticket Category: Ticket Category used to classify tickets during security operations (default: none).
NoteTo automatically generate a ticket on event detection, you must specify a ticket category. You can also control ticket creation in a playbook triggered by the event. If you want to control ticket creation in a playbook, do not set this field.
-
Detect Duplicates on: Names of fields used to determine duplicates, entered in
$fieldNamemacro format separated by commas (,) (up to 2,000 characters). If not specified, the Subject string is used as the criterion.NoteFor example, if **Subject** is set to "C&C server connection: $src_ip -> $dst_ip" but you want to avoid generating excessive tickets when the same host connects to different C&C servers, set the duplicate detection key to `$src_ip`.
-
Detect Duplicates for: Duration during which duplicate events are ignored after a ticket is issued (default: 0; range: 0–86,400 seconds).
- When "0": Behavior is determined by Reassign Tickets for.
- When non-zero: Identical events are ignored for the specified period and are not used as supporting data in the ticket.
-
Reassign Tickets for: Duration during which no new tickets are issued for recurring events; instead, supporting data and occurrence counts are added to the existing ticket (default: 3,600; range: 0–86,400 seconds).
- When "0": A new ticket with the same title is created for each event occurrence.
- When non-zero: Supporting data and occurrence counts are added to the existing ticket during the specified period.
-
Field Order: Order in which log data fields appear in the ticket's supporting data. Enter field names separated by commas (
,) (up to 2,000 characters; special characters and pipe symbols are not allowed). -
On Closing Ticket: How to handle tickets after they are closed when Reassign Tickets for is enabled (default: Reset Ticket Timer).
- Keep Ticket Timer: Even after a ticket is closed, if the same threat event occurs before the merge timer expires, supporting data and the occurrence count are added to the closed ticket.
- Reset Ticket Timer: When a ticket is closed, the merge timer is also considered expired, and a new ticket is issued for subsequent identical threat events.
-
-
After verifying that the entered properties are correct, click Save.
Duplicate Batch Rule
To duplicate an existing batch rule:
- In the batch rule list, select the checkbox for the rule you want to duplicate. The action menu appears in the toolbar.
- Click Duplicate in the toolbar.
- In the Clone Scenario dialog, review the selected rules and click Duplicate. To cancel, click Cancel.
- A rule named "Copy of original rule name" is added in a disabled state.
Edit Batch Rule
To edit a batch rule:
- In the batch rule list, click the name of the batch rule you want to edit.
- On the Edit Batch Rule screen, update the information and click OK. For descriptions of the editable properties, see Add Batch Rule.
Run Batch Rule
To run a batch rule immediately:
- In the batch rule list, select the checkbox for the rule you want to run.
- The action menu appears in the toolbar. Click Run Now.
- If the rule detects an event, you can check the detection results in Response > Tickets or Analysis > Event Summary.
View batch rule version history
A new version is automatically created each time you add or edit a batch rule. On the Version History tab of the edit screen, you can review past versions and restore a specific version or duplicate it as a separate rule.
- In the batch rule list, click the name of the rule whose version history you want to review.
- Click the Version History tab at the top of the edit screen. Cards are listed from the most recent version in reverse chronological order.
Each version card shows the following information:
- The time the version was changed, the account that made the change, and the version number (e.g.,
csp changed it on 2026-05-14 15:36:48. - Version 22) - The batch query body at that version
- Change history: Shows the items changed compared to the previous version, in the format
Field changed to NewValue. (Previous value: ...). When more than three items changed, click the Show N more button to expand the full list, then click Collapse to fold it again. If nothing changed, it showsNo changes. - If the version was created by a restore, the base version number (e.g.,
Restored from version 5)
Restore a previous version
To roll a rule back to a previous version's settings:
- On the Version History tab, locate the card for the version you want to restore. The card for the version currently in use, and any version with no changes, does not show a Restore button.
- Click Restore on the card.
- In the confirmation dialog, review the version to restore and proceed with the restore.
- On success, the restored settings are created as a new version, and you return to the Settings tab. If validation fails, a dialog with the failure reason is displayed; click Manual Editing to load the settings you tried to restore into the Settings tab and edit them directly.
Restoring a rule requires Administrator privileges or higher.
Duplicate a previous version as a new rule
To create a separate rule based on a previous version's settings:
- On the Version History tab, click Duplicate on the card for the version you want to duplicate.
- In the Duplicate dialog, enter a name for the new rule and proceed with the duplication. The default name is
Rule name Version N (copy). - The new rule is added to the list in a disabled state with the name you entered.
Duplicating a rule requires Administrator privileges or higher.
Delete Batch Rule
To delete a batch rule:
- In the batch rule list, select the checkbox for the rule you want to delete.
- The action menu appears in the toolbar. Click Delete.
- In the Delete batch rule(s) dialog, review the selected rules and click Delete. To cancel, click Cancel.