Explanations
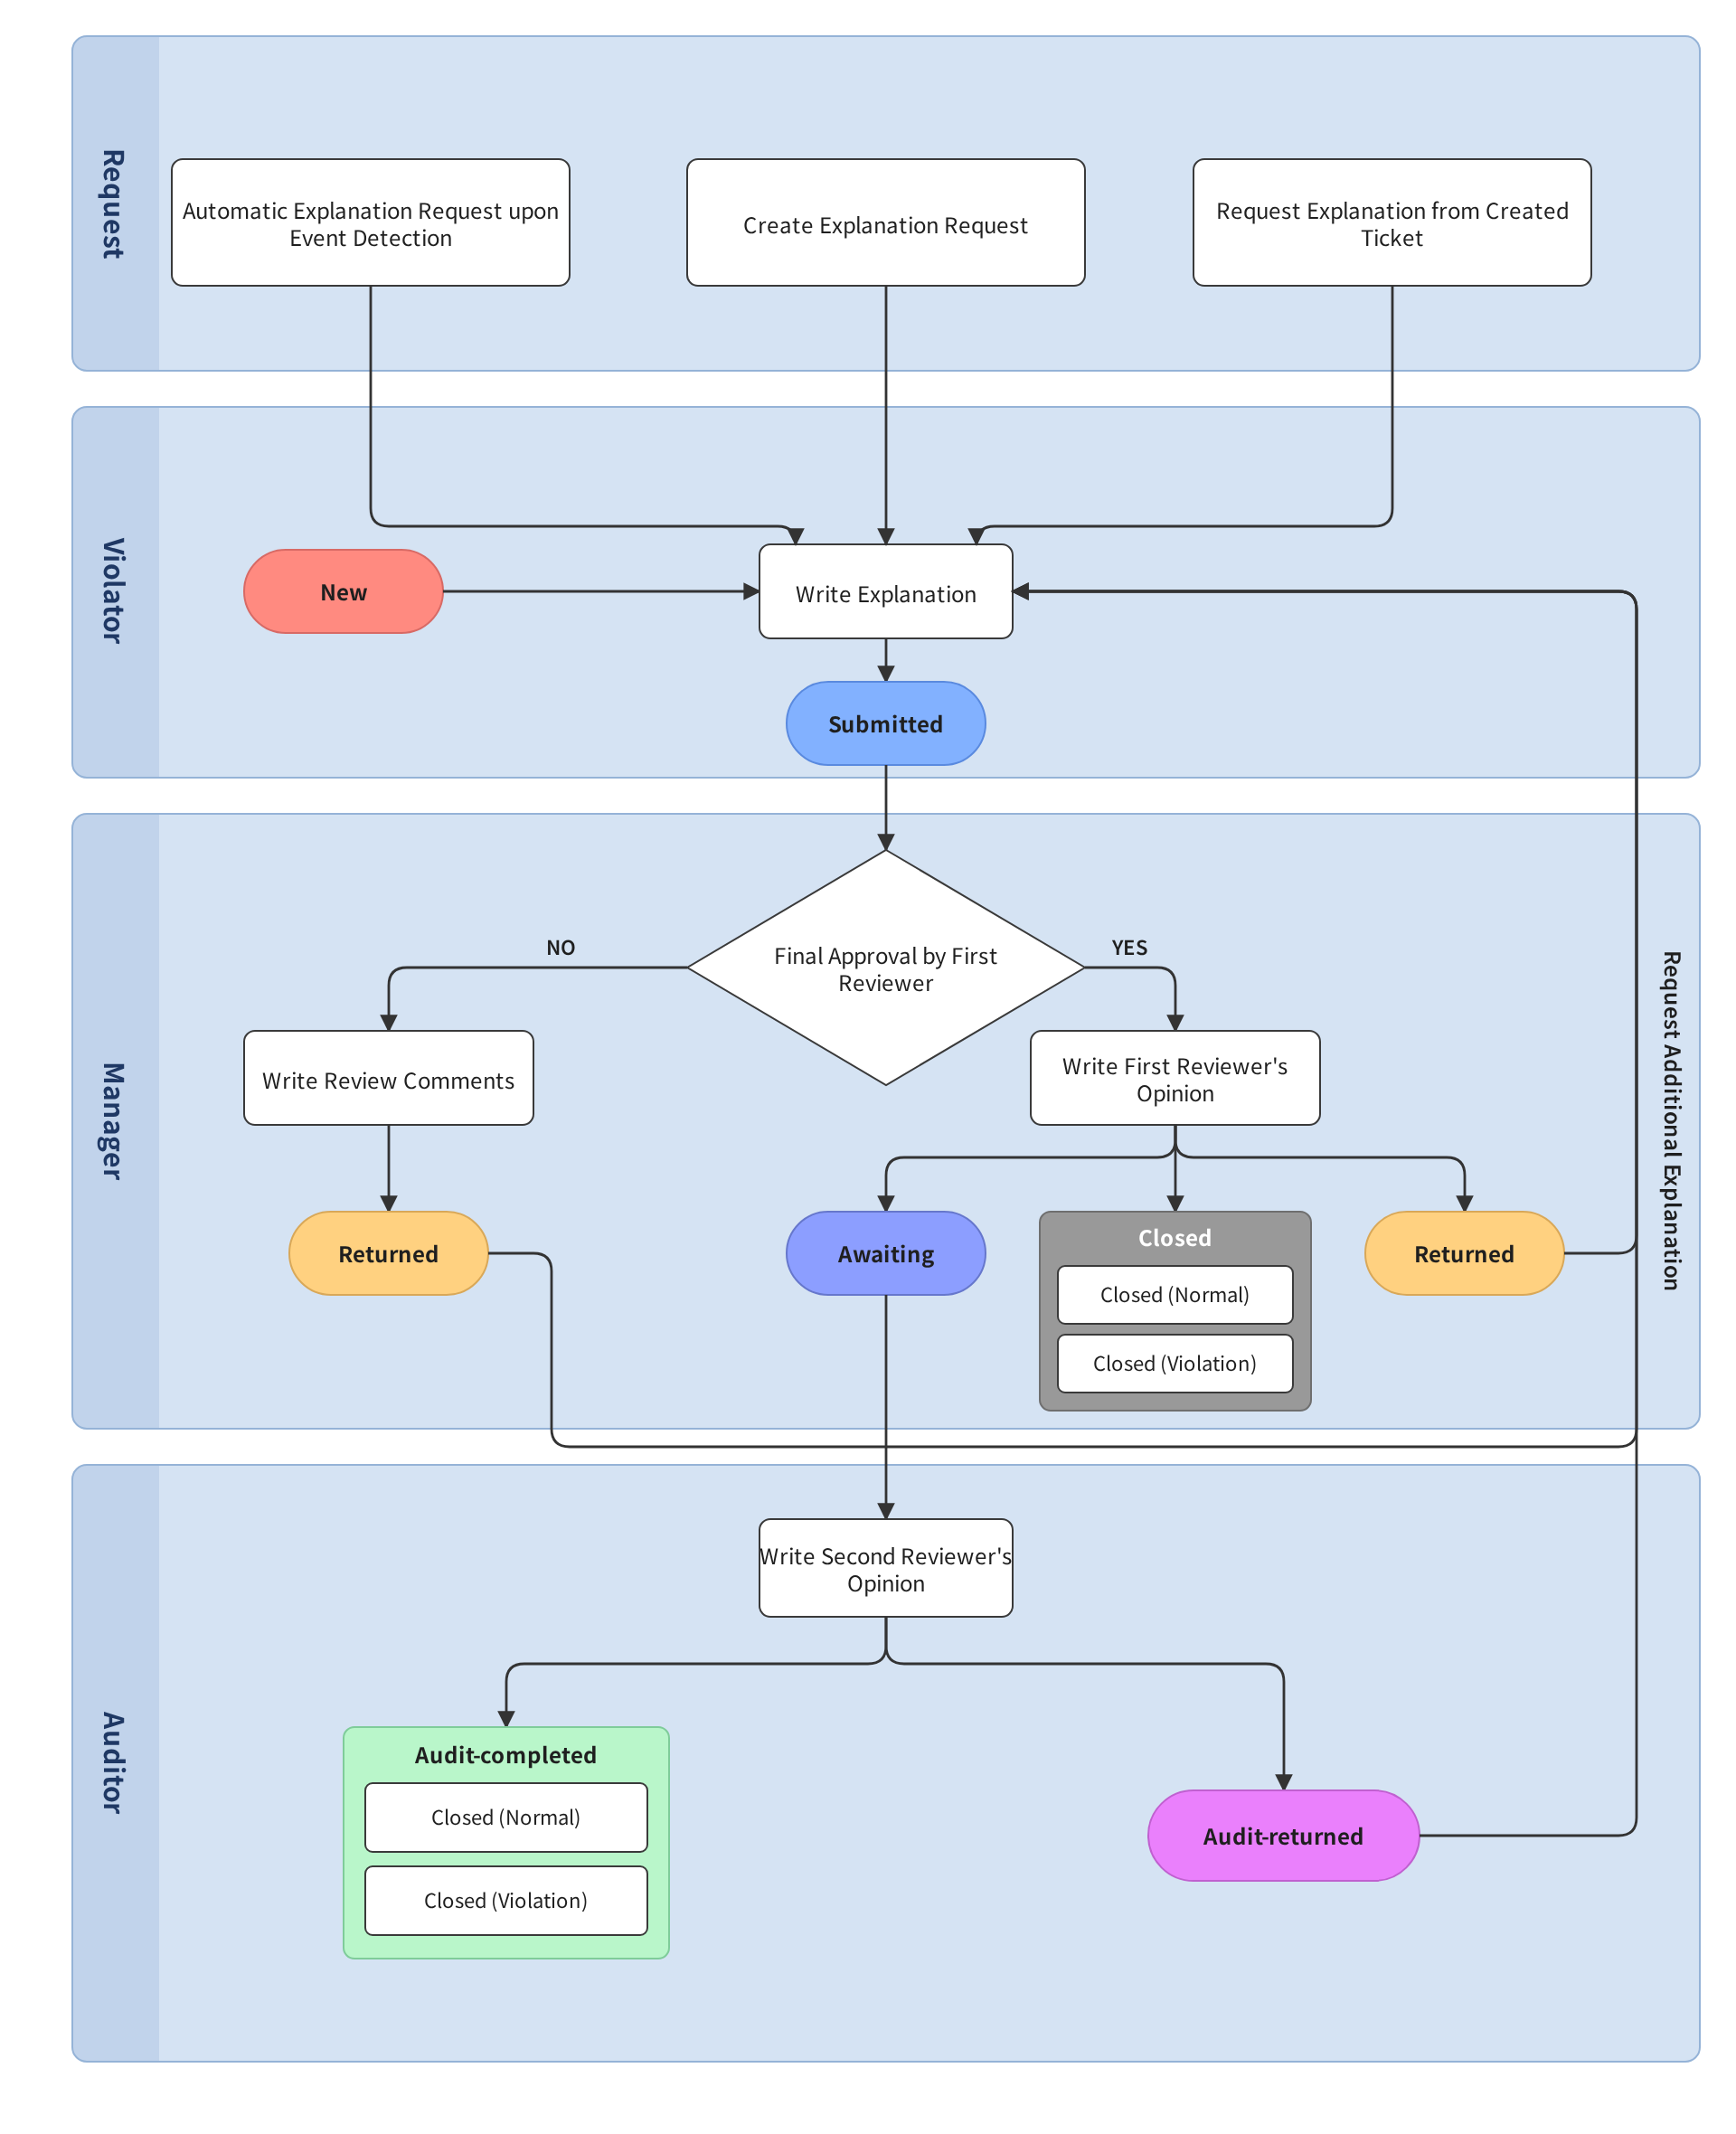
In cases where an explanation is required for a security violation, security personnel can request an explanation from the anomalous actor. By generating an explanation based on a ticket or by directly drafting the explanation content, the anomalous actor will receive an explanation request email at the email address registered in the Employees menu. By clicking the link in the explanation request email to draft the explanation, the reviewer will assess whether the explanation content is valid or constitutes a security violation. The process can be illustrated as follows:
For the explanation process to function smoothly, employee information must be registered in the Employees menu, and an explanation template must be configured.
Explanation list
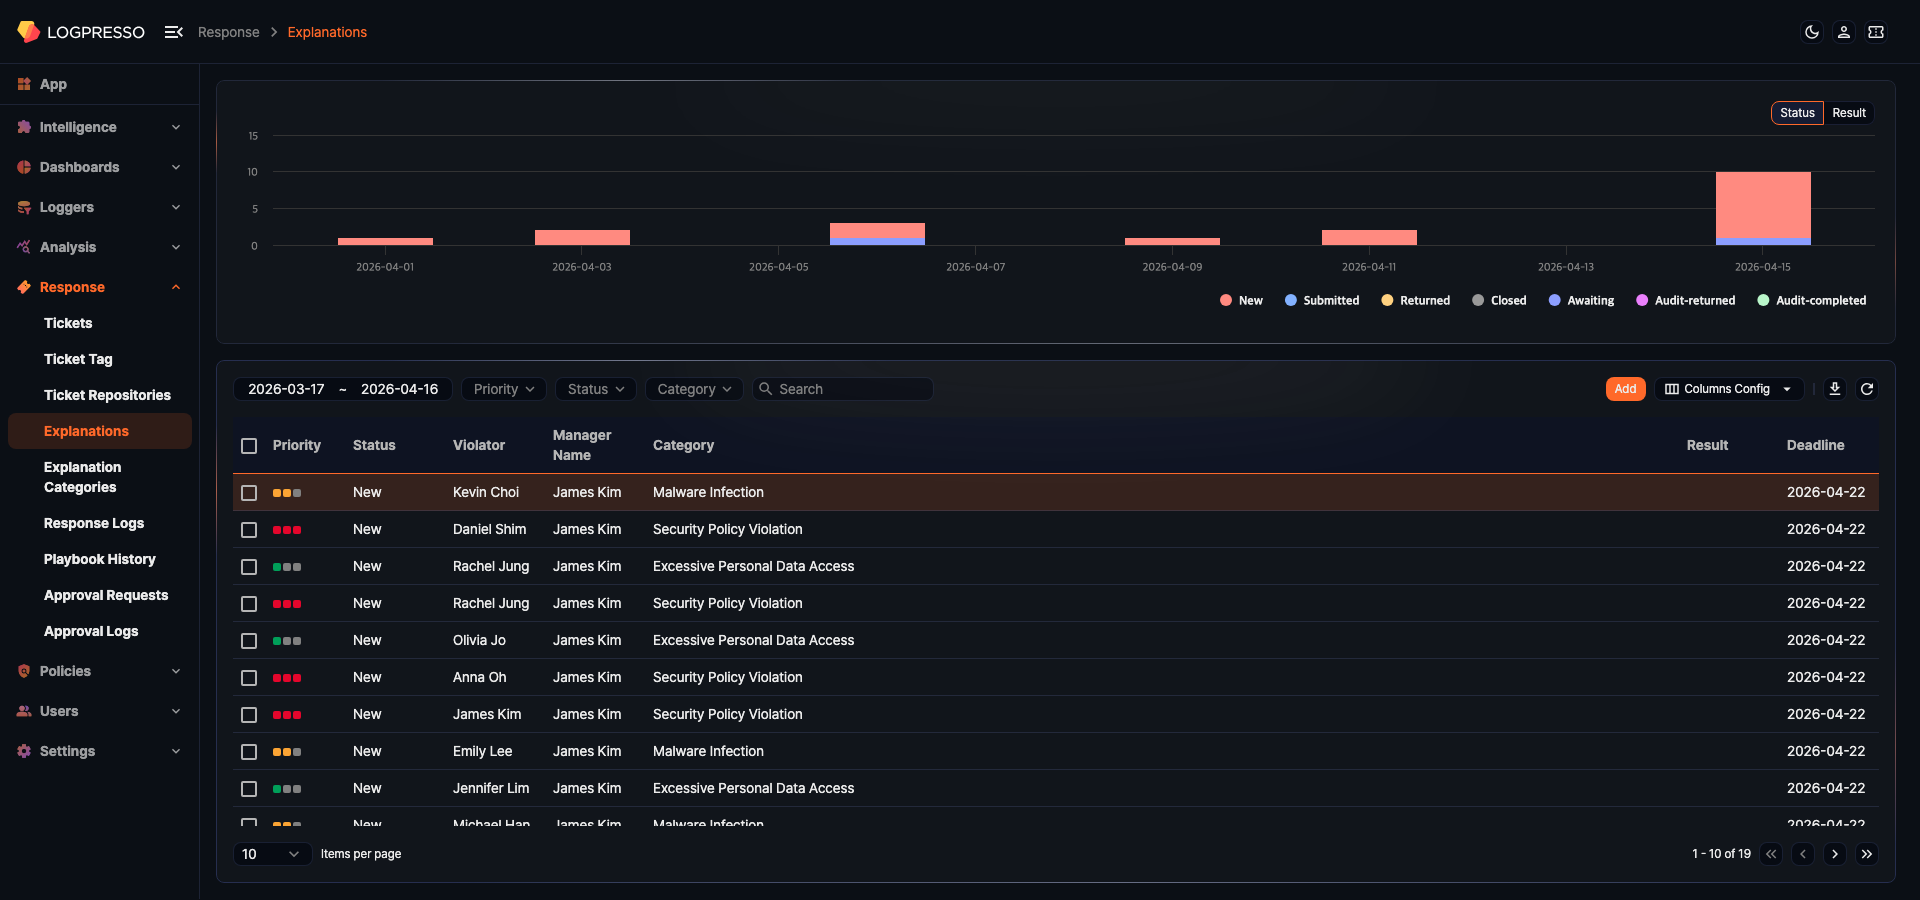
Click Response > Explanations to navigate to the explanation list. The top of the screen shows an explanation trend chart, and the bottom shows the list of explanation requests. Explanations can be automatically created by detection rules, or manually added from the ticket or explanation screen.
Viewing explanations requires the explanation view (EXPLANATION_VIEW) permission. Reviewing explanations or changing their status requires the explanation audit (EXPLANATION_AUDIT) permission.
Explanation trend chart

The chart above the list shows explanation status over time. Click the toggle in the upper right of the chart to switch between Status and Result views.
Viewing and searching explanations
The following columns are displayed in the list:
- Priority: Displays the explanation's priority (High/Medium/Low) as an indicator.
- Status: The current processing status of the explanation.
- New: The violator has not yet submitted an explanation.
- Submitted: The violator has submitted an explanation.
- Returned: The manager has returned the explanation.
- Closed: The manager processed the explanation without a secondary reviewer (self-approved).
- Awaiting: The manager approved the explanation and it is awaiting review by the auditor.
- Audit-returned: The auditor has returned the explanation.
- Audit-completed: The auditor has approved the explanation.
- Violator: The name of the employee who received the explanation request.
- Manager Name: The name of the primary reviewer.
- Auditor Name: The name of the secondary reviewer (auditor).
- Owner Name: The name of the user who created the explanation request.
- Category: The category assigned to the explanation.
- Ticket Title: The ID and title of the linked ticket. Click to navigate to that ticket.
- Result: The final processing result (Normal/Violated).
- Request Date: The date and time when the explanation was created.
- Deadline: The submission deadline date.
Use the toolbar filters to search explanations:
- Period: Set the search period based on the request date. The default is the last 30 days.
- Priority: Show only explanations with a specific priority.
- Status: Show only explanations with a specific processing status.
- Category: Show only explanations in a specific category.
- Keywords: Search by keywords in the explanation content.
Column settings
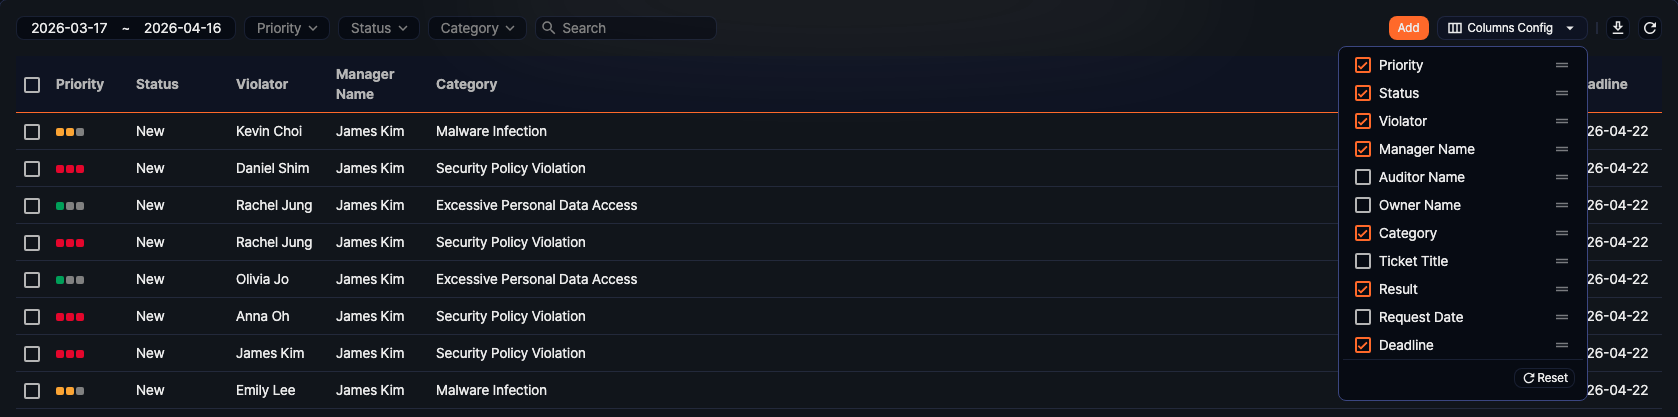
Click the Columns Config button in the toolbar to select which columns to display and reorder them. Changes are saved per user. Click Reset to restore the default settings.
Downloading the explanation list
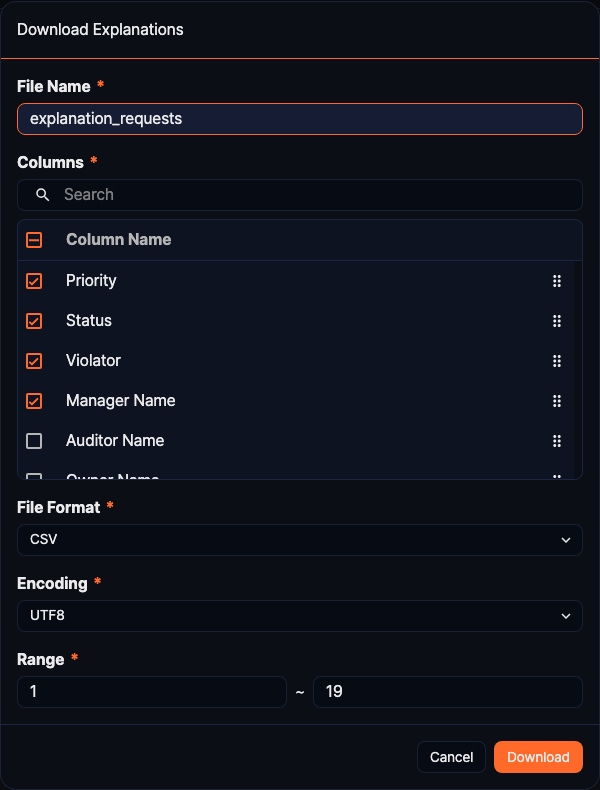
Click ![]() in the toolbar to download the explanation list as a file.
in the toolbar to download the explanation list as a file.
- File name: Enter the name for the saved file.
- Columns: Select the columns to include in the file. You can search for columns by name in the column search field. Available columns are Priority, Status, Violator, Manager Name, Auditor Name, Owner Name, Category, Ticket Title, Result, Request Date, and Deadline.
- File type: Select the file format (e.g., CSV).
- File encoding: Select the file encoding.
- Range: Select the range of explanations to download.
Refreshing the explanation list
Click ![]() in the toolbar to refresh the explanation list.
in the toolbar to refresh the explanation list.
Bulk reviewing explanations

Selecting checkboxes in the list reveals bulk action buttons in the toolbar.
-
Review: Change the status of selected explanations in bulk. Click Review to open the review dialog.
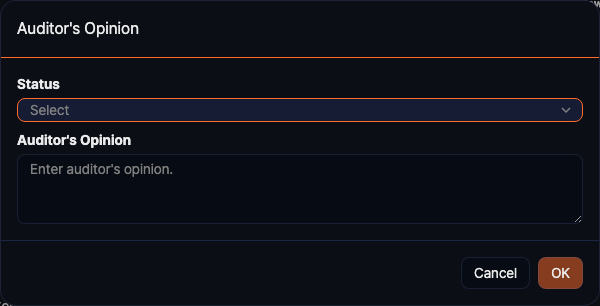
- Status: Select the status to apply. Choose from Confirm as Normal, Confirm as Violated, or Return.
- Auditor's Opinion: Enter a review comment (required).
NoteSelecting Confirm as Normal or Confirm as Violated records the result as Normal or Violated and changes the status to Audit-completed. Selecting Return changes the status back to New.
-
Delete: Delete the selected explanations.
-
Clear selection: Deselect all selected items.
Adding an explanation
Explanations can be automatically created by real-time or batch detection rules, requested from the ticket screen, or manually added by clicking Add in Response > Explanations.
To add an explanation, click Add in Response > Explanations, or click the Explanation Request button in the ticket detail screen.
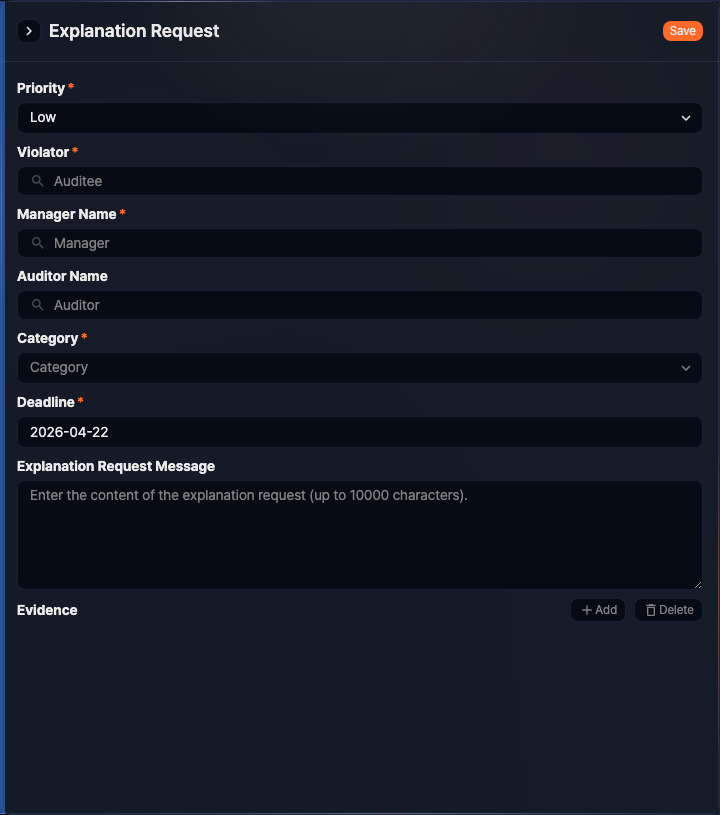
In the panel that opens on the right, configure the following:
- Priority: Select the explanation priority (required, default: Low, options: Low/Medium/High).
- Violator: Select the employee who will receive the explanation request (required, up to 1 person). Type a name or search to select. The Manager Name is automatically assigned when a violator is selected.
- Manager Name: Select the primary reviewer (required, up to 1 person). Automatically assigned when a violator is selected, but you can change it manually.
- Auditor Name: Select a secondary reviewer (auditor) to review after the primary reviewer approves (optional, up to 1 person). If no auditor is assigned, the primary reviewer processes the explanation as a final decision.
- Category: Select the explanation category (required). Manage categories in Response > Explanation Categories.
- Deadline: Select the submission deadline by which the violator must submit their explanation (required).
- Explanation Request Message: Enter a message to send to the violator (up to 10,000 characters).
Automatic primary reviewer assignment
When a violator is selected, the primary reviewer is automatically assigned according to the following rules:
- If the violator's department has a department manager, that manager is assigned as the primary reviewer.
- If the violator's department has no manager, the manager of the parent department is assigned.
- If no manager is found up to the top-level department, an employee with administrator privileges is assigned.
If the violator is a department manager:
- If the violator's parent department has a manager, that parent department manager is assigned as the primary reviewer.
- If there is no parent department or no manager up to the top level, an employee with administrator privileges is assigned.
Adding evidence

In the Evidence section at the bottom of the add panel, you can add log data to support the explanation request. Click Add to open the log selection dialog.

In the log selection dialog, configure the following to search for evidence logs:
- Table
- Select the table where the evidence was collected.
- Schema
- Select the schema of the logger that collected the evidence. The search returns data stored with the selected schema, and results are also displayed in that schema format.
- Period
- Enter the time range for the search.
- Keywords
- Enter keywords to search within the data. AND condition returns only records containing all keywords; OR condition returns records containing at least one keyword. Select the query expression option to enter a fulltext search boolean expression query directly.
- Max records
- Specify the maximum number of records to retrieve.
- Page size
- Specify the maximum number of records to display per page.
Select the desired logs from the search results and click Add selected logs to add them as evidence for the explanation request.
After configuring all fields in the panel, click Save to create the explanation request and send an email to the violator.
Writing an explanation
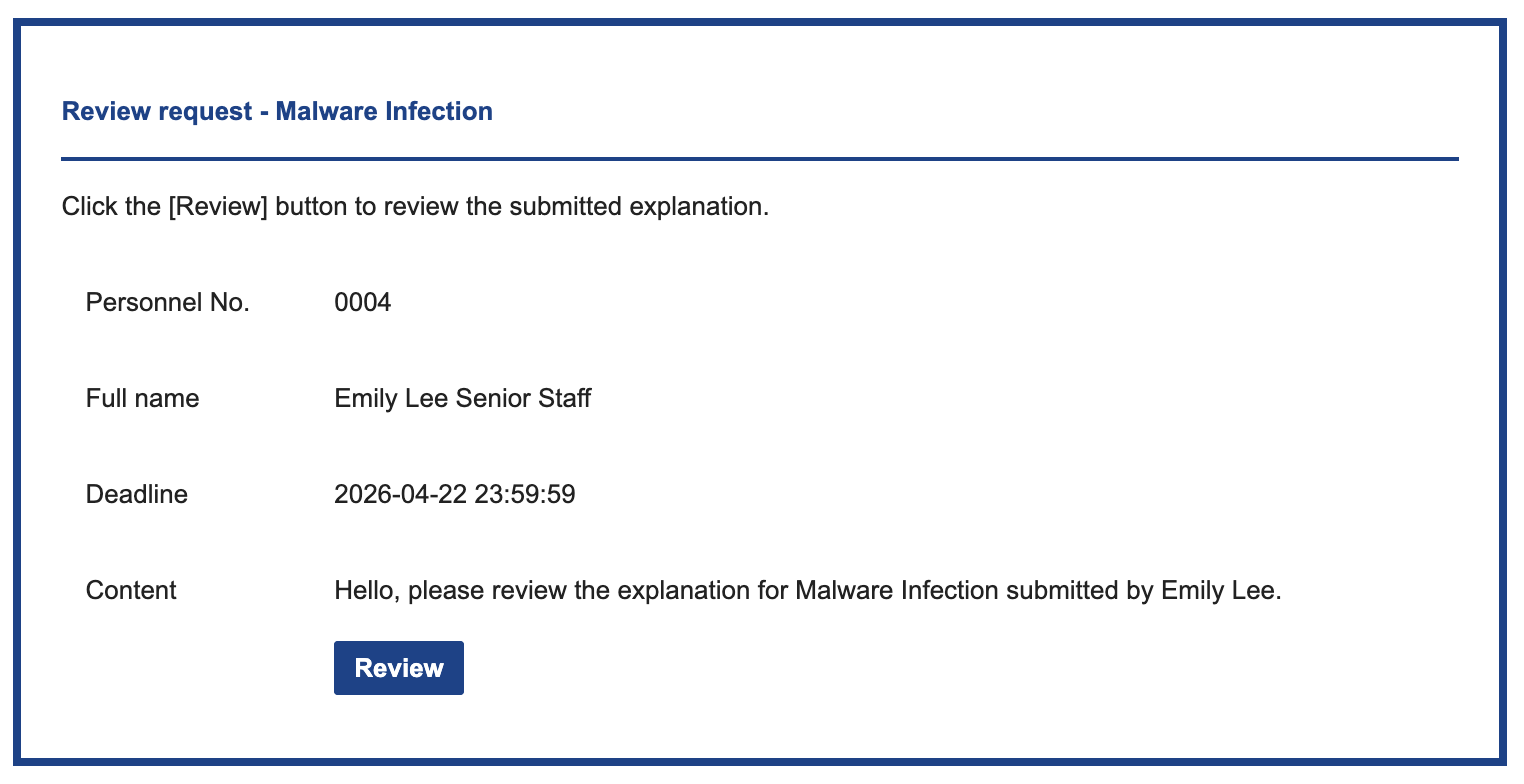
When an explanation is automatically requested by a detection policy, or when an explanation request is created from the ticket or explanation screen, the violator receives an explanation request email at the email address registered in the employee database. You can configure the email format in Settings > Explanation Template.
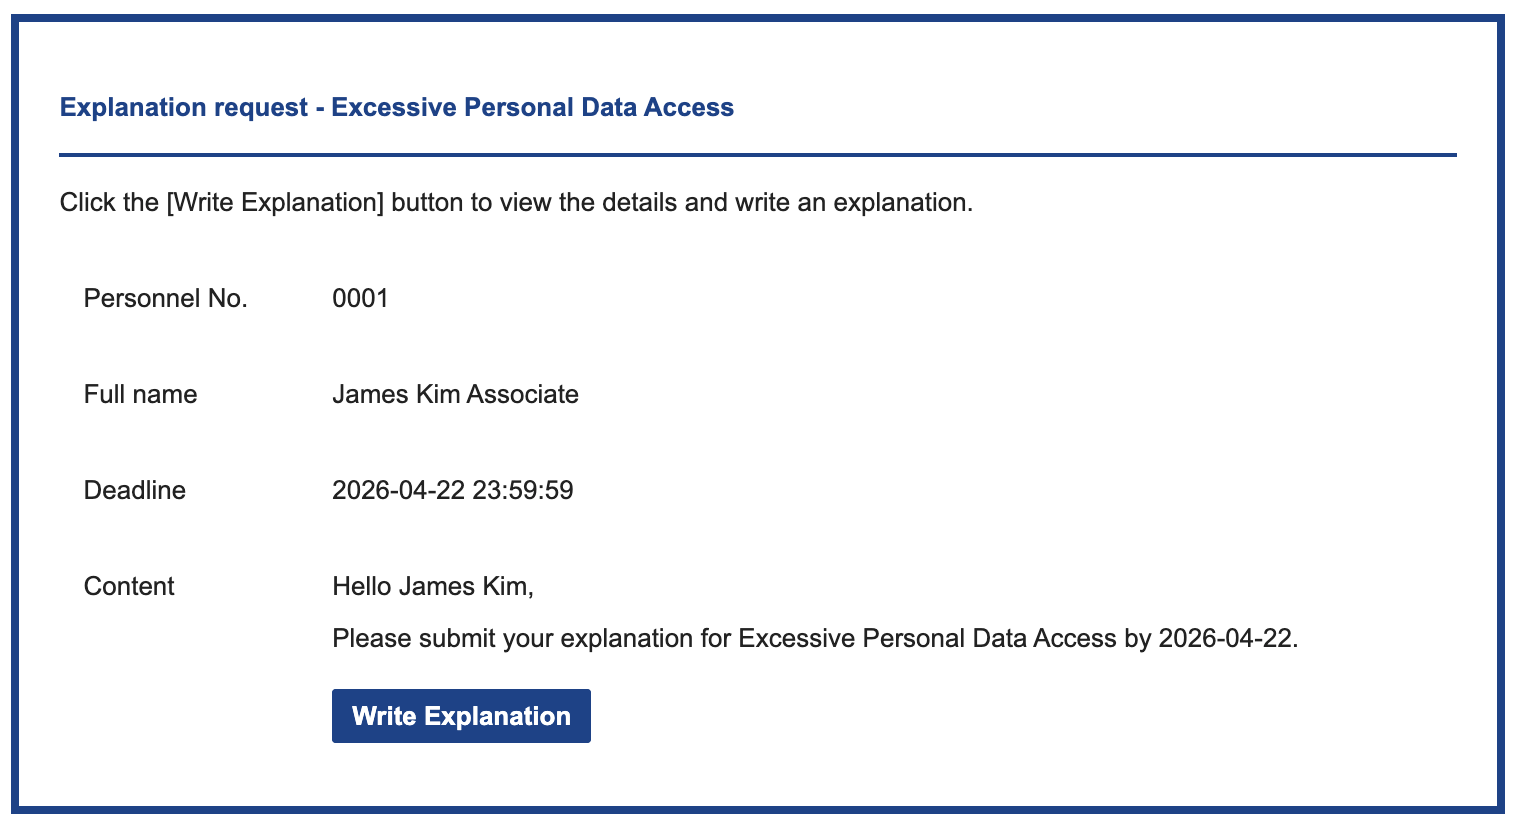
Click the link to write the explanation to open the explanation submission screen in a new window. Because a one-time login token is used, the violator can write their explanation without a Logpresso Sonar account. Write the explanation and click Submit Explanation to submit it. Submission is not possible after the deadline.
Token expiry example
- Explanation created: 2019-08-21 18:00:00
- Explanation deadline: 2019-08-27 23:59:59
- Current date: 2019-08-28 15:00:00
- Token expiry: 10 days
Although the deadline has passed, the token expiry is 2019-08-31 18:00:00, so submission is still possible.
Reviewing an explanation
When the violator submits their explanation, a review request email is sent to the reviewer. The reviewer clicks the link in the email to open the explanation review screen.
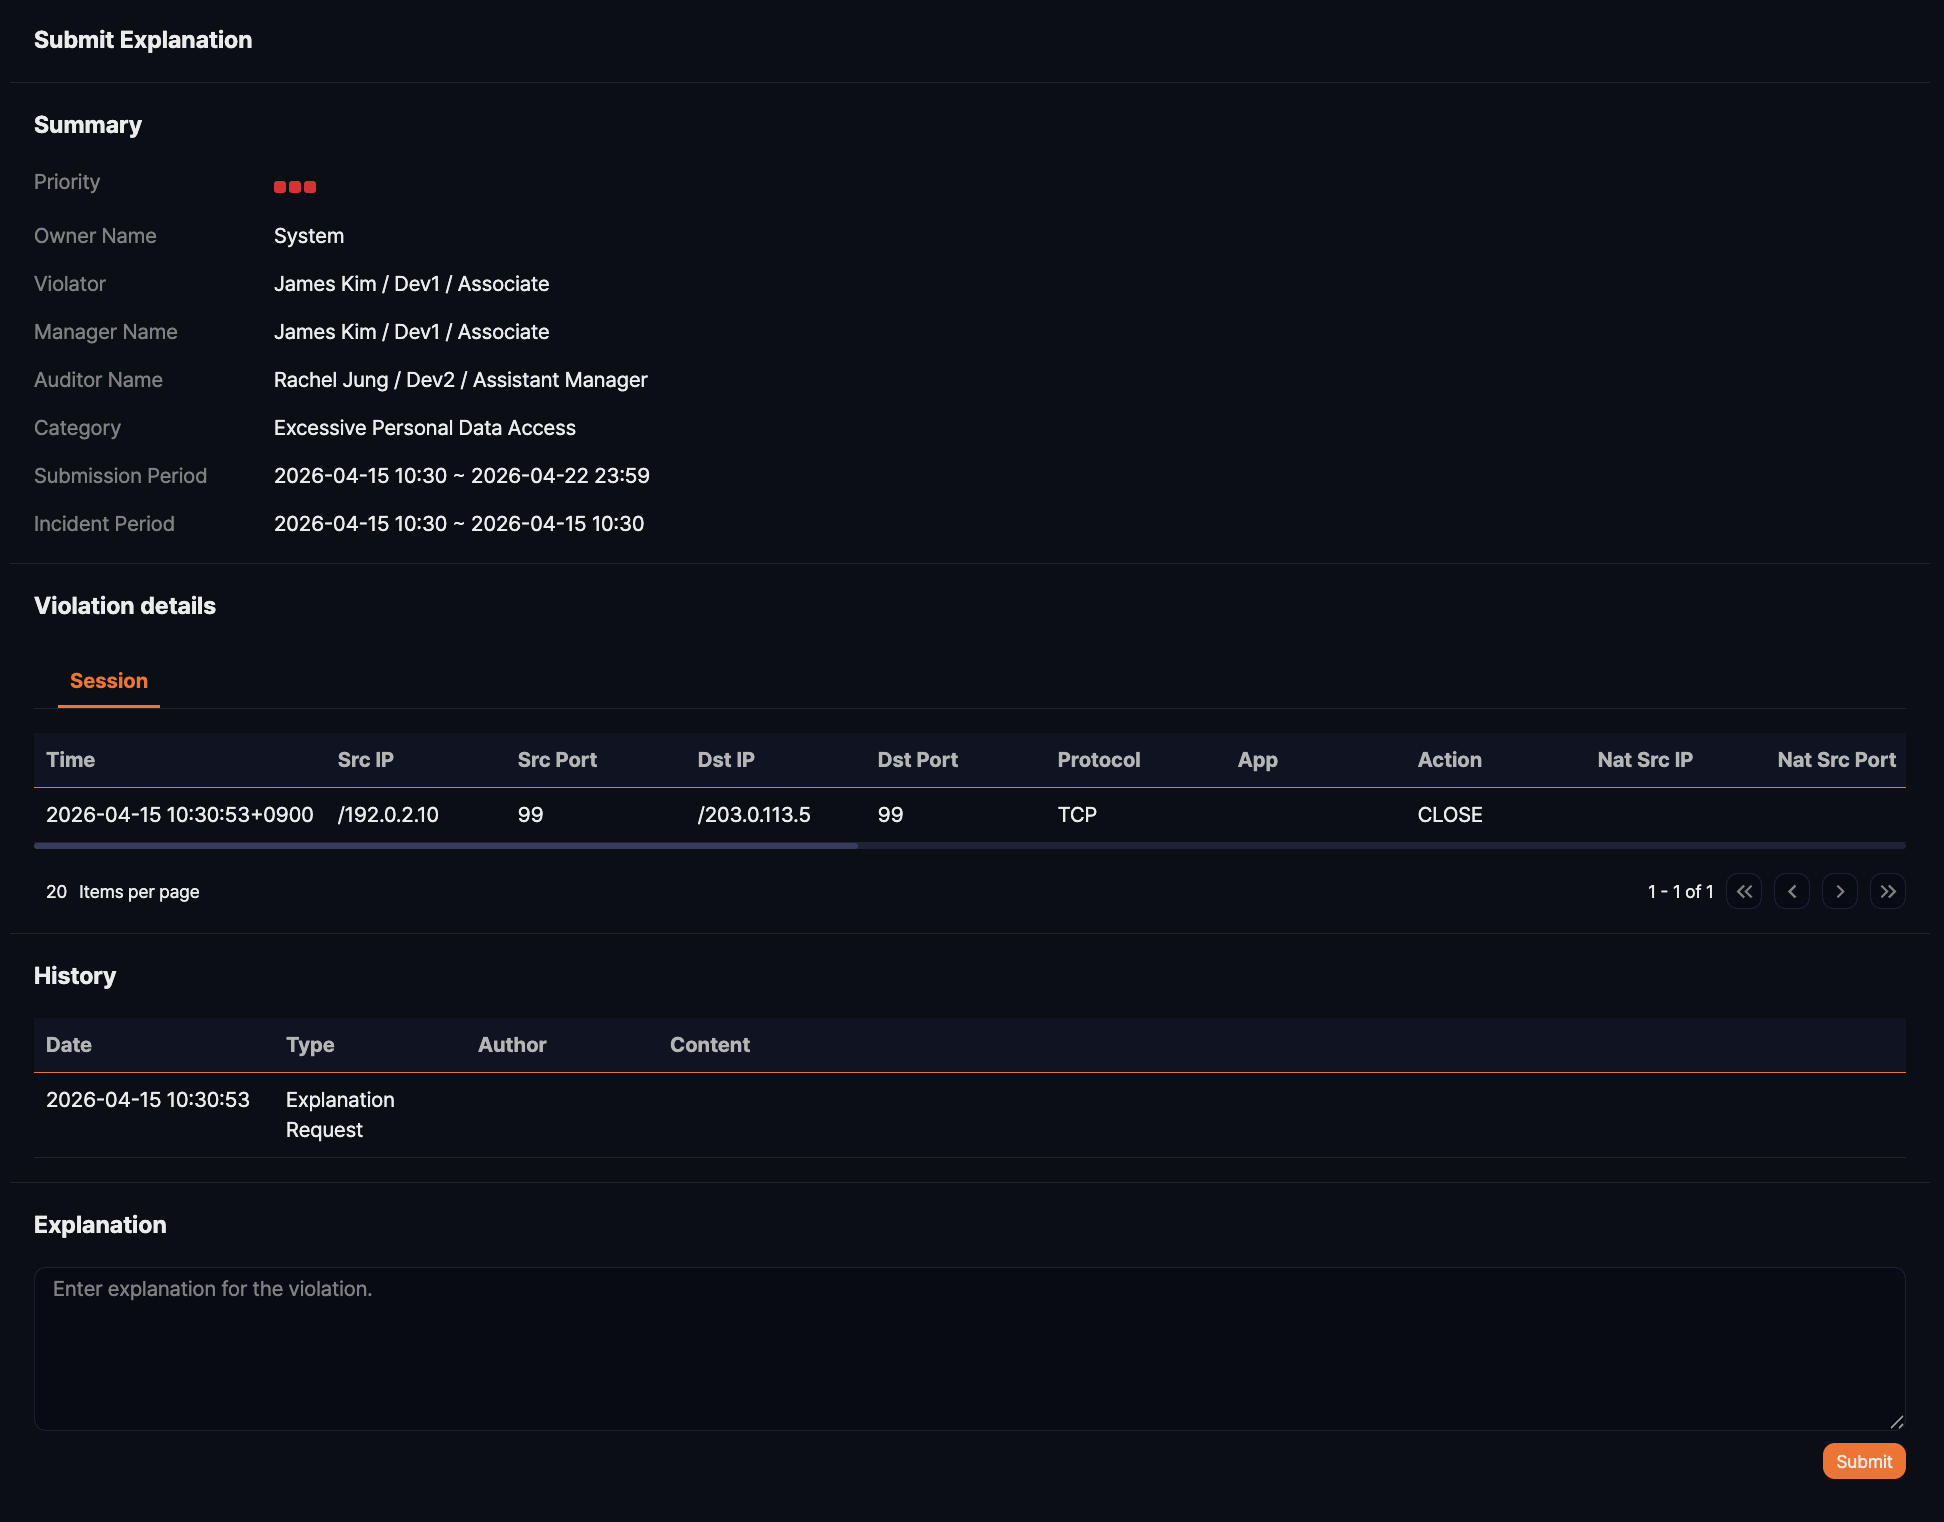
The explanation review screen displays the following information:
- Summary: Basic information about the explanation, including priority, requester, violator, reviewers, category, period, and request message.
- Evidence: Log data attached to the explanation request, displayed in tabs by schema.
- Explanation history: The violator's explanation and previous reviewers' comments in chronological order.
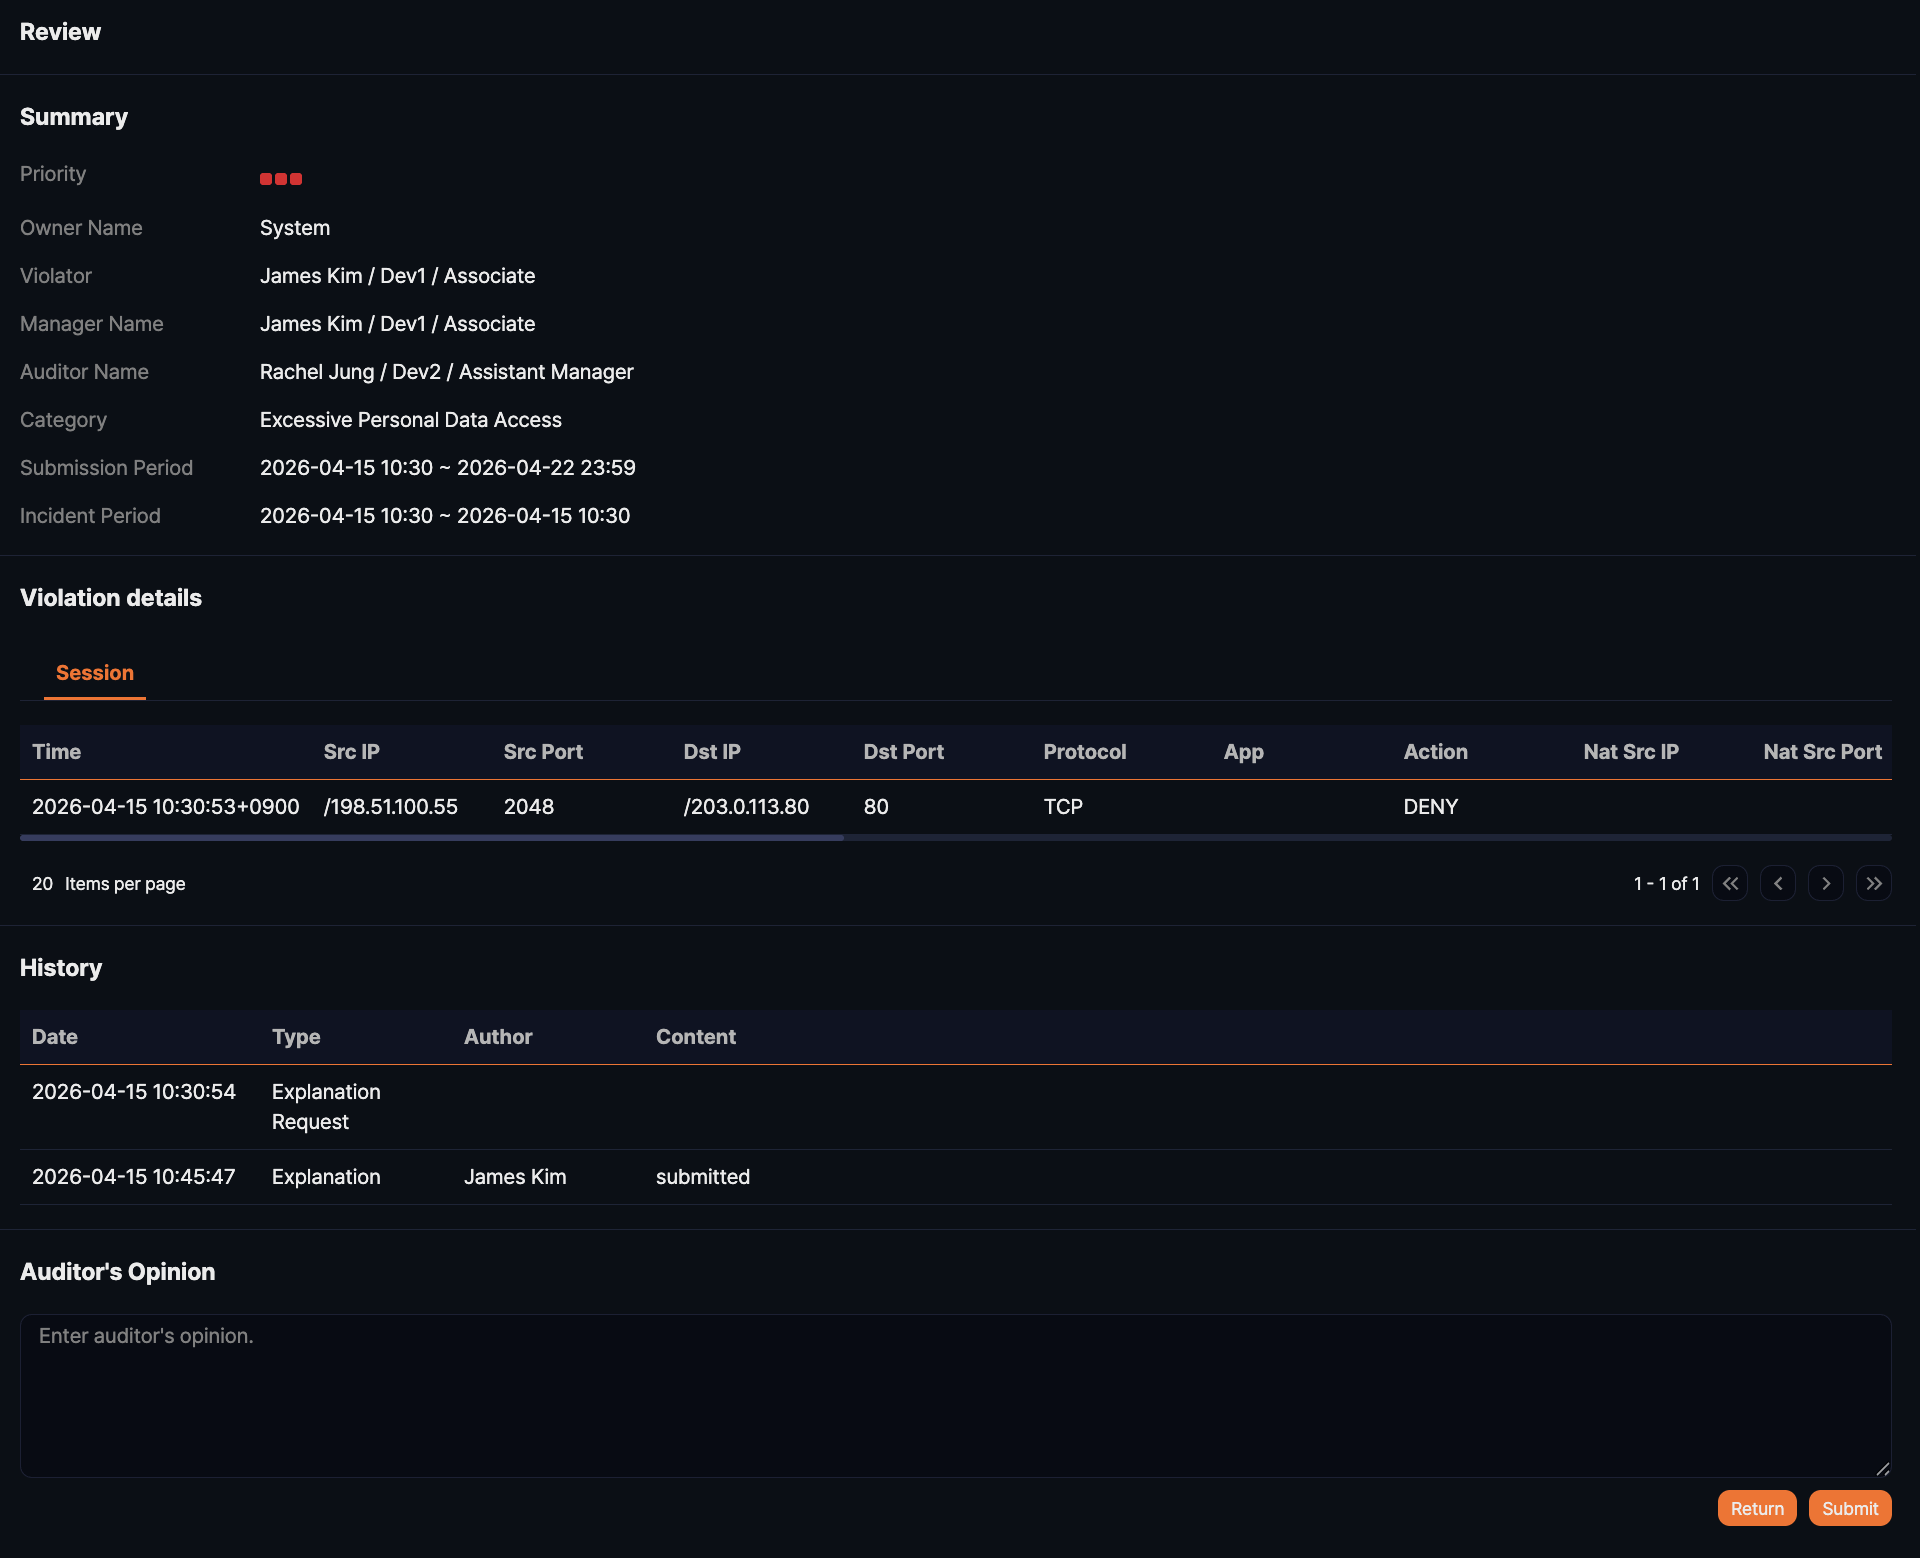
After reviewing the explanation details and evidence, enter your comment in the review field at the bottom of the screen and click the appropriate action button.
- Return: Return the explanation. The status changes to Returned (or Audit-returned), and the violator is notified.
- Confirm as Normal: Approve the explanation as normal. The status changes to Closed or Audit-completed, and the result is recorded as Normal.
- Confirm as Violated: Approve the explanation as a violation. The status changes to Closed or Audit-completed, and the result is recorded as Violated.