Playbook editor
All playbook creation and editing is done through the playbook editor.
Screen layout
When you first add a playbook, the initial screen looks like this:
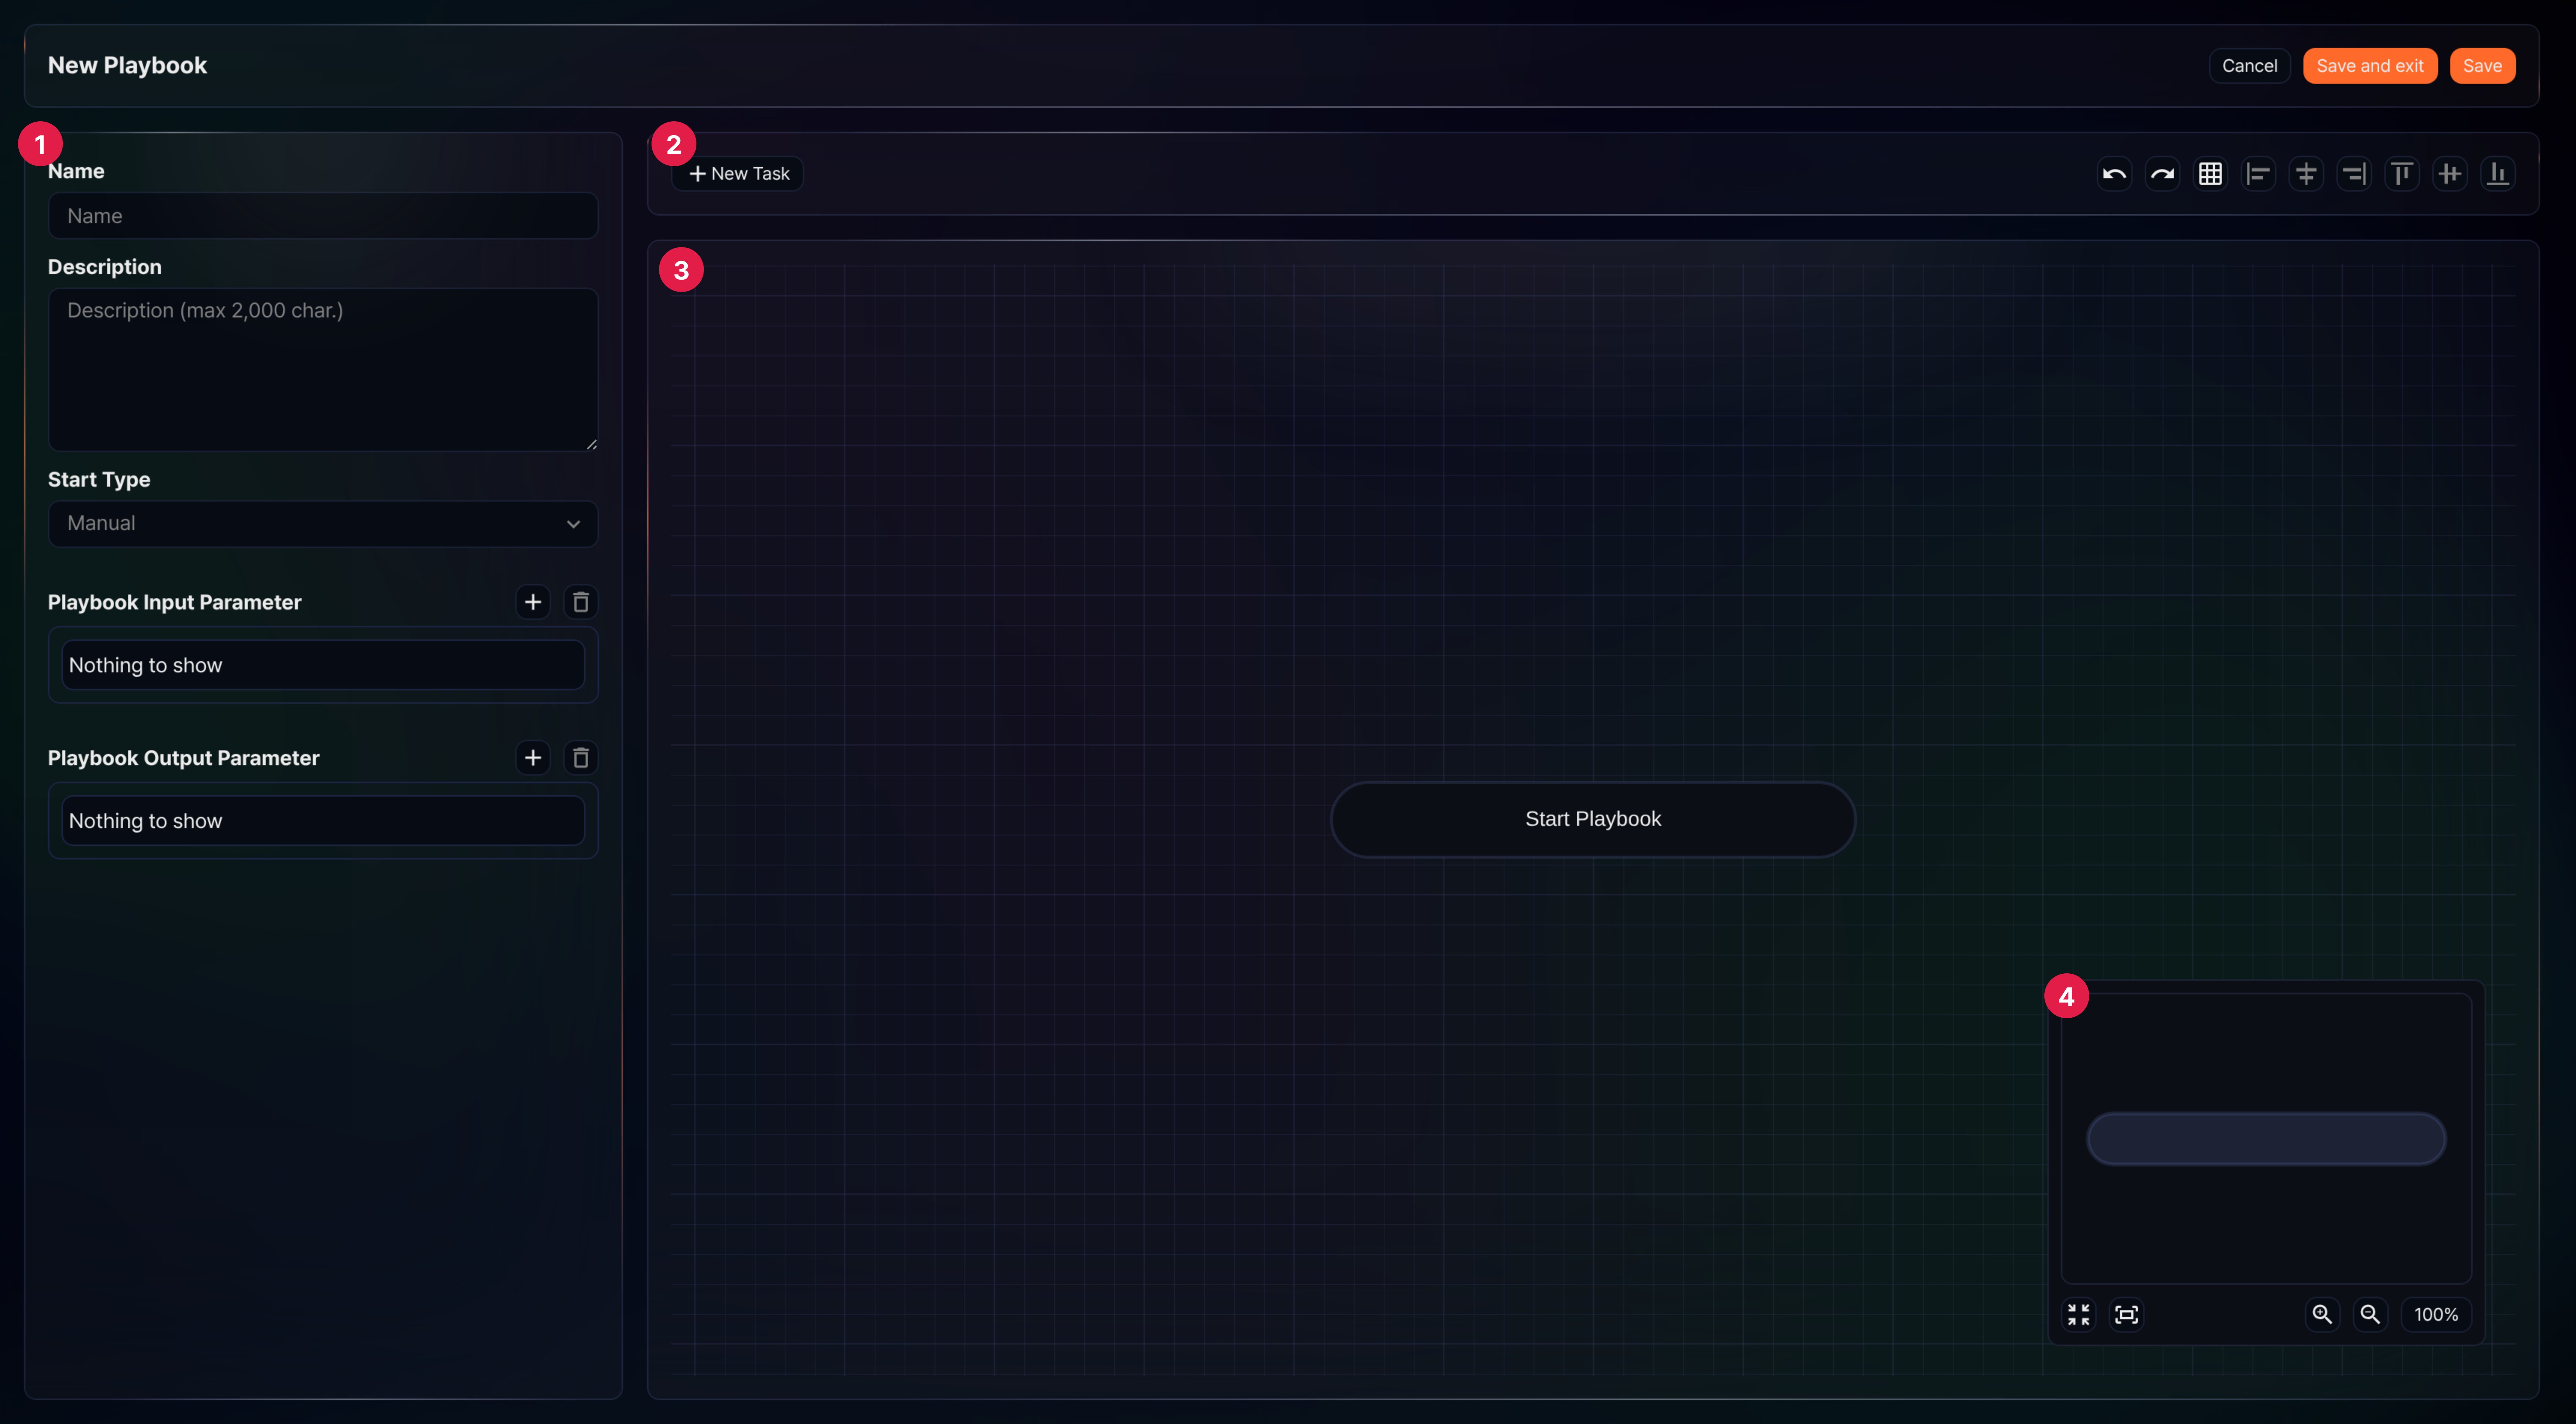
- ① Properties panel
- The properties panel displays playbook properties, or a task's common properties and properties by type. Task properties are applied by clicking Save at the bottom of the panel, while the playbook itself is saved using Save or Save and exit at the top of the screen.
- ② Toolbar
- Provides tools to add new tasks, undo/redo, show/hide the grid, and align tasks.

- New Task: Adds a new task object
- Undo/Redo: Reverses or reapplies recent actions (undo/redo)
- Show/hide grid: Toggles the background grid on and off
- Align: Aligns two or more selected task objects (from left to right: align left, center horizontally, align right, align top, center vertically, align bottom)
- ③ Task flowchart
- The task flowchart is where you place and connect task objects to define the playbook flow. You can specify the task execution order through user interactions.
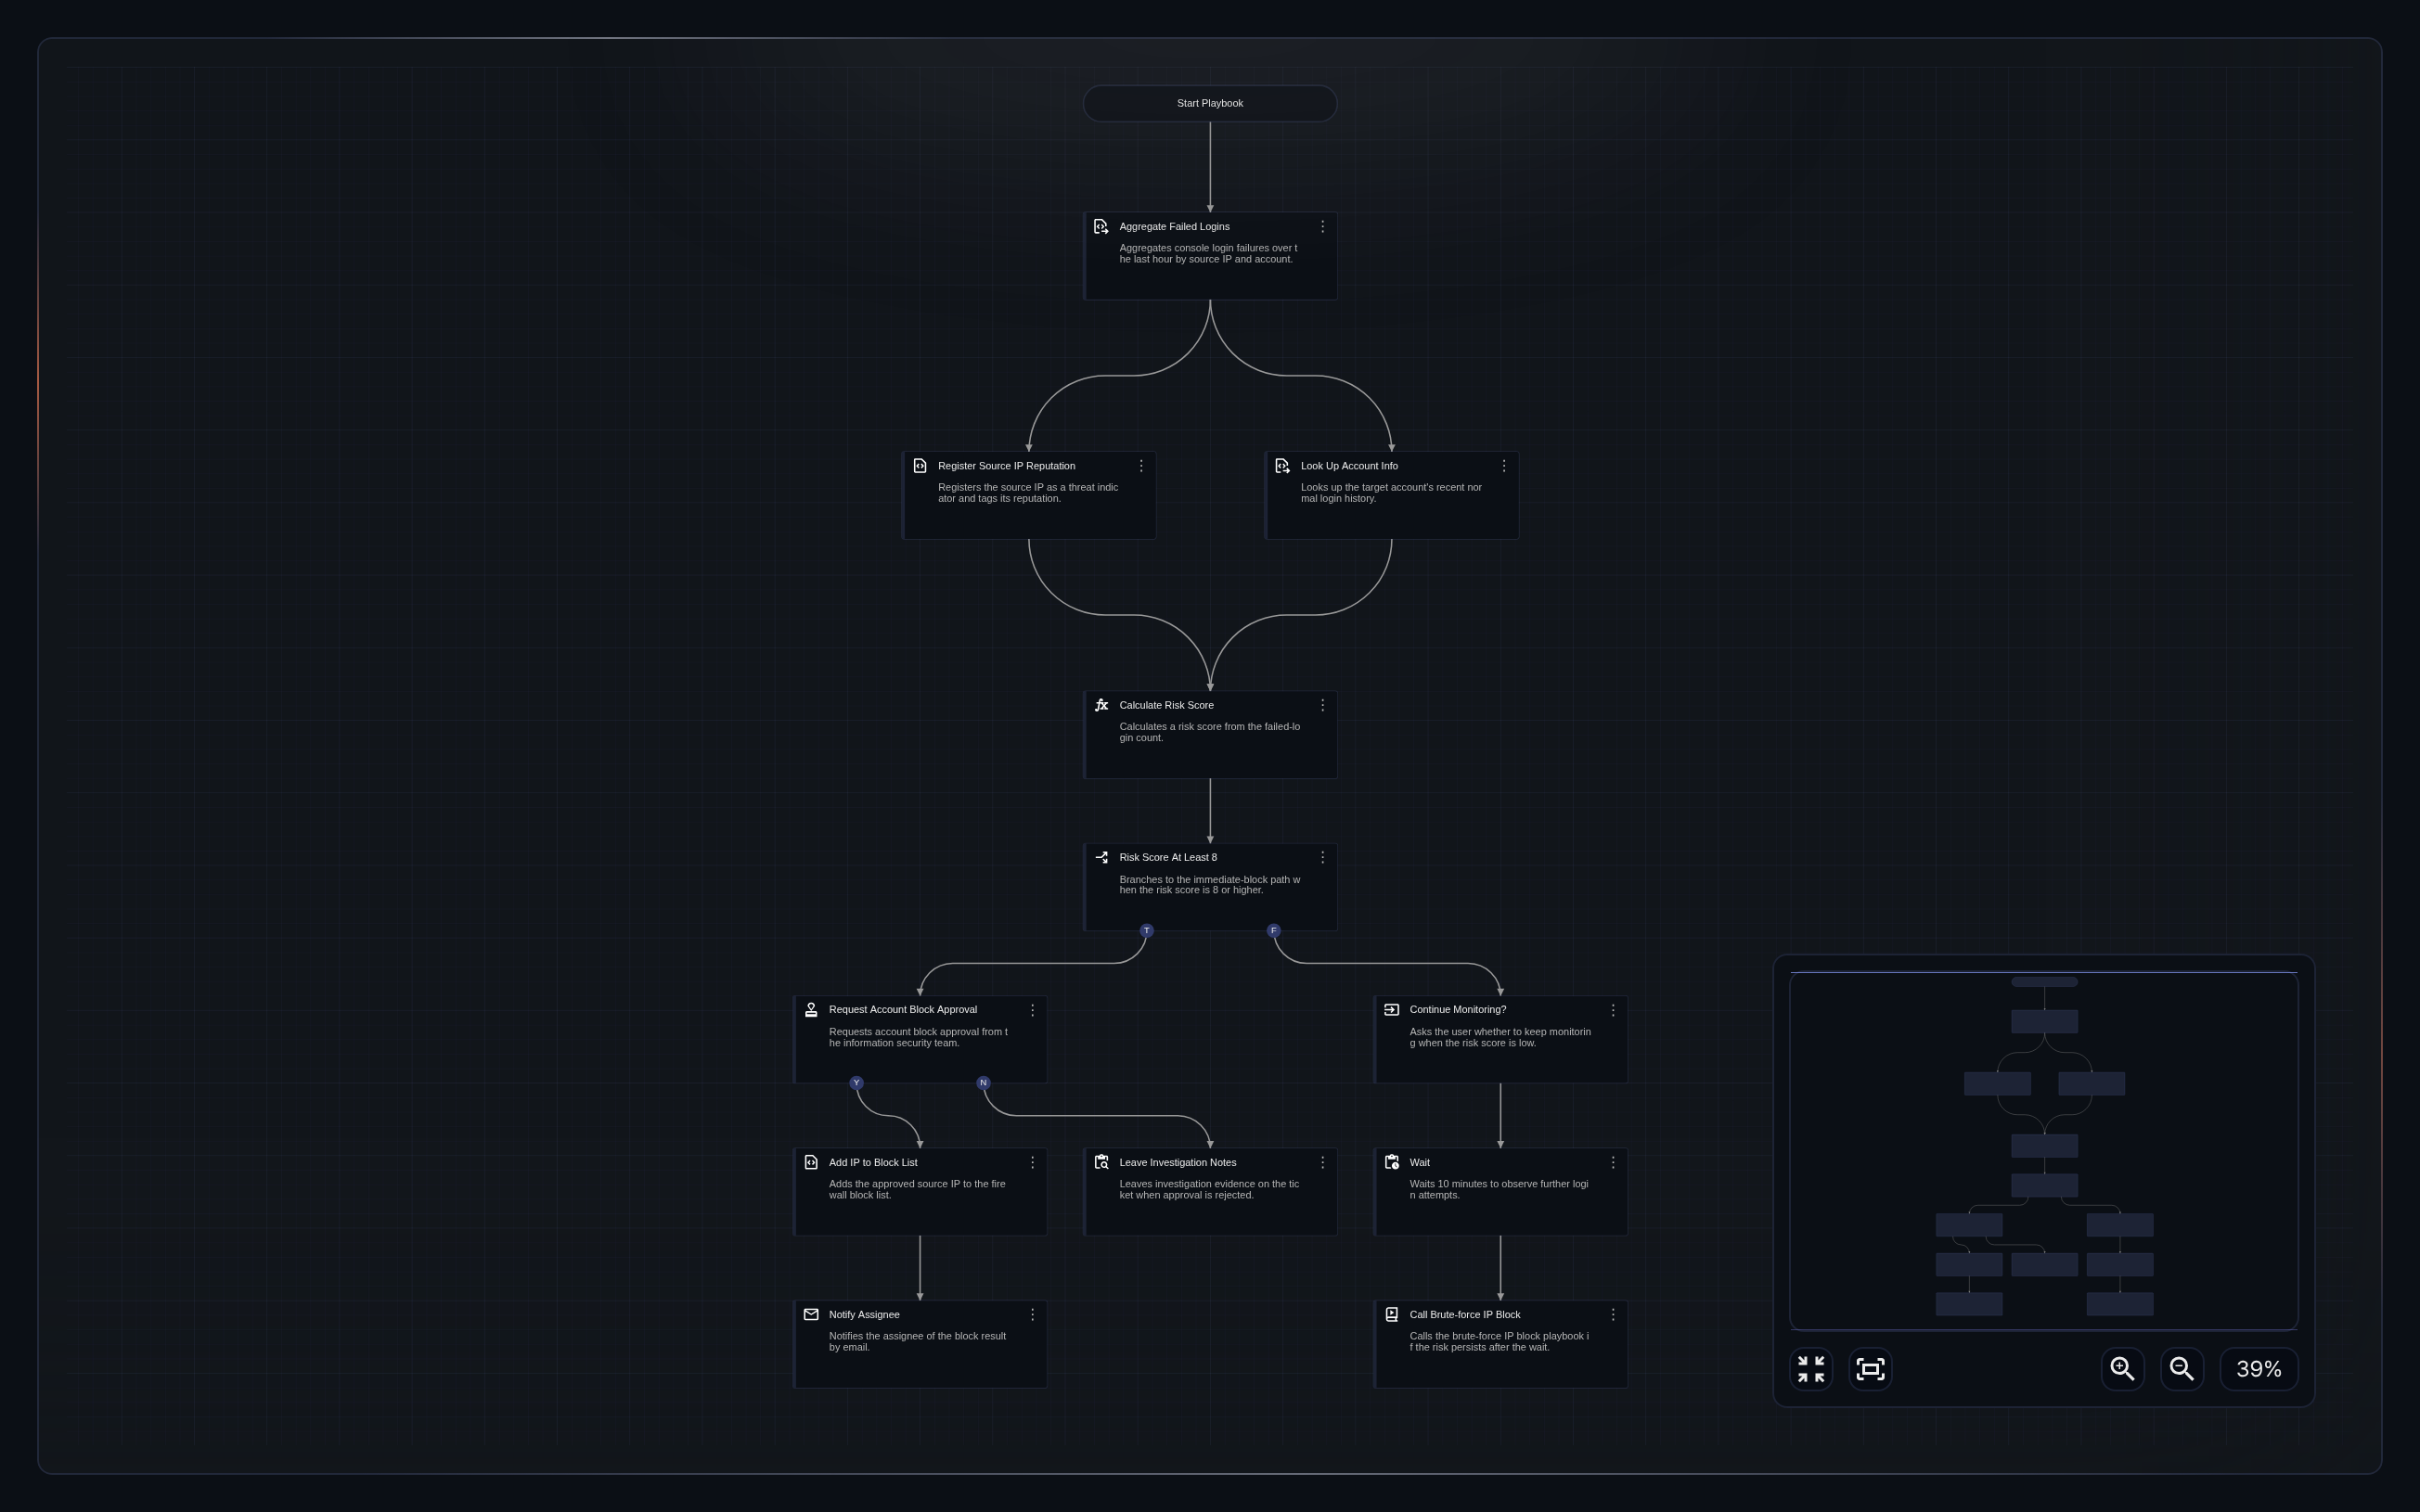
- ④ Map
- The map provides an overview of the entire playbook, showing the position and connections of all task objects. Click a location on the map to navigate the flowchart to that position.
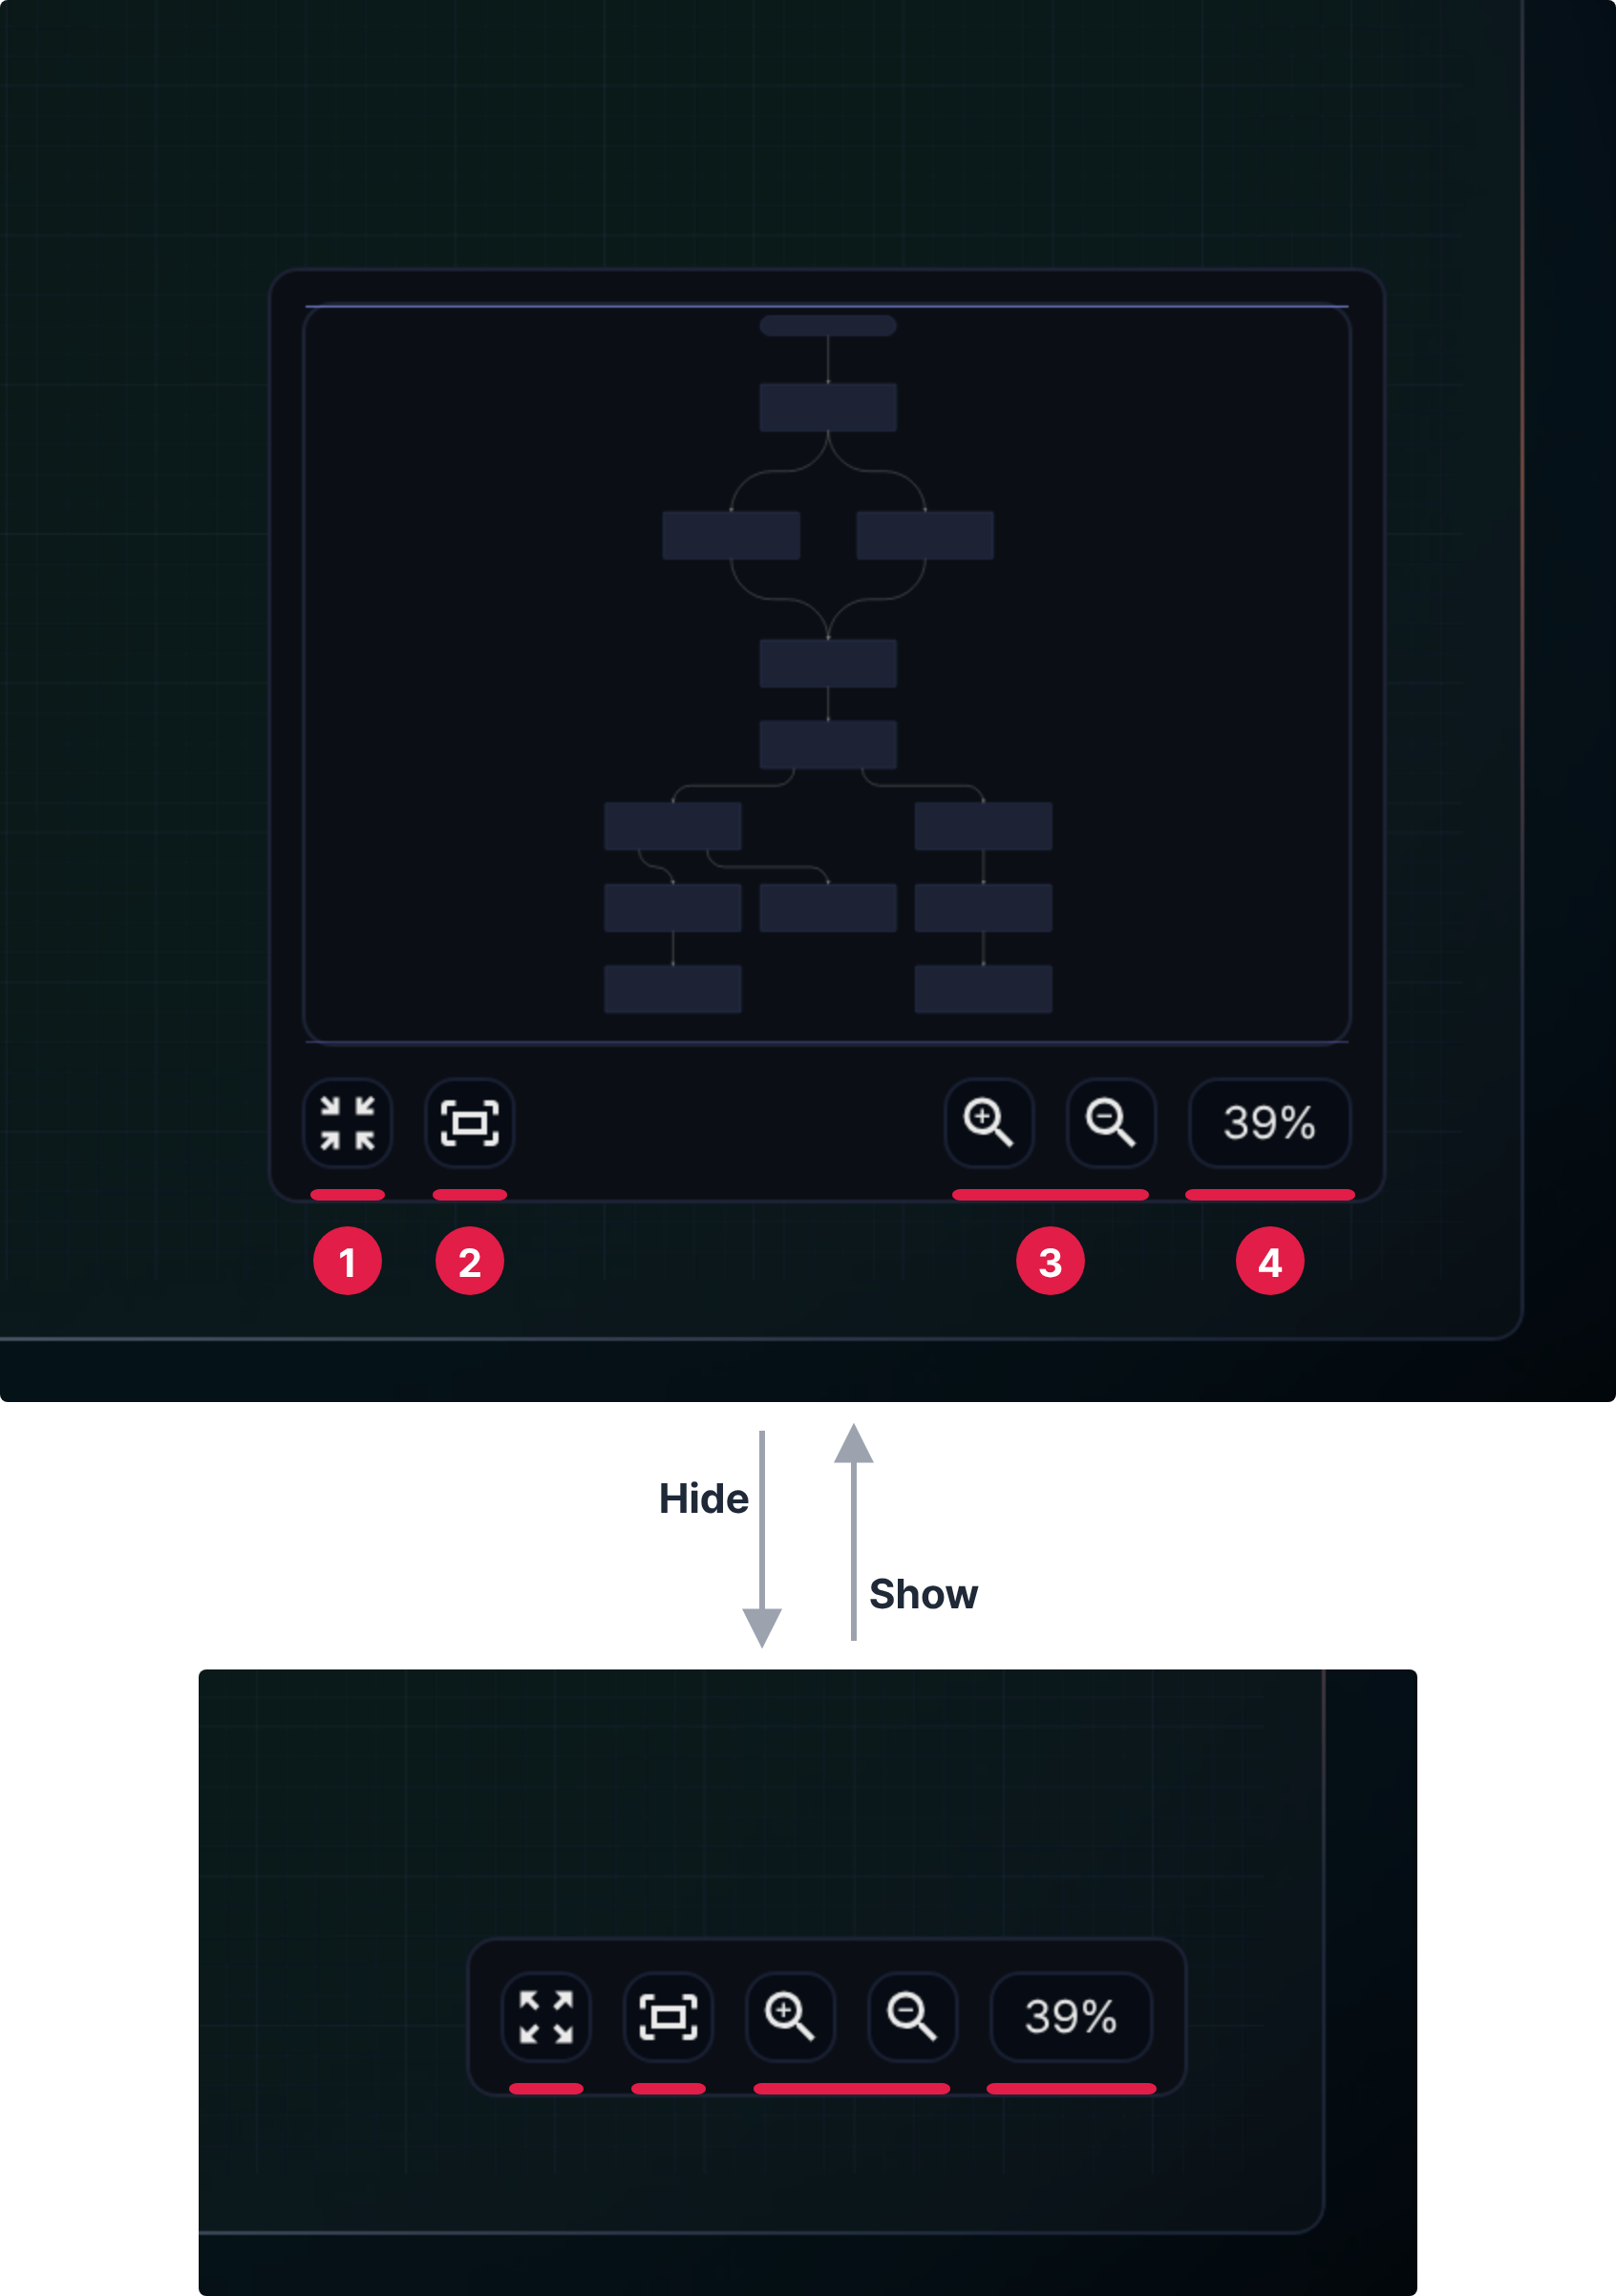
- Hide/show map: Hides or shows the map.
- Fit to screen: Resizes the flowchart to show all tasks in one view.
- Zoom in/out: Zooms the flowchart view in or out.
- Zoom level: Shows the current display scale of the flowchart. Click this button to reset the scale to actual size (100%). When you zoom the flowchart in or out, the current scale is displayed, and the scale can be adjusted from about 12.5% to 400%.
User interactions
Most work is done in the task flowchart. In the flowchart, you can perform the following actions:
- Click: Move the cursor to an object on the screen and press the left mouse button.
- Right-click (Secondary click): Move the cursor to an object on the screen and press the right mouse button.
- Drag & drop: Drag means clicking and holding an object while moving the cursor to another position; drop means releasing the button while dragging. Drag and drop are used together.
- Wheel scroll: Scroll the mouse wheel up or down.
Click, right-click, and drag & drop perform different actions depending on the target object.
- Click/Right-click
- The following interactions are available with click and right-click:
- Show connection points
-
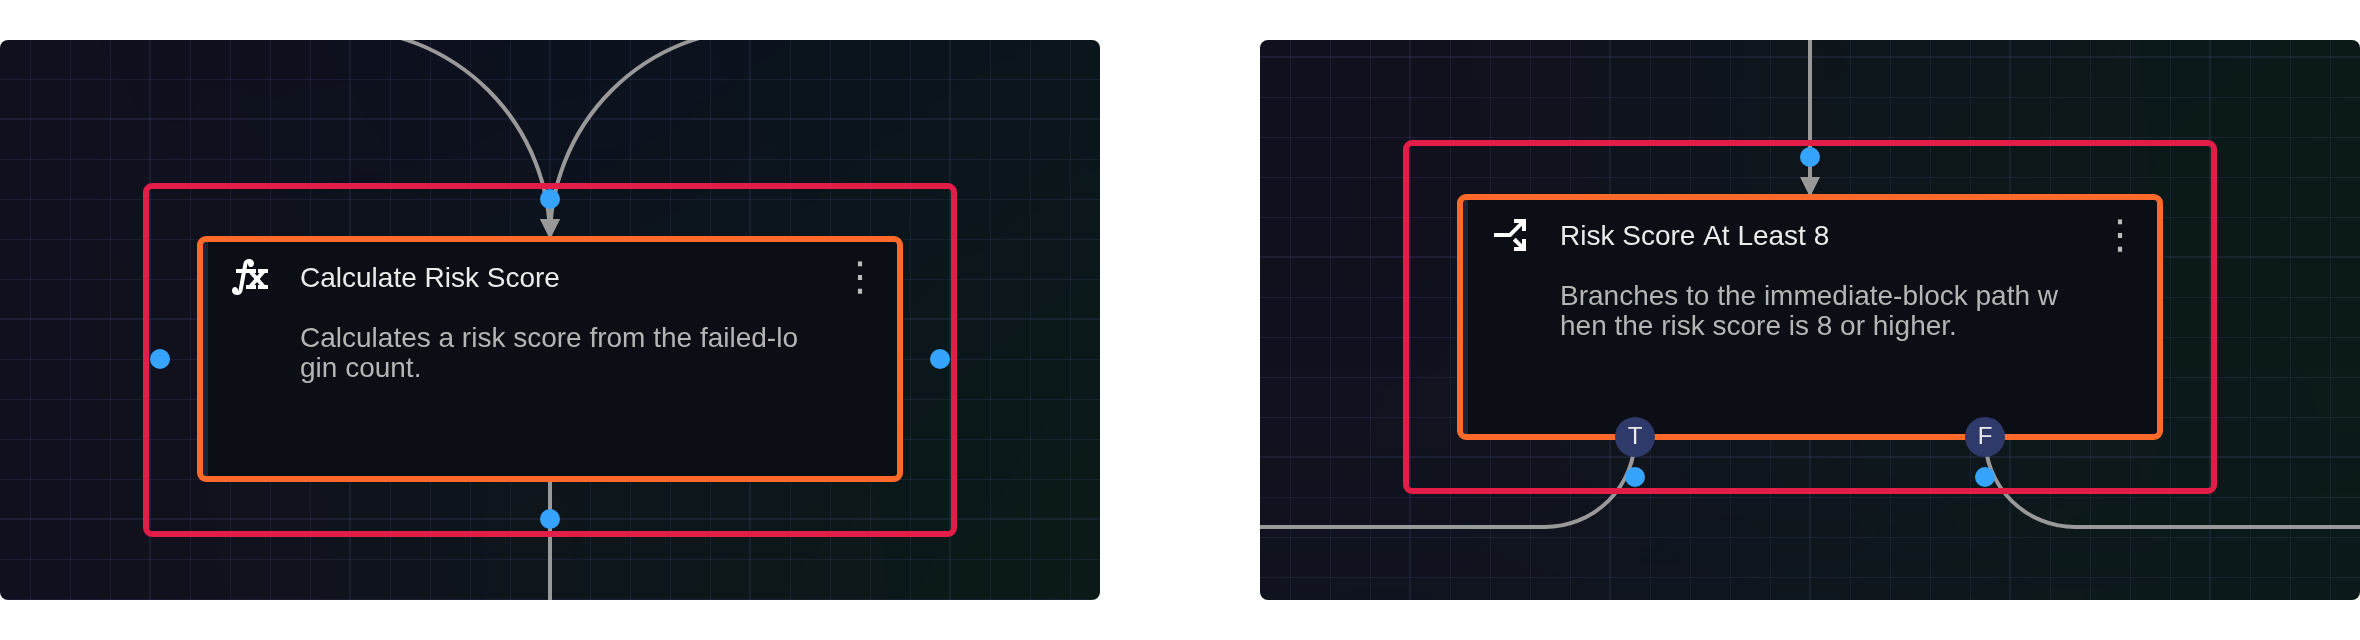
Clicking a task displays its connection points. Drag and drop a connection point to create a new task or draw a flow to another task.
-
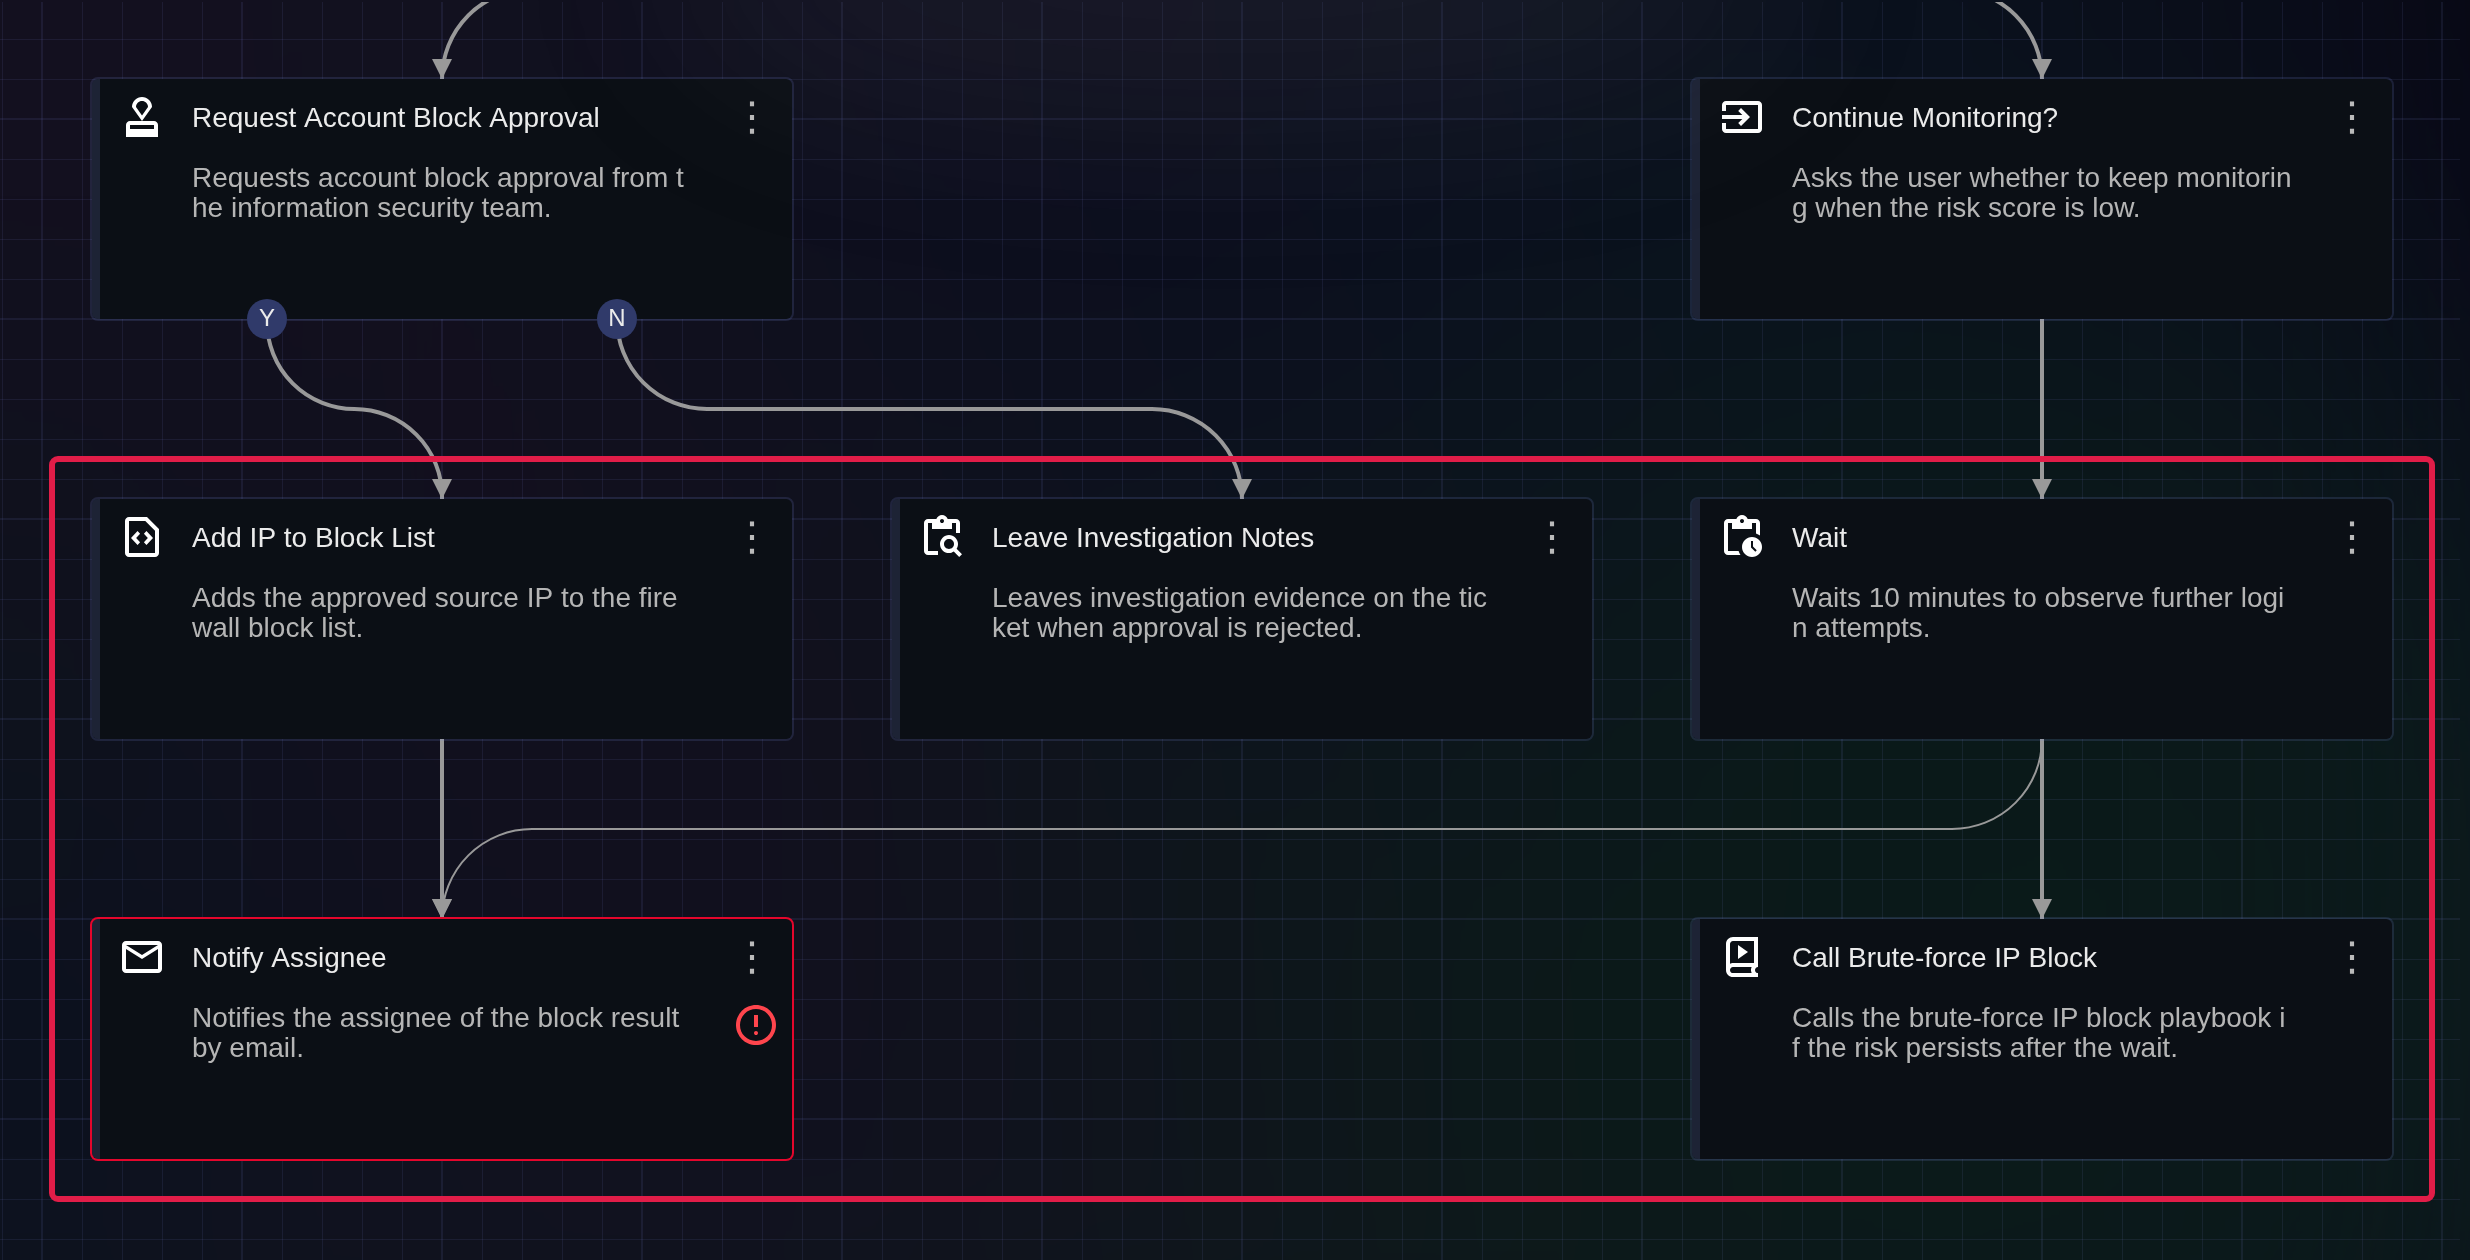
Some tasks—such as Branch and Approval request—have different connection point shapes or counts. The left figure shows the connection points on a standard task; the right figure shows those on a Branch task. The red boxes mark each selected task and its connection points.
- Edit task properties
-
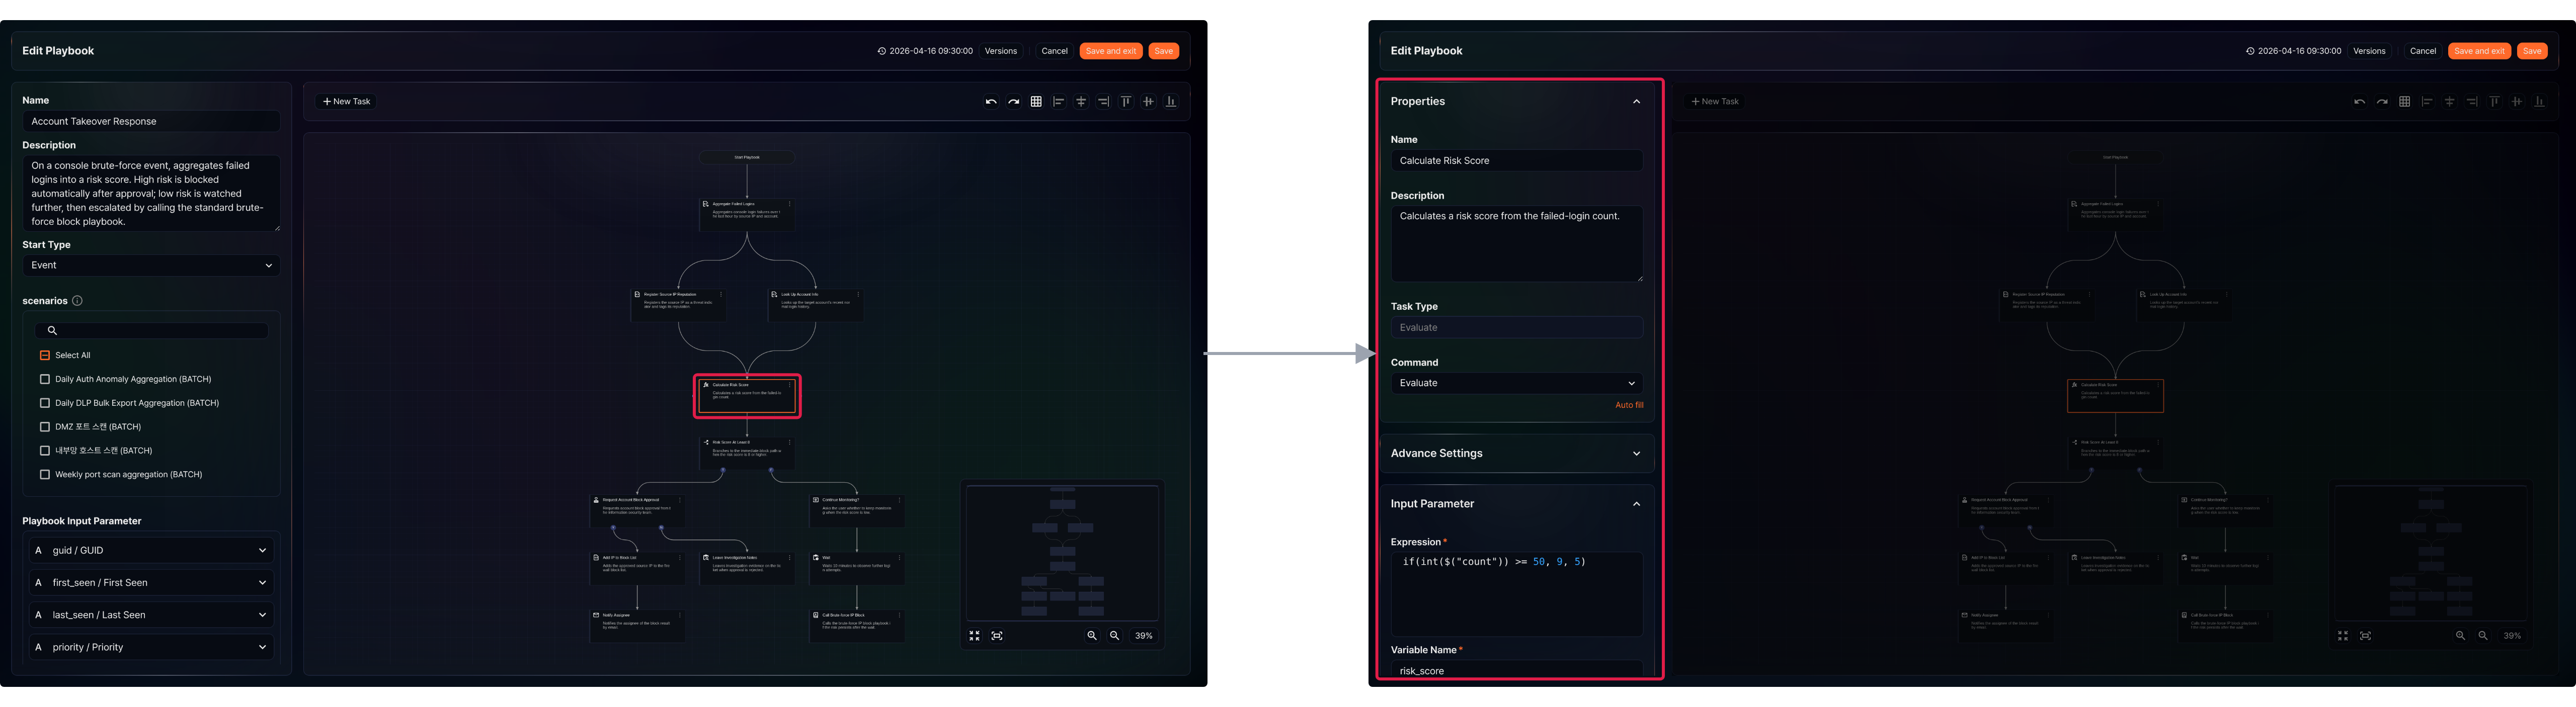
Right-clicking a task opens the properties panel with that task's properties, allowing you to edit it.
- Select a connection line
-
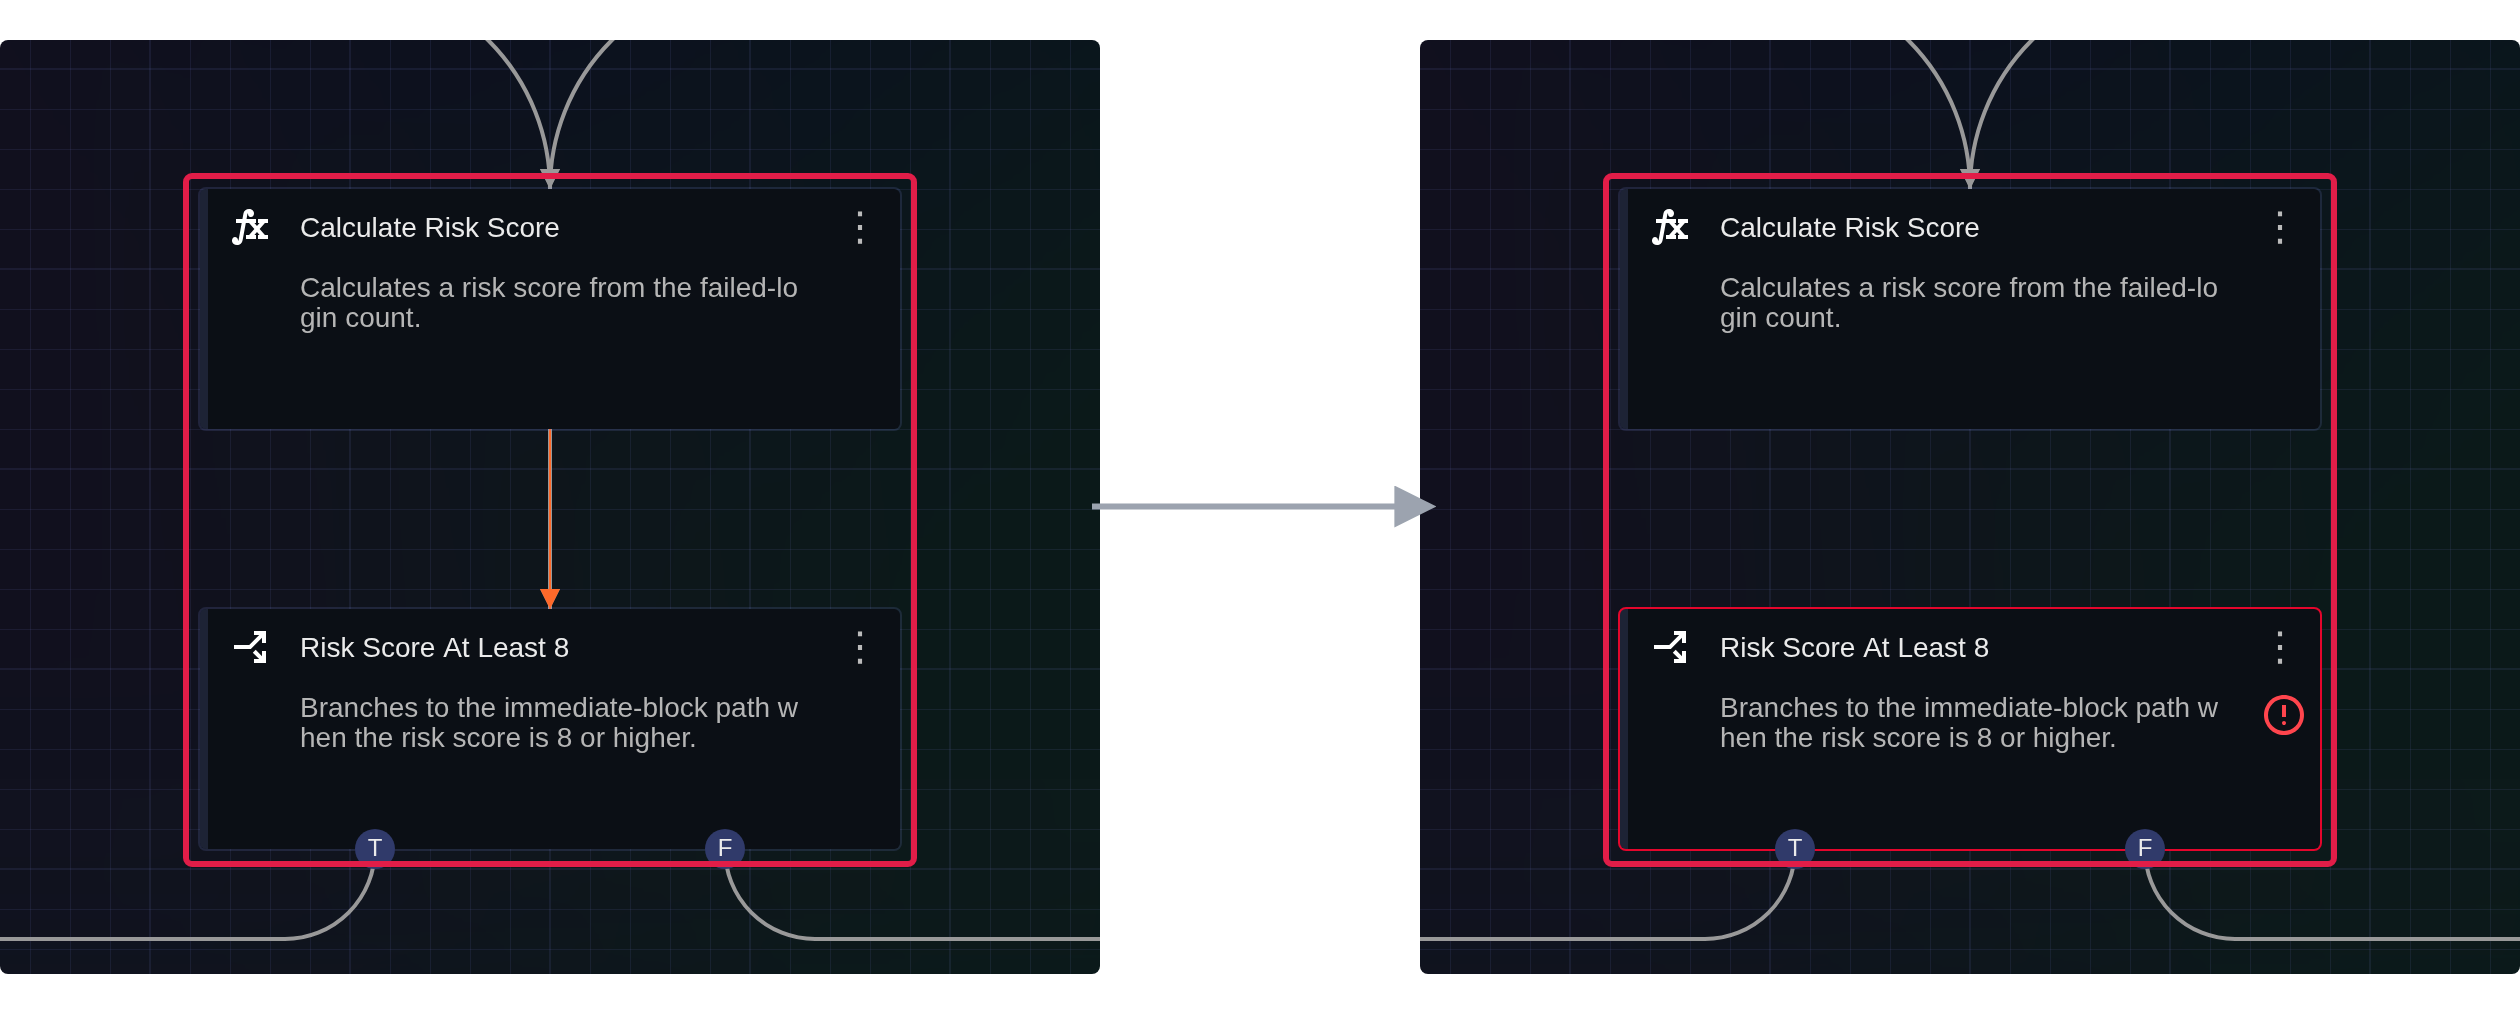
Clicking a connection line selects it. Selected connection lines are shown in an accent color. Press Delete or Backspace to delete the selected line. Deleting a connection line breaks the flow, and a warning indicator appears on the disconnected downstream task.
-
In the following figure, the left side shows the connection line between Calculate Risk Score and Risk Score At Least 8 selected by a click, and the right side shows the result after pressing Delete: the line is gone and a warning indicator appears on Risk Score At Least 8. The red box marks the two tasks the line connects.
- Select multiple tasks (Shift + click)
-
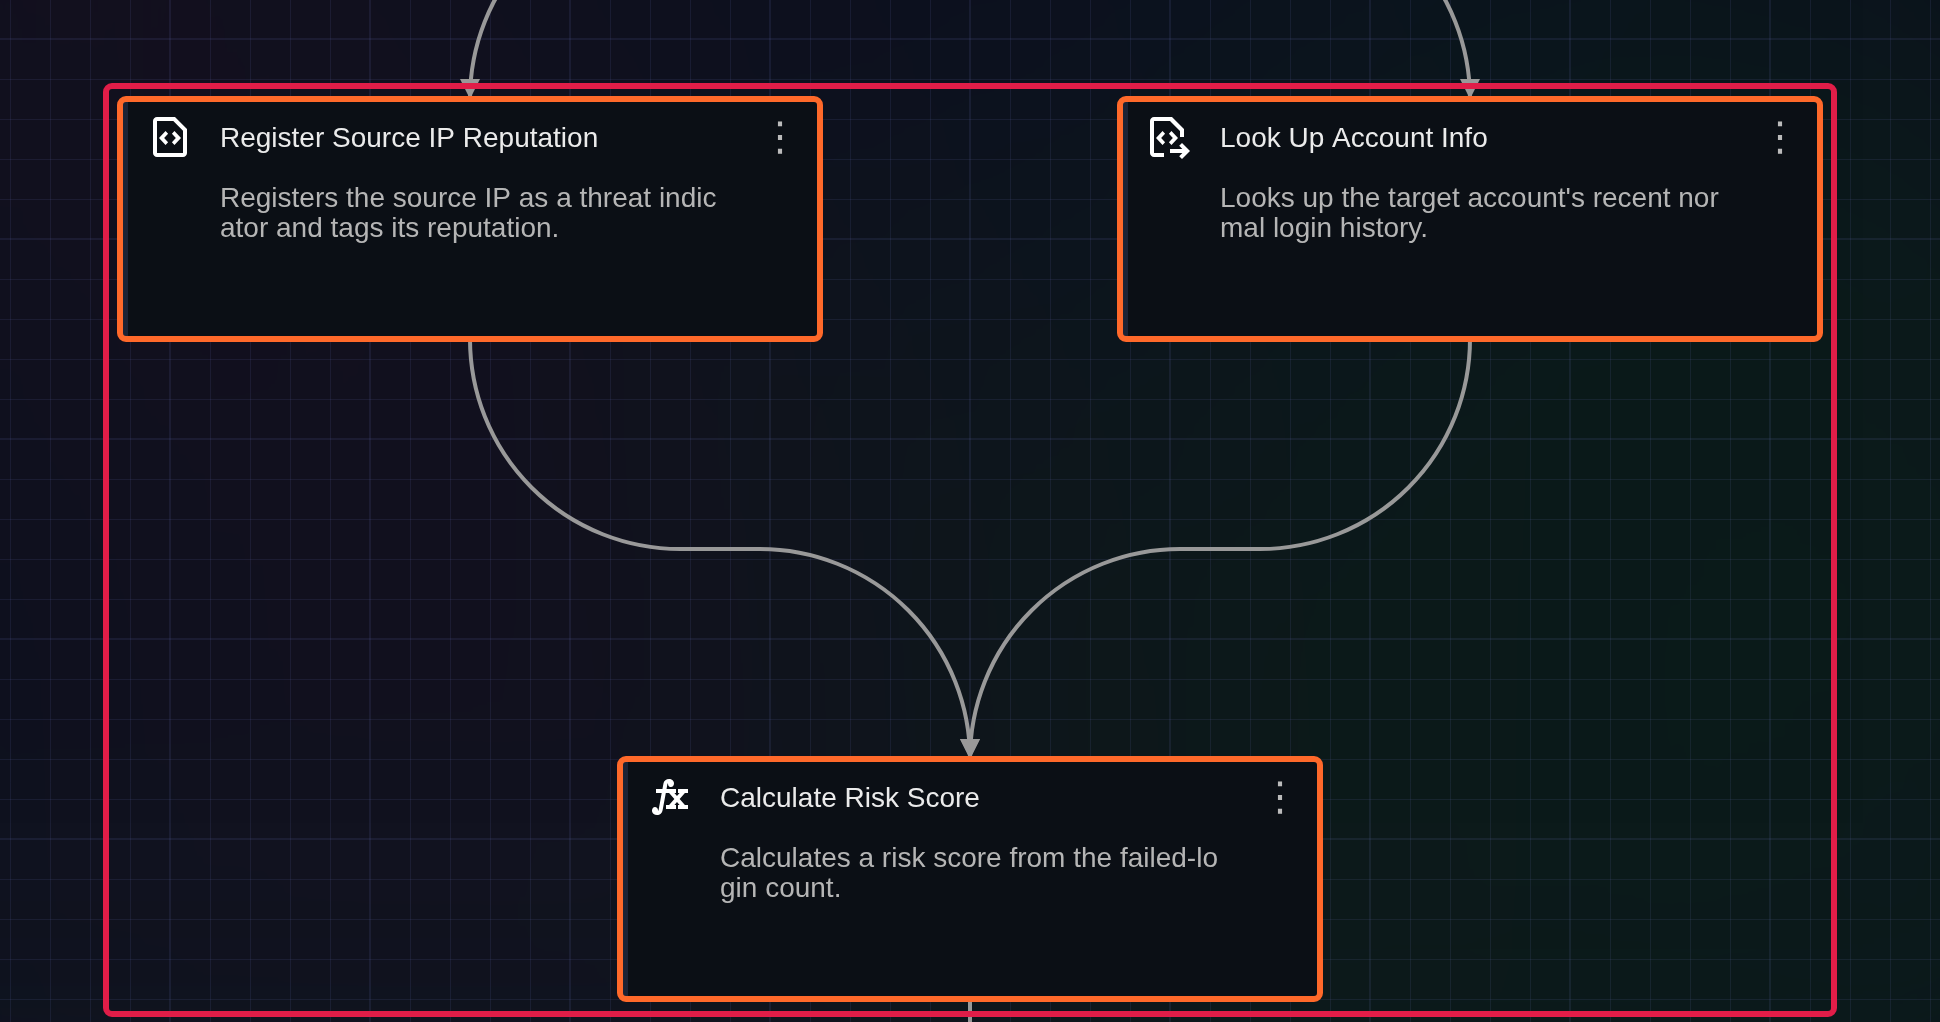
Hold Shift and click multiple tasks to select them at once. Press Delete or Backspace to delete all selected tasks at once. The following figure shows Register Source IP Reputation, Look Up Account Info, and Calculate Risk Score selected one after another with Shift + click (red box).
- Drag & drop
- The following interactions are available with drag and drop:
- Move task objects
-
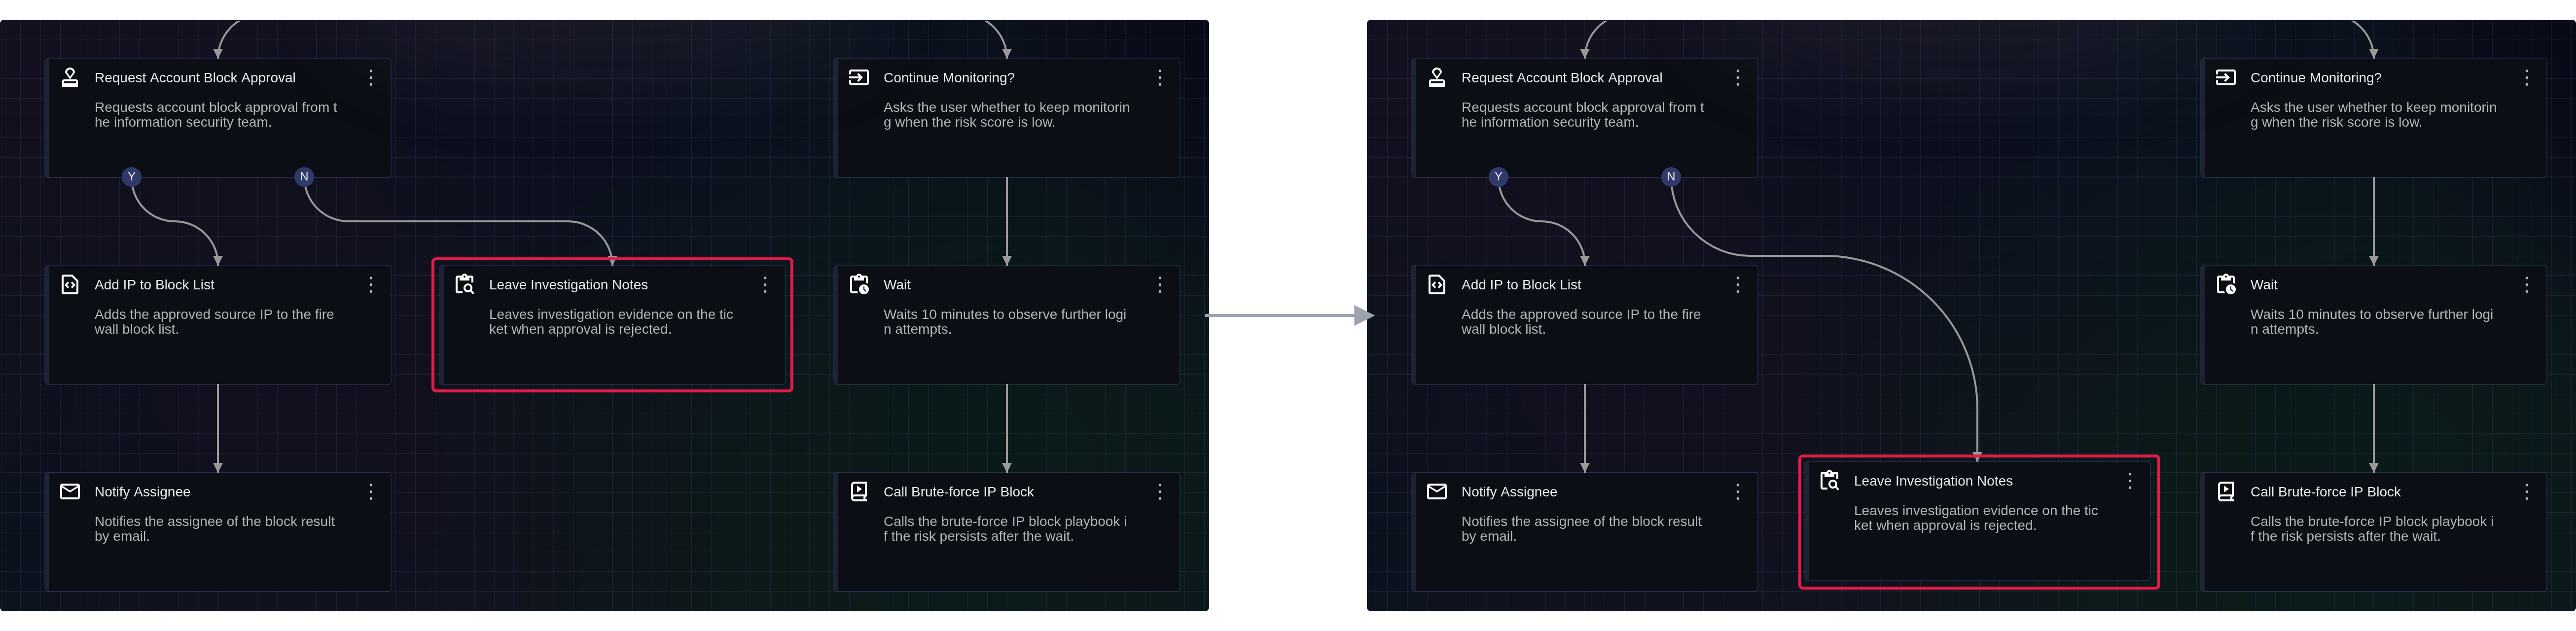
Drag and drop a task object to move it to a new position. When you move multiple selected tasks, the connection lines between them are preserved. In the following figure, the left side shows the flow before moving and the right side shows it after Leave Investigation Notes is moved down; its connection line follows. The red boxes mark the moved task.
- Create a new task
-
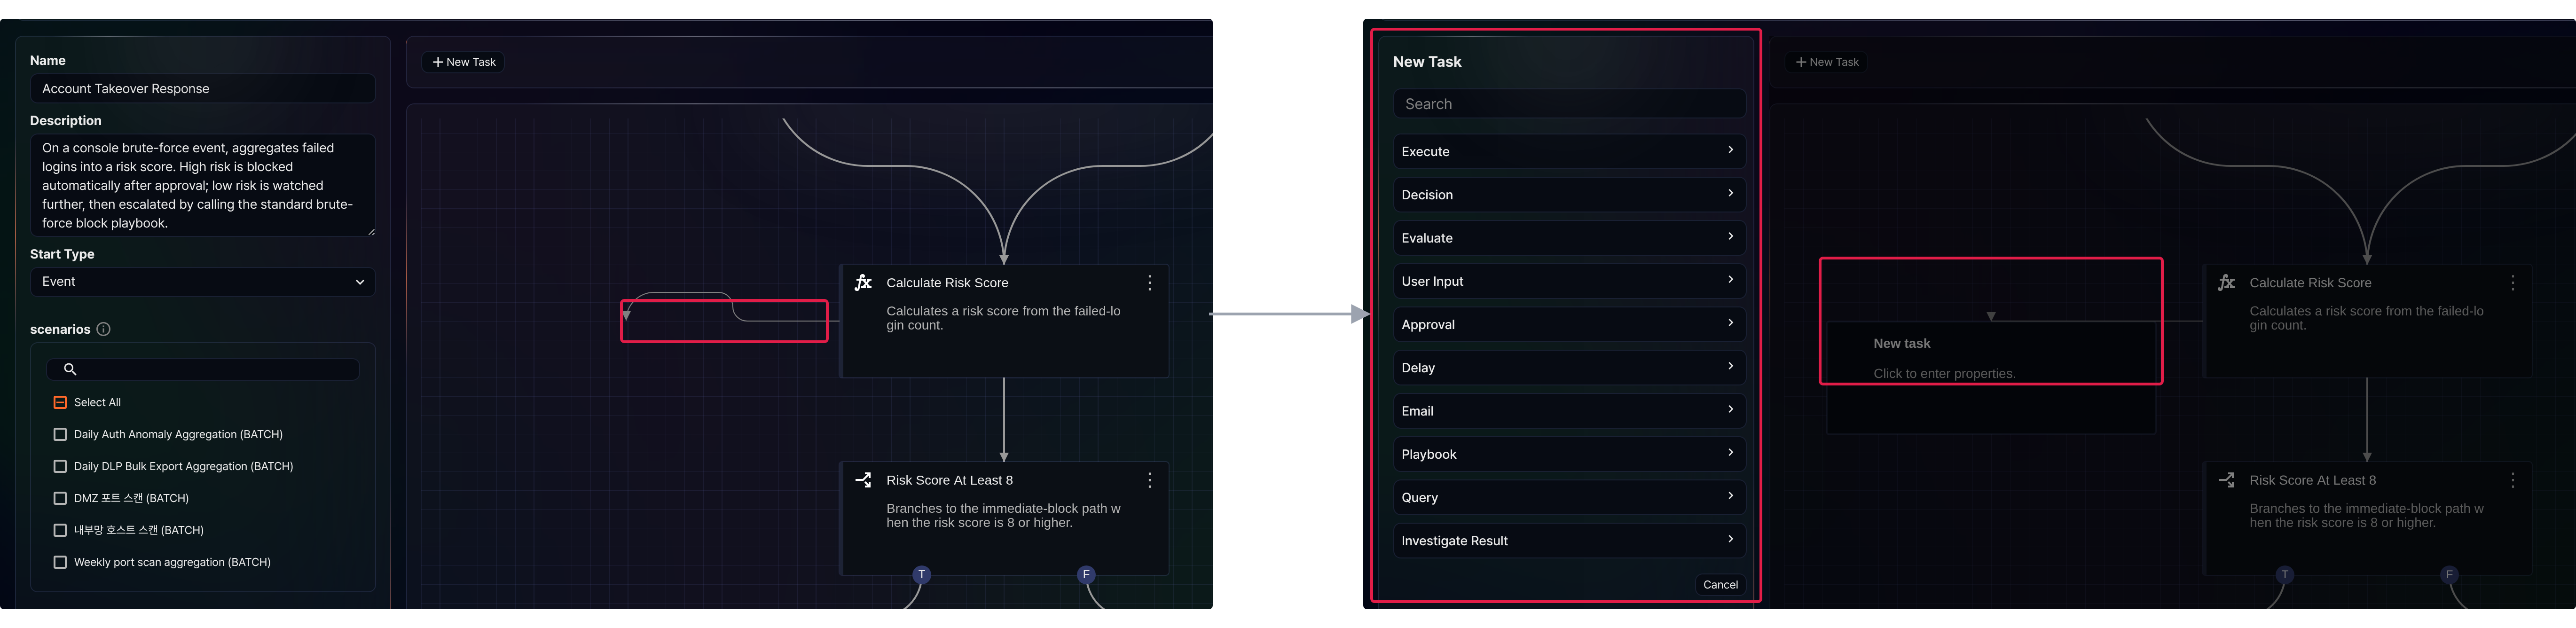
Drag a connection point of the selected task; a guide line follows the pointer from the connection point. Drop it on an empty area: a New task guide node appears at that location, and the New Task list of task types to add opens in place of the properties panel (Execute, Decision, Evaluate, User Input, Approval, Delay, Email, Playbook, Query, Investigate Result). Selecting a task type from the list adds the new task and displays its properties in the properties panel.
-
In the following figure, the left side shows the left connection point of Calculate Risk Score being dragged to an empty area, and the right side shows the result after dropping. The red boxes mark the dragged connection point and guide line (left), and the new guide node and the New Task list (right).
- Connect task flows
-
When you drag a connection point of the selected task onto another task, a guide line appears and the target task's connection point is highlighted. Dropping it creates a connection line between the two tasks.
-
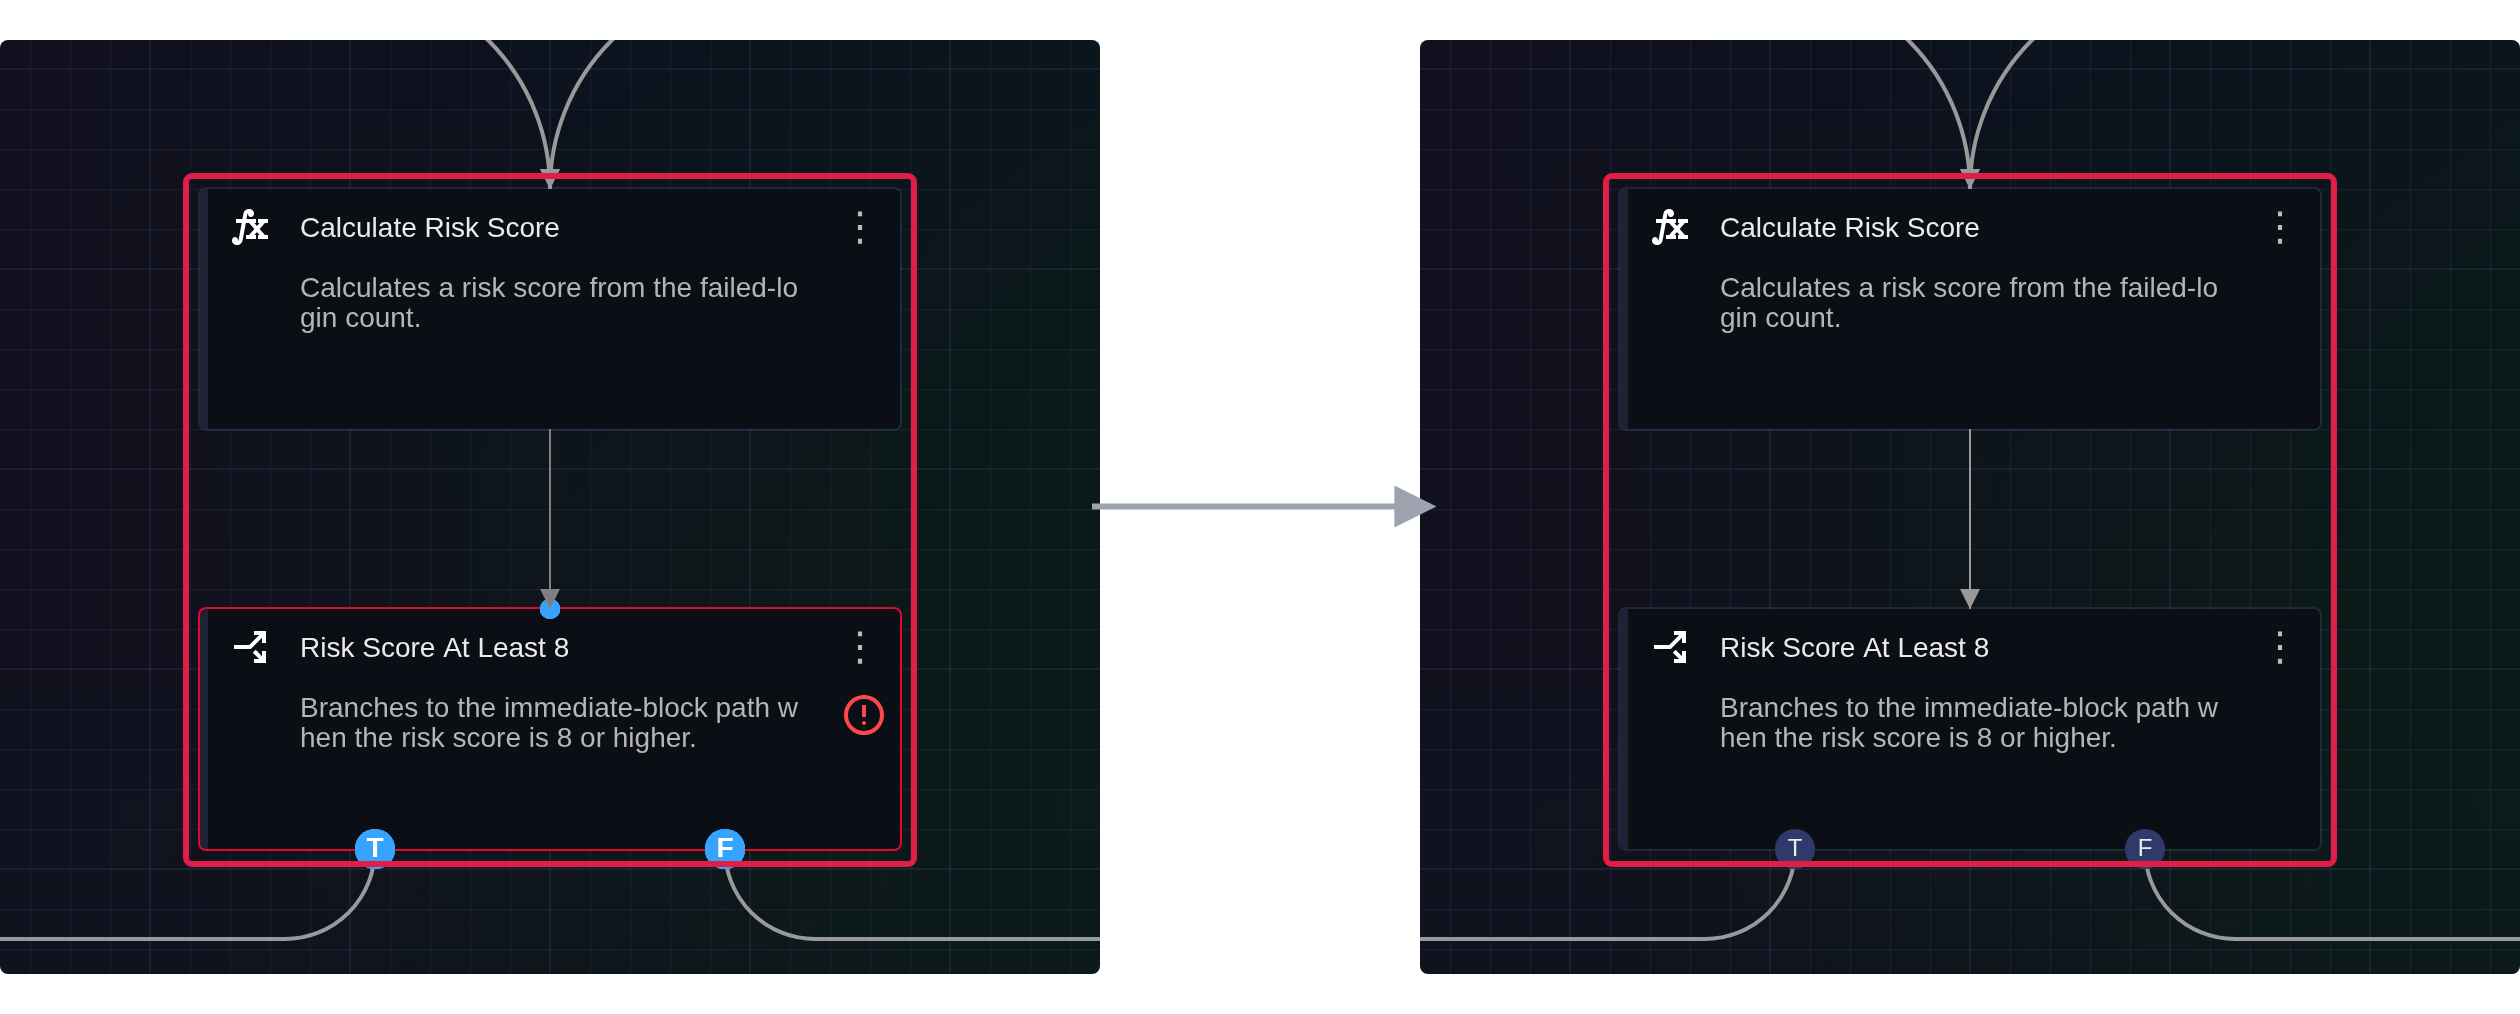
The following figure reconnects the Calculate Risk Score → Risk Score At Least 8 line deleted in the connection line example above. The left side shows the bottom connection point of Calculate Risk Score being dragged onto Risk Score At Least 8, and the right side shows the result after dropping: the line is created and the warning indicator disappears. The red box marks the two tasks being connected.
- Navigate the flowchart/map
-
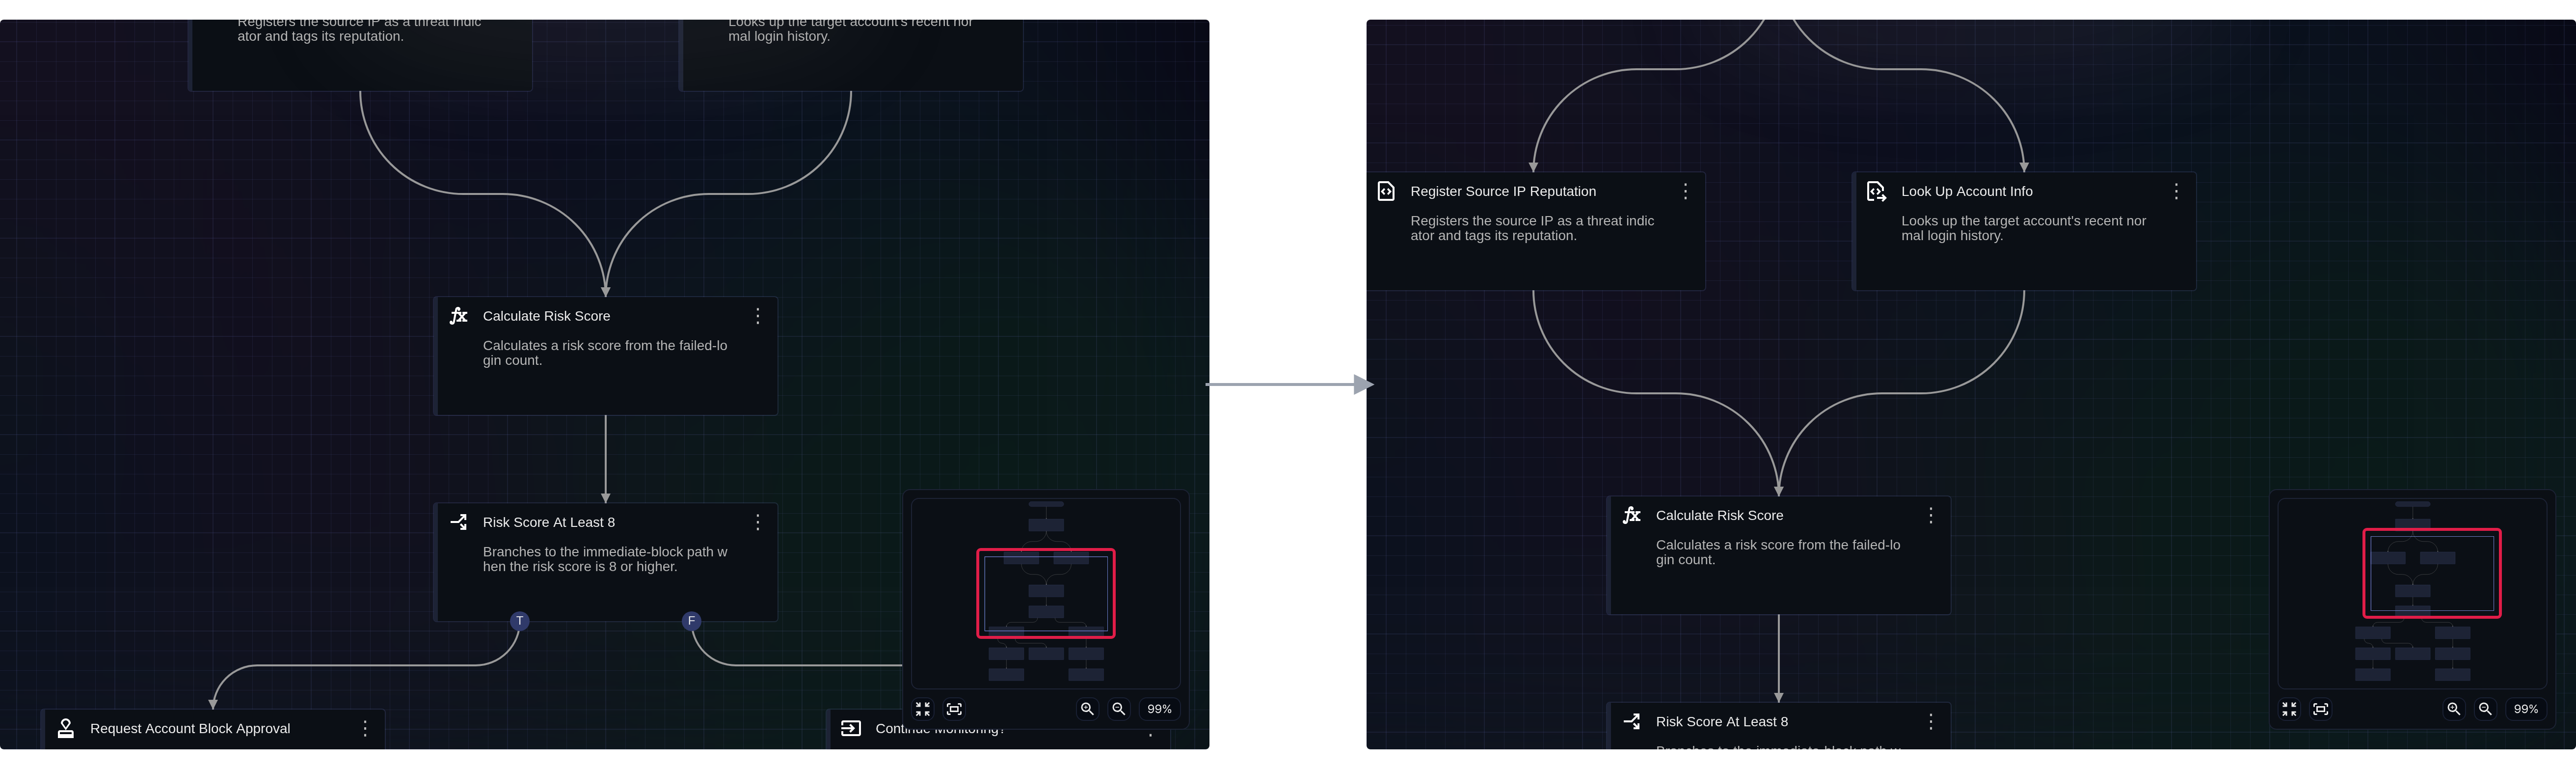
Drag and drop the background of the flowchart or the map to navigate to the dropped position. While you drag the background, the cursor changes to an open hand. In the following figure, the left side shows the view before moving and the right side shows it after dragging the background. The red box marks the box on the map that shows the area being viewed; it moves with the view.
-
The map shows a blue-bordered box indicating the currently visible area of the flowchart.
- Select multiple task objects
-
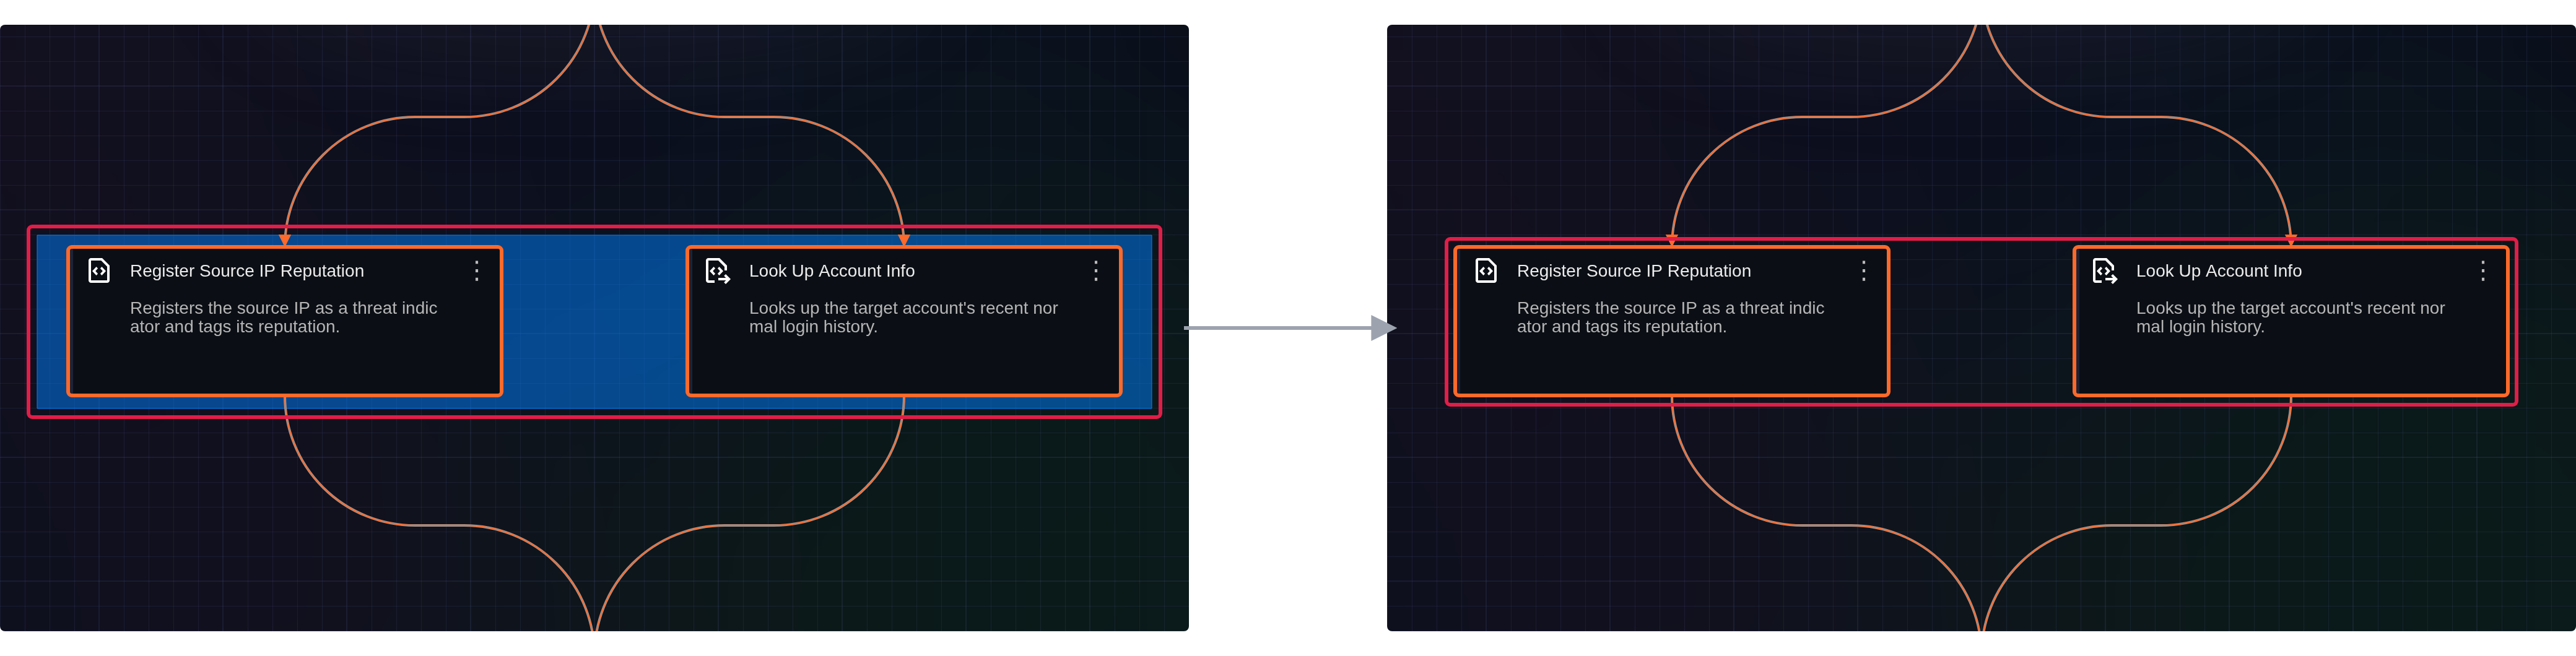
Hold Shift and drag on an empty area of the flowchart to draw a blue selection rectangle. When you release the mouse button, all tasks inside the rectangle are selected. Press Shift before you start dragging.
-
In the following figure, the left side shows the rectangle being drawn around Register Source IP Reputation and Look Up Account Info, and the right side shows both tasks selected after the mouse button is released. The red boxes mark the drawn rectangle (left) and the selected tasks (right).
- Wheel scroll
- The following interaction is available with wheel scroll:
- Zoom in/out
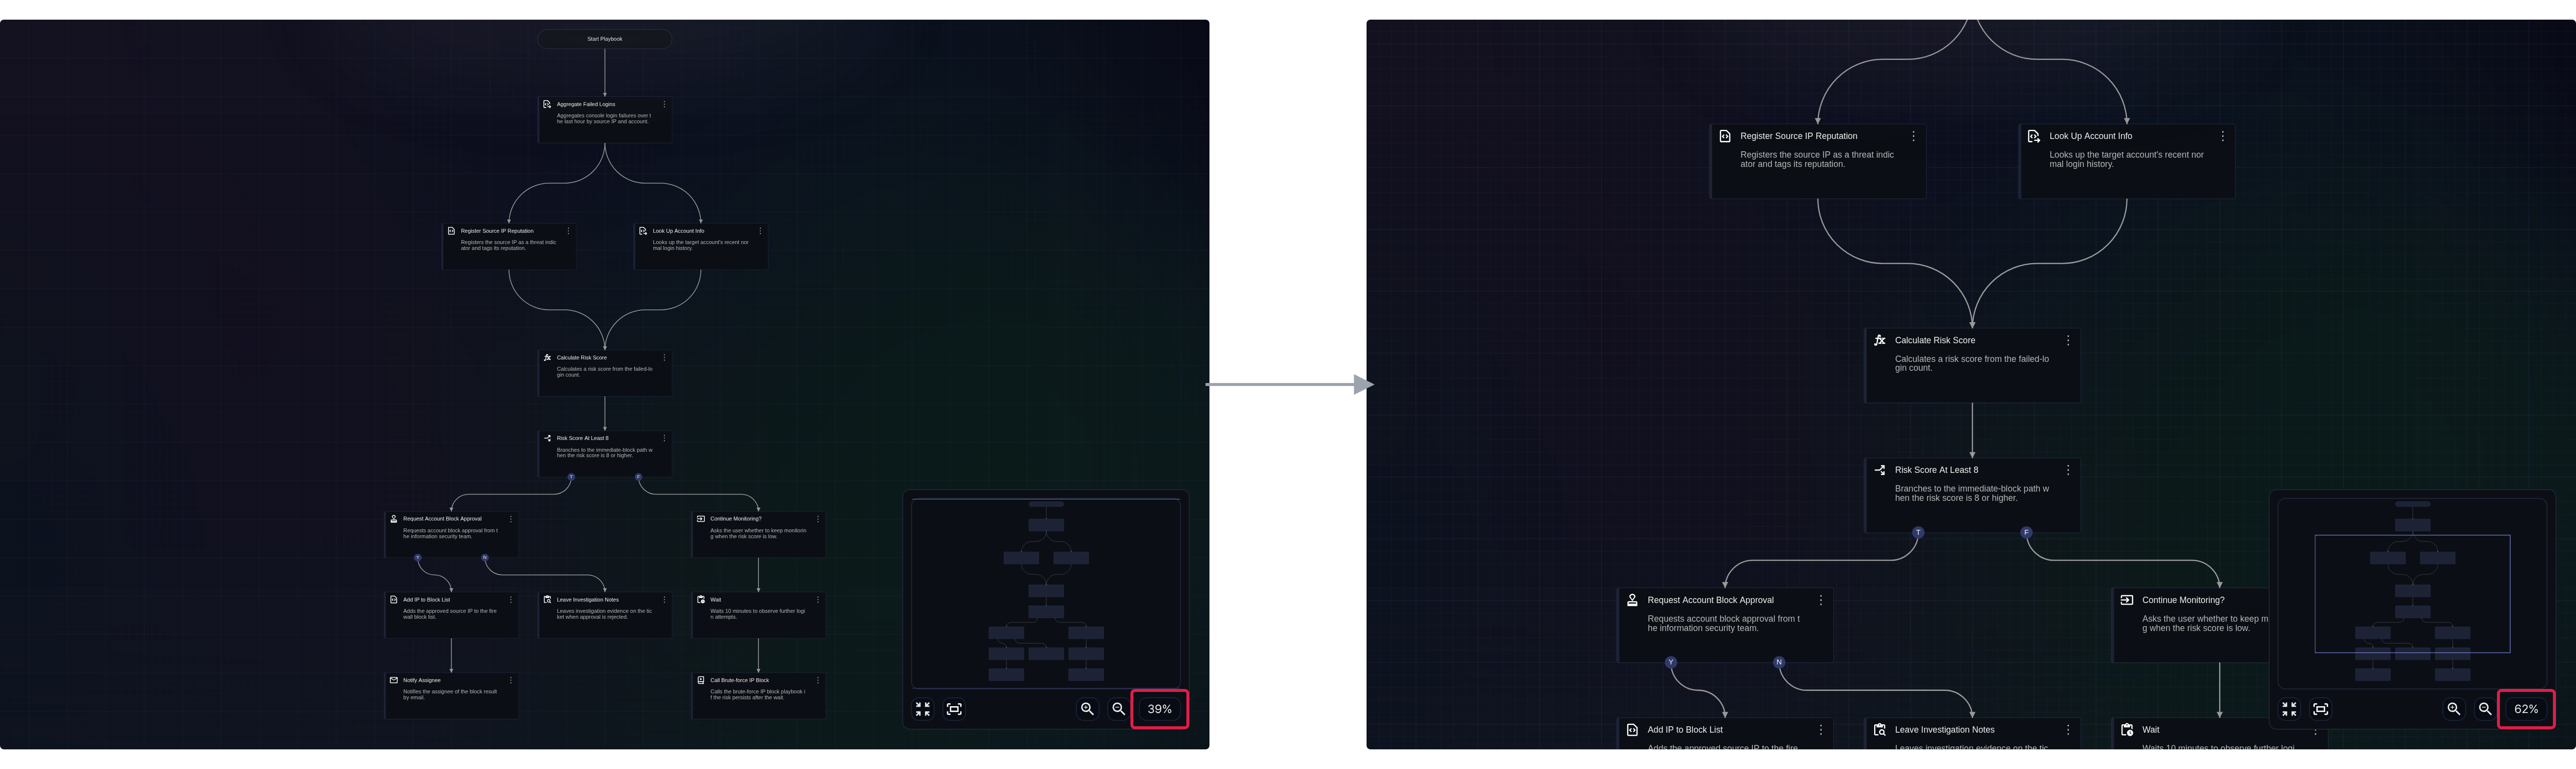
- Scroll the mouse wheel up to zoom in, or down to zoom out. Scroll direction may vary depending on your mouse settings. In the following figure, the left side shows the view before zooming and the right side shows it after scrolling the wheel up. The red box marks the zoom level shown below the map.
Keyboard shortcuts
Keyboard shortcuts let you execute commands quickly by pressing specific key combinations. The following shortcuts are available in the playbook editor:
| Windows/Linux | macOS | Action |
|---|---|---|
| ESC | ESC | Deselect, cancel playbook/task property editing |
| Ctrl+Z | Cmd+Z | Undo |
| Ctrl+Y or Ctrl+Shift+Z | Cmd+Y or Cmd+Shift+Z | Redo |
| Ctrl+A | Cmd+A | Select all tasks/connection lines in the flowchart |
| + or = | + or = | Zoom in on the flowchart |
| - | - | Zoom out on the flowchart |
| 0 | 0 | Reset the flowchart scale to 100% |
| G | G | Show/hide flowchart grid |
| F | F | Fit flowchart to screen |
| M | M | Show/hide map |
| Delete or Backspace | Delete or Backspace | Delete selected tasks/connection lines |
Task connection rules
A playbook operates by linking tasks in a defined flow. The flow can branch into multiple paths or merge back together.
- (1) All tasks must be connected.
-
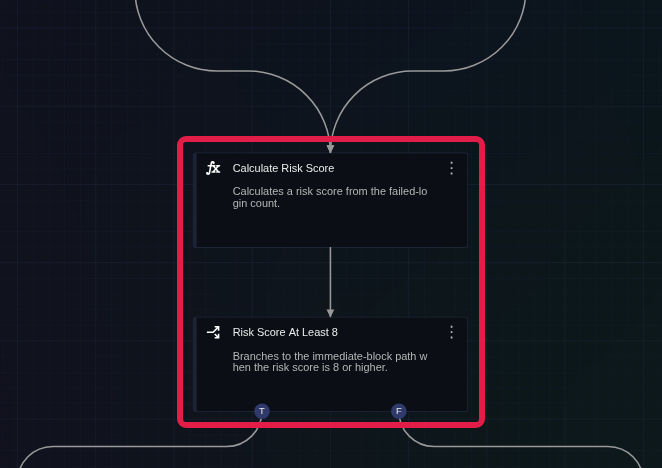
Every task except the first must be connected to at least one preceding task. The example below shows a basic flow with one preceding task and one following task. As shown by the red box around Calculate Risk Score → Risk Score At Least 8, when the preceding task completes, the following task runs.
-
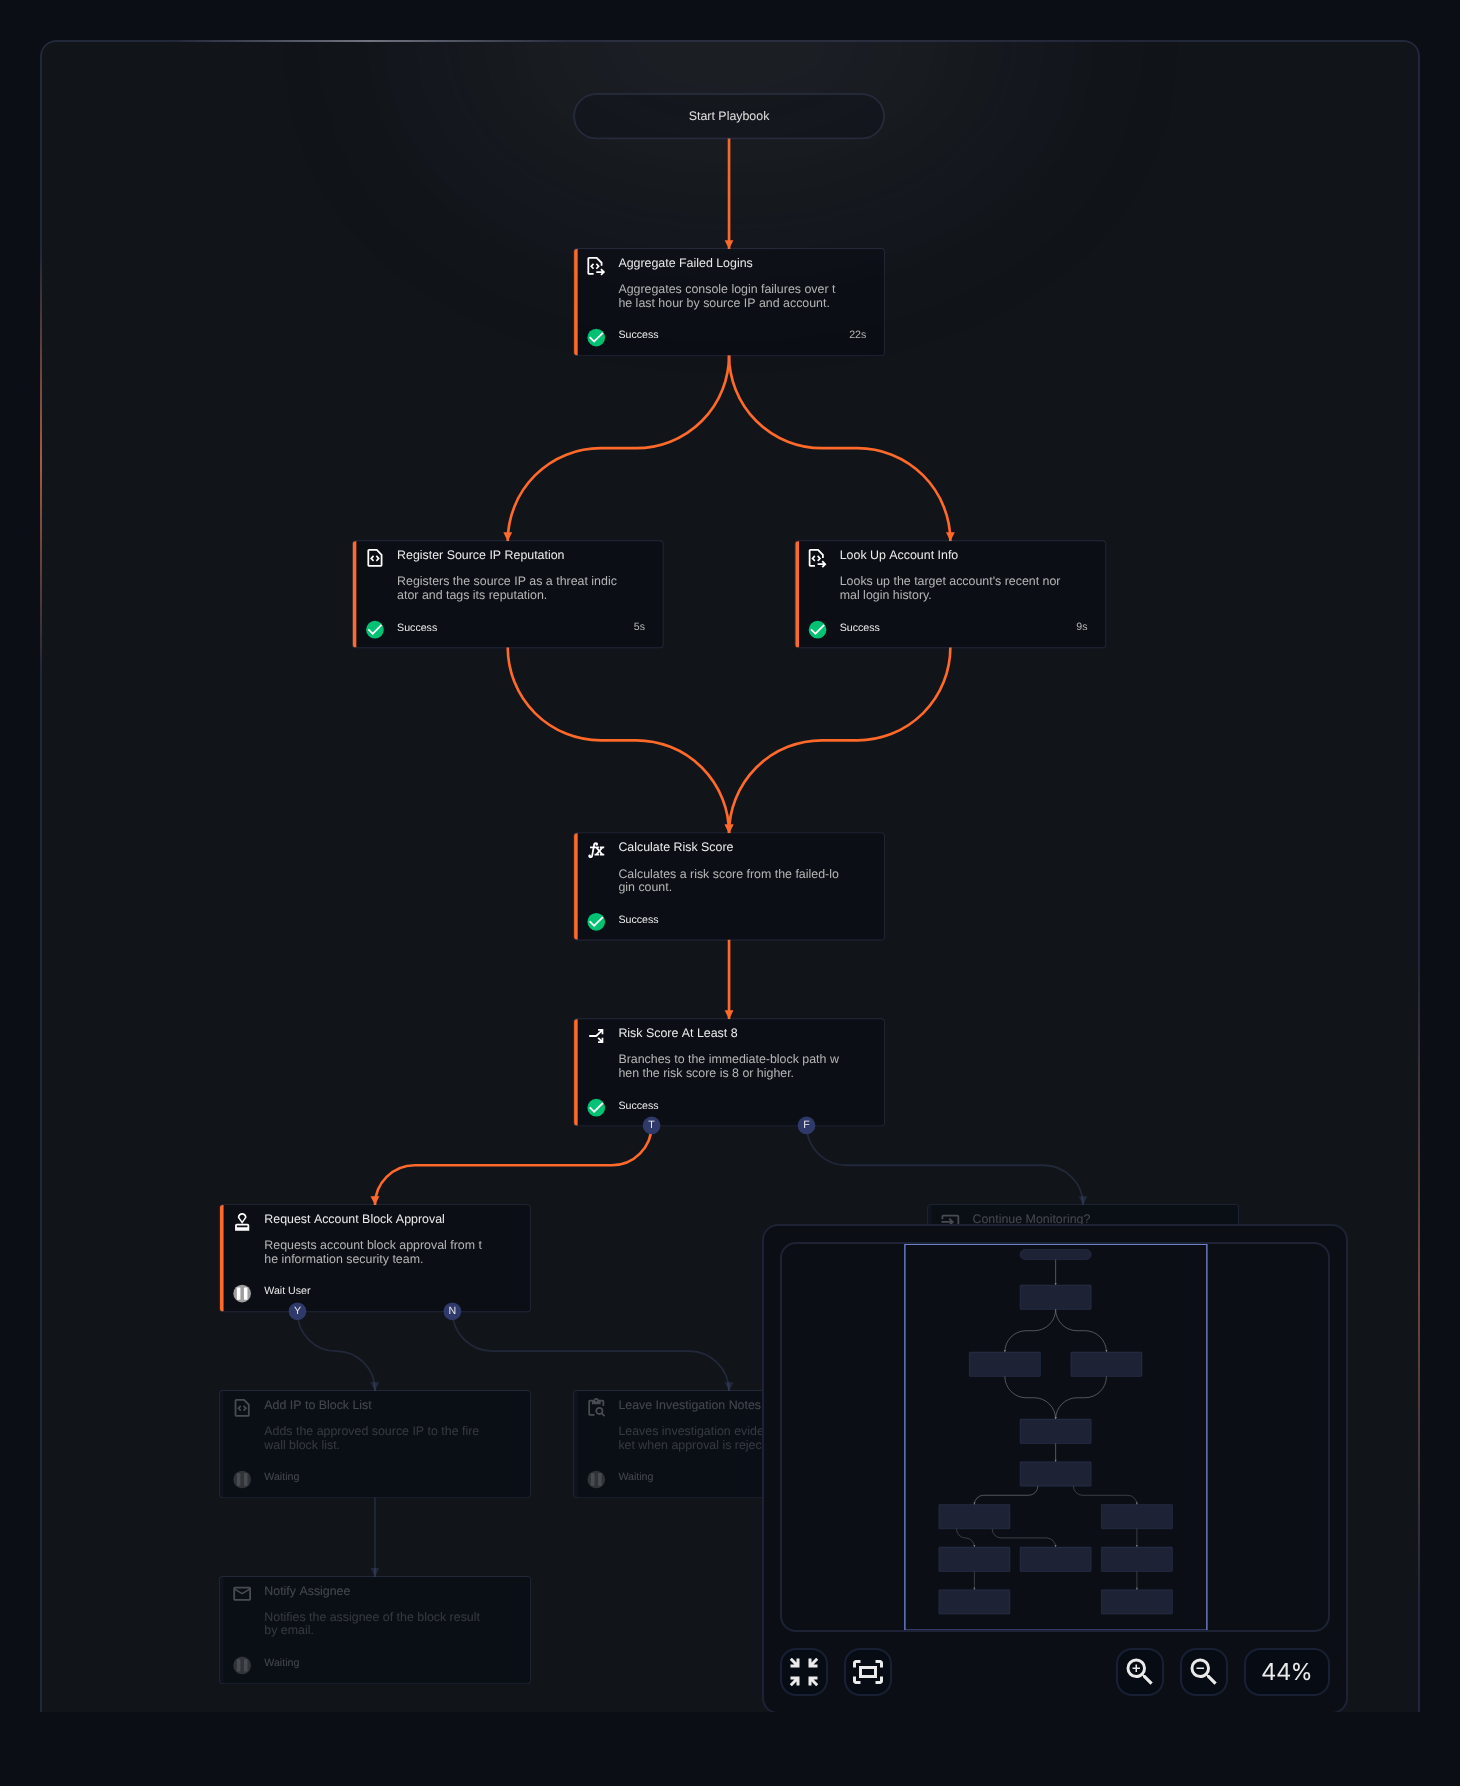
The following example, from a run screen under Response > Playbook History, shows a state where the preceding task has completed and the following task (an approval request) is waiting for the user's response.
-
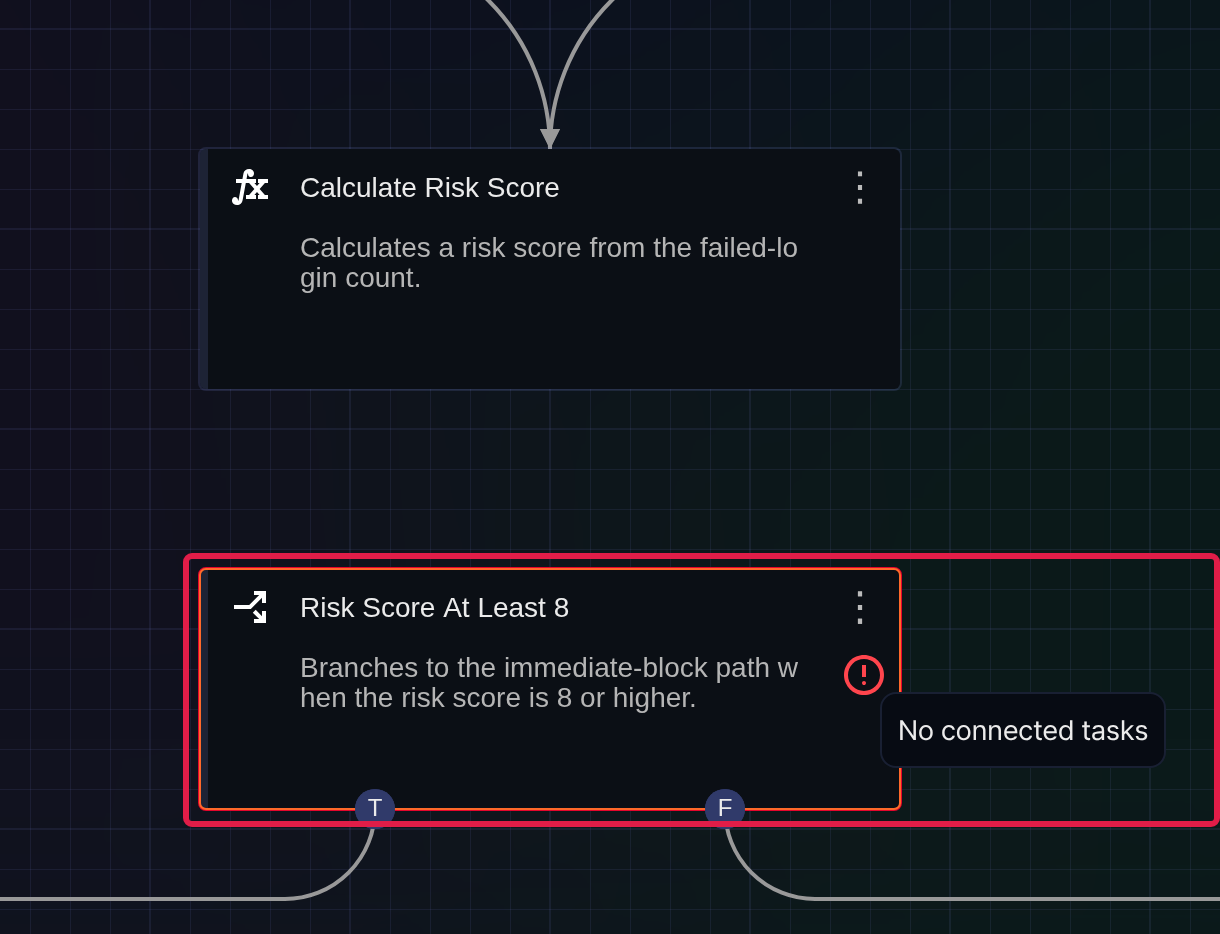
A task that is not connected to any preceding task displays a warning indicator, and hovering over the indicator shows the warning text (No connected tasks). A playbook with unconnected tasks is treated as a logical error and cannot be saved. In the following figure, the red box marks the disconnected Risk Score At Least 8 task and the warning text.
- (2) 1:N parallel connections are allowed.
-
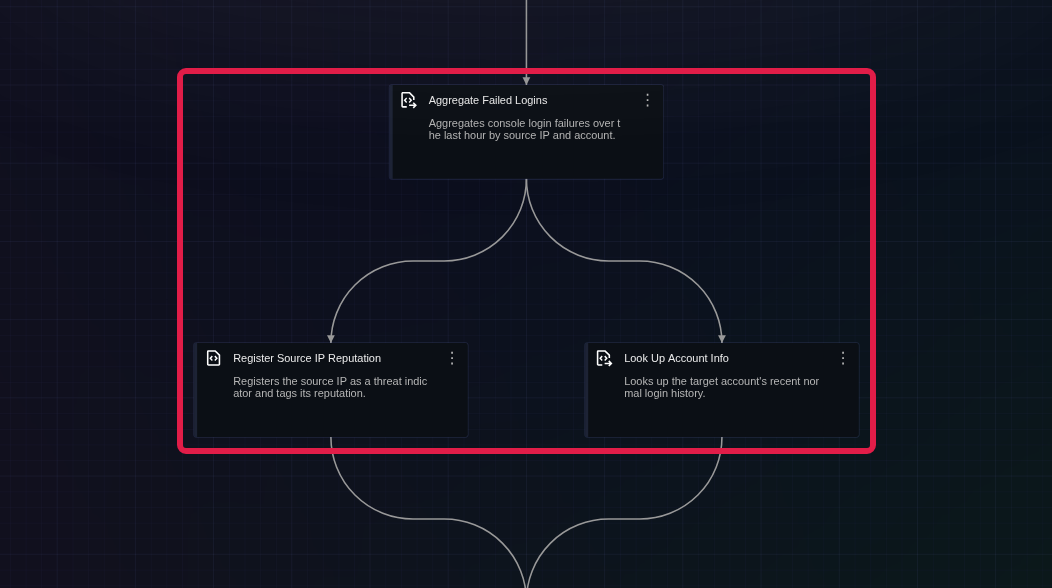
A 1:N connection means one preceding task is connected to multiple following tasks. When the preceding task completes, the following tasks run in parallel. The example below shows the red box around Aggregate Failed Logins → Register Source IP Reputation and Look Up Account Info.
-
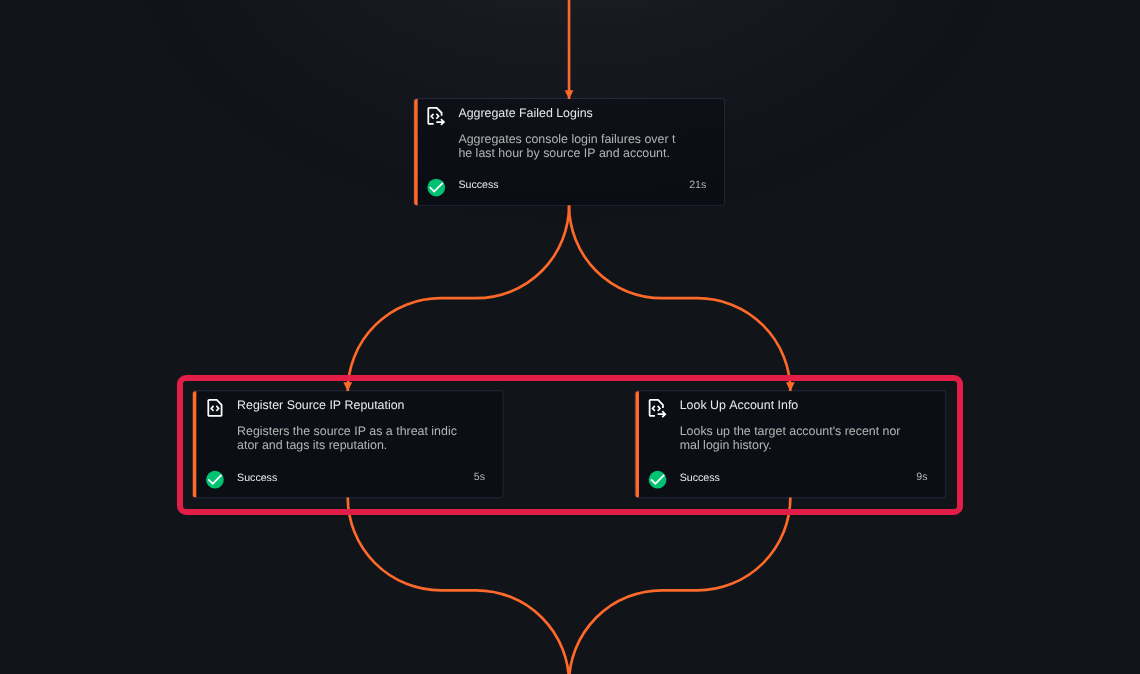
The following example, from a run screen under Response > Playbook History, shows the two following tasks marked with a red box running in parallel and completing as soon as the preceding task completes.
- (3) N:1 connections are also allowed.
-
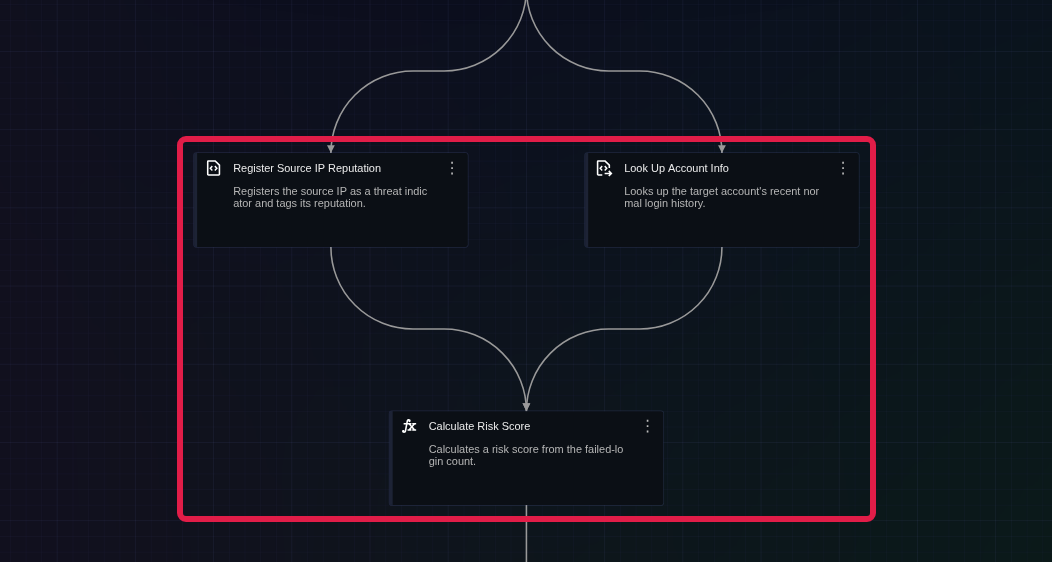
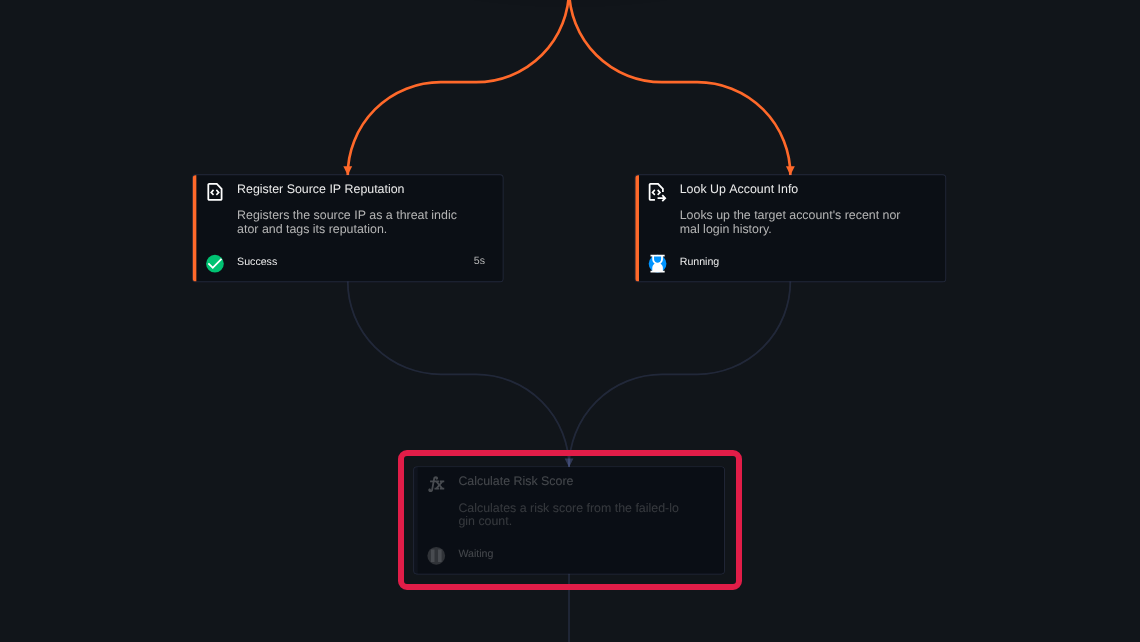
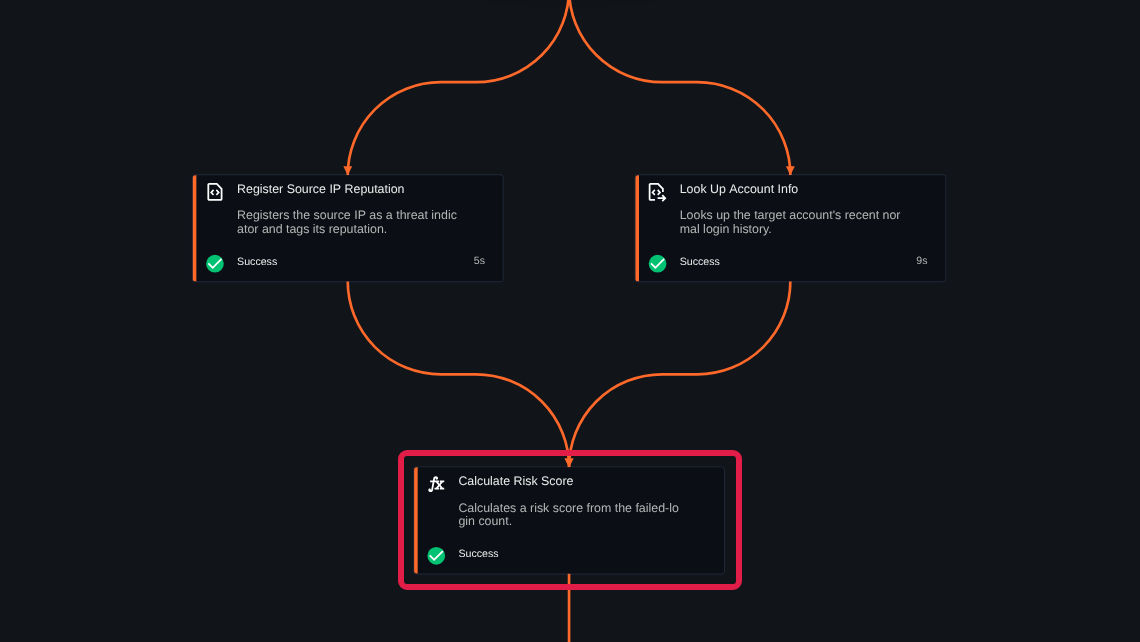
An N:1 connection means multiple preceding tasks are connected to one following task, and the following task runs only after all preceding tasks complete. The example below shows the red box around Register Source IP Reputation and Look Up Account Info → Calculate Risk Score.
-
The following task runs only after all of its preceding tasks have completed; until then, it waits. The following example, from a run screen under Response > Playbook History, shows that Register Source IP Reputation has completed but Look Up Account Info is still running, so Calculate Risk Score, marked with the red box, is waiting.
-
The following task runs once all preceding tasks complete. The following example, from a run screen under Response > Playbook History, shows the Calculate Risk Score task marked with a red box after it has run.
- (4) Infinite loops are not allowed.
-
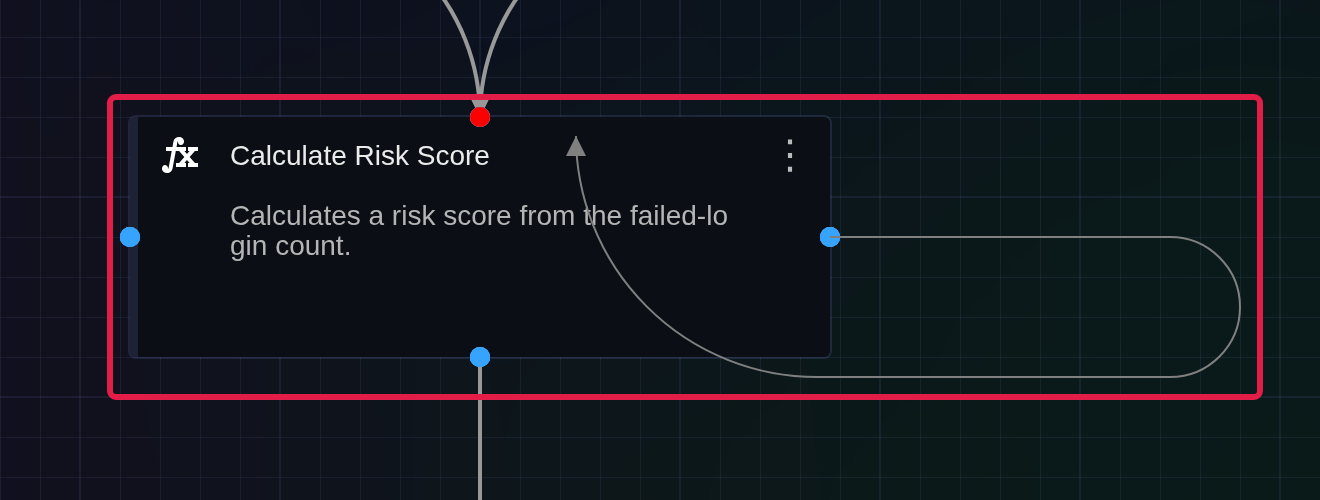
Infinite loops are not permitted because they would prevent the playbook from terminating. If you try to connect a task back to itself as a following task, the task handle turns red and the connection is rejected. If you connect a flow that cycles back through several tasks, the connection line is marked as an error and a warning appears (Cannot connect links in a circular reference), and the playbook cannot be saved. The following figure shows a connection point of Calculate Risk Score dragged onto the task itself, with the connection point shown in red (red box).
- (5) Logically branched flows cannot be merged.
-
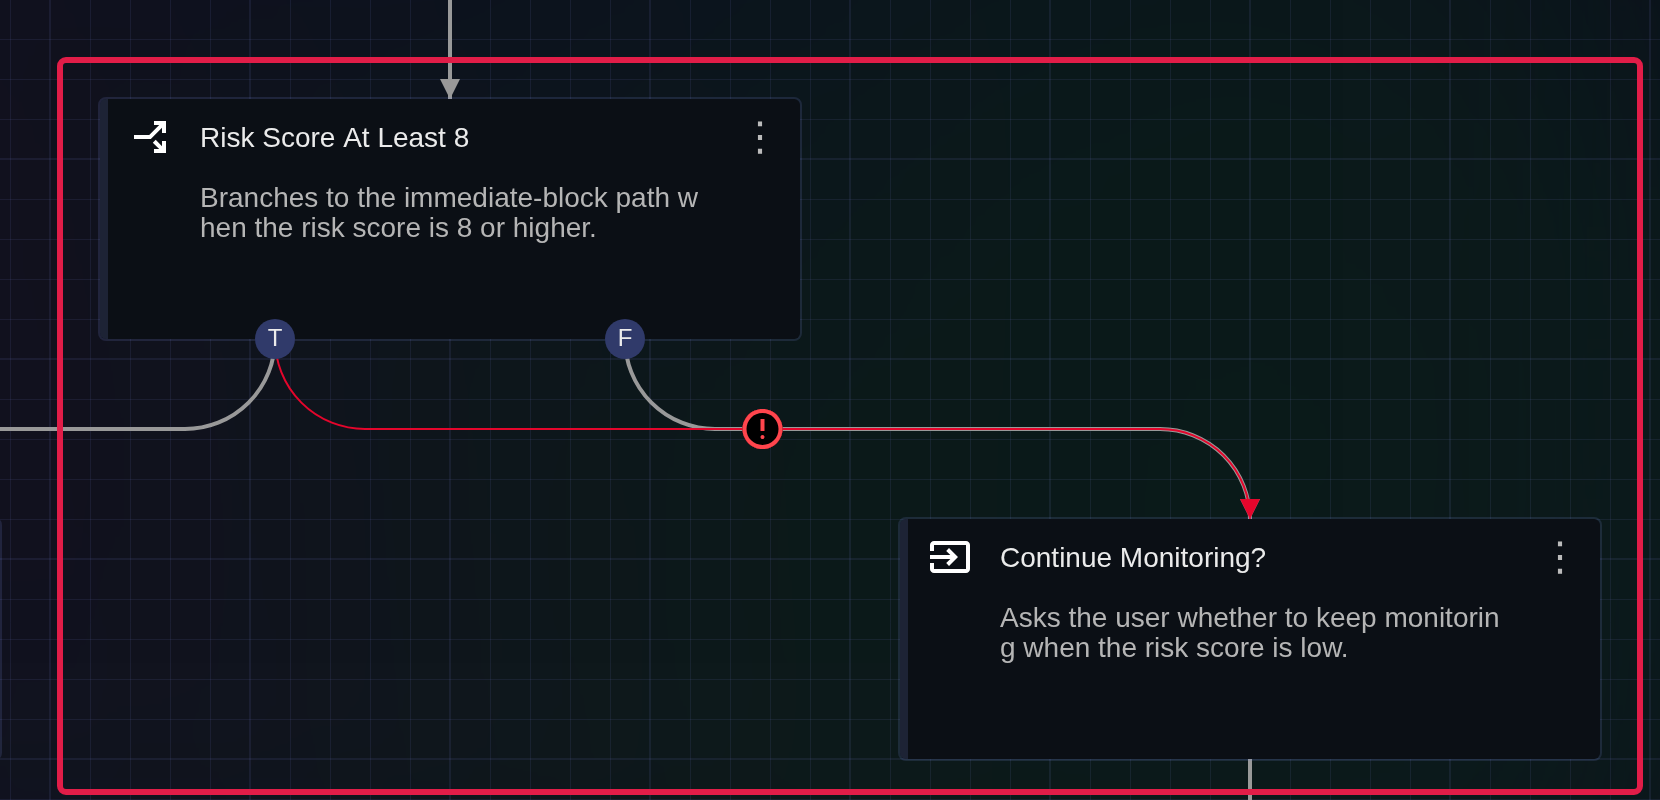
Decision (branch) tasks split the flow into a T (
true) path and an F (false) path based on the evaluation result, and Approval tasks split it into a Y (approve) path and an N (reject) path based on the approval result. Merging these logically exclusive paths back into a single task creates a logical contradiction, so the playbook cannot be saved. -
If you connect logically conflicting flows to the same task, a warning appears (Cannot connect more than one link to the same task) along with the connection line shown below. The following figure shows the T connection point of Risk Score At Least 8 connected to Continue Monitoring?, which the F flow already reaches (red box).
-
The following example shows an attempt to merge two logically exclusive flows into one task. A warning appears on the task where the two flows converge (Decision task incorrectly references child tasks for a branch, or Approval task incorrectly references child tasks for an approval request). In the following figure, Wait on the F flow is connected to Notify Assignee on the T flow, and a warning indicator appears on Notify Assignee; the red box marks the area of the new link.